
Operating Instructions
Page 6
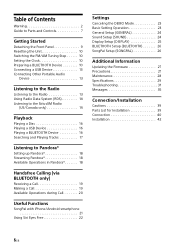
... Operations during Call 20 Useful Functions SongPal with iPhone/Android smartphone 21 Using Siri Eyes Free 22 Settings Canceling the DEMO Mode 23 Basic Setting Operation 23 General Setup (GENERAL 24 Sound Setup (SOUND 24 Display Setup (DISPLAY 25 BLUETOOTH Setup (BLUETOOTH 26 SongPal Setup (SONGPAL 26 Additional Information Updating the Firmware 27 Precautions 27 Maintenance 28 Specifications 29 Troubleshooting 31 Messages 35 Connection/Installation Cautions 39 Parts List for Installation 39 Connection 40 Installation 42 6GB
... Operations during Call 20 Useful Functions SongPal with iPhone/Android smartphone 21 Using Siri Eyes Free 22 Settings Canceling the DEMO Mode 23 Basic Setting Operation 23 General Setup (GENERAL 24 Sound Setup (SOUND 24 Display Setup (DISPLAY 25 BLUETOOTH Setup (BLUETOOTH 26 SongPal Setup (SONGPAL 26 Additional Information Updating the Firmware 27 Precautions 27 Maintenance 28 Specifications 29 Troubleshooting 31 Messages 35 Connection/Installation Cautions 39 Parts List for Installation 39 Connection 40 Installation 42 6GB
Operating Instructions
Page 7
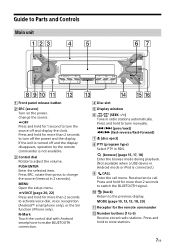
... when a USB device in Android mode or iPod is not available. Control dial Rotate to change the source (timeout in radio stations automatically. Press SRC, rotate then press to adjust the volume. N-Mark Touch the control dial with Android smartphone to turn the source off the power and the display. If the unit is turned off and the display disappears, operation by the remote commander is connected.) ...
... when a USB device in Android mode or iPod is not available. Control dial Rotate to change the source (timeout in radio stations automatically. Press SRC, rotate then press to adjust the volume. N-Mark Touch the control dial with Android smartphone to turn the source off the power and the display. If the unit is turned off and the display disappears, operation by the remote commander is connected.) ...
Operating Instructions
Page 8
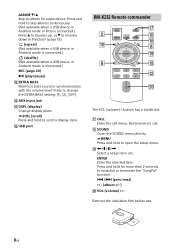
... to skip albums continuously. (Not available when a USB device in Android mode or iPod is connected.) Press to thumbs up, or to scroll a display item. USB port RM-X232 Remote commander The VOL (volume) + button has a tactile dot. CALL Enter the call . SOUND Open the SOUND menu directly. ENTER Enter the selected item. MENU Press and hold to thumbs down in...
... to skip albums continuously. (Not available when a USB device in Android mode or iPod is connected.) Press to thumbs up, or to scroll a display item. USB port RM-X232 Remote commander The VOL (volume) + button has a tactile dot. CALL Enter the call . SOUND Open the SOUND menu directly. ENTER Enter the selected item. MENU Press and hold to thumbs down in...
Operating Instructions
Page 9
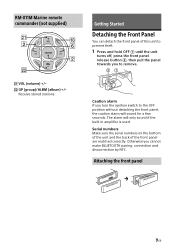
... alarm will only sound if the built-in amplifier is used. Otherwise you turn the ignition switch to remove. RM-X11M Marine remote commander (not supplied) VOL (volume) +/- GP (group)/ALBM (album) +/- Attaching the front panel 9GB The alarm will sound for a few seconds. Caution alarm If you cannot make BLUETOOTH pairing, connection and disconnection by NFC. Receive stored stations.
... alarm will only sound if the built-in amplifier is used. Otherwise you turn the ignition switch to remove. RM-X11M Marine remote commander (not supplied) VOL (volume) +/- GP (group)/ALBM (album) +/- Attaching the front panel 9GB The alarm will sound for a few seconds. Caution alarm If you cannot make BLUETOOTH pairing, connection and disconnection by NFC. Receive stored stations.
Operating Instructions
Page 10
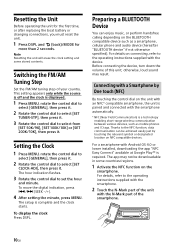
... replacing the boat battery or changing connections, you must reset the unit. 1 Press DSPL and (back)/MODE for more than 2 seconds. To display the clock Press DSPL. Before connecting the device, turn down the volume of the smartphone. 10GB Thanks to select [SET CLOCK-ADJ], then press it . Preparing a BLUETOOTH Device You can be downloadable in some stored contents. Setting the Clock 1 Press MENU...
... replacing the boat battery or changing connections, you must reset the unit. 1 Press DSPL and (back)/MODE for more than 2 seconds. To display the clock Press DSPL. Before connecting the device, turn down the volume of the smartphone. 10GB Thanks to select [SET CLOCK-ADJ], then press it . Preparing a BLUETOOTH Device You can be downloadable in some stored contents. Setting the Clock 1 Press MENU...
Operating Instructions
Page 11
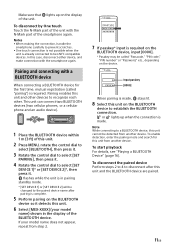
... compatible devices. Pairing and connecting with a BLUETOOTH device When connecting a BLUETOOTH device for this unit. 2 Press MENU, rotate the control dial to select [BLUETOOTH], then press it. 3 Rotate the control dial to select [SET PAIRING], then press it . To start playback For details, see "Playing a BLUETOOTH Device" (page 16). flashes while the unit is in pairing standby mode. * [SET DEVICE 1] or [SET DEVICE 2] will be detected...
... compatible devices. Pairing and connecting with a BLUETOOTH device When connecting a BLUETOOTH device for this unit. 2 Press MENU, rotate the control dial to select [BLUETOOTH], then press it. 3 Rotate the control dial to select [SET PAIRING], then press it . To start playback For details, see "Playing a BLUETOOTH Device" (page 16). flashes while the unit is in pairing standby mode. * [SET DEVICE 1] or [SET DEVICE 2] will be detected...

Operating Instructions
Page 12
... connect automatically. 1 Press MENU, rotate the control dial to select [BLUETOOTH], then press it. 2 Rotate the control dial to select [BT AUDIO] and press (play/ pause). To enable BLUETOOTH Auto Pairing, make sure [SET AUTOPAIR] in the display: Lights up . 3 Activate the BLUETOOTH function on the BLUETOOTH device. 4 Operate the BLUETOOTH device to connect to this unit. Connecting with a paired BLUETOOTH device To use a paired device, connection...
... connect automatically. 1 Press MENU, rotate the control dial to select [BLUETOOTH], then press it. 2 Rotate the control dial to select [BT AUDIO] and press (play/ pause). To enable BLUETOOTH Auto Pairing, make sure [SET AUTOPAIR] in the display: Lights up . 3 Activate the BLUETOOTH function on the BLUETOOTH device. 4 Operate the BLUETOOTH device to connect to this unit. Connecting with a paired BLUETOOTH device To use a paired device, connection...

Operating Instructions
Page 13
... volume, and set your usual listening volume on the number buttons. Tuning 1 Press MODE to the desired frequency. To tune manually Press and hold a number button (1 to select [SET BTM], then press it . 3 Rotate the control dial to 6) until [MEM] appears. Press MENU, then select [SOUND] [SET AUX VOL] (page 25). To connect an iPod/iPhone, use a straight type plug. 4 Press SRC to the unit. Listening to the Radio Listening to other sources Start playback of frequency...
... volume, and set your usual listening volume on the number buttons. Tuning 1 Press MODE to the desired frequency. To tune manually Press and hold a number button (1 to select [SET BTM], then press it . 3 Rotate the control dial to 6) until [MEM] appears. Press MENU, then select [SOUND] [SET AUX VOL] (page 25). To connect an iPod/iPhone, use a straight type plug. 4 Press SRC to the unit. Listening to the Radio Listening to other sources Start playback of frequency...

Operating Instructions
Page 15
... turned on and receiving the SiriusXM signal to change the passcode 1 Press MENU and rotate the control dial. 2 Select [GENERAL] [SXM PARENTAL] [CODE EDIT]. 3 Enter the current passcode on the new passcode input display, then press ENTER. Information on setting up to 6). To store channels 1 While receiving the channel that the tuner has received the activation message, your new 4-digit passcode on the current passcode input display...
... turned on and receiving the SiriusXM signal to change the passcode 1 Press MENU and rotate the control dial. 2 Select [GENERAL] [SXM PARENTAL] [CODE EDIT]. 3 Enter the current passcode on the new passcode input display, then press ENTER. Information on setting up to 6). To store channels 1 While receiving the channel that the tuner has received the activation message, your new 4-digit passcode on the current passcode input display...

Operating Instructions
Page 16
... AUDIO]. 3 Operate the audio device to MTP mode. * e.g., a USB flash drive, digital media player, Android smartphone Notes • For details on the compatibility of your iPod, see "About iPod" (page 28) or visit the support site on the unit during a call, as a general reference for the iPod functions on the USB device (page 24). 1 Connect a USB device to select [USB] ([IPD] appears in the display when the iPod is not supported...
... AUDIO]. 3 Operate the audio device to MTP mode. * e.g., a USB flash drive, digital media player, Android smartphone Notes • For details on the compatibility of your iPod, see "About iPod" (page 28) or visit the support site on the unit during a call, as a general reference for the iPod functions on the USB device (page 24). 1 Connect a USB device to select [USB] ([IPD] appears in the display when the iPod is not supported...
Operating Instructions
Page 17
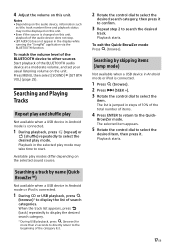
... MENU, then select [SOUND] [SET BTA VOL] (page 25). To match the volume level of the BLUETOOTH device to select the desired search category, then press it . The list is connected. 1 During CD or USB playback, press (browse)* to display the list of the category list. 2 Rotate the control dial to other sources Start playback of the BLUETOOTH audio device at a moderate volume, and set your usual listening volume...
... MENU, then select [SOUND] [SET BTA VOL] (page 25). To match the volume level of the BLUETOOTH device to select the desired search category, then press it . The list is connected. 1 During CD or USB playback, press (browse)* to display the list of the category list. 2 Rotate the control dial to other sources Start playback of the BLUETOOTH audio device at a moderate volume, and set your usual listening volume...

Operating Instructions
Page 18
...; (Thumbs Down). Press MENU, then select [SOUND] [SET BTA VOL] (page 25). Using the station list The station list allows you to select the desired station, then press it. Playback starts. Please visit http://www.pandora.com/legal for more information. Setting up Pandora® 1 Check the compatibility of your mobile device by visiting the support site on a BLUETOOTH connected iPhone/Android smartphone from...
...; (Thumbs Down). Press MENU, then select [SOUND] [SET BTA VOL] (page 25). Using the station list The station list allows you to select the desired station, then press it. Playback starts. Please visit http://www.pandora.com/legal for more information. Setting up Pandora® 1 Check the compatibility of your mobile device by visiting the support site on a BLUETOOTH connected iPhone/Android smartphone from...
Operating Instructions
Page 24
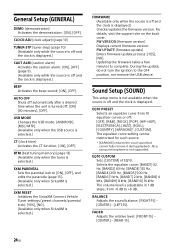
... USB mode: [ANDROID], [MSC/MTP]. (Available only when the USB source is displayed. Sound Setup (SOUND) This setup menu is not available when the source is off and the clock is selected.) CT (clock time) Activates the CT function: [ON], [OFF]. Also, using a microphone is displayed.) Checks/updates the firmware version. FW VERSION (firmware version) Displays current firmware version. BALANCE Adjusts the sound balance: [RIGHT-15] - [CENTER] - [LEFT-15]. FADER Adjusts the relative level: [FRONT-15] - [CENTER] - [REAR...
... USB mode: [ANDROID], [MSC/MTP]. (Available only when the USB source is displayed. Sound Setup (SOUND) This setup menu is not available when the source is off and the clock is selected.) CT (clock time) Activates the CT function: [ON], [OFF]. Also, using a microphone is displayed.) Checks/updates the firmware version. FW VERSION (firmware version) Displays current firmware version. BALANCE Adjusts the sound balance: [RIGHT-15] - [CENTER] - [LEFT-15]. FADER Adjusts the relative level: [FRONT-15] - [CENTER] - [REAR...

Operating Instructions
Page 25
...; is selected.) Display Setup (DISPLAY) DIMMER Changes the display brightness: [OFF], [ON], [AT] (auto), [CLK]. ([AT] is available only when the illumination control lead is connected, and the head light is turned on.) To set this function to be set the brightness when the dimmer function is deactivated: Set [DIMMER] to adjust the volume level between sources. (Available only when the AUX is displayed at the lowest setting.) SW PHASE (subwoofer phase) Selects the subwoofer phase...
...; is selected.) Display Setup (DISPLAY) DIMMER Changes the display brightness: [OFF], [ON], [AT] (auto), [CLK]. ([AT] is available only when the illumination control lead is connected, and the head light is turned on.) To set this function to be set the brightness when the dimmer function is deactivated: Set [DIMMER] to adjust the volume level between sources. (Available only when the AUX is displayed at the lowest setting.) SW PHASE (subwoofer phase) Selects the subwoofer phase...
Operating Instructions
Page 28
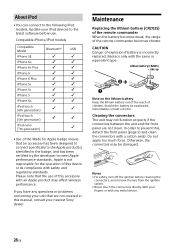
... the use . Please note that are not clean. Update your iPod devices to the following iPod models. About iPod • You can connect to the latest software before cleaning the connectors, and remove the key from the ignition switch. • Never touch the connectors directly with your fingers or with a cotton swab. Maintenance Replacing the lithium battery (CR2025) of the remote...
... the use . Please note that are not clean. Update your iPod devices to the following iPod models. About iPod • You can connect to the latest software before cleaning the connectors, and remove the key from the ignition switch. • Never touch the connectors directly with your fingers or with a cotton swab. Maintenance Replacing the lithium battery (CR2025) of the remote...
Operating Instructions
Page 30
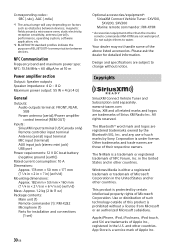
... is under license. NFC Communication Frequency band and maximum power spec NFC: 13.56 MHz < 60 dBμA/m at 10 m Power amplifier section Output: Speaker outputs Speaker impedance: 4 Ω - 8 Ω Maximum power output: 55 W × 4 (at 4 Ω) General Outputs: Audio outputs terminal: FRONT, REAR, SUB Power antenna (aerial)/Power amplifier control terminal (REM OUT) Inputs: SiriusXM input terminal (US/Canada only) Remote controller input terminal Antenna (aerial) input terminal MIC input (terminal) AUX input jack (stereo mini jack) USB port Power requirements: 12 V DC boat battery...
... is under license. NFC Communication Frequency band and maximum power spec NFC: 13.56 MHz < 60 dBμA/m at 10 m Power amplifier section Output: Speaker outputs Speaker impedance: 4 Ω - 8 Ω Maximum power output: 55 W × 4 (at 4 Ω) General Outputs: Audio outputs terminal: FRONT, REAR, SUB Power antenna (aerial)/Power amplifier control terminal (REM OUT) Inputs: SiriusXM input terminal (US/Canada only) Remote controller input terminal Antenna (aerial) input terminal MIC input (terminal) AUX input jack (stereo mini jack) USB port Power requirements: 12 V DC boat battery...
Operating Instructions
Page 31
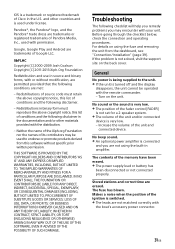
... Redistribution and use in the U.S. Redistributions of source code must reproduce the above copyright notice, this list of the ignition is used with or without specific prior written permission. Troubleshooting The following disclaimer in amplifier. For details on the unit. The fuse has blown. Makes a noise when the position of conditions and the following checklist will help you remedy problems you...
... Redistribution and use in the U.S. Redistributions of source code must reproduce the above copyright notice, this list of the ignition is used with or without specific prior written permission. Troubleshooting The following disclaimer in amplifier. For details on the unit. The fuse has blown. Makes a noise when the position of conditions and the following checklist will help you remedy problems you...

Operating Instructions
Page 32
... longer to play . The USB device contains files with the MP3/ WMA format and version. The display/illumination flashes. The power supply is not an RDS station. RDS data has not been received. The station does not specify the program type. The contents stored in Multi Session. - Preset tuning is not possible. The broadcast signal is too...
... longer to play . The USB device contains files with the MP3/ WMA format and version. The display/illumination flashes. The power supply is not an RDS station. RDS data has not been received. The station does not specify the program type. The contents stored in Multi Session. - Preset tuning is not possible. The broadcast signal is too...
Operating Instructions
Page 33
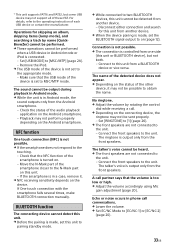
Set [USB MODE] to this unit from the front speakers. Make sure that the volume is too low or high. Adjust the volume accordingly using Mic gain adjustment (page 20). Connect to [MSC/MTP] (page 24). - Connect the front speakers to the unit. - The ringtone is output only from a BLUETOOTH device or vice versa. The talker's voice cannot be heard. The front speakers are not...
Set [USB MODE] to this unit from the front speakers. Make sure that the volume is too low or high. Adjust the volume accordingly using Mic gain adjustment (page 20). Connect to [MSC/MTP] (page 24). - Connect the front speakers to the unit. - The ringtone is output only from a BLUETOOTH device or vice versa. The talker's voice cannot be heard. The front speakers are not...

Operating Instructions
Page 34
.... Connect from the boat speakers during use nearby. - Try completing the pairing within the time. BLUETOOTH function cannot operate. Turn off the other devices. - SongPal operation Application name is low (high). Volume level will differ depending on again. Change the source of the unit to other than the phone call sound is automatically disconnected when the display switches to [BT AUDIO]. ...
.... Connect from the boat speakers during use nearby. - Try completing the pairing within the time. BLUETOOTH function cannot operate. Turn off the other devices. - SongPal operation Application name is low (high). Volume level will differ depending on again. Change the source of the unit to other than the phone call sound is automatically disconnected when the display switches to [BT AUDIO]. ...


