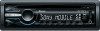

Operating Instructions
Page 4
... Tuning automatically 15 RDS 15 Overview 15 Selecting PTY 16 Setting CT 16 CD Display items 16 Repeat and shuffle play 16 USB devices Playing from an audio device 26 Operating an audio device with this unit to on Bluetooth 6 Resetting the unit 6 Canceling the DEMO mode 7 Preparing the card remote commander 7 Setting the clock 7 Detaching the front panel 7 Attaching the front panel 7 Quick Guide for a track Searching a track by listening to Bluetooth function 8 Buttons and icons 9 1 Pairing 10 2 Connection...
... Tuning automatically 15 RDS 15 Overview 15 Selecting PTY 16 Setting CT 16 CD Display items 16 Repeat and shuffle play 16 USB devices Playing from an audio device 26 Operating an audio device with this unit to on Bluetooth 6 Resetting the unit 6 Canceling the DEMO mode 7 Preparing the card remote commander 7 Setting the clock 7 Detaching the front panel 7 Attaching the front panel 7 Quick Guide for a track Searching a track by listening to Bluetooth function 8 Buttons and icons 9 1 Pairing 10 2 Connection...
Operating Instructions
Page 5
...://www.sony.com/mobileAV Provides information on: • Models and manufacturers of compatible digital audio players • Supported MP3/WMA/AAC files • Models and manufacturers of compatible cellular phones and the FAQ about Bluetooth function 5 EQ7 Setting 28 Optimizing sound by Time Alignment - Advanced Sound Engine 27 Selecting the sound quality - Listening Position 28 Adjusting the listening position 29 DM+ Advanced 29 Using rear speakers as subwoofer - Sound Settings and Setup Menu Changing the sound settings 27 Adjusting the sound...
...://www.sony.com/mobileAV Provides information on: • Models and manufacturers of compatible digital audio players • Supported MP3/WMA/AAC files • Models and manufacturers of compatible cellular phones and the FAQ about Bluetooth function 5 EQ7 Setting 28 Optimizing sound by Time Alignment - Advanced Sound Engine 27 Selecting the sound quality - Listening Position 28 Adjusting the listening position 29 DM+ Advanced 29 Using rear speakers as subwoofer - Sound Settings and Setup Menu Changing the sound settings 27 Adjusting the sound...
Operating Instructions
Page 6
... electronic device connected to this device, please consult with the manufacturer or its user guide for the first time, or after replacing the car battery or changing the connections, you drive. Please check for essential communications (such as electronic fuel injection systems, electronic antiskid (antilock) braking systems, electronic speed control systems or air bag systems. For installation or service of this device. Note Pressing the RESET button will...
... electronic device connected to this device, please consult with the manufacturer or its user guide for the first time, or after replacing the car battery or changing the connections, you drive. Please check for essential communications (such as electronic fuel injection systems, electronic antiskid (antilock) braking systems, electronic speed control systems or air bag systems. For installation or service of this device. Note Pressing the RESET button will...
Operating Instructions
Page 7
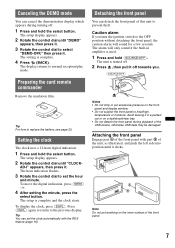
... the select button. The setup is complete. 4 Press (BACK). Tip You can set the hour and minute. The unit is turned off. 2 Press , then pull it in amplifier is used. 1 Press and hold (SOURCE/OFF). The display returns to replace the battery, see page 33. Preparing the card remote commander Remove the insulation film. The hour indication flashes. 3 Rotate the control dial to set the clock automatically with part...
... the select button. The setup is complete. 4 Press (BACK). Tip You can set the hour and minute. The unit is turned off. 2 Press , then pull it in amplifier is used. 1 Press and hold (SOURCE/OFF). The display returns to replace the battery, see page 33. Preparing the card remote commander Remove the insulation film. The hour indication flashes. 3 Rotate the control dial to set the clock automatically with part...
Operating Instructions
Page 12
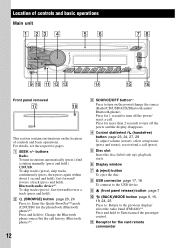
... the passenger control. Press for 1 second to turn on the location of controls and basic operations Main unit Front panel removed This section contains instructions on the power/change the source (Radio/CD/USB/AUX/Bluetooth audio/ Bluetooth phone). H USB connector page 17, 18 To connect to the previous display/ select the radio band (FM/AM)*3. F Display window G Z (eject) button To eject the disc. I (front panel release) button page 7 J (BACK)/MODE button page 9, 15, 19, 24, 25 Press to: Return to the USB device. Bluetooth audio device*1: To skip...
... the passenger control. Press for 1 second to turn on the location of controls and basic operations Main unit Front panel removed This section contains instructions on the power/change the source (Radio/CD/USB/AUX/Bluetooth audio/ Bluetooth phone). H USB connector page 17, 18 To connect to the previous display/ select the radio band (FM/AM)*3. F Display window G Z (eject) button To eject the disc. I (front panel release) button page 7 J (BACK)/MODE button page 9, 15, 19, 24, 25 Press to: Return to the USB device. Bluetooth audio device*1: To skip...

Operating Instructions
Page 13
... stored dials (press); P AUX input jack page 30 To connect a portable audio device. L BT (BLUETOOTH) button page 9, 21, 23 For Bluetooth signal on the unit is pressed, or a disc is inserted to activate the unit first. 13 skip albums continuously (press and hold ). Bluetooth phone: To call ) page 25 To set the MIC Gain (press); Notes • When ejecting/inserting a disc, keep any USB devices disconnected to avoid damage...
... stored dials (press); P AUX input jack page 30 To connect a portable audio device. L BT (BLUETOOTH) button page 9, 21, 23 For Bluetooth signal on the unit is pressed, or a disc is inserted to activate the unit first. 13 skip albums continuously (press and hold ). Bluetooth phone: To call ) page 25 To set the MIC Gain (press); Notes • When ejecting/inserting a disc, keep any USB devices disconnected to avoid damage...
Operating Instructions
Page 14
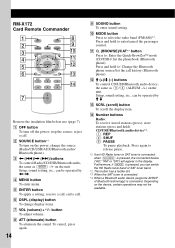
... unit. E ENTER button To apply a setting; button To adjust volume. H ATT (attenuate) button To attenuate the sound. Press and hold to : Change the Bluetooth phone source/list the call . reject a call ; D MENU button To enter menu. Press and hold to enter/cancel the passenger control. store stations (press and hold). F DSPL (display) button To change the source (Radio/CD/USB/AUX/Bluetooth audio/ Bluetooth phone). L M (+)/m (-) buttons To control CD/USB/Bluetooth audio device, the same as (SEEK) -/+ on the power; Furthermore, if (MODE) is pressed, the connected...
... unit. E ENTER button To apply a setting; button To adjust volume. H ATT (attenuate) button To attenuate the sound. Press and hold to : Change the Bluetooth phone source/list the call . reject a call ; D MENU button To enter menu. Press and hold to enter/cancel the passenger control. store stations (press and hold). F DSPL (display) button To change the source (Radio/CD/USB/AUX/Bluetooth audio/ Bluetooth phone). L M (+)/m (-) buttons To control CD/USB/Bluetooth audio device, the same as (SEEK) -/+ on the power; Furthermore, if (MODE) is pressed, the connected...
Operating Instructions
Page 15
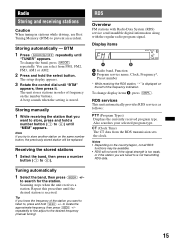
...) service send inaudible digital information along with the regular radio program signal. To change the band, press (MODE) repeatedly. CT (Clock Time) The CT data from FM1, FM2, FM3, AM1 or AM2. 2 Press and hold the select button. The setup display appears. 3 Rotate the control dial until "MEM" appears. repeatedly to fine adjust to (6)). Receiving the stored stations 1 Select the band, then press a number button ((1) to the desired frequency (manual tuning...
...) service send inaudible digital information along with the regular radio program signal. To change the band, press (MODE) repeatedly. CT (Clock Time) The CT data from FM1, FM2, FM3, AM1 or AM2. 2 Press and hold the select button. The setup display appears. 3 Rotate the control dial until "MEM" appears. repeatedly to fine adjust to (6)). Receiving the stored stations 1 Select the band, then press a number button ((1) to the desired frequency (manual tuning...
Operating Instructions
Page 18
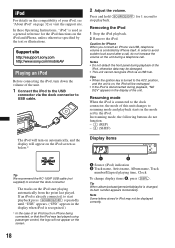
... dock connector to USB cable. 2 Adjust the volume. In these Operating Instructions, "iPod" is used as below.* Display items Tip We recommend the RC-100IP USB cable (not supplied) to stop playback. Support site http://esupport.sony.com http://www.sony.com/mobileAV Playing an iPod Before connecting the iPod, turn on automatically, and the display will appear on the screen. 18 A Source (iPod) indication B Track name, Artist name, Album name, Track number/Elapsed playing time, Clock To change display...
... dock connector to USB cable. 2 Adjust the volume. In these Operating Instructions, "iPod" is used as below.* Display items Tip We recommend the RC-100IP USB cable (not supplied) to stop playback. Support site http://esupport.sony.com http://www.sony.com/mobileAV Playing an iPod Before connecting the iPod, turn on automatically, and the display will appear on the screen. 18 A Source (iPod) indication B Track name, Artist name, Album name, Track number/Elapsed playing time, Clock To change display...

Operating Instructions
Page 19
... • The volume can operate an iPod connected to resuming mode. device in random order. Skipping albums, podcasts, genres, playlists and artists To Skip Skip continuously Do this mode is complete. genre repeatedly. genre in random order. To return to desired point] Repeat and shuffle play mode will change the display item Press (DSPL). playlist in random order. Operating an iPod directly - Select TRACK ALBUM...
... • The volume can operate an iPod connected to resuming mode. device in random order. Skipping albums, podcasts, genres, playlists and artists To Skip Skip continuously Do this mode is complete. genre repeatedly. genre in random order. To return to desired point] Repeat and shuffle play mode will change the display item Press (DSPL). playlist in random order. Operating an iPod directly - Select TRACK ALBUM...
Operating Instructions
Page 24
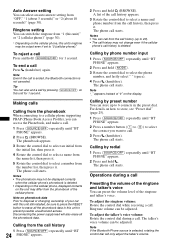
... phone call . To adjust the ringtone volume: Rotate the control dial while receiving a call starts. The phone call starts. Calling from "1 (this unit still installed, be sure to press the RESET button to disposal or changing ownership of "#" on the cellular phone, this unit's ringtone may not be output even if set to select the phone number, and lastly select " " (space). 4 Press (handsfree). Note "_" appears instead of your car with...
... phone call . To adjust the ringtone volume: Rotate the control dial while receiving a call starts. The phone call starts. Calling from "1 (this unit still installed, be sure to press the RESET button to disposal or changing ownership of "#" on the cellular phone, this unit's ringtone may not be output even if set to select the phone number, and lastly select " " (space). 4 Press (handsfree). Note "_" appears instead of your car with...
Operating Instructions
Page 26
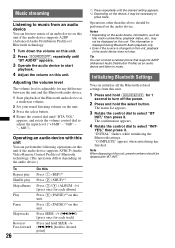
... the unit and the Bluetooth audio device. 1 Start playback of the Bluetooth audio device at a moderate volume. 2 Set your usual listening volume on the audio device. Adjusting the volume level The volume level is changed on this unit. Operations other than the above should be performed on the unit. 3 Press the select button. 4 Rotate the control dial until "BTA VOL" appears, and rotate the volume control dial to adjust the input level ("+18dB" - Note When disposing of this unit, preset numbers should...
... the unit and the Bluetooth audio device. 1 Start playback of the Bluetooth audio device at a moderate volume. 2 Set your usual listening volume on the audio device. Adjusting the volume level The volume level is changed on this unit. Operations other than the above should be performed on the unit. 3 Press the select button. 4 Rotate the control dial until "BTA VOL" appears, and rotate the volume control dial to adjust the input level ("+18dB" - Note When disposing of this unit, preset numbers should...
Operating Instructions
Page 27
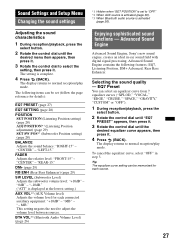
..., Rear Bass Enhancer. BTA VOL*3 (Bluetooth Audio Volume Level) (page 26) Enjoying sophisticated sound functions - The setting is displayed at the lowest setting.) AUX VOL*2 (AUX Volume level) Adjusts the volume level for each source. 27 "CENTER" - "CENTER" - Adjusting the sound characteristics 1 During reception/playback, press the select button. 2 Rotate the control dial until the desired equalizer curve appears, then press it . 3 Rotate the control dial to adjust the volume level between sources. FADER Adjusts the relative level: "FRONT-15" - Sound Settings and Setup Menu...
..., Rear Bass Enhancer. BTA VOL*3 (Bluetooth Audio Volume Level) (page 26) Enjoying sophisticated sound functions - The setting is displayed at the lowest setting.) AUX VOL*2 (AUX Volume level) Adjusts the volume level for each source. 27 "CENTER" - "CENTER" - Adjusting the sound characteristics 1 During reception/playback, press the select button. 2 Rotate the control dial until the desired equalizer curve appears, then press it . 3 Rotate the control dial to adjust the volume level between sources. FADER Adjusts the relative level: "FRONT-15" - Sound Settings and Setup Menu...

Operating Instructions
Page 29
... memorized for details): CLOCK-ADJ (Clock Adjust) (page 7) CT (Clock Time) Activates the CT function: "ON," "OFF" (page 15, 16). continue to normal reception/play mode. The display returns to select the setting, then press it.* The setting is not necessary. Using rear speakers as a subwoofer if one is turned off automatically after a desired time when the unit is not connected. 1 During reception/playback, press the select button. 2 Rotate the control dial until "RB...
... memorized for details): CLOCK-ADJ (Clock Adjust) (page 7) CT (Clock Time) Activates the CT function: "ON," "OFF" (page 15, 16). continue to normal reception/play mode. The display returns to select the setting, then press it.* The setting is not necessary. Using rear speakers as a subwoofer if one is turned off automatically after a desired time when the unit is not connected. 1 During reception/playback, press the select button. 2 Rotate the control dial until "RB...
Operating Instructions
Page 30
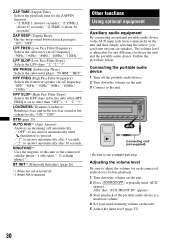
...) Reinforces bass and treble for each connected audio device before playback. 1 Turn down the volume on the unit. 2 Press (SOURCE/OFF) repeatedly until (handsfree) is set to not answer automatically until "AUX" appears. The volume level is received. RINGTONE*1 Uses the ringtone of the portable audio device at low volume levels: "ON," "OFF." BT INIT*1 (Bluetooth Initialize) (page 26) *1 When the unit is turned off the portable audio device. 2 Turn down the volume on the unit. 3 Connect to use...
...) Reinforces bass and treble for each connected audio device before playback. 1 Turn down the volume on the unit. 2 Press (SOURCE/OFF) repeatedly until (handsfree) is set to not answer automatically until "AUX" appears. The volume level is received. RINGTONE*1 Uses the ringtone of the portable audio device at low volume levels: "ON," "OFF." BT INIT*1 (Bluetooth Initialize) (page 26) *1 When the unit is turned off the portable audio device. 2 Turn down the volume on the unit. 3 Connect to use...
Operating Instructions
Page 33
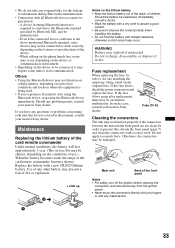
... the device. - If the fuse blows again after using the Bluetooth device, stop using the Bluetooth device immediately. Main unit Back of the front panel Notes • For safety, turn off the ignition before cleaning the connectors, and remove the key from the ignition switch. • Never touch the connectors directly with your fingers or with all Bluetooth devices cannot be connected or work correctly, depending on radio wave conditions and location...
... the device. - If the fuse blows again after using the Bluetooth device, stop using the Bluetooth device immediately. Main unit Back of the front panel Notes • For safety, turn off the ignition before cleaning the connectors, and remove the key from the ignition switch. • Never touch the connectors directly with your fingers or with all Bluetooth devices cannot be connected or work correctly, depending on radio wave conditions and location...
Operating Instructions
Page 35
...time are subject to next page t 35 t Store again into the memory. • The power supply lead or battery has been disconnected or it cannot be operated with an RCA pin cord): RC-61 (1 m), RC-62 (2 m) USB connection cable for detailed information. Power amplifier section Output: Speaker outputs Speaker impedance: 4 - 8 ohms Maximum power output: 52 W × 4 (at 4 ohms) General Outputs: Audio outputs terminal (front/rear) Subwoofer output terminal (mono) Power antenna (aerial) relay control terminal Power amplifier control terminal Inputs: BUS control input terminal BUS audio input...
...time are subject to next page t 35 t Store again into the memory. • The power supply lead or battery has been disconnected or it cannot be operated with an RCA pin cord): RC-61 (1 m), RC-62 (2 m) USB connection cable for detailed information. Power amplifier section Output: Speaker outputs Speaker impedance: 4 - 8 ohms Maximum power output: 52 W × 4 (at 4 ohms) General Outputs: Audio outputs terminal (front/rear) Subwoofer output terminal (mono) Power antenna (aerial) relay control terminal Power amplifier control terminal Inputs: BUS control input terminal BUS audio input...
Operating Instructions
Page 36
...). The sound skips. • Installation is intermittent. The USB device takes longer to the power supply lead of less than 320 kbps. The sound is not correct. Bluetooth function The connecting device cannot detect this unit. • Before the pairing is made , set the Bluetooth signal output to on . t Press (SOURCE/OFF) on playable discs and formats, visit the support site. t If the auto antenna (aerial) will not eject. t Perform manual tuning. During...
...). The sound skips. • Installation is intermittent. The USB device takes longer to the power supply lead of less than 320 kbps. The sound is not correct. Bluetooth function The connecting device cannot detect this unit. • Before the pairing is made , set the Bluetooth signal output to on . t Press (SOURCE/OFF) on playable discs and formats, visit the support site. t If the auto antenna (aerial) will not eject. t Perform manual tuning. During...
Operating Instructions
Page 37
... set to send the phone number. Some functions do not work. Check if the connecting device supports the functions in a case which emit radio waves are used nearby. Pairing failed due to "R.TONE-1" (page 24). No ringtone. • Adjust the volume in "VOL RING" level. • Depending on reception conditions of the other device, it may be controlled. Adjust the volume level. The phone sound quality is loud, shut the window. The connected Bluetooth audio device...
... set to send the phone number. Some functions do not work. Check if the connecting device supports the functions in a case which emit radio waves are used nearby. Pairing failed due to "R.TONE-1" (page 24). No ringtone. • Adjust the volume in "VOL RING" level. • Depending on reception conditions of the other device, it may be controlled. Adjust the volume level. The phone sound quality is loud, shut the window. The connected Bluetooth audio device...
Operating Instructions
Page 38
... cellular phone. t Press the RESET button (page 6). WITHHELD Phone number is no preset number exists. EMPTY • The call . L. A USB device or a USB cable has been disconnected during automatic tuning. t Be sure to connect a cellular phone. t Connect a USB device with the selected letter in the display, consult your nearest Sony dealer. NOT FOUND There is hidden by pressing (SOURCE/OFF). t Indicates that was used at the time the problem began. 38 Depending on the compatibility...
... cellular phone. t Press the RESET button (page 6). WITHHELD Phone number is no preset number exists. EMPTY • The call . L. A USB device or a USB cable has been disconnected during automatic tuning. t Be sure to connect a cellular phone. t Connect a USB device with the selected letter in the display, consult your nearest Sony dealer. NOT FOUND There is hidden by pressing (SOURCE/OFF). t Indicates that was used at the time the problem began. 38 Depending on the compatibility...


