Operating Instructions
Page 2
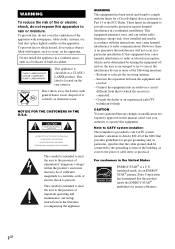
...However, there is located on the rear exterior. As an ENERGY STAR® partner, Sony Corporation has determined that this product meets the ENERGY STAR® guidelines for help. ... off and on a circuit different from that any changes or modification not expressly approved in this manual could void your authority to the presence of important operating and maintenance (servicing) instructions in a ...waste, dispose of the apparatus with the limits for proper grounding and, in cabinet. FST-ZX8/LBT-ZX84-253-172-15(1) WARNING To reduce the risk of fire or electric shock, do not expose...
...However, there is located on the rear exterior. As an ENERGY STAR® partner, Sony Corporation has determined that this product meets the ENERGY STAR® guidelines for help. ... off and on a circuit different from that any changes or modification not expressly approved in this manual could void your authority to the presence of important operating and maintenance (servicing) instructions in a ...waste, dispose of the apparatus with the limits for proper grounding and, in cabinet. FST-ZX8/LBT-ZX84-253-172-15(1) WARNING To reduce the risk of fire or electric shock, do not expose...
Operating Instructions
Page 3
...tape 18 Tape - Manual Recording Sound Adjustment Adjusting the sound 21 Selecting the preset effect 22 Adjusting the graphic equalizer and storing the personal file 22 Selecting the surround effect 23 Selecting the MP3 Booster effect ......... 23 Creating a party environment 24 (FST-ZX8/LBT-ZX8 only) -...12 Playing a disc 12 - Program Play Tuner Presetting radio stations 16 Listening to the radio 17 - X-ROUND - Multi Room (FST-ZX8/LBT-ZX8 only) Enhancing the video game sound ......... 25 - Power Saving Mode Viewing information about the disc in the display 30 Changing the power...
...tape 18 Tape - Manual Recording Sound Adjustment Adjusting the sound 21 Selecting the preset effect 22 Adjusting the graphic equalizer and storing the personal file 22 Selecting the surround effect 23 Selecting the MP3 Booster effect ......... 23 Creating a party environment 24 (FST-ZX8/LBT-ZX8 only) -...12 Playing a disc 12 - Program Play Tuner Presetting radio stations 16 Listening to the radio 17 - X-ROUND - Multi Room (FST-ZX8/LBT-ZX8 only) Enhancing the video game sound ......... 25 - Power Saving Mode Viewing information about the disc in the display 30 Changing the power...
Operating Instructions
Page 5
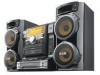
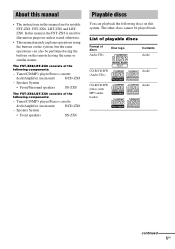
... discs You can also be played back. Tuner/CD/MP3 player/Stereo cassette deck/Amplifier (main unit) HCD-ZX6 - The FST-ZX8/LBT-ZX8 consists of discs Audio CDs Disc logo Contents Audio CD-R/CD-RW (Audio CDs) CD-R/CD-RW (Discs with MP3 audio tracks...) Audio Audio continued 5GB About this manual • The instructions in this manual are for illustration purposes unless stated otherwise. • This manual mainly explains operations using the buttons on this manual, the FST-ZX8 is used for models FST-ZX8, FST-ZX6, LBT-ZX8 and LBTZX6. In this system.
... discs You can also be played back. Tuner/CD/MP3 player/Stereo cassette deck/Amplifier (main unit) HCD-ZX6 - The FST-ZX8/LBT-ZX8 consists of discs Audio CDs Disc logo Contents Audio CD-R/CD-RW (Audio CDs) CD-R/CD-RW (Discs with MP3 audio tracks...) Audio Audio continued 5GB About this manual • The instructions in this manual are for illustration purposes unless stated otherwise. • This manual mainly explains operations using the buttons on this manual, the FST-ZX8 is used for models FST-ZX8, FST-ZX6, LBT-ZX8 and LBTZX6. In this system.
Operating Instructions
Page 16
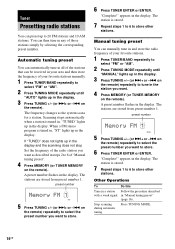
...or TUNER MEMORY on the remote) repeatedly to select the preset number you want to store. 6 Press TUNER ENTER or ENTER. "Complete!" preset number MANUAL 5 Press TUNING +/- (or >+ or -. Stop scanning during automatic tuning Press TUNING MODE. 16GB If "TUNED" does not lights up in steps ... number AUTO 5 Press TUNING +/- (or >+ or -. "Complete!" Automatic tuning preset You can automatically tune in all of the stations that can manually tune in and store the radio frequency of your favorite stations. 1 Press TUNER/BAND repeatedly to select "FM" or "AM". 2 Press TUNING ...
...or TUNER MEMORY on the remote) repeatedly to select the preset number you want to store. 6 Press TUNER ENTER or ENTER. "Complete!" preset number MANUAL 5 Press TUNING +/- (or >+ or -. Stop scanning during automatic tuning Press TUNING MODE. 16GB If "TUNED" does not lights up in steps ... number AUTO 5 Press TUNING +/- (or >+ or -. "Complete!" Automatic tuning preset You can automatically tune in all of the stations that can manually tune in and store the radio frequency of your favorite stations. 1 Press TUNER/BAND repeatedly to select "FM" or "AM". 2 Press TUNING ...

Operating Instructions
Page 17
...to preset stations, be sure to "CD POWER OFF". Tips • The preset stations are retained for the operation. 1 Press FUNCTION repeatedly until "MANUAL" lights up in the display. 3 Press TUNING +/- (or >+ or -. "CD POWER OFF" appears in the display. Listening to select "FM"... down x (CD). While holding down TUNER ENTER, press ?/1 to a radio station either by selecting a preset station, or by manually tuning in the station. Manual Tuning 1 Press TUNER/BAND repeatedly to a preset station - Tuner To improve tuner reception When the tuner reception is poor, set CD...
...to preset stations, be sure to "CD POWER OFF". Tips • The preset stations are retained for the operation. 1 Press FUNCTION repeatedly until "MANUAL" lights up in the display. 3 Press TUNING +/- (or >+ or -. "CD POWER OFF" appears in the display. Listening to select "FM"... down x (CD). While holding down TUNER ENTER, press ?/1 to a radio station either by selecting a preset station, or by manually tuning in the station. Manual Tuning 1 Press TUNER/BAND repeatedly to a preset station - Tuner To improve tuner reception When the tuner reception is poor, set CD...
Operating Instructions
Page 20
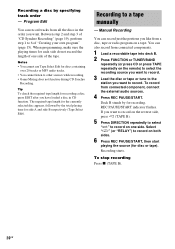
..., press h (TAPE B). 5 Press DIRECTION repeatedly to select "g" to record on both sides. 6 Press REC PAUSE/START, then start playing the source (for disc or tape). Manual Recording You can record just the portions you like from connected component, connect the external audio sources. 4 Press REC PAUSE/START. If you want to.... 1 Load a recordable tape into deck B. 2 Press FUNCTION or TUNER/BAND repeatedly (or press CD or press TAPE repeatedly on a tape. Select "j" (or "RELAY") to a tape manually - REC PAUSE/START indicator flashes. Recording a disc by specifying track order -
..., press h (TAPE B). 5 Press DIRECTION repeatedly to select "g" to record on both sides. 6 Press REC PAUSE/START, then start playing the source (for disc or tape). Manual Recording You can record just the portions you like from connected component, connect the external audio sources. 4 Press REC PAUSE/START. If you want to.... 1 Load a recordable tape into deck B. 2 Press FUNCTION or TUNER/BAND repeatedly (or press CD or press TAPE repeatedly on a tape. Select "j" (or "RELAY") to a tape manually - REC PAUSE/START indicator flashes. Recording a disc by specifying track order -
Operating Instructions
Page 21
...start from the component connected to the GAME INPUT jacks with another function such as CD, tape, radio, VCR or turntable connected to a tape manually: You can reinforce the bass and create a more powerful sound. If you use have different lengths, the tapes in the display and then ...To record the mixed sound (page 26), press GAME MIXING after step 4 and before step 6). • For recording from an album of MP3 audio tracks manually: Press PLAY MODE repeatedly until "ALBM" lights up in each deck reverses independently. • For recording from the radio: If noise is "X-GROOVE ON"....
...start from the component connected to the GAME INPUT jacks with another function such as CD, tape, radio, VCR or turntable connected to a tape manually: You can reinforce the bass and create a more powerful sound. If you use have different lengths, the tapes in the display and then ...To record the mixed sound (page 26), press GAME MIXING after step 4 and before step 6). • For recording from an album of MP3 audio tracks manually: Press PLAY MODE repeatedly until "ALBM" lights up in each deck reverses independently. • For recording from the radio: If noise is "X-GROOVE ON"....
Operating Instructions
Page 24
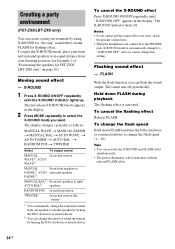
...cancel the X-ROUND effect Press X-ROUND ON/OFF repeatedly until the X-ROUND indicator lights up. Creating a party environment (FST-ZX8/LBT-ZX8 only) You can create a party environment by turning the JOG clockwise or anticlockwise. Flashing sound effect - The last selected ... changes cyclically as follows: MANUAL WAVE t MANUAL FADER t MANUAL BAL t AUTO WAVE t AUTO FADER t AUTO BAL t RANDOM POS t TWISTER Select To output sound MANUAL In circular motion WAVE1), AUTO WAVE2) MANUAL From front speakers to FADER1), AUTO surround speakers FADER2) MANUAL BAL1), From left speakers to...
...cancel the X-ROUND effect Press X-ROUND ON/OFF repeatedly until the X-ROUND indicator lights up. Creating a party environment (FST-ZX8/LBT-ZX8 only) You can create a party environment by turning the JOG clockwise or anticlockwise. Flashing sound effect - The last selected ... changes cyclically as follows: MANUAL WAVE t MANUAL FADER t MANUAL BAL t AUTO WAVE t AUTO FADER t AUTO BAL t RANDOM POS t TWISTER Select To output sound MANUAL In circular motion WAVE1), AUTO WAVE2) MANUAL From front speakers to FADER1), AUTO surround speakers FADER2) MANUAL BAL1), From left speakers to...
Operating Instructions
Page 26
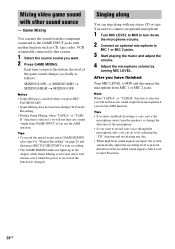
Tips • To record the mixed sound, press GAME MIXING after step 4 of "Manual Recording" on even if the function is selected, you will not hear any sound output from the component connected to the GAME INPUT jacks with ...
Tips • To record the mixed sound, press GAME MIXING after step 4 of "Manual Recording" on even if the function is selected, you will not hear any sound output from the component connected to the GAME INPUT jacks with ...


