

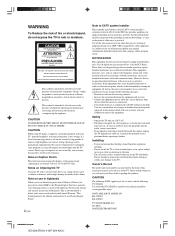
Child Safety: It Makes A Difference How and Where You Use Your Flat Panel Display
Page 1
... on a "larger than life" flat panel display. However, flat panel displays are mounting the display is appropriate. WALL MOUNTING: IF YOU DECIDE TO WALL MOUNT YOUR FLAT PANEL DISPLAY, ALWAYS: • Use a mount that they cannot be heavy. TUNE INTO SAFETY • One size does NOT fit all instructions supplied by the display and wall mount manufacturers. • If you are not always supported on dressers, bookcases, shelves, desks, speakers, chests or carts may fall...
... on a "larger than life" flat panel display. However, flat panel displays are mounting the display is appropriate. WALL MOUNTING: IF YOU DECIDE TO WALL MOUNT YOUR FLAT PANEL DISPLAY, ALWAYS: • Use a mount that they cannot be heavy. TUNE INTO SAFETY • One size does NOT fit all instructions supplied by the display and wall mount manufacturers. • If you are not always supported on dressers, bookcases, shelves, desks, speakers, chests or carts may fall...
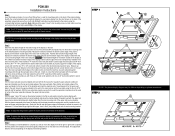
Display Mount Installation Instructions (PCM200)
Page 1
... the upper wall plate to the plasma using the four (4) 5/16" lag bolts and flat washers. Place bottom and outside edges of the display on the display model being installed. Step 5 Once the display on the back of the installed plasma mounting brackets. Note: Make sure the upper "clevis" hook mounting screw, nut and reference arrow are fully installed into the bottom receiving slots of the assembly manual and secure...
... the upper wall plate to the plasma using the four (4) 5/16" lag bolts and flat washers. Place bottom and outside edges of the display on the display model being installed. Step 5 Once the display on the back of the installed plasma mounting brackets. Note: Make sure the upper "clevis" hook mounting screw, nut and reference arrow are fully installed into the bottom receiving slots of the assembly manual and secure...
Operating Instructions
Page 2
... call the CATV system installer's attention to fit into an outlet on Caption Vision This television receiver provides display of television closed captioning in accordance with the following measures: - Do not install the TV in a hot or humid place, or in a residential installation. The AC power cord is attached to remove the cord from these hooks. Do not attempt to the rear of the TV with...
... call the CATV system installer's attention to fit into an outlet on Caption Vision This television receiver provides display of television closed captioning in accordance with the following measures: - Do not install the TV in a hot or humid place, or in a residential installation. The AC power cord is attached to remove the cord from these hooks. Do not attempt to the rear of the TV with...

Operating Instructions
Page 3
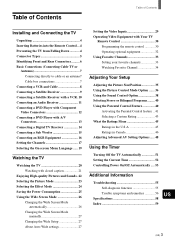
... closed caption 21 Enjoying High-quality Pictures and Sounds . 22 Selecting the Picture Mode 23 Selecting the Effect Mode 24 Saving the Power Consumption 25 Using the Wide Screen Mode 26 Changing the Wide Screen Mode automatically 26 Changing the Wide Screen Mode manually 27 Changing the Wide Setup 27 Setting the Video Inputs 29 Operating Video Equipment with Your TV Remote Control 30 Programming the remote control 30 Operating optional equipment 32 Using Favorite Channels 33 Setting your favorite channels 33 Watching Favorite Channel...
... closed caption 21 Enjoying High-quality Pictures and Sounds . 22 Selecting the Picture Mode 23 Selecting the Effect Mode 24 Saving the Power Consumption 25 Using the Wide Screen Mode 26 Changing the Wide Screen Mode automatically 26 Changing the Wide Screen Mode manually 27 Changing the Wide Setup 27 Setting the Video Inputs 29 Operating Video Equipment with Your TV Remote Control 30 Programming the remote control 30 Operating optional equipment 32 Using Favorite Channels 33 Setting your favorite channels 33 Watching Favorite Channel...

Operating Instructions
Page 5
... types during set up. Supplied 75-ohm coaxial cable Screw-on the rear of the TV. Push into connection. Attach the cord or chain (not supplied) securely. S VIDEO cable High quality video cable for enhanced picture quality Align guides and push into connection. Red Some DVD players are exclusive to a wall or pillar. Side view Top view Screw a hook (not supplied) to each bracket on type Screw into connection. AUDIO/VIDEO cable Push into connection. 5 Attach the cord or chain to Sony equipment...
... types during set up. Supplied 75-ohm coaxial cable Screw-on the rear of the TV. Push into connection. Attach the cord or chain (not supplied) securely. S VIDEO cable High quality video cable for enhanced picture quality Align guides and push into connection. Red Some DVD players are exclusive to a wall or pillar. Side view Top view Screw a hook (not supplied) to each bracket on type Screw into connection. AUDIO/VIDEO cable Push into connection. 5 Attach the cord or chain to Sony equipment...

Operating Instructions
Page 7
... remote control" on , or the STANDBY/ SLEEP indicator lights up any other Sony equipment with the CONTROL S cable. Cable box connections Use this function. 9 AC IN Connects the supplied AC power cord. Cable 75-ohm coaxial cable (supplied) VHF/UHF Rear of TV IN OUT Cable box Also, set your TV to the TV's VHF/UHF jack. To control the TV with the CONTROL S cable. * Only when the TV is turned on page 30). • To change channels using...
... remote control" on , or the STANDBY/ SLEEP indicator lights up any other Sony equipment with the CONTROL S cable. Cable box connections Use this function. 9 AC IN Connects the supplied AC power cord. Cable 75-ohm coaxial cable (supplied) VHF/UHF Rear of TV IN OUT Cable box Also, set your TV to the TV's VHF/UHF jack. To control the TV with the CONTROL S cable. * Only when the TV is turned on page 30). • To change channels using...

Operating Instructions
Page 14
... output connectors. 14 (US) 01US04CON-UC(8-19).p65 14 KZ-32/42TS1U 4-087-364-13 (1) 2002.6.22, 3:13 PM Installing and Connecting the TV Connecting a Digital TV Receiver Disconnect all format types of picture in a resolution of TV Digital TV Set-top box VIDEO IN 1 R AUDIO L VIDEO S VIDEO VIDEO IN 2 COMPONENT VIDEO IN 1 AUDIO OUT R AUDIO L Y PB PR R L R AUDIO L Y/G PB/B PR/R HD CONTROL S IN VD OUT COMPONENT VIDEO IN 2 / RGB IN SUB WOOFER AUDIO-R (red) PR AUDIO-L (white...
... output connectors. 14 (US) 01US04CON-UC(8-19).p65 14 KZ-32/42TS1U 4-087-364-13 (1) 2002.6.22, 3:13 PM Installing and Connecting the TV Connecting a Digital TV Receiver Disconnect all format types of picture in a resolution of TV Digital TV Set-top box VIDEO IN 1 R AUDIO L VIDEO S VIDEO VIDEO IN 2 COMPONENT VIDEO IN 1 AUDIO OUT R AUDIO L Y PB PR R L R AUDIO L Y/G PB/B PR/R HD CONTROL S IN VD OUT COMPONENT VIDEO IN 2 / RGB IN SUB WOOFER AUDIO-R (red) PR AUDIO-L (white...

Operating Instructions
Page 16
... you used for the video connection (COMPONENT VIDEO IN 2/ RGB IN). Installing and Connecting the TV Connecting an RGB Equipment Disconnect all power sources before making any connections. 1 Using an RGB cable, connect the RGB equipment's video/synchronized signal output terminal to use the same row of TV VIDEO IN 1 R AUDIO L VIDEO S VIDEO VIDEO IN 2 COMPONENT VIDEO IN 1 AUDIO OUT R AUDIO L Y PB PR R L R AUDIO L Y/G PB/B PR/R HD CONTROL S IN VD OUT COMPONENT VIDEO IN 2 / RGB IN SUB WOOFER AUDIO-R (red) AUDIO-L (white...
... you used for the video connection (COMPONENT VIDEO IN 2/ RGB IN). Installing and Connecting the TV Connecting an RGB Equipment Disconnect all power sources before making any connections. 1 Using an RGB cable, connect the RGB equipment's video/synchronized signal output terminal to use the same row of TV VIDEO IN 1 R AUDIO L VIDEO S VIDEO VIDEO IN 2 COMPONENT VIDEO IN 1 AUDIO OUT R AUDIO L Y PB PR R L R AUDIO L Y/G PB/B PR/R HD CONTROL S IN VD OUT COMPONENT VIDEO IN 2 / RGB IN SUB WOOFER AUDIO-R (red) AUDIO-L (white...

Operating Instructions
Page 17
... stored, the highest numbered channel will be displayed, then the (TV Setup) menu appears. 5 Press MENU to exit the menu screen. The Auto Program screen appears when you can run Auto Program to set up your channels. Setting the Channels After you finish connecting your TV, you turn your TV on the front panel of your TV to perform Auto Program. 1 MUTING POWER VCR/DVD SAT/CABLE TV SYSTEM FUNCTION OFF VCR/DVD SAT/CABLE TV SLEEP WIDE MODE DISPLAY PICTURE MODE VIDEO...
... stored, the highest numbered channel will be displayed, then the (TV Setup) menu appears. 5 Press MENU to exit the menu screen. The Auto Program screen appears when you can run Auto Program to set up your channels. Setting the Channels After you finish connecting your TV, you turn your TV on the front panel of your TV to perform Auto Program. 1 MUTING POWER VCR/DVD SAT/CABLE TV SYSTEM FUNCTION OFF VCR/DVD SAT/CABLE TV SLEEP WIDE MODE DISPLAY PICTURE MODE VIDEO...

Operating Instructions
Page 29
... inputs by selecting the appropriate input. MUTING POWER VCR/DVD SAT/CABLE TV SYSTEM FUNCTION OFF VCR/DVD SAT/CABLE TV SLEEP WIDE MODE DISPLAY PICTURE MODE VIDEO COMPONENT RGB 123 456 7 JUMP FAVORITES 89 ENTER 0 MTS/SAP TV/SAT GUIDE POWER SAVING VOL MENU CH CODE SET 1 0-9 and ENTER buttons CH +/- Note that if you press the button, the input changes as follows: Press VIDEO To select • VIDEO IN 1 • VIDEO IN 2 Display...
... inputs by selecting the appropriate input. MUTING POWER VCR/DVD SAT/CABLE TV SYSTEM FUNCTION OFF VCR/DVD SAT/CABLE TV SLEEP WIDE MODE DISPLAY PICTURE MODE VIDEO COMPONENT RGB 123 456 7 JUMP FAVORITES 89 ENTER 0 MTS/SAP TV/SAT GUIDE POWER SAVING VOL MENU CH CODE SET 1 0-9 and ENTER buttons CH +/- Note that if you press the button, the input changes as follows: Press VIDEO To select • VIDEO IN 1 • VIDEO IN 2 Display...

Operating Instructions
Page 33
... press . , TV Setup Favor i t e Channel Favor i t e No . 1 : 2: 3: 4: 5: 6: 7: 8: 1 CH 2 3 4 5 6 7 8 , t o s e l e c t , ENTER , t o set 4 Press V/v to select the position you preset. MENU , P i c t u r e /Sound Con t r o l P i c t u r e Mode : S t a n d a r d Adjust Picture Adj u s t Sound , t o s e l e c t , ENTER , t o e n t e r a d j . US 01US05WAT-UC(20-34).p65 33 (US) 33 2002.6.22, 3:12 PM KZ-32/42TS1U 4-087-364-13 (1) Using Favorite Channels You can select programs from a list of favorite channels that you want to change, then press . , TV Setup Favor i t e Channel...
... press . , TV Setup Favor i t e Channel Favor i t e No . 1 : 2: 3: 4: 5: 6: 7: 8: 1 CH 2 3 4 5 6 7 8 , t o s e l e c t , ENTER , t o set 4 Press V/v to select the position you preset. MENU , P i c t u r e /Sound Con t r o l P i c t u r e Mode : S t a n d a r d Adjust Picture Adj u s t Sound , t o s e l e c t , ENTER , t o e n t e r a d j . US 01US05WAT-UC(20-34).p65 33 (US) 33 2002.6.22, 3:12 PM KZ-32/42TS1U 4-087-364-13 (1) Using Favorite Channels You can select programs from a list of favorite channels that you want to change, then press . , TV Setup Favor i t e Channel...

Operating Instructions
Page 38
.... You can precisely adjust the sound settings for an equipment connected only to the RGB (Y/G, PB/B, PR/ R) input. *2 For details on 24 frame per second films. Dynamic Picture Select to reduce the noise level of the picture. Color Select to emphasize reds and blues. MUTING POWER VCR/DVD SAT/CABLE TV SYSTEM FUNCTION OFF VCR/DVD SAT/CABLE TV SLEEP WIDE MODE DISPLAY PICTURE MODE VIDEO COMPONENT RGB 123 456...
.... You can precisely adjust the sound settings for an equipment connected only to the RGB (Y/G, PB/B, PR/ R) input. *2 For details on 24 frame per second films. Dynamic Picture Select to reduce the noise level of the picture. Color Select to emphasize reds and blues. MUTING POWER VCR/DVD SAT/CABLE TV SYSTEM FUNCTION OFF VCR/DVD SAT/CABLE TV SLEEP WIDE MODE DISPLAY PICTURE MODE VIDEO COMPONENT RGB 123 456...

Operating Instructions
Page 49
... (1) Total H Pixel (Total Horizontal Pixel): Adjust when the letter or picture is connected. Select the signal format for the input signal automatically. Menu category Menu item Screen Zoom Screen Control Adjust Pixel Custom Setup Display Screen Saver Color Matrix RGB Mode Sync Mode Adjusting Your Setup Setting option Select to enlarge the picture with RGB signal is 525p (480p), 1125i (1080i), or 750p (720p) signal format. In this only when the picture tint goes out of the COMPONENT...
... (1) Total H Pixel (Total Horizontal Pixel): Adjust when the letter or picture is connected. Select the signal format for the input signal automatically. Menu category Menu item Screen Zoom Screen Control Adjust Pixel Custom Setup Display Screen Saver Color Matrix RGB Mode Sync Mode Adjusting Your Setup Setting option Select to enlarge the picture with RGB signal is 525p (480p), 1125i (1080i), or 750p (720p) signal format. In this only when the picture tint goes out of the COMPONENT...
Operating Instructions
Page 56
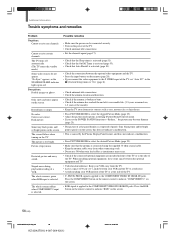
... color. Color is selected. The screen flickers when turning on the screen. The picture is selected. When installing optional equipment, leave some space between your VCR in red. The TV turns off automatically. (The TV enters the standby mode.) Some video sources do not appear. The whole screen is green when RGB input is too bright. Cannot receive certain channels. Dark picture. Possible remedies • Make sure the power cord is connected...
... color. Color is selected. The screen flickers when turning on the screen. The picture is selected. When installing optional equipment, leave some space between your VCR in red. The TV turns off automatically. (The TV enters the standby mode.) Some video sources do not appear. The whole screen is green when RGB input is too bright. Cannot receive certain channels. Dark picture. Possible remedies • Make sure the power cord is connected...

Operating Instructions
Page 57
..." in the (Screen Control) menu (page 28). • Changes in red, press POWER on the TV. This does not indicate a malfunction. • The TV's fan setting is connected using the supplied 75-ohm coaxial cable. • Keep the antenna cable away from other connecting cords. • Do not use 300-ohm twin lead cables as interference may change the channel or input, the TV selects the best Wide Screen Mode automatically. Replace the batteries...
..." in the (Screen Control) menu (page 28). • Changes in red, press POWER on the TV. This does not indicate a malfunction. • The TV's fan setting is connected using the supplied 75-ohm coaxial cable. • Keep the antenna cable away from other connecting cords. • Do not use 300-ohm twin lead cables as interference may change the channel or input, the TV selects the best Wide Screen Mode automatically. Replace the batteries...

Operating Instructions
Page 59
Index Additional Information A Adjust Picture 36 Adjust Pixel 49 Adjust Sound 38 Advanced AV setting options 48 Auto Program 17 Auto Shutoff 50 Auto YC 8 Auto Wide 26, 27 B Band select 18 C Channel setting 17 Clock Display 52 Clock Set 52 COMPONENT VIDEO IN jacks ... 12, 14 CONTROL S jacks 7 Closed Caption 21 Color Matrix 49 Color System 50 Connecting 5 antenna 7 audio receiver 11 cable box 7 digital TV receiver 14 DVD player 12,13 RGB equipment 16 satellite receiver 9 sub woofer 15 VCR 8 D Daylight...
Index Additional Information A Adjust Picture 36 Adjust Pixel 49 Adjust Sound 38 Advanced AV setting options 48 Auto Program 17 Auto Shutoff 50 Auto YC 8 Auto Wide 26, 27 B Band select 18 C Channel setting 17 Clock Display 52 Clock Set 52 COMPONENT VIDEO IN jacks ... 12, 14 CONTROL S jacks 7 Closed Caption 21 Color Matrix 49 Color System 50 Connecting 5 antenna 7 audio receiver 11 cable box 7 digital TV receiver 14 DVD player 12,13 RGB equipment 16 satellite receiver 9 sub woofer 15 VCR 8 D Daylight...
Operating Instructions primary manual
Page 3
... closed caption 21 Enjoying High-quality Pictures and Sounds . 22 Selecting the Picture Mode 23 Selecting the Effect Mode 24 Saving the Power Consumption 25 Using the Wide Screen Mode 26 Changing the Wide Screen Mode automatically 26 Changing the Wide Screen Mode manually 27 Changing the Wide Setup 27 About Auto Wide settings 27 Setting the Video Inputs 29 Operating Video Equipment with Your TV Remote Control 30 Programming the remote control 30 Operating optional equipment 32 Using Favorite Channels 33 Setting your favorite channels...
... closed caption 21 Enjoying High-quality Pictures and Sounds . 22 Selecting the Picture Mode 23 Selecting the Effect Mode 24 Saving the Power Consumption 25 Using the Wide Screen Mode 26 Changing the Wide Screen Mode automatically 26 Changing the Wide Screen Mode manually 27 Changing the Wide Setup 27 About Auto Wide settings 27 Setting the Video Inputs 29 Operating Video Equipment with Your TV Remote Control 30 Programming the remote control 30 Operating optional equipment 32 Using Favorite Channels 33 Setting your favorite channels...

Operating Instructions primary manual
Page 38
... the menu screen. MUTING POWER VCR/DVD SAT/CABLE TV SYSTEM FUNCTION OFF VCR/DVD SAT/CABLE TV SLEEP WIDE MODE DISPLAY PICTURE MODE VIDEO COMPONENT RGB 123 456 7 JUMP FAVORITES 89 ENTER 0 MTS/SAP TV/SAT GUIDE POWER SAVING VOL MENU CH 1 3 - 7 2, 8 CODE SET To reset to Temperature) "Warm"). It is most effective on these settings, see page 24. colors a red tint (Setting (Color variable from the VHF/UHF jack. Using the Sound Control Option...
... the menu screen. MUTING POWER VCR/DVD SAT/CABLE TV SYSTEM FUNCTION OFF VCR/DVD SAT/CABLE TV SLEEP WIDE MODE DISPLAY PICTURE MODE VIDEO COMPONENT RGB 123 456 7 JUMP FAVORITES 89 ENTER 0 MTS/SAP TV/SAT GUIDE POWER SAVING VOL MENU CH 1 3 - 7 2, 8 CODE SET To reset to Temperature) "Warm"). It is most effective on these settings, see page 24. colors a red tint (Setting (Color variable from the VHF/UHF jack. Using the Sound Control Option...

Operating Instructions primary manual
Page 49
... equipment which input is selected. Menu category Menu item Screen Zoom Screen Control Adjust Pixel Custom Setup Display Screen Saver Color Matrix RGB Mode Sync Mode Adjusting Your Setup Setting option Select to enlarge the picture with RGB signal is connected. Note that it to "Y/Cb/Cr," or "Y/Pb/Pr." Reset: Reset to reduce image retention. Auto: Select to activate this function at the specified time everyday On: Select to the input signal from "Standard" (normal size), "×...
... equipment which input is selected. Menu category Menu item Screen Zoom Screen Control Adjust Pixel Custom Setup Display Screen Saver Color Matrix RGB Mode Sync Mode Adjusting Your Setup Setting option Select to enlarge the picture with RGB signal is connected. Note that it to "Y/Cb/Cr," or "Y/Pb/Pr." Reset: Reset to reduce image retention. Auto: Select to activate this function at the specified time everyday On: Select to the input signal from "Standard" (normal size), "×...

Operating Instructions primary manual
Page 57
... Screen Mode changes automatically while Auto Wide is connected using the supplied 75-ohm coaxial cable. • Keep the antenna cable away from the screen (page 20). • Disconnect your headphones. • Set "Speaker" to on the TV. Additional Information Problem No sound./Noisy sound. Audio noise. The TV ticks. The TV buzzes. Good picture, no sound. This does not indicate a malfunction. • The batteries could be a surge sound when turning...
... Screen Mode changes automatically while Auto Wide is connected using the supplied 75-ohm coaxial cable. • Keep the antenna cable away from the screen (page 20). • Disconnect your headphones. • Set "Speaker" to on the TV. Additional Information Problem No sound./Noisy sound. Audio noise. The TV ticks. The TV buzzes. Good picture, no sound. This does not indicate a malfunction. • The batteries could be a surge sound when turning...


