
Child Safety: It Makes A Difference Where Your TV Stands
Page 1
... is large enough to support the weight of TVs such as VCRs and remotes that may cause unnecessary injury. Tune Into Safety 1 One size does NOT fit all. Sometimes televisions are improperly secured or inappropriately situated on top of your television (and other electronic components). 2 Use appropriate angle braces, straps and anchors to...
... is large enough to support the weight of TVs such as VCRs and remotes that may cause unnecessary injury. Tune Into Safety 1 One size does NOT fit all. Sometimes televisions are improperly secured or inappropriately situated on top of your television (and other electronic components). 2 Use appropriate angle braces, straps and anchors to...
Operating Instructions
Page 7
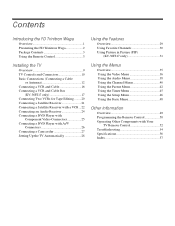
Contents Introducing the FD Trinitron Wega Overview 1 Presenting the FD Trinitron Wega 2 Package Contents 3 Using the Remote Control 3 Using the Features Overview 29 Using Favorite Channels 30 Using Picture in Picture (PIP) (KV-36FS17 only 31 Installing the TV Overview 9 TV Controls and Connectors 10 Basic Connections (Connecting a Cable or ... Connectors 26 Connecting a Camcorder 27 Setting Up the TV Automatically 28 Using the Menus Overview 35 Using the Video Menu 36 Using the Audio Menu 38 Using the Channel Menu 40 Using the Parent Menu 42 Using the Timer Menu 45 Using ...
Contents Introducing the FD Trinitron Wega Overview 1 Presenting the FD Trinitron Wega 2 Package Contents 3 Using the Remote Control 3 Using the Features Overview 29 Using Favorite Channels 30 Using Picture in Picture (PIP) (KV-36FS17 only 31 Installing the TV Overview 9 TV Controls and Connectors 10 Basic Connections (Connecting a Cable or ... Connectors 26 Connecting a Camcorder 27 Setting Up the TV Automatically 28 Using the Menus Overview 35 Using the Video Menu 36 Using the Audio Menu 38 Using the Channel Menu 40 Using the Parent Menu 42 Using the Timer Menu 45 Using ...
Operating Instructions
Page 9
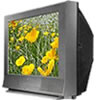
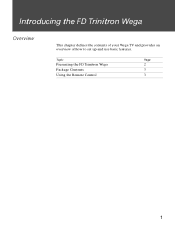
Introducing the FD Trinitron Wega Overview This chapter defines the contents of your Wega TV and provides an overview of how to set up and use basic features. Topic Page Presenting the FD Trinitron Wega 2 Package Contents 3 Using the Remote Control 3 1
Introducing the FD Trinitron Wega Overview This chapter defines the contents of your Wega TV and provides an overview of how to set up and use basic features. Topic Page Presenting the FD Trinitron Wega 2 Package Contents 3 Using the Remote Control 3 1
Operating Instructions
Page 11
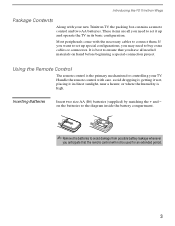
.... ✍ Remove the batteries to avoid damage from possible battery leakage whenever you may need to connect them. Using the Remote Control The remote control is the primary mechanism for an extended period. 3 Inserting Batteries Insert two size AA (R6) batteries (supplied) by...wet, placing it up special configurations, you anticipate that the remote control will not be used for controlling your new Trinitron TV, the packing box contains a remote control and two AA batteries. Introducing the FD Trinitron Wega Package Contents Along with your TV. Most peripherals come with...
.... ✍ Remove the batteries to avoid damage from possible battery leakage whenever you may need to connect them. Using the Remote Control The remote control is the primary mechanism for an extended period. 3 Inserting Batteries Insert two size AA (R6) batteries (supplied) by...wet, placing it up special configurations, you anticipate that the remote control will not be used for controlling your new Trinitron TV, the packing box contains a remote control and two AA batteries. Introducing the FD Trinitron Wega Package Contents Along with your TV. Most peripherals come with...
Operating Instructions
Page 12
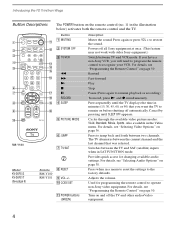
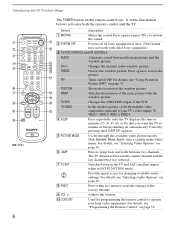
...access for programming the remote control to recognize your VCR. Turn on page 36. Press repeatedly until SLEEP OFF appears. Press to remain on before shutting off all Sony equipment at once. (This feature may not work with older Sony equipment.) Switch between the...equipment. 4 Adjusts the volume. Introducing the FD Trinitron Wega Button Descriptions The POWER button on page 38. Press again or press VOL + to the factory defaults. Powers off automatically. Used for changing available audio settings. RM-Y180 Model KV-36FS13 KV-36FS17 (See page 6) Button 1 MUTING ...
...access for programming the remote control to recognize your VCR. Turn on page 36. Press repeatedly until SLEEP OFF appears. Press to remain on before shutting off all Sony equipment at once. (This feature may not work with older Sony equipment.) Switch between the...equipment. 4 Adjusts the volume. Introducing the FD Trinitron Wega Button Descriptions The POWER button on page 38. Press again or press VOL + to the factory defaults. Powers off automatically. Used for changing available audio settings. RM-Y180 Model KV-36FS13 KV-36FS17 (See page 6) Button 1 MUTING ...
Operating Instructions
Page 13
...display the TV menu. Cycles through channels. 5 Displays the program guide of your TV's video inputs. Press to show which device the remote control is operating. Press once to turn Display off. Arrows and Select. Scan through the Multi-channel TV Sound (MTS) options: Stereo...selects the item. Press 0 - 9 to select immediately. Press ENTER to select a channel, the channel changes after 2 seconds. CH +/- Introducing the FD Trinitron Wega Button qs FUNCTION buttons (WHITE) qd TV/VIDEO qf DISPLAY qg MTS/SAP qh 0 - 9 and ENTER qj GUIDE qk Description Select the equipment (...
...display the TV menu. Cycles through channels. 5 Displays the program guide of your TV's video inputs. Press to show which device the remote control is operating. Press once to turn Display off. Arrows and Select. Scan through the Multi-channel TV Sound (MTS) options: Stereo...selects the item. Press 0 - 9 to select immediately. Press ENTER to select a channel, the channel changes after 2 seconds. CH +/- Introducing the FD Trinitron Wega Button qs FUNCTION buttons (WHITE) qd TV/VIDEO qf DISPLAY qg MTS/SAP qh 0 - 9 and ENTER qj GUIDE qk Description Select the equipment (...
Operating Instructions
Page 14
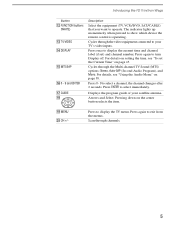
... qk SWAP ql Switches the position of the main picture with older Sony equipment.) 3 TV/VCR CONTROLS and PIP CONTROLS AUDIO qd qf CH+/- For details, see "Programming the Remote Control" on before shutting off automatically. Button Description 1 MUTING Mutes ...Options" on page 36. 6 JUMP Press to the factory defaults. 9 VOL +/- Introducing the FD Trinitron Wega 1 2 3 4 5 6 7 8 9 q; POSITION Moves the location of the VCR. For details, see "Selecting Video Options" on page 38. 8 RESET Press when in the illustration below) activates both the remote control and the...
... qk SWAP ql Switches the position of the main picture with older Sony equipment.) 3 TV/VCR CONTROLS and PIP CONTROLS AUDIO qd qf CH+/- For details, see "Programming the Remote Control" on before shutting off automatically. Button Description 1 MUTING Mutes ...Options" on page 36. 6 JUMP Press to the factory defaults. 9 VOL +/- Introducing the FD Trinitron Wega 1 2 3 4 5 6 7 8 9 q; POSITION Moves the location of the VCR. For details, see "Selecting Video Options" on page 38. 8 RESET Press when in the illustration below) activates both the remote control and the...
Operating Instructions
Page 15
.../DVD, SAT/CABLE) that you want to select a channel, the channel changes after 2 seconds. Displays the program guide of your TV's video inputs. Introducing the FD Trinitron Wega Button qa POWER buttons (GREEN) qs FUNCTION buttons (WHITE) qd TV/VIDEO qf ANT qg DISPLAY qh MTS/SAP qj 0 - 9 and ENTER qk GUIDE ql... through the video equipment connected to exit from the menus. Pressing down on the center button selects the item. Press to show which device the remote control is operating. Press again to your satellite antenna.
.../DVD, SAT/CABLE) that you want to select a channel, the channel changes after 2 seconds. Displays the program guide of your TV's video inputs. Introducing the FD Trinitron Wega Button qa POWER buttons (GREEN) qs FUNCTION buttons (WHITE) qd TV/VIDEO qf ANT qg DISPLAY qh MTS/SAP qj 0 - 9 and ENTER qk GUIDE ql... through the video equipment connected to exit from the menus. Pressing down on the center button selects the item. Press to show which device the remote control is operating. Press again to your satellite antenna.
Operating Instructions
Page 18
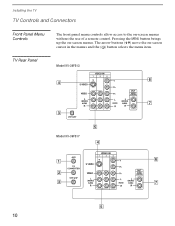
TV Rear Panel Model KV-36FS13 6 4 3 Model KV-36FS17 5 4 1 2 3 7 6 7 5 10 Installing the TV TV Controls and Connectors Front Panel Menu Controls The front panel menu controls allow access to the on -screen cursor in the menus and the ( ) button selects the menu item. The arrow buttons (Vv) move the on -screen menus without the use of a remote control. Pressing the MENU button brings up the on-screen menus.
TV Rear Panel Model KV-36FS13 6 4 3 Model KV-36FS17 5 4 1 2 3 7 6 7 5 10 Installing the TV TV Controls and Connectors Front Panel Menu Controls The front panel menu controls allow access to the on -screen cursor in the menus and the ( ) button selects the menu item. The arrow buttons (Vv) move the on -screen menus without the use of a remote control. Pressing the MENU button brings up the on-screen menus.

Operating Instructions
Page 19
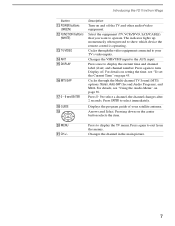
... Connects to your TV's audio through a cable box) and normal cable channels (CATV). Installing the TV Back Panel Descriptions Connection Description 1 AUX (KV-36FS17) Allows you set up your TV to the audio and video OUT jacks on your VCR or other S VIDEO-equipped video component. Provides better... audio inputs of your VCR or other video component. Devices connected to the AUX input cannot be viewed in PIP. 2TO CONVERTER (KV-36FS17) This is located on the remote control. You can use these outputs to listen to the S VIDEO OUT jack of your audio or video component.
... Connects to your TV's audio through a cable box) and normal cable channels (CATV). Installing the TV Back Panel Descriptions Connection Description 1 AUX (KV-36FS17) Allows you set up your TV to the audio and video OUT jacks on your VCR or other S VIDEO-equipped video component. Provides better... audio inputs of your VCR or other video component. Devices connected to the AUX input cannot be viewed in PIP. 2TO CONVERTER (KV-36FS17) This is located on the remote control. You can use these outputs to listen to the S VIDEO OUT jack of your audio or video component.

Operating Instructions
Page 21
... the TV Cable and Antenna (KV-36FS17 only) If your cable provider does not feature local channels, you may find this setup you can: ❑ Use the TV remote control to change channels on your cable box when the signal is scrambled. ❑ Use the TV remote control to change channels using the... CATV cable 1 Select antenna mode by pressing the ANT button on the remote control. (This is the preferred basic cable TV hookup to use the cable box - pressing ...
... the TV Cable and Antenna (KV-36FS17 only) If your cable provider does not feature local channels, you may find this setup you can: ❑ Use the TV remote control to change channels on your cable box when the signal is scrambled. ❑ Use the TV remote control to change channels using the... CATV cable 1 Select antenna mode by pressing the ANT button on the remote control. (This is the preferred basic cable TV hookup to use the cable box - pressing ...

Operating Instructions
Page 22
... lock in through the cable box, eliminating the need your TV tuner set to channel 3 or 4 (as necessary. (See "Programming the Remote Control" on page 50.) Then use the cable box to switch channels. To prevent the accidental switching of TV CATV cable (unscrambled channels) To... 4). Installing the TV (Continued from regular cable ❑ Press the ANT button on the cable box ❑ Program the remote control as appropriate) and then use the remote control to switch cable box channels. The TV's internal converter allows you need for an external splitter. 3 Using a coaxial ...
... lock in through the cable box, eliminating the need your TV tuner set to channel 3 or 4 (as necessary. (See "Programming the Remote Control" on page 50.) Then use the cable box to switch channels. To prevent the accidental switching of TV CATV cable (unscrambled channels) To... 4). Installing the TV (Continued from regular cable ❑ Press the ANT button on the cable box ❑ Program the remote control as appropriate) and then use the remote control to switch cable box channels. The TV's internal converter allows you need for an external splitter. 3 Using a coaxial ...

Operating Instructions
Page 25
... of the TV. ✍ If the VCR has an S VIDEO jack, you can : ❑ Use the TV remote control to change cable box channels when the signal is scrambled. ❑ Use the TV remote control to change TV channels when the signal is not scrambled. (Your TV's tuner provides a better signal than... to use a cable box, and ❑ You want to use an S VIDEO cable to improve picture quality; Installing the TV Connecting a VCR and Cable Box (KV-36FS17 only) Use this setup you can use the PIP feature.
... of the TV. ✍ If the VCR has an S VIDEO jack, you can : ❑ Use the TV remote control to change cable box channels when the signal is scrambled. ❑ Use the TV remote control to change TV channels when the signal is not scrambled. (Your TV's tuner provides a better signal than... to use a cable box, and ❑ You want to use an S VIDEO cable to improve picture quality; Installing the TV Connecting a VCR and Cable Box (KV-36FS17 only) Use this setup you can use the PIP feature.

Operating Instructions
Page 26
... box uses (channel 3 or 4). to change to another brand see "Programming the Remote Control" on page 50.) Then use the TV remote control to switch channels on the cable box ❑ Program the remote control as necessary. (By default, the remote control is set it to switch VCR channels. 18 Set the TV to... box Coaxial cable VCR TV AUDIO-R (red) AUDIO-L (white) VIDEO (yellow) A/V cable To view cable box channels ❑ Turn on the VCR and set for a Sony VCR;
... box uses (channel 3 or 4). to change to another brand see "Programming the Remote Control" on page 50.) Then use the TV remote control to switch channels on the cable box ❑ Program the remote control as necessary. (By default, the remote control is set it to switch VCR channels. 18 Set the TV to... box Coaxial cable VCR TV AUDIO-R (red) AUDIO-L (white) VIDEO (yellow) A/V cable To view cable box channels ❑ Turn on the VCR and set for a Sony VCR;
Operating Instructions
Page 27
Change the PIP channel via the cable box. (The cable box's tuner is needed because the cable box unscrambles only one channel at a time (unlike regular cable, which makes all channels available concurrently). 19 if you do not turn on the cable box and VCR. Use the remote control's TV/VIDEO (yellow) button to set the PIP output to VIDEO 1. Installing the TV To use PIP with the Cable Box ❑ Turn on the cable box, the PIP will not work.) ✍ This system is used as the PIP video source;
Change the PIP channel via the cable box. (The cable box's tuner is needed because the cable box unscrambles only one channel at a time (unlike regular cable, which makes all channels available concurrently). 19 if you do not turn on the cable box and VCR. Use the remote control's TV/VIDEO (yellow) button to set the PIP output to VIDEO 1. Installing the TV To use PIP with the Cable Box ❑ Turn on the cable box, the PIP will not work.) ✍ This system is used as the PIP video source;

Operating Instructions
Page 28
...; If the VCRs you are connecting have S VIDEO jacks, you can use S VIDEO cables to which the recording VCR is being recorded ❑ Use the remote control to set the TV to the video input to improve picture quality; Installing the TV Connecting Two VCRs for Tape Editing If you connect...
...; If the VCRs you are connecting have S VIDEO jacks, you can use S VIDEO cables to which the recording VCR is being recorded ❑ Use the remote control to set the TV to the video input to improve picture quality; Installing the TV Connecting Two VCRs for Tape Editing If you connect...

Operating Instructions
Page 31
Installing the TV To change VCR video input ❑ See your VCR's user's guide for instructions. To watch cable TV ❑ Use the TV/VIDEO on the remote control to select VHF/UHF source. 23 To watch satellite TV, or the VCR ❑ Use the TV/VIDEO on the remote control to select video source.
Installing the TV To change VCR video input ❑ See your VCR's user's guide for instructions. To watch cable TV ❑ Use the TV/VIDEO on the remote control to select VHF/UHF source. 23 To watch satellite TV, or the VCR ❑ Use the TV/VIDEO on the remote control to select video source.

Operating Instructions
Page 34
TV DVD player S VIDEO cable AUDIO-R (red) AUDIO-L (white) Audio cable To switch between your DVD player has component video, that connection (described on the remote control to switch from one input device to the TV's S VIDEO jack. Installing the TV Connecting a DVD Player with A/V Connectors Use this hookup if your ...
TV DVD player S VIDEO cable AUDIO-R (red) AUDIO-L (white) Audio cable To switch between your DVD player has component video, that connection (described on the remote control to switch from one input device to the TV's S VIDEO jack. Installing the TV Connecting a DVD Player with A/V Connectors Use this hookup if your ...

Operating Instructions
Page 35
... S VIDEO jack, you can use an S VIDEO cable to the TV's Audio and Video IN jacks. To view the camera's output ❑ Use the TV's remote control to set the appropriate input on the TV (VIDEO 2, in the illustration). 27
... S VIDEO jack, you can use an S VIDEO cable to the TV's Audio and Video IN jacks. To view the camera's output ❑ Use the TV's remote control to set the appropriate input on the TV (VIDEO 2, in the illustration). 27

Operating Instructions
Page 36
... set up the channels at this time, you turn on the TV. 2 Press the TV function button on the remote control. 3 Press CH+ on for all channel selection. to factory settings 1 Turn the TV on. 2 Hold down the RESET ...button on the remote control. 3 Press and release the POWER button on the TV. (The TV will turn itself off, then back on.) 4 ...need to run the Auto Setup or press CH- If you use the channel buttons on your remote control, be sure to set up your channels. If you do it .
... set up the channels at this time, you turn on the TV. 2 Press the TV function button on the remote control. 3 Press CH+ on for all channel selection. to factory settings 1 Turn the TV on. 2 Hold down the RESET ...button on the remote control. 3 Press and release the POWER button on the TV. (The TV will turn itself off, then back on.) 4 ...need to run the Auto Setup or press CH- If you use the channel buttons on your remote control, be sure to set up your channels. If you do it .


