Operating Instructions
Page 3
... of imprints are not covered by qualified personnel before operating it checked by your TV. These limits are registered trademarks of Sony Corporation. Trademarks and Copyrights As an ENERGY STAR® Partner, Sony Corporation has determined that interference will fit into the power outlet only one or ...are unable to the point of cable entry as close to insert the plug fully into the TV, unplug it and have it further. Use of station logos onto the TV screen. WEGA, FD Trinitron and Steady Sound are trademarks of the FCC rules. CAUTION RISK OF ELECTRIC SHOCK DO NOT ...
... of imprints are not covered by qualified personnel before operating it checked by your TV. These limits are registered trademarks of Sony Corporation. Trademarks and Copyrights As an ENERGY STAR® Partner, Sony Corporation has determined that interference will fit into the power outlet only one or ...are unable to the point of cable entry as close to insert the plug fully into the TV, unplug it and have it further. Use of station logos onto the TV screen. WEGA, FD Trinitron and Steady Sound are trademarks of the FCC rules. CAUTION RISK OF ELECTRIC SHOCK DO NOT ...
Operating Instructions
Page 4
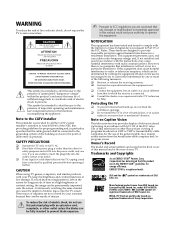
...TV and wait for necessary ventilation. If a snapping or popping sound from a TV...TV. An appliance and cart combination should be operated only from the type of the area where the TV... is not to protect it from the set , and to be equipped with a polarized alternating current line plug (a plug having one way. WARNING To guard against the possibility of the TV...unplug the TV and consult... is continuous or frequent while the TV is a safety feature. If the...moved with water for some TV sets to replace your dealer... sure of the type of this TV near the seashore may cause the ...
...TV and wait for necessary ventilation. If a snapping or popping sound from a TV...TV. An appliance and cart combination should be operated only from the type of the area where the TV... is not to protect it from the set , and to be equipped with a polarized alternating current line plug (a plug having one way. WARNING To guard against the possibility of the TV...unplug the TV and consult... is continuous or frequent while the TV is a safety feature. If the...moved with water for some TV sets to replace your dealer... sure of the type of this TV near the seashore may cause the ...
Operating Instructions
Page 7
Contents Introduction Introducing the FD Trinitron WEGA® Features 1 About this Manual...2 Batteries for the Remote Control 2 Front Panel Menu Controls ...2 Using the Remote Control Remote Control Description...3 Connecting Your TV TV Rear Panel ...5 Basic Connections ...6 Connecting Additional Equipment 7 Using Basic Functions Setting Up the TV...17 Quick Start to the Menus ...18 Using the Menus How...
Contents Introduction Introducing the FD Trinitron WEGA® Features 1 About this Manual...2 Batteries for the Remote Control 2 Front Panel Menu Controls ...2 Using the Remote Control Remote Control Description...3 Connecting Your TV TV Rear Panel ...5 Basic Connections ...6 Connecting Additional Equipment 7 Using Basic Functions Setting Up the TV...17 Quick Start to the Menus ...18 Using the Menus How...
Operating Instructions
Page 9
Sharpens picture definition to the on-screen menus without the use of the current program viewed, if available. ❏ Energy Star® - Lets you will enjoy include: ❏ FD Trinitron Flat CRT - Displays the name and the remaining time of a remote control. ❏ Front ... monitor what their children watch on TV by using audio technology to your purchase of the features you quickly connect video games, camcorders, or stereo/mono equipment. 1 Introducing the FD Trinitron WEGA® Features Some of the Sony FD Trinitron WEGA®. Allows access to give objects...
Sharpens picture definition to the on-screen menus without the use of the current program viewed, if available. ❏ Energy Star® - Lets you will enjoy include: ❏ FD Trinitron Flat CRT - Displays the name and the remaining time of a remote control. ❏ Front ... monitor what their children watch on TV by using audio technology to your purchase of the features you quickly connect video games, camcorders, or stereo/mono equipment. 1 Introducing the FD Trinitron WEGA® Features Some of the Sony FD Trinitron WEGA®. Allows access to give objects...

Operating Instructions
Page 10
...menus with your remote control. ❏ Use the button on the front panel to navigate through the menus, then select an item. Once your new TV. MADE IN MALASYA ✍ Under normal conditions, batteries will not be worn out. ✍ If you will last up to six months. Front... Panel Menu Controls The front panel controls allow you to access the menu without the remote control. ❏ Press to display the on-screen menu. ❏ Use the and buttons on the front panel instead of time, remove the batteries to avoid possible damage from battery leakage. About...
...menus with your remote control. ❏ Use the button on the front panel to navigate through the menus, then select an item. Once your new TV. MADE IN MALASYA ✍ Under normal conditions, batteries will not be worn out. ✍ If you will last up to six months. Front... Panel Menu Controls The front panel controls allow you to access the menu without the remote control. ❏ Press to display the on-screen menu. ❏ Use the and buttons on the front panel instead of time, remove the batteries to avoid possible damage from battery leakage. About...

Operating Instructions
Page 12
...SLEEP Press to return to factory settings while in approximately 15, 30, 45, 60, or 90 minutes. Turns the TV off automatically in an on -screen menus. Press when you want to display the current time (if set) and channel number. Press again to adjust the...Off). Cycles through the available Video Mode settings. Press 0 9 buttons to select or access an option. 9 RESET q; Press when you want to turn the TV on -screen menu. Remote Control Remote Control Description Button 1 MUTING 2 DISPLAY 3 MTS/SAP 4 JUMP 5 PICTURE MODE 6 VOL (volume) 7 8 Description Instantly turns off ...
...SLEEP Press to return to factory settings while in approximately 15, 30, 45, 60, or 90 minutes. Turns the TV off automatically in an on -screen menus. Press when you want to display the current time (if set) and channel number. Press again to adjust the...Off). Cycles through the available Video Mode settings. Press 0 9 buttons to select or access an option. 9 RESET q; Press when you want to turn the TV on -screen menu. Remote Control Remote Control Description Button 1 MUTING 2 DISPLAY 3 MTS/SAP 4 JUMP 5 PICTURE MODE 6 VOL (volume) 7 8 Description Instantly turns off ...
Operating Instructions
Page 13
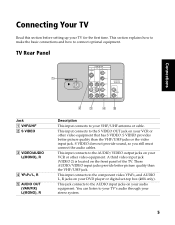
... explains how to make the basic connections and how to the component video YPBPR, and AUDIO L, R jacks on the front panel of the TV. A third video input jack (VIDEO 2) is located on your VCR or other video equipment. These AUDIO/VIDEO input jacks provide better picture ... jacks or the video input jack. You can listen to the AUDIO input jacks on your DVD player or digital set-top box (480i only). TV Rear Panel 1 3 S VIDEO 4 Y 1 PB AUDIO OUT (VAR/FIX) PR VIDEO L (MONO) L L (MONO) R R R Jack 1 VHF/UHF 2 S VIDEO 3 VIDEO/AUDIO L(MONO), R 4 YPBPR/ L, R 5 AUDIO OUT...
... explains how to make the basic connections and how to the component video YPBPR, and AUDIO L, R jacks on the front panel of the TV. A third video input jack (VIDEO 2) is located on your VCR or other video equipment. These AUDIO/VIDEO input jacks provide better picture ... jacks or the video input jack. You can listen to the AUDIO input jacks on your DVD player or digital set-top box (480i only). TV Rear Panel 1 3 S VIDEO 4 Y 1 PB AUDIO OUT (VAR/FIX) PR VIDEO L (MONO) L L (MONO) R R R Jack 1 VHF/UHF 2 S VIDEO 3 VIDEO/AUDIO L(MONO), R 4 YPBPR/ L, R 5 AUDIO OUT...
Operating Instructions
Page 14
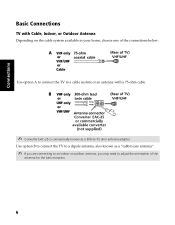
Connections Basic Connections TV with Cable, Indoor, or Outdoor Antenna Depending on the cable system available in your home, choose one of the connections below: Use option A to connect the TV to a cable system or an antenna with a 75-ohm cable. ✍ Converter EAC-25 is commercially known as a "rabbit ears antenna". ✍ If you are connecting to an indoor or outdoor antenna, you may need to -75 ohm antenna adapter. Use option B to connect the TV to a dipole antenna, also known as a 300-to adjust the orientation of the antenna for the best reception. 6
Connections Basic Connections TV with Cable, Indoor, or Outdoor Antenna Depending on the cable system available in your home, choose one of the connections below: Use option A to connect the TV to a cable system or an antenna with a 75-ohm cable. ✍ Converter EAC-25 is commercially known as a "rabbit ears antenna". ✍ If you are connecting to an indoor or outdoor antenna, you may need to -75 ohm antenna adapter. Use option B to connect the TV to a dipole antenna, also known as a 300-to adjust the orientation of the antenna for the best reception. 6

Operating Instructions
Page 15
...) L (MONO) R Audio R (red) Audio L (white) Video (yellow) Optional connection 1 Connect the coaxial cable from your TV antenna or cable service to the IN jack on your VCR. 2 Connect a coaxial cable (not supplied) from the OUT jack on... your VCR to Channel 3 or 4 (as set on the TV. Optional connection ❏ If your VCR is equipped with video outputs, you still must connect the audio ...cables (not supplied) from AUDIO/VIDEO OUT on your VCR to AUDIO/VIDEO IN on your TV. ❏ For better picture quality, use the button to switch between the VHF/UHF and...
...) L (MONO) R Audio R (red) Audio L (white) Video (yellow) Optional connection 1 Connect the coaxial cable from your TV antenna or cable service to the IN jack on your VCR. 2 Connect a coaxial cable (not supplied) from the OUT jack on... your VCR to Channel 3 or 4 (as set on the TV. Optional connection ❏ If your VCR is equipped with video outputs, you still must connect the audio ...cables (not supplied) from AUDIO/VIDEO OUT on your VCR to AUDIO/VIDEO IN on your TV. ❏ For better picture quality, use the button to switch between the VHF/UHF and...

Operating Instructions
Page 16
If you will be controlling all channels. Cable box 1 From cable/ antenna VIDEO AUDIO L AUDIO R LINE OUT 2 Rear of TV 1 3 S VIDEO 4 Y PB PR VIDEO L L (MONO) R R 1 Connect the coaxial cable from your cable service to the IN jack on your cable box. 2 Connect a coaxial cable (not ...supplied) from the OUT jack on your cable box to the VHF/UHF jack on your TV. ✍ To view channels from your cable box, tune your TV to channel 3 or 4 (as set on the rear panel of service, use this connection. Connections Connecting...
If you will be controlling all channels. Cable box 1 From cable/ antenna VIDEO AUDIO L AUDIO R LINE OUT 2 Rear of TV 1 3 S VIDEO 4 Y PB PR VIDEO L L (MONO) R R 1 Connect the coaxial cable from your cable service to the IN jack on your cable box. 2 Connect a coaxial cable (not ...supplied) from the OUT jack on your cable box to the VHF/UHF jack on your TV. ✍ To view channels from your cable box, tune your TV to channel 3 or 4 (as set on the rear panel of service, use this connection. Connections Connecting...
Operating Instructions
Page 17
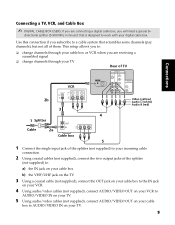
... Box ✍ DIGITAL CABLE BOX USERS: If you are receiving a scrambled signal ❏ change channels through your TV Rear of TV Connections 2b VCR LINE IN VIDEO AUDIO L AUDIO R LINE OUT 3 1 Splitter Cable 2a VIDEO AUDIO L AUDIO... cable system that is designed to AUDIO/VIDEO IN on your cable box to work with your TV. 9 directional splitter (5-900 Mhz mininum) that scrambles some channels (pay channels), but not all... supplied) to: a) the IN jack on your cable box b) the VHF/UHF jack on the TV 3 Using a coaxial cable (not supplied), connect the OUT jack on your cable box to the ...
... Box ✍ DIGITAL CABLE BOX USERS: If you are receiving a scrambled signal ❏ change channels through your TV Rear of TV Connections 2b VCR LINE IN VIDEO AUDIO L AUDIO R LINE OUT 3 1 Splitter Cable 2a VIDEO AUDIO L AUDIO... cable system that is designed to AUDIO/VIDEO IN on your cable box to work with your TV. 9 directional splitter (5-900 Mhz mininum) that scrambles some channels (pay channels), but not all... supplied) to: a) the IN jack on your cable box b) the VHF/UHF jack on the TV 3 Using a coaxial cable (not supplied), connect the OUT jack on your cable box to the ...

Operating Instructions
Page 18
S VIDEO does not provide sound, so you still must connect the audio cables. ✍ To view channels from your cable box, tune your TV to channel 3 or 4 (as set on the rear panel), instead of your cable box) and use S VIDEO (located on the rear panel of the yellow video cable. Connections Optional connection ❏ For better picture quality, use the cable box's remote control to change channels. ✍ If you will be controlling all channel selection through your cable box, you should consider using the Channel Fix feature by setting your TV to channel 3 or 4 (see page 25). 10
S VIDEO does not provide sound, so you still must connect the audio cables. ✍ To view channels from your cable box, tune your TV to channel 3 or 4 (as set on the rear panel), instead of your cable box) and use S VIDEO (located on the rear panel of the yellow video cable. Connections Optional connection ❏ For better picture quality, use the cable box's remote control to change channels. ✍ If you will be controlling all channel selection through your cable box, you should consider using the Channel Fix feature by setting your TV to channel 3 or 4 (see page 25). 10
Operating Instructions
Page 19
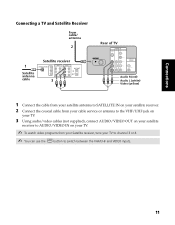
... Satellite Receiver From cable/ antenna 2 1 Satellite antenna cable Satellite receiver Y VIDEO 1 VIDEO 2 VIDEO 1 VIDEO 2 PB L L PR R R 3 Rear of TV 1 3 S VIDEO 4 Y PB PR VIDEO L L (MONO) R R AUDIO OUT (VAR/FIX) L (MONO) R Audio R (red) Audio L (white) Video (yellow) 1 Connect the cable from your satellite antenna ...to SATELLITE IN on your satellite receiver. 2 Connect the coaxial cable from your cable service or antenna to the VHF/UHF jack on your TV. 3 Using audio/video cables (not supplied), connect AUDIO/VIDEO OUT on your satellite receiver to AUDIO/VIDEO IN on your...
... Satellite Receiver From cable/ antenna 2 1 Satellite antenna cable Satellite receiver Y VIDEO 1 VIDEO 2 VIDEO 1 VIDEO 2 PB L L PR R R 3 Rear of TV 1 3 S VIDEO 4 Y PB PR VIDEO L L (MONO) R R AUDIO OUT (VAR/FIX) L (MONO) R Audio R (red) Audio L (white) Video (yellow) 1 Connect the cable from your satellite antenna ...to SATELLITE IN on your satellite receiver. 2 Connect the coaxial cable from your cable service or antenna to the VHF/UHF jack on your TV. 3 Using audio/video cables (not supplied), connect AUDIO/VIDEO OUT on your satellite receiver to AUDIO/VIDEO IN on your...

Operating Instructions
Page 20
... Splitter 3a Satellite receiver 3b For Viewing Y VIDEO 1 VIDEO 2 VIDEO 1 VIDEO 2 PB L L PR R R 4 For Recording LINE IN VIDEO AUDIO L AUDIO R LINE OUT VCR Rear of TV 1 3 S VIDEO 4 Y PB PR VIDEO L L (MONO) R R AUDIO OUT (VAR/FIX) L (MONO) R Video (yellow) Audio L (white) Audio R (red) 6 For Viewing 5 For Playback 1...the two output jacks of the splitter (not supplied) to: a) the IN jack on your satellite receiver b) the VHF/UHF jack on the TV 4 Using a coaxial cable (not supplied), connect the OUT jack on your satellite receiver to the VHF/UHF IN on your VCR. 5 Using ...
... Splitter 3a Satellite receiver 3b For Viewing Y VIDEO 1 VIDEO 2 VIDEO 1 VIDEO 2 PB L L PR R R 4 For Recording LINE IN VIDEO AUDIO L AUDIO R LINE OUT VCR Rear of TV 1 3 S VIDEO 4 Y PB PR VIDEO L L (MONO) R R AUDIO OUT (VAR/FIX) L (MONO) R Video (yellow) Audio L (white) Audio R (red) 6 For Viewing 5 For Playback 1...the two output jacks of the splitter (not supplied) to: a) the IN jack on your satellite receiver b) the VHF/UHF jack on the TV 4 Using a coaxial cable (not supplied), connect the OUT jack on your satellite receiver to the VHF/UHF IN on your VCR. 5 Using ...

Operating Instructions
Page 21
... the IN jack on your VCR. 3 Using a coaxial cables (not supplied), connect the OUT jack on your VCR to the VHF/UHF jack on your TV. 4 Using audio/video cables (not supplied), connect AUDIO/VIDEO OUT on your satellite receiver to AUDIO/VIDEO IN on your VCR. 5 Using audio/video cables... component video cables (not supplied), connect YPBPR OUT on your satellite receiver to YPBPR IN on your TV. 7 Connect AUDIO OUT on your satellite receiver to AUDIO IN on your TV. ✍ To view from the satellite receiver or VCR, select the video input to which your satellite receiver or VCR is...
... the IN jack on your VCR. 3 Using a coaxial cables (not supplied), connect the OUT jack on your VCR to the VHF/UHF jack on your TV. 4 Using audio/video cables (not supplied), connect AUDIO/VIDEO OUT on your satellite receiver to AUDIO/VIDEO IN on your VCR. 5 Using audio/video cables... component video cables (not supplied), connect YPBPR OUT on your satellite receiver to YPBPR IN on your TV. 7 Connect AUDIO OUT on your satellite receiver to AUDIO IN on your TV. ✍ To view from the satellite receiver or VCR, select the video input to which your satellite receiver or VCR is...

Operating Instructions
Page 22
...; The YPBPR outputs on your DVD player are sometimes labeled Y, CB, and CR or Y, B-Y, and R-Y. Rear of DVD Player Rear of TV 1 3 S VIDEO 4 Y PB PR VIDEO L L (MONO) R R AUDIO OUT (VAR/FIX) L (MONO) R Optional connection Video (yellow) Audio L (white) Audio R (red) Optional connection ❏ For better ...(VIDEO/AUDIO L(MONO),R) Using audio/video cables (not supplied), connect AUDIO/VIDEO OUT on your DVD player to AUDIO/VIDEO IN on your TV. Rear of TV Rear of the yellow video cable. Connections Connecting a DVD Player using component video cables (480i only).
...; The YPBPR outputs on your DVD player are sometimes labeled Y, CB, and CR or Y, B-Y, and R-Y. Rear of DVD Player Rear of TV 1 3 S VIDEO 4 Y PB PR VIDEO L L (MONO) R R AUDIO OUT (VAR/FIX) L (MONO) R Optional connection Video (yellow) Audio L (white) Audio R (red) Optional connection ❏ For better ...(VIDEO/AUDIO L(MONO),R) Using audio/video cables (not supplied), connect AUDIO/VIDEO OUT on your DVD player to AUDIO/VIDEO IN on your TV. Rear of TV Rear of the yellow video cable. Connections Connecting a DVD Player using component video cables (480i only).

Operating Instructions
Page 23
... cables (not supplied), connect AUDIO/VIDEO OUT on your camcorder to AUDIO/VIDEO IN on your stereo. 2 Set the Speaker option to Off. TV, AUX, TAPE2) on your TV. Front Panel A/V output Audio R (red) Audio L (white) Video (yellow) ❏ For better picture quality, use S VIDEO (located on page 23. S ...on page 23. 3 After you connect the audio system, you can use the Audio/Video inputs on either the front or rear panel of the TV. Connections Connecting an Audio System ✍ If you are connecting a Home Theater, please refer to your Home Theater manual for playback) To connect ...
... cables (not supplied), connect AUDIO/VIDEO OUT on your camcorder to AUDIO/VIDEO IN on your stereo. 2 Set the Speaker option to Off. TV, AUX, TAPE2) on your TV. Front Panel A/V output Audio R (red) Audio L (white) Video (yellow) ❏ For better picture quality, use S VIDEO (located on page 23. S ...on page 23. 3 After you connect the audio system, you can use the Audio/Video inputs on either the front or rear panel of the TV. Connections Connecting an Audio System ✍ If you are connecting a Home Theater, please refer to your Home Theater manual for playback) To connect ...

Operating Instructions
Page 24
... connecting a camcorder, use audio/video cables (not supplied) to connect AUDIO/VIDEO OUT on your first VCR to AUDIO/VIDEO IN on your TV. 16 Connections Connecting for Video Tape Editing (VCR and Camcorder) Camcorder (for playback) A/V output VCR (for playback) LINE IN VIDEO AUDIO L AUDIO... R LINE OUT 1b or 1a LINE IN VIDEO AUDIO L AUDIO R LINE OUT VCR (for recording) Rear of TV 1 3 S VIDEO 4 Y PB PR VIDEO L L (MONO) R R AUDIO OUT (VAR/FIX) L (MONO) R Audio R (red) Audio L (white) Video (yellow) 2 1 For video tape editing...
... connecting a camcorder, use audio/video cables (not supplied) to connect AUDIO/VIDEO OUT on your first VCR to AUDIO/VIDEO IN on your TV. 16 Connections Connecting for Video Tape Editing (VCR and Camcorder) Camcorder (for playback) A/V output VCR (for playback) LINE IN VIDEO AUDIO L AUDIO... R LINE OUT 1b or 1a LINE IN VIDEO AUDIO L AUDIO R LINE OUT VCR (for recording) Rear of TV 1 3 S VIDEO 4 Y PB PR VIDEO L L (MONO) R R AUDIO OUT (VAR/FIX) L (MONO) R Audio R (red) Audio L (white) Video (yellow) 2 1 For video tape editing...

Operating Instructions
Page 25
Press to select. 5 Press v to highlight Cable. The Initial Setup screen appears. To perform Auto Program again 1 Press . 2 Press b to highlight Channel Menu. 3 Press v to highlight Auto Program. During Auto Program, the TV will automatically search for channels. 6 After Auto Program finishes, press to exit. .... ✍ When you start Auto Program, or press to start Auto Program wait until you turn itself off, then back on the TV until it will turn on . 4 Release . 17 otherwise it is finished; Basic Functions Initial Setup First please connect cable/antenna Auto ...
Press to select. 5 Press v to highlight Cable. The Initial Setup screen appears. To perform Auto Program again 1 Press . 2 Press b to highlight Channel Menu. 3 Press v to highlight Auto Program. During Auto Program, the TV will automatically search for channels. 6 After Auto Program finishes, press to exit. .... ✍ When you start Auto Program, or press to start Auto Program wait until you turn itself off, then back on the TV until it will turn on . 4 Release . 17 otherwise it is finished; Basic Functions Initial Setup First please connect cable/antenna Auto ...
Operating Instructions
Page 26
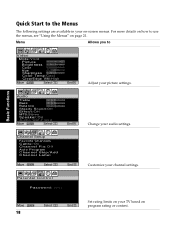
Customize your TV based on your channel settings. Move 18 Set rating limits on Select End program rating or content. Basic Functions Audio Treble Bass Balance Steady Sound:... Color Temp:Cool ClearEdge VM:High Move Select End Adjust your picture settings. Menu Allows you to use the menus, see "Using the Menus" on -screen menus.
Customize your TV based on your channel settings. Move 18 Set rating limits on Select End program rating or content. Basic Functions Audio Treble Bass Balance Steady Sound:... Color Temp:Cool ClearEdge VM:High Move Select End Adjust your picture settings. Menu Allows you to use the menus, see "Using the Menus" on -screen menus.


