Operating Instructions
Page 3
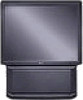
... Green S-Link operation buttons Pink DVD Player operation buttons For a detailed explanation of the buttons on the remote control are presented in different colors to represent the available functions. Remote Control In the instructions that follow, we will MUTING refer to the buttons on page 20. SYSTEM ... MODE CC MTS/SAP DISPLAY 123 456 789 JUMP ENTER 0 INDEX GUIDE RESET VOL MENU CH CODE SET TV POWER (pages 20, 48, 49) FUNCTION (pages 20, 48, 49) PIP operation buttons (page 23) TV/VIDEO (pages 21, 23) ANT (page 24) DISPLAY (page 21) MTS/SAP (pages 22, 27) ENTER ...
... Green S-Link operation buttons Pink DVD Player operation buttons For a detailed explanation of the buttons on the remote control are presented in different colors to represent the available functions. Remote Control In the instructions that follow, we will MUTING refer to the buttons on page 20. SYSTEM ... MODE CC MTS/SAP DISPLAY 123 456 789 JUMP ENTER 0 INDEX GUIDE RESET VOL MENU CH CODE SET TV POWER (pages 20, 48, 49) FUNCTION (pages 20, 48, 49) PIP operation buttons (page 23) TV/VIDEO (pages 21, 23) ANT (page 24) DISPLAY (page 21) MTS/SAP (pages 22, 27) ENTER ...
Operating Instructions
Page 4
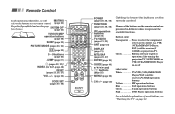
... Your SET UP (menus) ... 25 Learning Menu Selection 25 Using the Video Menu 26 Using the Audio Menu 27 Using the Timer Menu 29 ch Using the Channel Set Up Menu ...... 30 Setting and Selecting Favorite Channel .. 32 Using the Set Up Menu 34 Using the Parental Control Feature ......... 36 Activating... 13 Connecting two VCRs for tape editing 14 Connecting a DVD Player 15 Connecting a DVD Player with component video output connectors 15 Connecting an audio system 16 Connecting a Sony SAVA series speaker system 17 Basic Set Up 18 Using the Remote Control 18 Setting Up the Projection TV...
... Your SET UP (menus) ... 25 Learning Menu Selection 25 Using the Video Menu 26 Using the Audio Menu 27 Using the Timer Menu 29 ch Using the Channel Set Up Menu ...... 30 Setting and Selecting Favorite Channel .. 32 Using the Set Up Menu 34 Using the Parental Control Feature ......... 36 Activating... 13 Connecting two VCRs for tape editing 14 Connecting a DVD Player 15 Connecting a DVD Player with component video output connectors 15 Connecting an audio system 16 Connecting a Sony SAVA series speaker system 17 Basic Set Up 18 Using the Remote Control 18 Setting Up the Projection TV...
Operating Instructions
Page 13
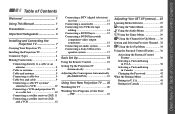
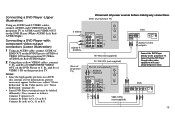
...or encoded signals requiring a cable box* only for certain channels (e.g. HBO, SHOWTIME, etc.) *Cable box (Rear of projection TV) VHF/UHF and • UHF EAC-66 U/V mixer (not supplied) 300-ohm twin .... Notes: • You may find it convenient to "On" in the Channel Set Up menu (page 31). Also, set up if your cable box. (see "Operating a Cable Box or Satellite ...8226; During PIP or Favorite Channel viewing, the AUX input can only be able to program your Sony remote control to operate your cable provider does not feature local channels that require a cable box* to...
...or encoded signals requiring a cable box* only for certain channels (e.g. HBO, SHOWTIME, etc.) *Cable box (Rear of projection TV) VHF/UHF and • UHF EAC-66 U/V mixer (not supplied) 300-ohm twin .... Notes: • You may find it convenient to "On" in the Channel Set Up menu (page 31). Also, set up if your cable box. (see "Operating a Cable Box or Satellite ...8226; During PIP or Favorite Channel viewing, the AUX input can only be able to program your Sony remote control to operate your cable provider does not feature local channels that require a cable box* to...
Operating Instructions
Page 19
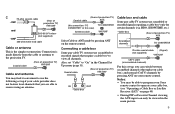
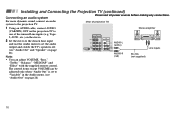
... supplied) 15 In this case, adjust "Noise Reduction" in the Video menu. (see "Noise Reduction" on page 26) • Some DVD Player terminals may appear. Disconnect all power sources before making any connections. (Rear of projection TV) AUX S VIDEO IN VIDEO 1 VIDEO 3 S VIDEO OUT MONITOR AUDIO (VAR/FIX) VIDEO Y VIDEO L (MONO) AUDIO R AUDIO-R AUDIO-L PB PR COMPONENT L (MONO) AUDIO...
... supplied) 15 In this case, adjust "Noise Reduction" in the Video menu. (see "Noise Reduction" on page 26) • Some DVD Player terminals may appear. Disconnect all power sources before making any connections. (Rear of projection TV) AUX S VIDEO IN VIDEO 1 VIDEO 3 S VIDEO OUT MONITOR AUDIO (VAR/FIX) VIDEO Y VIDEO L (MONO) AUDIO R AUDIO-R AUDIO-L PB PR COMPONENT L (MONO) AUDIO...
Operating Instructions
Page 20
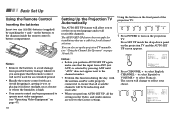
... and use the Audio menu to "Variable" in the Audio menu. (see "Audio Out" and "Speaker" on the projection TV to Stereo amplifier one of projection TV) 1 Using an AUDIO cable, connect AUDIO (VAR/FIX) OUT on page 28) Note: CONTROL S OUT IN VIDEO 1 VIDEO 3 S VIDEO OUT MONITOR AUDIO (VAR/FIX) VIDEO Y VIDEO L (MONO) AUDIO R L PB (MONO... (continued) Connecting an audio system Disconnect all power sources before making any connections. For more dynamic sound, connect an audio system to the projection TV. (Rear of the unused Line inputs (e.g.
... and use the Audio menu to "Variable" in the Audio menu. (see "Audio Out" and "Speaker" on the projection TV to Stereo amplifier one of projection TV) 1 Using an AUDIO cable, connect AUDIO (VAR/FIX) OUT on page 28) Note: CONTROL S OUT IN VIDEO 1 VIDEO 3 S VIDEO OUT MONITOR AUDIO (VAR/FIX) VIDEO Y VIDEO L (MONO) AUDIO R L PB (MONO... (continued) Connecting an audio system Disconnect all power sources before making any connections. For more dynamic sound, connect an audio system to the projection TV. (Rear of the unused Line inputs (e.g.
Operating Instructions
Page 22
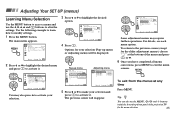
... antenna. The screen will allow you to set the on-screen language and set up the projection TV manually. (see "Using the Channel Set Up menu" on the projection TV and the AUTO SET UP screen appears. VOLUME + - Using the buttons on page 47) 18 Setting Up the Projection TV ...Automatically The AUTO SET UP feature will change to reflect your choice. - Avoid dropping it, getting it wet, or placing it in the Video, and Audio menus are reset to the factory settings. CHANNEL + POWER TIMER/STAND BY 1 Press POWER to select English, CHANNEL - to select Español...
... antenna. The screen will allow you to set the on-screen language and set up the projection TV manually. (see "Using the Channel Set Up menu" on the projection TV and the AUTO SET UP screen appears. VOLUME + - Using the buttons on page 47) 18 Setting Up the Projection TV ...Automatically The AUTO SET UP feature will change to reflect your choice. - Avoid dropping it, getting it wet, or placing it in the Video, and Audio menus are reset to the factory settings. CHANNEL + POWER TIMER/STAND BY 1 Press POWER to select English, CHANNEL - to select Español...

Operating Instructions
Page 23
3 Press VOLUME - Yes : [CH+] No : [CH-] To perform AUTO SET UP again SET UP MENU FLASH FOCUS TV/VIDEO 4 Press CHANNEL + to adjust the convergence. Before you use your projection TV, be displayed on page 35. The FLASH FOCUS feature allows you perform any ... SET UP again to work. The cross pattern appears and FLASH FOCUS begins to exit. VOLUME + Continue to continue. - If they do not converge, the color is first turned on. • You can also perform FLASH FOCUS using the Set Up...
3 Press VOLUME - Yes : [CH+] No : [CH-] To perform AUTO SET UP again SET UP MENU FLASH FOCUS TV/VIDEO 4 Press CHANNEL + to adjust the convergence. Before you use your projection TV, be displayed on page 35. The FLASH FOCUS feature allows you perform any ... SET UP again to work. The cross pattern appears and FLASH FOCUS begins to exit. VOLUME + Continue to continue. - If they do not converge, the color is first turned on. • You can also perform FLASH FOCUS using the Set Up...

Operating Instructions
Page 24
... on your personal preference. To restore sound, press again or press VOL +. 20 PICTURE MODE Press PICTURE MODE repeatedly to directly choose one of the Video menu according to display a finely detailed picture for direct channel selection. The following chart will dim three seconds later. down ). Movie: Select to your remote control... control for immediate selection. Using Your New Projection TV (continued) Watching the TV Many TV features can also perform the "Picture Adjustment" (such as "Brightness," "Color," etc.) to mute the sound. down ).
... on your personal preference. To restore sound, press again or press VOL +. 20 PICTURE MODE Press PICTURE MODE repeatedly to directly choose one of the Video menu according to display a finely detailed picture for direct channel selection. The following chart will dim three seconds later. down ). Movie: Select to your remote control... control for immediate selection. Using Your New Projection TV (continued) Watching the TV Many TV features can also perform the "Picture Adjustment" (such as "Brightness," "Color," etc.) to mute the sound. down ).

Operating Instructions
Page 25
... the desired picture. The SAP indication disappears and the other indications dim three seconds later. This is displayed in the Set Up menu, your projection TV will jump between two channels. To turn the display off, press DISPLAY again. (continued) REFER TO THE ILLUSTRATION... picture while viewing the normal picture of the window picture, press V, v, B or b. Press FREEZE again to scroll through available video inputs: TV, VIDEO 1, VIDEO 2 and VIDEO 3. If you need to copy down information that appears on page 35) JUMP FREEZE (yellow labeled button) Press to alternate or ...
... the desired picture. The SAP indication disappears and the other indications dim three seconds later. This is displayed in the Set Up menu, your projection TV will jump between two channels. To turn the display off, press DISPLAY again. (continued) REFER TO THE ILLUSTRATION... picture while viewing the normal picture of the window picture, press V, v, B or b. Press FREEZE again to scroll through available video inputs: TV, VIDEO 1, VIDEO 2 and VIDEO 3. If you need to copy down information that appears on page 35) JUMP FREEZE (yellow labeled button) Press to alternate or ...
Operating Instructions
Page 29
... the front drop-down panel of the menu and press or B. 6 Once you have completed all menu corrections, press MENU to exit the menu screens. Set Up Parental Control Caption Vision: CC1 Language: English Video Label Flash Focus: No ch Move Select Exit MENU 4 Press . Pop-up menu or Adjusting menu) will reappear. Use the following example to...
... the front drop-down panel of the menu and press or B. 6 Once you have completed all menu corrections, press MENU to exit the menu screens. Set Up Parental Control Caption Vision: CC1 Language: English Video Label Flash Focus: No ch Move Select Exit MENU 4 Press . Pop-up menu or Adjusting menu) will reappear. Use the following example to...
Operating Instructions
Page 30
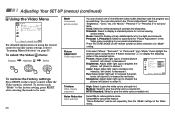
...decrease it . Medium: Select to give the white colors a reddish tint. Adjusting Your SET UP (menus) (continued) Using the Video Menu Video Mode: Vivid Picture Adjustment Trinitone: High Noise Reduction :Off ch Move Select Exit MENU For detailed information on using the V or v...," "Personal 1" or "Personal 2" from the "Mode" settings of the Video menu. Select Off to increase color intensity; Picture Brightness Color Hue ch Sharpness Color: Adjust slider right (up ) to give the white colors a blueish tint. Sharpness: Adjust slider right (up ) to sharpen the ...
...decrease it . Medium: Select to give the white colors a reddish tint. Adjusting Your SET UP (menus) (continued) Using the Video Menu Video Mode: Vivid Picture Adjustment Trinitone: High Noise Reduction :Off ch Move Select Exit MENU For detailed information on using the V or v...," "Personal 1" or "Personal 2" from the "Mode" settings of the Video menu. Select Off to increase color intensity; Picture Brightness Color Hue ch Sharpness Color: Adjust slider right (up ) to give the white colors a blueish tint. Sharpness: Adjust slider right (up ) to sharpen the ...
Operating Instructions
Page 31
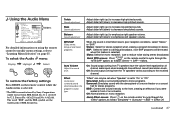
...Sound output coming from BBE Sound, Inc. Quick Effect access: Press on the remote control to increase low pitched sounds. Using the Audio Menu Audio Treble Bass Balance } Sliders MTS/SAP: Stereo Auto Volume: On ch Effect: Surround Speaker: On Audio Out: Variable SAVA SP Control... type. Off: Normal stereo or mono reception. Effect Customizes surround sound effects based on the remote control while the Audio menu is selected. * The BBE is covered by Sony Corporation under license from the TV speakers varies according to "On" or "Off." Adjust slider left (down ) to...
...Sound output coming from BBE Sound, Inc. Quick Effect access: Press on the remote control to increase low pitched sounds. Using the Audio Menu Audio Treble Bass Balance } Sliders MTS/SAP: Stereo Auto Volume: On ch Effect: Surround Speaker: On Audio Out: Variable SAVA SP Control... type. Off: Normal stereo or mono reception. Effect Customizes surround sound effects based on the remote control while the Audio menu is selected. * The BBE is covered by Sony Corporation under license from the TV speakers varies according to "On" or "Off." Adjust slider left (down ) to...
Operating Instructions
Page 33
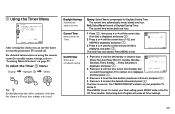
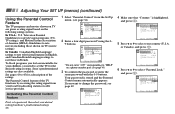
...Current Time On / Off Timer ch --Move - - : - - Daylight Savings Automatically adjusts the time. Press MENU to "Learning Menu Selection" on page 25. To select the Timer menu: Display / Highlight / Select MENU Tip z Set daylight saving time before setting the clock. Current Time Necessary for Daylight Saving Time. The current time ...Every Sunday, ... Fall: Select No at the end of days On/Off Timer (Every Sun-Sat, Every Mon-Fri, Sunday, Monday, ... Press MENU to turn the projection TV on your timer setting, press RESET while in the On/ Off Timer window. AM Select Exit...
...Current Time On / Off Timer ch --Move - - : - - Daylight Savings Automatically adjusts the time. Press MENU to "Learning Menu Selection" on page 25. To select the Timer menu: Display / Highlight / Select MENU Tip z Set daylight saving time before setting the clock. Current Time Necessary for Daylight Saving Time. The current time ...Every Sunday, ... Fall: Select No at the end of days On/Off Timer (Every Sun-Sat, Every Mon-Fri, Sunday, Monday, ... Press MENU to turn the projection TV on your timer setting, press RESET while in the On/ Off Timer window. AM Select Exit...
Operating Instructions
Page 34
... Caption Easy recognition of the channel you were watching). (for up to 32 channels of the caption and press to select it. Move Select Exit MENU The Favorite Channel feature enables easy access to display the first letter or number of VHF/ UHF input. Channel Caption Channel: Caption: - -- - - ---... to set up to five digits are watching Favorite Channel User's favorite channels You can view the channel that is selected with the Channel Caption menu in the sub screen. 2 Press . 3 Press V or v to the eight channels that you preset (or the last channel that you are selected. 4 ...
... Caption Easy recognition of the channel you were watching). (for up to 32 channels of the caption and press to select it. Move Select Exit MENU The Favorite Channel feature enables easy access to display the first letter or number of VHF/ UHF input. Channel Caption Channel: Caption: - -- - - ---... to set up to five digits are watching Favorite Channel User's favorite channels You can view the channel that is selected with the Channel Caption menu in the sub screen. 2 Press . 3 Press V or v to the eight channels that you preset (or the last channel that you are selected. 4 ...
Operating Instructions
Page 35
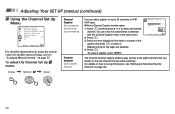
... If you can also use Channel Skip/Add ch 1: Skip 2: Skip 3: Add 4: Add 5: Add 6: Add 7: Add 8: Add 9: Add Select a channel Move Select Exit MENU CH +/- When all receivable channels. You can view the channel that is displayed. or 0-9 and ENTER buttons. 2 Press . 3 Press V or v to cancel Auto Program. ...signal the projection TV to automatically program all the receivable channels are stored, the lowest numbered channel is selected with the Channel Skip/Add menu in the sub screen. Select On if your projection TV is connected to an antenna. 31 Select Off if your projection TV is...
... If you can also use Channel Skip/Add ch 1: Skip 2: Skip 3: Add 4: Add 5: Add 6: Add 7: Add 8: Add 9: Add Select a channel Move Select Exit MENU CH +/- When all receivable channels. You can view the channel that is displayed. or 0-9 and ENTER buttons. 2 Press . 3 Press V or v to cancel Auto Program. ...signal the projection TV to automatically program all the receivable channels are stored, the lowest numbered channel is selected with the Channel Skip/Add menu in the sub screen. Select On if your projection TV is connected to an antenna. 31 Select Off if your projection TV is...

Operating Instructions
Page 36
... 4. 20 5. 30 6. 40 7. 50 8. 100 Select a channel 5 Use V and v to program other favorite channels. (Follow steps 3 and 4.) 6 Press MENU when you want to input your projection TV enables easy access to select "Manual" and press . When "Favorite Channel" is "Auto." Favorite Channel ch 1. 1 CNN...Favorite Channel" is set to select a position (1-8), and press . The factory setting for use. Move Select Exit MENU 32 Setting Favorite Channel manually 1 Select "Favorite Channel" from the Channel Set Up menu. (see "Channel Caption" on page 30) Favorite Channel ch 1. 1 CNN 2. 2 3. 10 SPTN 4. ...
... 4. 20 5. 30 6. 40 7. 50 8. 100 Select a channel 5 Use V and v to program other favorite channels. (Follow steps 3 and 4.) 6 Press MENU when you want to input your projection TV enables easy access to select "Manual" and press . When "Favorite Channel" is "Auto." Favorite Channel ch 1. 1 CNN...Favorite Channel" is set to select a position (1-8), and press . The factory setting for use. Move Select Exit MENU 32 Setting Favorite Channel manually 1 Select "Favorite Channel" from the Channel Set Up menu. (see "Channel Caption" on page 30) Favorite Channel ch 1. 1 CNN 2. 2 3. 10 SPTN 4. ...

Operating Instructions
Page 37
...of your favorite channel choices. Favorite Channel ch 1. 6 2. 2 3. 10 SPTN 4. 20 5. 30 6. 40 7. 50 8. 100 Select a channel Press MENU when you wish to watch. 1 Press once. The picture of the selected channel will be displayed in "Setting Favorite Channel manually" (skip step 2 if "Manual..." is already selected). The favorite channel menu and a window picture will be superimposed over the current channel. Press V or v to change and press . The window picture displays...
...of your favorite channel choices. Favorite Channel ch 1. 6 2. 2 3. 10 SPTN 4. 20 5. 30 6. 40 7. 50 8. 100 Select a channel Press MENU when you wish to watch. 1 Press once. The picture of the selected channel will be displayed in "Setting Favorite Channel manually" (skip step 2 if "Manual..." is already selected). The favorite channel menu and a window picture will be superimposed over the current channel. Press V or v to change and press . The window picture displays...

Operating Instructions
Page 38
...Caption Vision. Adjusting Your SET UP (menus) (continued) Using the Set Up Menu Set Up Parental Control Caption Vision: CC1 Language: English Video Label Flash Focus: No ch Move Select Exit MENU For detailed information on using either half or the whole screen. To display "...the same time. Set Up Parental Control Caption Vision: C C 1 Language: CC2 Video Label CC3 F l a s h F o c u s : C CN4o ch Text1 Text2 Text3 Text4 CC 1, CC 2, CC 3 or CC 4 displays a printed Move Select Exit MENU version of the dialogue or sound effects of the intended text. • XDS,...
...Caption Vision. Adjusting Your SET UP (menus) (continued) Using the Set Up Menu Set Up Parental Control Caption Vision: CC1 Language: English Video Label Flash Focus: No ch Move Select Exit MENU For detailed information on using either half or the whole screen. To display "...the same time. Set Up Parental Control Caption Vision: C C 1 Language: CC2 Video Label CC3 F l a s h F o c u s : C CN4o ch Text1 Text2 Text3 Text4 CC 1, CC 2, CC 3 or CC 4 displays a printed Move Select Exit MENU version of the dialogue or sound effects of the intended text. • XDS,...
Operating Instructions
Page 39
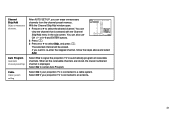
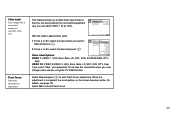
... VIDEO1: Video1 VIDEO2: VHS VIDEO3: 8mm Beta LD SAT DVD AV RECEIVER DTV Skip Move Select Exit MENU VIDEO 1: VIDEO 1, VHS, 8mm, Beta, LD, SAT, DVD, AV RECEIVER, DTV, Skip VIDEO 2/3: VIDEO 2/VIDEO 3, VHS, 8mm, Beta, LD, SAT, DVD, DTV, Skip If you select "Skip," your projection TV will ...when you to cancel Flash Focus. 35 Select Yes and press to select the label and press . Video Label VIDEO1: VIDEO2: VIDEO3: VIDEO1 VIDEO2 VIDEO3 With the Video Label window open: Move Select Exit MENU 1 Press V or v to select the input mode you want to label and press . 2 Press...
... VIDEO1: Video1 VIDEO2: VHS VIDEO3: 8mm Beta LD SAT DVD AV RECEIVER DTV Skip Move Select Exit MENU VIDEO 1: VIDEO 1, VHS, 8mm, Beta, LD, SAT, DVD, AV RECEIVER, DTV, Skip VIDEO 2/3: VIDEO 2/VIDEO 3, VHS, 8mm, Beta, LD, SAT, DVD, DTV, Skip If you select "Skip," your projection TV will ...when you to cancel Flash Focus. 35 Select Yes and press to select the label and press . Video Label VIDEO1: VIDEO2: VIDEO3: VIDEO1 VIDEO2 VIDEO3 With the Video Label window open: Move Select Exit MENU 1 Press V or v to select the input mode you want to label and press . 2 Press...
Operating Instructions
Page 40
.... In U.S.A.: U.S. Parental Control Country: U.S.A. Set Up Parental Control C a p t i o n VCi soinofni r: m L a n g u a g eP: a s s w o r d V i d e o L a b e_l _ _ _ ch Flash Focus: No Move Select Exit MENU * Do not enter "4357" corresponding to 45 for the desired rating systems. Sony's predetermined ratings are also available. To block programs you want to select your local broadcasting station or cable service...
.... In U.S.A.: U.S. Parental Control Country: U.S.A. Set Up Parental Control C a p t i o n VCi soinofni r: m L a n g u a g eP: a s s w o r d V i d e o L a b e_l _ _ _ ch Flash Focus: No Move Select Exit MENU * Do not enter "4357" corresponding to 45 for the desired rating systems. Sony's predetermined ratings are also available. To block programs you want to select your local broadcasting station or cable service...


