
The Sony Guide to Home Theater
Page 17
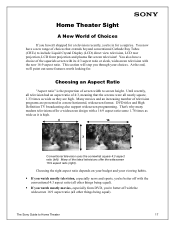
... view television, LCD rear projection, LCD front projection and plasma flat screen television! That's why many modern televisions offer a widescreen design with a 16:9 aspect ratio some features worth looking for a surprise. You now have a choice of the latest televisions offer the widescreen 16:9 aspect ratio (right). DVD titles and High Definition TV broadcasting also... with the new 16:9 aspect ratio. Choosing an Aspect Ratio "Aspect ratio" is high. 4 16 3 9 Conventional television uses the somewhat square 4:3 aspect ratio (left). The Sony Guide to Home Theater 17
... view television, LCD rear projection, LCD front projection and plasma flat screen television! That's why many modern televisions offer a widescreen design with a 16:9 aspect ratio some features worth looking for a surprise. You now have a choice of the latest televisions offer the widescreen 16:9 aspect ratio (right). DVD titles and High Definition TV broadcasting also... with the new 16:9 aspect ratio. Choosing an Aspect Ratio "Aspect ratio" is high. 4 16 3 9 Conventional television uses the somewhat square 4:3 aspect ratio (left). The Sony Guide to Home Theater 17

The Sony Guide to Home Theater
Page 20
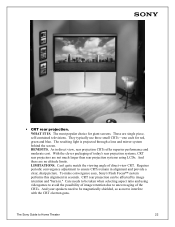
... filter light generated by a network of the screen. So they are no convergence. And there are somewhat limited in plastic. LIMITATIONS. LCD is driven by a lamp behind the screen. They're immune from "burn-in," so there's never any harm from videogames left ...liquid sandwiched in viewing angle and contrast ratio. The Sony Guide to appear in front projectors, rear-projection TVs, and flat-panel displays. Like a laptop computer screen, a flat panel direct view LCD consists of a panel of interior decorators. Currently LCD televisions cost more and they 're ideal from your...
... filter light generated by a network of the screen. So they are no convergence. And there are somewhat limited in plastic. LIMITATIONS. LCD is driven by a lamp behind the screen. They're immune from "burn-in," so there's never any harm from videogames left ...liquid sandwiched in viewing angle and contrast ratio. The Sony Guide to appear in front projectors, rear-projection TVs, and flat-panel displays. Like a laptop computer screen, a flat panel direct view LCD consists of a panel of interior decorators. Currently LCD televisions cost more and they 're ideal from your...
The Sony Guide to Home Theater
Page 22
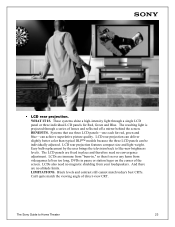
.... As in seconds. LIMITATIONS. Care needs to be taken when selecting aspect ratio and using LCDs. They typically use three small CRTs-one each for giant screens. CRT rear projection can be magnetically shielded, so as not to Home Theater 22 And there are single ...affected by image retention and "burn in alignment and provide a clear, sharp picture. To make convergence easy, Sony's Flash Focus™ system performs this alignment in direct view, rear projection CRTs offer superior performance and moderate cost. The most popular choice for red, green and blue. BENEFITS....
.... As in seconds. LIMITATIONS. Care needs to be taken when selecting aspect ratio and using LCDs. They typically use three small CRTs-one each for giant screens. CRT rear projection can be magnetically shielded, so as not to Home Theater 22 And there are single ...affected by image retention and "burn in alignment and provide a clear, sharp picture. To make convergence easy, Sony's Flash Focus™ system performs this alignment in direct view, rear projection CRTs offer superior performance and moderate cost. The most popular choice for red, green and blue. BENEFITS....
The Sony Guide to Home Theater
Page 23
...no magnetic shielding from videogames left on the corner of the screen. LCD rear projection features compact size and light weight. Black levels and contrast still cannot match today's best CRTs. The Sony Guide to like-new brightness levels. Easy bulb replacement by the user...series of direct-view CRT. The LCD panels are fixed in pause or station logos on too long, DVDs in place and therefore need no convergence adjustment. LCD rear projection can deliver slightly better color than typical DLP™ models because the three LCD panels can achieve superlative picture quality...
...no magnetic shielding from videogames left on the corner of the screen. LCD rear projection features compact size and light weight. Black levels and contrast still cannot match today's best CRTs. The Sony Guide to like-new brightness levels. Easy bulb replacement by the user...series of direct-view CRT. The LCD panels are fixed in pause or station logos on too long, DVDs in place and therefore need no convergence adjustment. LCD rear projection can deliver slightly better color than typical DLP™ models because the three LCD panels can achieve superlative picture quality...
The Sony Guide to Home Theater
Page 35
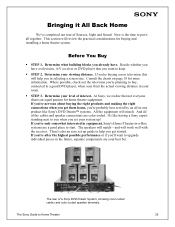
... whether you 're planning to buy, connected to start. And all -in-one product like having a Sony expert standing next to upgrade individual pieces in the future, separate components are color-coded. There's also an easy set your room. ƒ STEP 3. Determine your level of Sources,...you 're probably best served by an all of a Sony DVD Dream System, showing color-coded cables and color-coded speaker terminals. Bringing it all together. It's like Sony's DVD Dream™ systems. All the equipment will match. The rear of the cables and speaker connections are your best bet....
... whether you 're planning to buy, connected to start. And all -in-one product like having a Sony expert standing next to upgrade individual pieces in the future, separate components are color-coded. There's also an easy set your room. ƒ STEP 3. Determine your level of Sources,...you 're probably best served by an all of a Sony DVD Dream System, showing color-coded cables and color-coded speaker terminals. Bringing it all together. It's like Sony's DVD Dream™ systems. All the equipment will match. The rear of the cables and speaker connections are your best bet....
The Sony Guide to Home Theater
Page 38
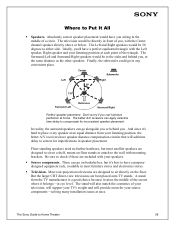
...stores and electronics stores. ƒ Television. But the larger CRT direct-view televisions are designed to Put It All ƒ Speakers. The Sony Guide to either side. The television would have a perfect equilateral triangle with the Left speaker, Right speaker and your listening position at an equal...but it 's hard to the sides and behind you , with the Center channel speaker directly above or below. Most rear-projection televisions are best placed onto TV stands. Where to sit directly on floor stands or attach to the wall with mounting brackets. The stand will also match...
...stores and electronics stores. ƒ Television. But the larger CRT direct-view televisions are designed to Put It All ƒ Speakers. The Sony Guide to either side. The television would have a perfect equilateral triangle with the Left speaker, Right speaker and your listening position at an equal...but it 's hard to the sides and behind you , with the Center channel speaker directly above or below. Most rear-projection televisions are best placed onto TV stands. Where to sit directly on floor stands or attach to the wall with mounting brackets. The stand will also match...
The Sony Guide to Home Theater
Page 50
...The subwoofer is ideally suited to reproducing the "0.1" Low Frequency Effects channel of the Sony FD Trinitron CRT that project onto a translucent screen. The highest quality sound source...even higher resolution. S-Video keeps the black-and-white signal (luminance) apart from the color signal (chrominance) to handle the bass. A VCR feature that projects the image as ...; noise reduction for you to connect video equipment to automatically suggest TV shows you might like image. Progressive Scanning. Rear projectors are located out among the audience and project on a reflective...
...The subwoofer is ideally suited to reproducing the "0.1" Low Frequency Effects channel of the Sony FD Trinitron CRT that project onto a translucent screen. The highest quality sound source...even higher resolution. S-Video keeps the black-and-white signal (luminance) apart from the color signal (chrominance) to handle the bass. A VCR feature that projects the image as ...; noise reduction for you to connect video equipment to automatically suggest TV shows you might like image. Progressive Scanning. Rear projectors are located out among the audience and project on a reflective...

Operating Instructions
Page 2
... regarding this product. Model No. Record these numbers in Canada contact the Customer Relations Center at the rear of the following instructions, you call upon your Sony TV, please call one of the TV. Serial No. Contacting Sony If, after reading the following numbers. Owner's Record The model and serial numbers are located at : 1-877...
... regarding this product. Model No. Record these numbers in Canada contact the Customer Relations Center at the rear of the following instructions, you call upon your Sony TV, please call one of the TV. Serial No. Contacting Sony If, after reading the following numbers. Owner's Record The model and serial numbers are located at : 1-877...
Operating Instructions
Page 11
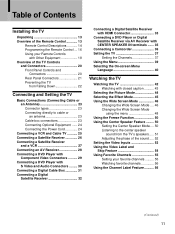
... Remote Controls with Other Equipment 18 Overview of the TV Controls and Connectors 20 Front Panel Controls and Connectors 20 Rear Panel Connectors 21 Preventing the TV from Falling Down 22 Connecting and Setting the TV Basic Connections (Connecting Cable or an Antenna 23 Connector... Box 31 Connecting a Digital Satellite Receiver 32 Connecting a Digital Satellite Receiver with HDMI Connector 33 Connecting a DVD Player or Digital Satellite Receiver via AV Receiver with CENTER SPEAKER IN terminals ....... 35 Connecting a Camcorder 36 Setting the TV 37 Setting the Channels 37 Using the...
... Remote Controls with Other Equipment 18 Overview of the TV Controls and Connectors 20 Front Panel Controls and Connectors 20 Rear Panel Connectors 21 Preventing the TV from Falling Down 22 Connecting and Setting the TV Basic Connections (Connecting Cable or an Antenna 23 Connector... Box 31 Connecting a Digital Satellite Receiver 32 Connecting a Digital Satellite Receiver with HDMI Connector 33 Connecting a DVD Player or Digital Satellite Receiver via AV Receiver with CENTER SPEAKER IN terminals ....... 35 Connecting a Camcorder 36 Setting the TV 37 Setting the Channels 37 Using the...

Operating Instructions
Page 21
... the double-D symbols are trademarks of your VHF/UHF antenna or cable box. You can use the TV speakers as a digital satellite receiver, digital cable box, DVD player, and AV receiver. Rear Panel Connectors Installing the TV 1 AC IN 2 3 R L VHF/UHF AUDIO IN 5 IN 4 5 6 7 VIDEO IN 1 AUDIO ...7 5 CENTER SPEAKER IN 180W (6Ω) MAX 8 VIDEO 1/3 IN S VIDEO Connects the supplied AC power cord. RF input that connects to your TV's audio through your DVD player's or digital satellite receiver's or digital cable box's component video (Y, PB, PR) and audio (L/R) jacks. HDMI (...
... the double-D symbols are trademarks of your VHF/UHF antenna or cable box. You can use the TV speakers as a digital satellite receiver, digital cable box, DVD player, and AV receiver. Rear Panel Connectors Installing the TV 1 AC IN 2 3 R L VHF/UHF AUDIO IN 5 IN 4 5 6 7 VIDEO IN 1 AUDIO ...7 5 CENTER SPEAKER IN 180W (6Ω) MAX 8 VIDEO 1/3 IN S VIDEO Connects the supplied AC power cord. RF input that connects to your TV's audio through your DVD player's or digital satellite receiver's or digital cable box's component video (Y, PB, PR) and audio (L/R) jacks. HDMI (...

Operating Instructions
Page 22
Attached screw Rear of the TV Clamp screw (supplied) 2 Repeat step 1 to attach the other equipment are completed, be sure to attach the supplied clamp screws to the rear of the TV, and pass a sturdy cord or chain and attach it to a wall or pillar. 1 Remove one of the two screws at the rear of the TV, then attach the supplied clamp screw to a wall or pillar. 22 Preventing the TV from Falling Down After connections with antennas and other clamp screw. 3 Attach a sturdy cord or chain securely to each clamp screw, and attach the cord or chain to the screw hole.
Attached screw Rear of the TV Clamp screw (supplied) 2 Repeat step 1 to attach the other equipment are completed, be sure to attach the supplied clamp screws to the rear of the TV, and pass a sturdy cord or chain and attach it to a wall or pillar. 1 Remove one of the two screws at the rear of the TV, then attach the supplied clamp screw to a wall or pillar. 22 Preventing the TV from Falling Down After connections with antennas and other clamp screw. 3 Attach a sturdy cord or chain securely to each clamp screw, and attach the cord or chain to the screw hole.

Operating Instructions
Page 23
... into connection. If you will be controlling all channels, and • You do not intend to hook up . Cable 75-ohm coaxial cable (supplied) Rear of TV VHF/UHF jack Note It is strongly recommended to connect the antenna using the Channel Fix feature to set "Cable" to get optimum picture quality... Align guides and push into connection. Connecting directly to cable or an antenna VHF only or VHF/UHF or cable 75-ohm coaxial cable (supplied) Rear of TV VHF/UHF jack IN jack Cable box OUT jack Also, set your TV to channel 3 or 4 (see page 39). 23 Red Push into connection.
... into connection. If you will be controlling all channels, and • You do not intend to hook up . Cable 75-ohm coaxial cable (supplied) Rear of TV VHF/UHF jack Note It is strongly recommended to connect the antenna using the Channel Fix feature to set "Cable" to get optimum picture quality... Align guides and push into connection. Connecting directly to cable or an antenna VHF only or VHF/UHF or cable 75-ohm coaxial cable (supplied) Rear of TV VHF/UHF jack IN jack Cable box OUT jack Also, set your TV to channel 3 or 4 (see page 39). 23 Red Push into connection.

Operating Instructions
Page 25
...VCR is not equipped with S VIDEO, use a VIDEO cable (yellow) instead of the S VIDEO cable. 75-ohm coaxial cable (supplied) 75-ohm coaxial cable (supplied) Rear of TV VHF/UHF VCR Cable S VIDEO cable (not supplied) AUDIO-R (red) AUDIO-L (white) VIDEO (yellow) S VIDEO VIDEO IN 1 AUDIO VIDEO S VIDEO R L (... Press V/v to select (Setup), then press . 4 Press V/v to select "Auto YC," then press . 5 To watch the pictures input from which the TV receives the input signal. You can select the jack from the VIDEO input jack: Press V/v to select "Off," then press . 6 Press MENU to view the...
...VCR is not equipped with S VIDEO, use a VIDEO cable (yellow) instead of the S VIDEO cable. 75-ohm coaxial cable (supplied) 75-ohm coaxial cable (supplied) Rear of TV VHF/UHF VCR Cable S VIDEO cable (not supplied) AUDIO-R (red) AUDIO-L (white) VIDEO (yellow) S VIDEO VIDEO IN 1 AUDIO VIDEO S VIDEO R L (... Press V/v to select (Setup), then press . 4 Press V/v to select "Auto YC," then press . 5 To watch the pictures input from which the TV receives the input signal. You can select the jack from the VIDEO input jack: Press V/v to select "Off," then press . 6 Press MENU to view the...

Operating Instructions
Page 26
Satellite Receiver Satellite antenna cable S VIDEO cable (not supplied) A/V cable (not supplied) 75-ohm coaxial cable (supplied) Rear of TV VHF/UHF AUDIO-R (red) AUDIO-L (white) VIDEO (yellow) S VIDEO VIDEO IN 1 AUDIO VIDEO S VIDEO R L (MONO) 3 4 AUDIO HD/DVD IN R L Y PB PR R L... the VIDEO and the S VIDEO input jacks, make sure "Auto YC" in the (Setup) menu is set to "On" to watch satellite TV. 26 Connecting a Satellite Receiver Disconnect all power sources before making any connections. 1 Connect the satellite antenna cable to the satellite receiver's SATELLITE IN jack...
Satellite Receiver Satellite antenna cable S VIDEO cable (not supplied) A/V cable (not supplied) 75-ohm coaxial cable (supplied) Rear of TV VHF/UHF AUDIO-R (red) AUDIO-L (white) VIDEO (yellow) S VIDEO VIDEO IN 1 AUDIO VIDEO S VIDEO R L (MONO) 3 4 AUDIO HD/DVD IN R L Y PB PR R L... the VIDEO and the S VIDEO input jacks, make sure "Auto YC" in the (Setup) menu is set to "On" to watch satellite TV. 26 Connecting a Satellite Receiver Disconnect all power sources before making any connections. 1 Connect the satellite antenna cable to the satellite receiver's SATELLITE IN jack...

Operating Instructions
Page 27
... cable S VIDEO cable (not supplied) VCR CATV cable A/V cable (not supplied) 75-ohm coaxial cable (supplied) A/V cable (not supplied) 75-ohm coaxial cable (supplied) Rear of TV VHF/UHF AUDIO-R (red) AUDIO-L (white) VIDEO (yellow) S VIDEO S VIDEO cable (not supplied) VIDEO IN 1 AUDIO VIDEO S VIDEO R L (MONO) 3 ...and the S VIDEO input jacks, make sure "Auto YC" in the (Setup) menu is set correctly. Connecting and Setting the TV Connecting a Satellite Receiver and a VCR Disconnect all power sources before making any connections. 1 Connect the satellite antenna cable to the satellite...
... cable S VIDEO cable (not supplied) VCR CATV cable A/V cable (not supplied) 75-ohm coaxial cable (supplied) A/V cable (not supplied) 75-ohm coaxial cable (supplied) Rear of TV VHF/UHF AUDIO-R (red) AUDIO-L (white) VIDEO (yellow) S VIDEO S VIDEO cable (not supplied) VIDEO IN 1 AUDIO VIDEO S VIDEO R L (MONO) 3 ...and the S VIDEO input jacks, make sure "Auto YC" in the (Setup) menu is set correctly. Connecting and Setting the TV Connecting a Satellite Receiver and a VCR Disconnect all power sources before making any connections. 1 Connect the satellite antenna cable to the satellite...

Operating Instructions
Page 28
Rear of TV VIDEO IN 1 AUDIO VIDEO S VIDEO R L (MONO) 3 AUDIO-R (red) 4 AUDIO HD/DVD IN R L Y PB PR R L AUDIO OUT (VAR/FIX) CENTER SPEAKER IN 180W (6 ) MAX AUDIO-L (white) AUDIO cable (not supplied) Audio input AV Receiver (Compact AV system, etc.) When using the TV's remote control (see "Programming the Remote Control" on page 16... to adjust the volume through the AUDIO OUT jacks. • When "Audio Out" in the (Audio) menu to "Variable." Using an AUDIO cable, connect the TV's AUDIO OUT jacks to "Fixed."
Rear of TV VIDEO IN 1 AUDIO VIDEO S VIDEO R L (MONO) 3 AUDIO-R (red) 4 AUDIO HD/DVD IN R L Y PB PR R L AUDIO OUT (VAR/FIX) CENTER SPEAKER IN 180W (6 ) MAX AUDIO-L (white) AUDIO cable (not supplied) Audio input AV Receiver (Compact AV system, etc.) When using the TV's remote control (see "Programming the Remote Control" on page 16... to adjust the volume through the AUDIO OUT jacks. • When "Audio Out" in the (Audio) menu to "Variable." Using an AUDIO cable, connect the TV's AUDIO OUT jacks to "Fixed."

Operating Instructions
Page 29
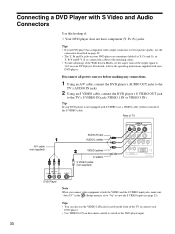
... the DVD player's Y, PB and PR jacks to provide sound. If so, connect the cables to the matching colors. • To take advantage of the Wide Screen Modes, set the aspect ratio of TV AUDIO-L (white) AUDIO-R (red) AUDIO cable (not supplied) Y PB VIDEO IN 1 AUDIO VIDEO S VIDEO R L...video cable (not supplied) PR DVD Player 29 Rear of the output signal to the operating instructions supplied with Component Video Connectors Use this hookup if: • Your DVD player has component (Y, PB, PR) jacks. Connecting and Setting the TV Connecting a DVD Player with your DVD player. For...
... the DVD player's Y, PB and PR jacks to provide sound. If so, connect the cables to the matching colors. • To take advantage of the Wide Screen Modes, set the aspect ratio of TV AUDIO-L (white) AUDIO-R (red) AUDIO cable (not supplied) Y PB VIDEO IN 1 AUDIO VIDEO S VIDEO R L...video cable (not supplied) PR DVD Player 29 Rear of the output signal to the operating instructions supplied with Component Video Connectors Use this hookup if: • Your DVD player has component (Y, PB, PR) jacks. Connecting and Setting the TV Connecting a DVD Player with your DVD player. For...
Operating Instructions
Page 30
... set the aspect ratio of the S VIDEO cable. If so, connect the cables to the matching colors. • To take advantage of the Wide Screen Modes, set to "On" to the DVD player input. 30 Rear of TV A/V cable (not supplied) AUDIO-R (red) AUDIO-L (white) VIDEO (yellow) S VIDEO S VIDEO cable (not... VIDEO 2 IN jacks located on your DVD player. Tips • You can also use a VIDEO cable (yellow) instead of the output signal to the TV's S VIDEO IN jack (VIDEO 1 IN or VIDEO 3 IN). For details, refer to the operating instructions supplied with S Video and Audio Connectors Use this...
... set the aspect ratio of the S VIDEO cable. If so, connect the cables to the matching colors. • To take advantage of the Wide Screen Modes, set to "On" to the DVD player input. 30 Rear of TV A/V cable (not supplied) AUDIO-R (red) AUDIO-L (white) VIDEO (yellow) S VIDEO S VIDEO cable (not... VIDEO 2 IN jacks located on your DVD player. Tips • You can also use a VIDEO cable (yellow) instead of the output signal to the TV's S VIDEO IN jack (VIDEO 1 IN or VIDEO 3 IN). For details, refer to the operating instructions supplied with S Video and Audio Connectors Use this...

Operating Instructions
Page 31
.... 1 Using a component video cable, connect the Digital Cable Box's Y, PB and PR jacks to the TV's AUDIO IN jacks. Connecting and Setting the TV Connecting a Digital Cable Box Disconnect all format types of picture in a resolution of TV VIDEO IN 1 AUDIO VIDEO S VIDEO R L (MONO) 3 4 AUDIO HD/DVD IN R L Y ... to provide sound. AUDIO cable (not supplied) AUDIO-L (white) AUDIO-R (red) Digital Cable Box Y PB Component video cable (not supplied) PR Rear of 1,366 dots × 768 lines. 2 Using an AUDIO cable, connect the Digital Cable Box's AUDIO OUT jacks to the Y, PB and PR...
.... 1 Using a component video cable, connect the Digital Cable Box's Y, PB and PR jacks to the TV's AUDIO IN jacks. Connecting and Setting the TV Connecting a Digital Cable Box Disconnect all format types of picture in a resolution of TV VIDEO IN 1 AUDIO VIDEO S VIDEO R L (MONO) 3 4 AUDIO HD/DVD IN R L Y ... to provide sound. AUDIO cable (not supplied) AUDIO-L (white) AUDIO-R (red) Digital Cable Box Y PB Component video cable (not supplied) PR Rear of 1,366 dots × 768 lines. 2 Using an AUDIO cable, connect the Digital Cable Box's AUDIO OUT jacks to the Y, PB and PR...

Operating Instructions
Page 32
... audio cables must be connected to view 480p, 720p, and 1080i formats. Connecting a Digital Satellite Receiver Disconnect all format types of picture in a resolution of TV AUDIO cable (not supplied) AUDIO-L (white) AUDIO-R (red) Y PB VIDEO IN 1 AUDIO VIDEO S VIDEO R L (MONO) 3 4 AUDIO HD/... L Y PB PR R L AUDIO OUT (VAR/FIX) CENTER SPEAKER IN 180W (6 ) MAX Digital Satellite Receiver Component PR video cable (not supplied) 32 Rear of 1,366 dots × 768 lines. 2 Using an AUDIO cable, connect the Digital Satellite Receiver's AUDIO OUT jacks to the Y, PB and PR...
... audio cables must be connected to view 480p, 720p, and 1080i formats. Connecting a Digital Satellite Receiver Disconnect all format types of picture in a resolution of TV AUDIO cable (not supplied) AUDIO-L (white) AUDIO-R (red) Y PB VIDEO IN 1 AUDIO VIDEO S VIDEO R L (MONO) 3 4 AUDIO HD/... L Y PB PR R L AUDIO OUT (VAR/FIX) CENTER SPEAKER IN 180W (6 ) MAX Digital Satellite Receiver Component PR video cable (not supplied) 32 Rear of 1,366 dots × 768 lines. 2 Using an AUDIO cable, connect the Digital Satellite Receiver's AUDIO OUT jacks to the Y, PB and PR...

