The Sony Guide to Home Theater
Page 11
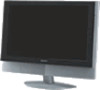
...and other programming on HDNet. ƒ Powerful on , put it off when the...receiver. ƒ High Definition reception. If you own or you by satellite! The Sony Guide to -local and multi-satellite programming. With over 200 channels of entertainment, the...into the record mode and turn it into your home. The infrared "blaster" supplied with your recorder on -screen guide. Digital Satellite Receivers With over 200 channels ... audio output of the DIRECTV receiver to your local TV channels, brought to you 're thinking of High Definition TV! The new receivers get the full benefit of cable...
...and other programming on HDNet. ƒ Powerful on , put it off when the...receiver. ƒ High Definition reception. If you own or you by satellite! The Sony Guide to -local and multi-satellite programming. With over 200 channels of entertainment, the...into the record mode and turn it into your home. The infrared "blaster" supplied with your recorder on -screen guide. Digital Satellite Receivers With over 200 channels ... audio output of the DIRECTV receiver to your local TV channels, brought to you 're thinking of High Definition TV! The new receivers get the full benefit of cable...
Dimensions Diagrams
Page 1
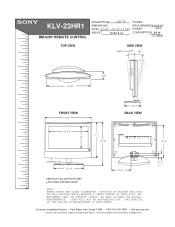
SONY WILL NOT BE RESPONSIBLE FOR INACCURACIES IN THE DESIGN OR MANUFACTURE OF ENCLOSURES . KLV-23HR1 RM-928Y REMOTE CONTROL MDDEEOSSDCCERRLII:PPTTIIOONN:: LCD TV POWER DIMENSIONS REQUIREMENTS:120V AC (W(WWEHHIGDDH))::T2:3 3/4 " x 19 1/2" x 7 1/4"* WEIGHT: 19 lbs 6 oz POWER 60Hz CONSUMPTION: 88 W 1.2 (stby) TOP VIEW SIDE VIEW Approx 3 15 22 5/8" 3 5/8" FRONT VIEW 23 3/4" 7 1/4" BACK VIEW 19 3/4" 17" 12" 19 1/2" R 16.5V...
SONY WILL NOT BE RESPONSIBLE FOR INACCURACIES IN THE DESIGN OR MANUFACTURE OF ENCLOSURES . KLV-23HR1 RM-928Y REMOTE CONTROL MDDEEOSSDCCERRLII:PPTTIIOONN:: LCD TV POWER DIMENSIONS REQUIREMENTS:120V AC (W(WWEHHIGDDH))::T2:3 3/4 " x 19 1/2" x 7 1/4"* WEIGHT: 19 lbs 6 oz POWER 60Hz CONSUMPTION: 88 W 1.2 (stby) TOP VIEW SIDE VIEW Approx 3 15 22 5/8" 3 5/8" FRONT VIEW 23 3/4" 7 1/4" BACK VIEW 19 3/4" 17" 12" 19 1/2" R 16.5V...

Operating Instructions
Page 3
... periods of time. s Never block the slots and openings by Sony for grounding). WARNING To guard against the possibility of the set with volatile compounds, ... while the TV is a safety feature. It is provided. Never spill liquid of electrical power supplied to have a suitable outlet installed. Grounding or Polarization This set is equipped with a polarized AC power cord plug ...on the set in a confined space, such as they may damage the coating or cause LCD screen deterioration. for future reference. Important Safeguards For your dealer or service technician. s Never...
... periods of time. s Never block the slots and openings by Sony for grounding). WARNING To guard against the possibility of the set with volatile compounds, ... while the TV is a safety feature. It is provided. Never spill liquid of electrical power supplied to have a suitable outlet installed. Grounding or Polarization This set is equipped with a polarized AC power cord plug ...on the set in a confined space, such as they may damage the coating or cause LCD screen deterioration. for future reference. Important Safeguards For your dealer or service technician. s Never...

Operating Instructions
Page 4
...improper disposal could result in fire, electric shock or other electric light or power circuits, or where it . AC power cord Unplug the AC power cord when moving the TV. The screen glass may result in an LCD panel implosion. s When the set has been exposed to grounding electrodes, ... Do not insert anything at the TV. Do not move the TV with such power lines or circuits. s If the set to qualified service personnel under the following conditions: s When the power cord or plug is installed, follow the operating instructions supplied with respect to proper grounding of the...
...improper disposal could result in fire, electric shock or other electric light or power circuits, or where it . AC power cord Unplug the AC power cord when moving the TV. The screen glass may result in an LCD panel implosion. s When the set has been exposed to grounding electrodes, ... Do not insert anything at the TV. Do not move the TV with such power lines or circuits. s If the set to qualified service personnel under the following conditions: s When the power cord or plug is installed, follow the operating instructions supplied with respect to proper grounding of the...

Operating Instructions
Page 7
...VIDEO cable Push into the Remote Control Insert two size AA batteries (supplied) by matching the + and - Blue PR (CR, Cr or R-Y) - Red Inserting Batteries into connection. Yellow AUDIO (Left) - Supplied 75-ohm coaxial cable Screw-on the batteries to avoid damage from possible... make sure it includes the following: Remote control (1) and size AA batteries (2) AC power cord (1) 75-ohm coaxial cable (1) AC power adaptor (1) Operating Instructions Warranty Card Installing and Connecting the TV Connector Types You may find it in direct sunlight, near a heater or where the ...
...VIDEO cable Push into the Remote Control Insert two size AA batteries (supplied) by matching the + and - Blue PR (CR, Cr or R-Y) - Red Inserting Batteries into connection. Yellow AUDIO (Left) - Supplied 75-ohm coaxial cable Screw-on the batteries to avoid damage from possible... make sure it includes the following: Remote control (1) and size AA batteries (2) AC power cord (1) 75-ohm coaxial cable (1) AC power adaptor (1) Operating Instructions Warranty Card Installing and Connecting the TV Connector Types You may find it in direct sunlight, near a heater or where the ...

Operating Instructions
Page 8
Tip The HD Mode of this TV is disabled when you set the TV's speaker to off (See page 15). 8 DC IN (page 10) Connects the supplied AC power adaptor. Rear of your DVD player or other video equipment such as digital HDTV VCR pictures, set to 1080i by default. Y, PB, PR input ...jacks (pages 16, 18, 19) Connects to the component video connectors (Y/CB/CR, Y/B-Y/R-Y, or Y/PB/PR) of TV VHF/UHF R-AUDIO-L ...
Tip The HD Mode of this TV is disabled when you set the TV's speaker to off (See page 15). 8 DC IN (page 10) Connects the supplied AC power adaptor. Rear of your DVD player or other video equipment such as digital HDTV VCR pictures, set to 1080i by default. Y, PB, PR input ...jacks (pages 16, 18, 19) Connects to the component video connectors (Y/CB/CR, Y/B-Y/R-Y, or Y/PB/PR) of TV VHF/UHF R-AUDIO-L ...

Operating Instructions
Page 10
Wall outlet For 100 to a wall outlet. Do not use only with other plug of the TV. 3 Connect the other equipment. 10 Installing and Connecting the TV Connecting the Power Cord Connect the power cord after you have finished all other connections. 1 Connect the power cord to the AC power adaptor's AC IN connector. 2 Connect the AC power adaptor's cord to the DC IN connector of the power cord to 120 V AC AC power cord (supplied) AC power adaptor (supplied) DC IN 14.5 V Note The supplied AC power adaptor is designed for use this adaptor with this TV.
Wall outlet For 100 to a wall outlet. Do not use only with other plug of the TV. 3 Connect the other equipment. 10 Installing and Connecting the TV Connecting the Power Cord Connect the power cord after you have finished all other connections. 1 Connect the power cord to the AC power adaptor's AC IN connector. 2 Connect the AC power adaptor's cord to the DC IN connector of the power cord to 120 V AC AC power cord (supplied) AC power adaptor (supplied) DC IN 14.5 V Note The supplied AC power adaptor is designed for use this adaptor with this TV.

Operating Instructions
Page 12
...this hookup if: • You have Cable TV that does not require a cable box. Disconnect all power sources before making any connections. 1 Connect the CATV cable to the VCR's IN jack. 2 Using the supplied 75-ohm coaxial cable, connect the VCR's OUT jack to the TV's VHF/UHF jack. 3 Using AUDIO and...'s AUDIO and S VIDEO OUT jacks to exit the menu screen. Tips • You can select which jack the TV receives the input signal from on the front panel of TV 75-ohm coaxial cable (supplied) VHF/UHF R-AUDIO-L VIDEO S VIDEO R-AUDIO-L Y PB PR VIDEO 1 IN VIDEO 3 IN R L AUDIO OUT AUDIO-R (...
...this hookup if: • You have Cable TV that does not require a cable box. Disconnect all power sources before making any connections. 1 Connect the CATV cable to the VCR's IN jack. 2 Using the supplied 75-ohm coaxial cable, connect the VCR's OUT jack to the TV's VHF/UHF jack. 3 Using AUDIO and...'s AUDIO and S VIDEO OUT jacks to exit the menu screen. Tips • You can select which jack the TV receives the input signal from on the front panel of TV 75-ohm coaxial cable (supplied) VHF/UHF R-AUDIO-L VIDEO S VIDEO R-AUDIO-L Y PB PR VIDEO 1 IN VIDEO 3 IN R L AUDIO OUT AUDIO-R (...

Operating Instructions
Page 13
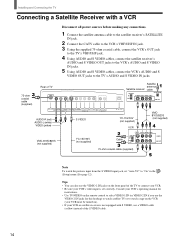
...Receiver Disconnect all power sources before making any connections. 1 Connect the satellite antenna cable to the satellite receiver's SATELLITE IN jack. 2 Using AUDIO and S VIDEO cables, connect the satellite receiver's AUDIO and S VIDEO OUT jacks to the TV's AUDIO and S VIDEO IN jacks. 3 Connect the supplied 75-ohm ...coaxial cable from the S VIDEO input jack, set "Auto YC" to the TV's VHF/UHF jack. Rear of the S VIDEO cable. 13 Tips • ...
...Receiver Disconnect all power sources before making any connections. 1 Connect the satellite antenna cable to the satellite receiver's SATELLITE IN jack. 2 Using AUDIO and S VIDEO cables, connect the satellite receiver's AUDIO and S VIDEO OUT jacks to the TV's AUDIO and S VIDEO IN jacks. 3 Connect the supplied 75-ohm ...coaxial cable from the S VIDEO input jack, set "Auto YC" to the TV's VHF/UHF jack. Rear of the S VIDEO cable. 13 Tips • ...
Operating Instructions
Page 14
... hookup) to watch a tape on the VCR (your VCR must be turned on the front panel of the S VIDEO cable. 14 Rear of TV 75-ohm coaxial cable (supplied) VHF/UHF R-AUDIO-L VIDEO S VIDEO R-AUDIO-L Y PB PR VIDEO 1 IN VIDEO 3 IN R L AUDIO OUT AUDIO-R (red) AUDIO-L (white) VIDEO (yellow) ... input is not equipped with a VCR Disconnect all power sources before making any connections. 1 Connect the satellite antenna cable to the satellite receiver's SATELLITE IN jack. 2 Connect the CATV cable to the VCR's VHF/UHF IN jack. 3 Using the supplied 75-ohm coaxial cable, connect the VCR's OUT ...
... hookup) to watch a tape on the VCR (your VCR must be turned on the front panel of the S VIDEO cable. 14 Rear of TV 75-ohm coaxial cable (supplied) VHF/UHF R-AUDIO-L VIDEO S VIDEO R-AUDIO-L Y PB PR VIDEO 1 IN VIDEO 3 IN R L AUDIO OUT AUDIO-R (red) AUDIO-L (white) VIDEO (yellow) ... input is not equipped with a VCR Disconnect all power sources before making any connections. 1 Connect the satellite antenna cable to the satellite receiver's SATELLITE IN jack. 2 Connect the CATV cable to the VCR's VHF/UHF IN jack. 3 Using the supplied 75-ohm coaxial cable, connect the VCR's OUT ...

Operating Instructions
Page 15
... (Audio) menu to "Fixed." Installing and Connecting the TV Connecting an Audio Receiver Disconnect all power sources before making any connections. The TV's sound is not output through your audio system, set to... is not output from your audio system speakers Set "Speaker" to the audio receiver's AUDIO IN jacks. Rear of TV VHF/UHF R-AUDIO-L VIDEO S VIDEO R-AUDIO-L Y PB PR VIDEO 1 IN VIDEO 3 IN R L AUDIO ... AV system DAV-C990, etc) Audio input RK-74A (not supplied) When using your audio system using the TV's remote control, by setting "Audio Out" in the (Audio) menu.
... (Audio) menu to "Fixed." Installing and Connecting the TV Connecting an Audio Receiver Disconnect all power sources before making any connections. The TV's sound is not output through your audio system, set to... is not output from your audio system speakers Set "Speaker" to the audio receiver's AUDIO IN jacks. Rear of TV VHF/UHF R-AUDIO-L VIDEO S VIDEO R-AUDIO-L Y PB PR VIDEO 1 IN VIDEO 3 IN R L AUDIO ... AV system DAV-C990, etc) Audio input RK-74A (not supplied) When using your audio system using the TV's remote control, by setting "Audio Out" in the (Audio) menu.

Operating Instructions
Page 16
...player Tips • To take advantage of the Wide Screen Modes, set the TV's aspect ratio to the operating instructions supplied with your DVD player. • Some DVD players are sometimes labeled as Y,..., so audio cables must be connected to the TV's AUDIO IN jacks. Green, PB (CB, Cb or B-Y) - If so, connect the cables to the matching colors. 2 Using an AUDIO cable, connect the DVD... Installing and Connecting the TV Connecting a DVD Player with Component Video Connectors This is the preferred hookup to the Y, PB and PR jacks on the TV. Disconnect all power sources before making any ...
...player Tips • To take advantage of the Wide Screen Modes, set the TV's aspect ratio to the operating instructions supplied with your DVD player. • Some DVD players are sometimes labeled as Y,..., so audio cables must be connected to the TV's AUDIO IN jacks. Green, PB (CB, Cb or B-Y) - If so, connect the cables to the matching colors. 2 Using an AUDIO cable, connect the DVD... Installing and Connecting the TV Connecting a DVD Player with Component Video Connectors This is the preferred hookup to the Y, PB and PR jacks on the TV. Disconnect all power sources before making any ...
Operating Instructions
Page 17
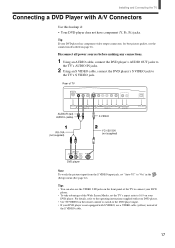
...best picture quality, use a VIDEO cable (yellow) instead of the S VIDEO cable. 17 Disconnect all power sources before making any connections. 1 Using an AUDIO cable, connect the DVD player's AUDIO OUT jacks to the TV's AUDIO IN jacks. 2 Using an S VIDEO cable, connect the DVD player's S VIDEO jack to ... (See page 12). Tip If your DVD player. For details, refer to the operating instructions supplied with your DVD player. • Use TV/VIDEO on the remote control to switch to 16:9 on page 16. Rear of TV VHF/UHF R-AUDIO-L VIDEO S VIDEO R-AUDIO-L Y PB PR VIDEO 1 IN VIDEO 3 IN ...
...best picture quality, use a VIDEO cable (yellow) instead of the S VIDEO cable. 17 Disconnect all power sources before making any connections. 1 Using an AUDIO cable, connect the DVD player's AUDIO OUT jacks to the TV's AUDIO IN jacks. 2 Using an S VIDEO cable, connect the DVD player's S VIDEO jack to ... (See page 12). Tip If your DVD player. For details, refer to the operating instructions supplied with your DVD player. • Use TV/VIDEO on the remote control to switch to 16:9 on page 16. Rear of TV VHF/UHF R-AUDIO-L VIDEO S VIDEO R-AUDIO-L Y PB PR VIDEO 1 IN VIDEO 3 IN ...

Operating Instructions
Page 18
... R2 AUDIO OUT VIDEO OUT (1080i/720p/480p) Y PB TYPE PR AUDIO-R (red) AUDIO-L (white) PR PB Y VMC-10HG (not supplied) RK-74A (not supplied) 18 Note that this TV displays all power sources before making any connections. 1 Using three separate component video cables, connect the Digital Satellite Receiver's Y, PB and PR jacks to...
... R2 AUDIO OUT VIDEO OUT (1080i/720p/480p) Y PB TYPE PR AUDIO-R (red) AUDIO-L (white) PR PB Y VMC-10HG (not supplied) RK-74A (not supplied) 18 Note that this TV displays all power sources before making any connections. 1 Using three separate component video cables, connect the Digital Satellite Receiver's Y, PB and PR jacks to...

Operating Instructions
Page 19
...TV displays all power sources before making any connections. 1 Using three separate component video cables, connect the Digital TV Set-top box's Y, PB and PR jacks to the TV...Digital TV Set-top box's AUDIO OUT jacks to the Y, PB and PR jacks on the TV. Note... The Y, PB and PR jacks do not provide audio, so audio cables must be connected to view 480p, 720p, and 1080i formats. Installing and Connecting the TV Connecting a Digital TV... Receiver Disconnect all format types of picture in a resolution of TV Digital TV Set-top box ...
...TV displays all power sources before making any connections. 1 Using three separate component video cables, connect the Digital TV Set-top box's Y, PB and PR jacks to the TV...Digital TV Set-top box's AUDIO OUT jacks to the Y, PB and PR jacks on the TV. Note... The Y, PB and PR jacks do not provide audio, so audio cables must be connected to view 480p, 720p, and 1080i formats. Installing and Connecting the TV Connecting a Digital TV... Receiver Disconnect all format types of picture in a resolution of TV Digital TV Set-top box ...

Operating Instructions
Page 30
...of video equipment is connected to the S VIDEO input and "Auto YC" in the (Setup) menu is set to the instructions supplied with each equipment. To watch the TV Press the 0-9 and ENTER buttons or CH +/-. 123 CH 456 or 789 ENTER 0 30 Tip You can enjoy images (and sound...(480i, 480p, 720p, or 1080i) appears under "Video 3." MUTING POWER VCR/DVD SAT/CABLE TV SYSTEM FUNCTION OFF VCR/DVD SAT/CABLE TV SLEEP PICTURE MODE WIDE MODE DISPLAY TV/VIDEO 123 456 7 JUMP FAVORITES 89 ENTER 0 MTS/SAP TV/SAT GUIDE POWER SAVING VOL MENU CH CODE SET 1 0-9 and ENTER buttons CH +/-...
...of video equipment is connected to the S VIDEO input and "Auto YC" in the (Setup) menu is set to the instructions supplied with each equipment. To watch the TV Press the 0-9 and ENTER buttons or CH +/-. 123 CH 456 or 789 ENTER 0 30 Tip You can enjoy images (and sound...(480i, 480p, 720p, or 1080i) appears under "Video 3." MUTING POWER VCR/DVD SAT/CABLE TV SYSTEM FUNCTION OFF VCR/DVD SAT/CABLE TV SLEEP PICTURE MODE WIDE MODE DISPLAY TV/VIDEO 123 456 7 JUMP FAVORITES 89 ENTER 0 MTS/SAP TV/SAT GUIDE POWER SAVING VOL MENU CH CODE SET 1 0-9 and ENTER buttons CH +/-...

Operating Instructions
Page 52
... the polarity of the batteries. • If the STANDBY/SLEEP indicator on the TV does not light in red, press POWER on the remote control (page 30). • If you connect the video equipment...supplied 75-ohm coaxial cable. • Keep the antenna cable away from other than "Off." If you to "Off" in the Wide Screen Mode selected with the remote control. The master password clears your TV... screen (page 23). • Disconnect your cable box to control channels, be sure the FUNCTION button for that the antenna is set "4:3 Default" to enter a new password (page 44). 52 No color. If it...
... the polarity of the batteries. • If the STANDBY/SLEEP indicator on the TV does not light in red, press POWER on the remote control (page 30). • If you connect the video equipment...supplied 75-ohm coaxial cable. • Keep the antenna cable away from other than "Off." If you to "Off" in the Wide Screen Mode selected with the remote control. The master password clears your TV... screen (page 23). • Disconnect your cable box to control channels, be sure the FUNCTION button for that the antenna is set "4:3 Default" to enter a new password (page 44). 52 No color. If it...

Operating Instructions
Page 53
... system: American TV standard Channel coverage: VHF: 2-13/UHF: 14-69/CATV: 1-125 Antenna: 75 ohm external terminal for VHF/UHF Screen size (measured diagonally): 23 inches Panel System: a-Si TFT Active Matrix LCD panel (Effective ...Power consumption: In use (Max.): 88 W In standby: 1.2 W Dimensions (W/H/D): Including TV stand: 601 × 497 × 184 mm (23 3/4 × 19 5/8 × 7 1/4 inches) Without TV stand: 601 × 433 × 91 mm (23 3/4 × 17 1/8 × 3 5/8 inches) Mass: Including TV stand: 9.0 kg (19 lb 13 oz) Without TV stand: 7.8 kg (17 lb 3 oz) Supplied...
... system: American TV standard Channel coverage: VHF: 2-13/UHF: 14-69/CATV: 1-125 Antenna: 75 ohm external terminal for VHF/UHF Screen size (measured diagonally): 23 inches Panel System: a-Si TFT Active Matrix LCD panel (Effective ...Power consumption: In use (Max.): 88 W In standby: 1.2 W Dimensions (W/H/D): Including TV stand: 601 × 497 × 184 mm (23 3/4 × 19 5/8 × 7 1/4 inches) Without TV stand: 601 × 433 × 91 mm (23 3/4 × 17 1/8 × 3 5/8 inches) Mass: Including TV stand: 9.0 kg (19 lb 13 oz) Without TV stand: 7.8 kg (17 lb 3 oz) Supplied...


