Operating Instructions
Page 5
.... Accessories Do not place the set . Stubborn stains may be moved with a soft cloth. Consult qualified service personnel. Always turn the set is operating, unplug the TV and consult your dealer or service technician. for example, near a bathtub, washbowl, kitchen sink, or laundry tub, in the... solution of an internal malfunction that could create a fire hazard. If the picture becomes dark after using the LCD Projection TV for a long period of time, it gently with care. If you clean the screen surface in a wet basement, or near water - If a snapping or ...
.... Accessories Do not place the set . Stubborn stains may be moved with a soft cloth. Consult qualified service personnel. Always turn the set is operating, unplug the TV and consult your dealer or service technician. for example, near a bathtub, washbowl, kitchen sink, or laundry tub, in the... solution of an internal malfunction that could create a fire hazard. If the picture becomes dark after using the LCD Projection TV for a long period of time, it gently with care. If you clean the screen surface in a wet basement, or near water - If a snapping or ...
Operating Instructions
Page 12
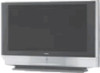
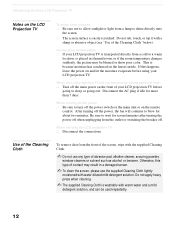
...and let the moisture evaporate before going out. Be sure to blow for a long period of time ❑ Turn off the power switch on the main unit or on the LCD Projection TV To enjoy clear pictures ❑ Be sure not to allow sunlight or light from the front of...Do not use the supplied Cleaning Cloth lightly moistened with water diluted mild detergent solution. Introducing the Sony LCD Projection TV Notes on the remote control. When turning off the power ❑ Be sure to turn off the main power on the front of the Cleaning Cloth" below). Disconnect the AC plug if...
...and let the moisture evaporate before going out. Be sure to blow for a long period of time ❑ Turn off the power switch on the main unit or on the LCD Projection TV To enjoy clear pictures ❑ Be sure not to allow sunlight or light from the front of...Do not use the supplied Cleaning Cloth lightly moistened with water diluted mild detergent solution. Introducing the Sony LCD Projection TV Notes on the remote control. When turning off the power ❑ Be sure to turn off the main power on the front of the Cleaning Cloth" below). Disconnect the AC plug if...
Operating Instructions
Page 13
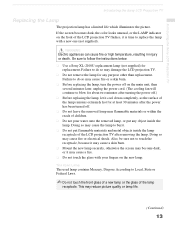
... the front glass of a new lamp or the glass of the LCD projection TV after the power has been turned off. ❑ Do not leave the removed lamp near flammable materials or within the reach of the LCD projection TV flashes, it is time to do so may cause a fire. ❑ Do not touch the ... any purpose other than replacement. If the screen becomes dark, the color looks unusual, or the LAMP indicator on the new lamp. Introducing the Sony LCD Projection TV Introducing the Sony LCD Projection TV Replacing the Lamp The projection lamp has a limited life which illuminates the picture.
... the front glass of a new lamp or the glass of the LCD projection TV after the power has been turned off. ❑ Do not leave the removed lamp near flammable materials or within the reach of the LCD projection TV flashes, it is time to do so may cause a fire. ❑ Do not touch the ... any purpose other than replacement. If the screen becomes dark, the color looks unusual, or the LAMP indicator on the new lamp. Introducing the Sony LCD Projection TV Introducing the Sony LCD Projection TV Replacing the Lamp The projection lamp has a limited life which illuminates the picture.
Operating Instructions
Page 43
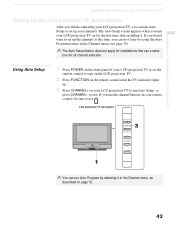
... the LCD Projection TV Installing and Connecting the LCD Projection TV Setting Up the LCD projection TV Automatically After you finish connecting your LCD projection TV, you can run Auto Setup to set up the channels at this time, you can run Auto Setup, or press CHANNEL- The Auto Setup screen appears when you turn on the LCD projection TV. 2 Press FUNCTION...
... the LCD Projection TV Installing and Connecting the LCD Projection TV Setting Up the LCD projection TV Automatically After you finish connecting your LCD projection TV, you can run Auto Setup to set up the channels at this time, you can run Auto Setup, or press CHANNEL- The Auto Setup screen appears when you turn on the LCD projection TV. 2 Press FUNCTION...
Operating Instructions
Page 45
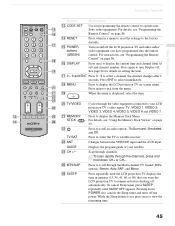
... (GREEN) Turn on and off the LCD projection TV and other audio/ video equipment you want the LCD projection TV to remain on page 55. See page 84 for programming the remote control to display the LCD projection TV on setting the time. w; wg MTS/SAP wh SLEEP Cycles through the Multi-channel TV Sound (MTS... a menu to reset the settings to view the remaining time. 45 Using the Features While the Sleep feature is displayed, select the item. qf RESET Press when in minutes (15, 30, 45, 60, or 90) that you have programmed into the remote control. qk MENU Press to operate ...
... (GREEN) Turn on and off the LCD projection TV and other audio/ video equipment you want the LCD projection TV to remain on page 55. See page 84 for programming the remote control to display the LCD projection TV on setting the time. w; wg MTS/SAP wh SLEEP Cycles through the Multi-channel TV Sound (MTS... a menu to reset the settings to view the remaining time. 45 Using the Features While the Sleep feature is displayed, select the item. qf RESET Press when in minutes (15, 30, 45, 60, or 90) that you have programmed into the remote control. qk MENU Press to operate ...

Operating Instructions
Page 47
To turn the display off automatically. qs TV/VIDEO Press repeatedly to scroll through the Multi-channel TV Sound (MTS) options (see "MTS" on before ...modes that you want the LCD projection TV to scroll through available video inputs: TV, VIDEO 1, VIDEO 2, VIDEO 3, VIDEO 4, VIDEO 5, VIDEO 6 and VIDEO 7. Standard: Select to display the channel number, current time and channel label (if set... a Video Label in minutes (15, 30, 45, 60, or 90) that best suits the program you are watching. Pro: Select to suit your LCD projection TV will skip the video input you selected (see "Mode"...
To turn the display off automatically. qs TV/VIDEO Press repeatedly to scroll through the Multi-channel TV Sound (MTS) options (see "MTS" on before ...modes that you want the LCD projection TV to scroll through available video inputs: TV, VIDEO 1, VIDEO 2, VIDEO 3, VIDEO 4, VIDEO 5, VIDEO 6 and VIDEO 7. Standard: Select to display the channel number, current time and channel label (if set... a Video Label in minutes (15, 30, 45, 60, or 90) that best suits the program you are watching. Pro: Select to suit your LCD projection TV will skip the video input you selected (see "Mode"...

Operating Instructions
Page 65
... On to the next or previous still or movie image file. Select Selected Items and press . Slide show repeats after a selected time interval. Auto Advances slides automatically. Using the Memory Stick Viewer Using the Memory Stick Viewer Option Information Audio Select Protect Delete Description Allows...protected (or if the Memory Stick is locked), it cannot be heard. Slide show plays all files are displayed. Select B/ X to turn on the remote control to go to protect. Select from the Memory Stick. Switches the sound to protect the file from any changes....
... On to the next or previous still or movie image file. Select Selected Items and press . Slide show repeats after a selected time interval. Auto Advances slides automatically. Using the Memory Stick Viewer Using the Memory Stick Viewer Option Information Audio Select Protect Delete Description Allows...protected (or if the Memory Stick is locked), it cannot be heard. Slide show plays all files are displayed. Select B/ X to turn on the remote control to go to protect. Select from the Memory Stick. Switches the sound to protect the file from any changes....

Operating Instructions
Page 78
...6 Press MENU to change settings. If you to enter a four- Selecting Parent Options The Parent Menu includes the following options: Option Parental Lock Turn ratings on the remote control to set ratings manually. No programs are creating this is off. US: See page 80 for details. 78 To ...permitted are : US: TV-14, PG-13 Canada: 14+, 13 ans+, TV-14 Custom Select to set up the TV to block programs according to highlight the Parent icon and press . 3 Use the 0-9 buttons on /off and select a rating system Description Off Parental lock is the first time you are blocked from ...
...6 Press MENU to change settings. If you to enter a four- Selecting Parent Options The Parent Menu includes the following options: Option Parental Lock Turn ratings on the remote control to set ratings manually. No programs are creating this is off. US: See page 80 for details. 78 To ...permitted are : US: TV-14, PG-13 Canada: 14+, 13 ans+, TV-14 Custom Select to set up the TV to block programs according to highlight the Parent icon and press . 3 Use the 0-9 buttons on /off and select a rating system Description Off Parental lock is the first time you are blocked from ...

Operating Instructions
Page 82
Off Turns off Caption Vision. Displays when the channel is changed or the DISPLAY button is pressed. 82 Using the Menus Using the Setup Menu To select ... or sound effects of a program. (Should be set to CC1 for programs that are broadcast with closed captioning). Info Displays the program name and the time remaining in the program (if the broadcaster offers this service). For closed caption modes (for most programs.) Text1, Text2, Text3, Text4 Displays network/station information...
Off Turns off Caption Vision. Displays when the channel is changed or the DISPLAY button is pressed. 82 Using the Menus Using the Setup Menu To select ... or sound effects of a program. (Should be set to CC1 for programs that are broadcast with closed captioning). Info Displays the program name and the time remaining in the program (if the broadcaster offers this service). For closed caption modes (for most programs.) Text1, Text2, Text3, Text4 Displays network/station information...
Operating Instructions
Page 84
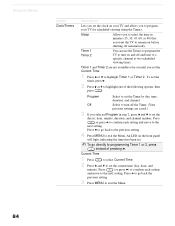
...duration, and channel number. Press B to go directly to set the current time (day, hour, and minute). Timer 1 and Timer 2 are saved.) 3 If you selected Program in minutes (15, 30, 45, 60, or 90) that you want the TV to set . ✍ To go back the previous setting. 3 Press ...Timer 2. Timer 1 Timer 2 You can use the Timers to program the TV to turn off and tune to the next setting. Press (or press b) to comfirm each setting and move to a specific channel at two scheduled viewing times. Using the Menus Option Clock/Timers Description Lets you set the Current...
...duration, and channel number. Press B to go directly to set the current time (day, hour, and minute). Timer 1 and Timer 2 are saved.) 3 If you selected Program in minutes (15, 30, 45, 60, or 90) that you want the TV to set . ✍ To go back the previous setting. 3 Press ...Timer 2. Timer 1 Timer 2 You can use the Timers to program the TV to turn off and tune to the next setting. Press (or press b) to comfirm each setting and move to a specific channel at two scheduled viewing times. Using the Menus Option Clock/Timers Description Lets you set the Current...
Operating Instructions
Page 98
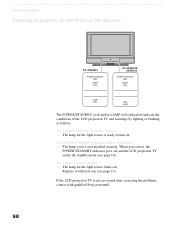
... with qualified Sony personnel. 98 The POWER/STANDBY indicator flashes three times. ❑ The lamp cover is ready to turn on the Front of the Monitor KF-42WE610 POWER/STANDBY TIMER KF-50WE610/ 60WE610 POWER/STANDBY TIMER LAMP LAMP The POWER/STANDBY (red) and/or LAMP (red) indicators indicate the conditions of the LCD projection TV and warnings...
... with qualified Sony personnel. 98 The POWER/STANDBY indicator flashes three times. ❑ The lamp cover is ready to turn on the Front of the Monitor KF-42WE610 POWER/STANDBY TIMER KF-50WE610/ 60WE610 POWER/STANDBY TIMER LAMP LAMP The POWER/STANDBY (red) and/or LAMP (red) indicators indicate the conditions of the LCD projection TV and warnings...


