
Operating Instructions
Page 1
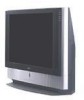
Customers in the continental United States contact the Direct Response Center at: 1-800-222-SONY (7669) Customers in U.S.A. If, after reading this instruction manual, you have additional questions related to the use of your Sony projection TV, please call one of the following numbers (English only). 4-097-546-13 (2) LCD Projection TV KF-42WE610/50WE610/60WE610 Printed in Canada contact the Customer Relations Center at: (416) 499-SONY (7669) LCD Projection TV HD-Monitor Operating Instructions KF-42WE610 KF-50WE610 KF-60WE610 2003 Sony Corporation
Customers in the continental United States contact the Direct Response Center at: 1-800-222-SONY (7669) Customers in U.S.A. If, after reading this instruction manual, you have additional questions related to the use of your Sony projection TV, please call one of the following numbers (English only). 4-097-546-13 (2) LCD Projection TV KF-42WE610/50WE610/60WE610 Printed in Canada contact the Customer Relations Center at: (416) 499-SONY (7669) LCD Projection TV HD-Monitor Operating Instructions KF-42WE610 KF-50WE610 KF-60WE610 2003 Sony Corporation
Operating Instructions
Page 2
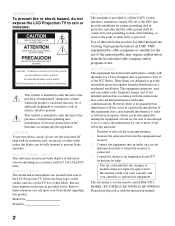
... are designed to the grounding system of the building, as practical. You are located at the rear of the following measures: ❑ Reorient or relocate the receiving antennas. ❑ Increase the... transmitted by one or more of the LCD Projection TV, below . This symbol is connected. ❑ Consult the dealer or an experienced radio/TV technician for help. Owner's Record The model...below the Sony logo, on the sticker, and also on , the user is for the use of this equipment does cause harmful interference to operate this product. MODEL: KF-42WE610, KF-50WE610, KF-60WE610 ...
... are designed to the grounding system of the building, as practical. You are located at the rear of the following measures: ❑ Reorient or relocate the receiving antennas. ❑ Increase the... transmitted by one or more of the LCD Projection TV, below . This symbol is connected. ❑ Consult the dealer or an experienced radio/TV technician for help. Owner's Record The model...below the Sony logo, on the sticker, and also on , the user is for the use of this equipment does cause harmful interference to operate this product. MODEL: KF-42WE610, KF-50WE610, KF-60WE610 ...

Operating Instructions
Page 3
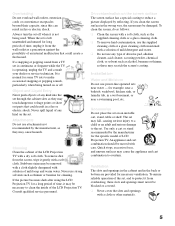
As an ENERGY STAR® Partner, Sony Corporation has determined that face the screen with opaque drapery. BBE and... your dealer. ❑ If any liquid or solid object should fall inside the cabinet, unplug the LCD Projection TV immediately and have it checked by pulling the plug itself. and are trademarks of BBE Sound, Inc. If... ceiling or to a warm location, or if the room temperature changes suddenly, the picture may be using the LCD Projection TV for energy efficiency. Installing ❑ To prevent internal heat buildup, do not expose the screen to let the moisture...
As an ENERGY STAR® Partner, Sony Corporation has determined that face the screen with opaque drapery. BBE and... your dealer. ❑ If any liquid or solid object should fall inside the cabinet, unplug the LCD Projection TV immediately and have it checked by pulling the plug itself. and are trademarks of BBE Sound, Inc. If... ceiling or to a warm location, or if the room temperature changes suddenly, the picture may be using the LCD Projection TV for energy efficiency. Installing ❑ To prevent internal heat buildup, do not expose the screen to let the moisture...
Operating Instructions
Page 5
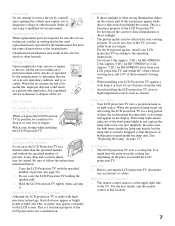
...with a soft cloth, such as they may be removed with a cloth slightly dampened with a soft cloth. Cleaning Clean the cabinet of the LCD Projection TV with a solution of mild detergent and water. ❑ Do not use attachments not recommended by the manufacturer, as the supplied cleaning cloth or ... touch dangerous voltage points or short out parts that could result in fire or electric shock. If the picture becomes dark after using the LCD Projection TV for example, near a swimming pool, etc. for a long period of any kind into the set . Use only a cart or stand ...
...with a soft cloth, such as they may be removed with a cloth slightly dampened with a soft cloth. Cleaning Clean the cabinet of the LCD Projection TV with a solution of mild detergent and water. ❑ Do not use attachments not recommended by the manufacturer, as the supplied cleaning cloth or ... touch dangerous voltage points or short out parts that could result in fire or electric shock. If the picture becomes dark after using the LCD Projection TV for example, near a swimming pool, etc. for a long period of any kind into the set . Use only a cart or stand ...
Operating Instructions
Page 7
... the specified number of persons (see page 18). ❑ Do not carry the LCD Projection TV holding the speaker grill. ❑ Hold the LCD Projection TV tightly when carrying it at least 1.8m (approx. 5.9ft.) for KF-42WE610, 2.0m (approx. 6.6ft.) for KF-50WE610 or 2.2m (approx. 7.2ft.) for a long period of its light source. Safety Check...
... the specified number of persons (see page 18). ❑ Do not carry the LCD Projection TV holding the speaker grill. ❑ Hold the LCD Projection TV tightly when carrying it at least 1.8m (approx. 5.9ft.) for KF-42WE610, 2.0m (approx. 6.6ft.) for KF-50WE610 or 2.2m (approx. 7.2ft.) for a long period of its light source. Safety Check...
Operating Instructions
Page 8
...Sony LCD Projection TV Presenting the Sony LCD Projection TV 9 Using This Manual 10 Enjoying Your LCD Projection TV 11 Replacing the Lamp 13 Installing and Connecting the LCD Projection TV Contents 17 Inserting Batteries into the Remote Control ..........17 Carrying Your LCD Projection TV 18 To Prevent the LCD Projection TV from Falling Down 19 When Installing Your LCD Projection TV... TV Receiver with component connectors 39 Connecting a Digital TV Receiver with DVI-HDTV connector 40 Connecting a Camcorder 41 Using the CONTROL S Feature 42 Setting Up the LCD projection TV ...
...Sony LCD Projection TV Presenting the Sony LCD Projection TV 9 Using This Manual 10 Enjoying Your LCD Projection TV 11 Replacing the Lamp 13 Installing and Connecting the LCD Projection TV Contents 17 Inserting Batteries into the Remote Control ..........17 Carrying Your LCD Projection TV 18 To Prevent the LCD Projection TV from Falling Down 19 When Installing Your LCD Projection TV... TV Receiver with component connectors 39 Connecting a Digital TV Receiver with DVI-HDTV connector 40 Connecting a Camcorder 41 Using the CONTROL S Feature 42 Setting Up the LCD projection TV ...
Operating Instructions
Page 9
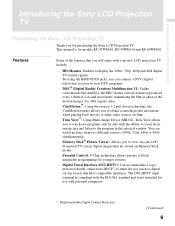
... to the program in on Memory Stick media. ❑ Parental Control: V-Chip technology allows parents to block unsuitable programming for purchasing the Sony LCD Projection TV. You can connect a DTV (digital television) receiver to view DTV programs. ❑ DRC® (Digital Reality Creation) Multifunction V1:...or ghost of the features that you will enjoy with your LCD Projection TV screen digital images that have compatible interfaces. The DVI-HDTV input terminal is not intended for models KF-42WE610, KF-50WE610 and KF-60WE610. This manual is for use with the EIA-861 standard ...
... to the program in on Memory Stick media. ❑ Parental Control: V-Chip technology allows parents to block unsuitable programming for purchasing the Sony LCD Projection TV. You can connect a DTV (digital television) receiver to view DTV programs. ❑ DRC® (Digital Reality Creation) Multifunction V1:...or ghost of the features that you will enjoy with your LCD Projection TV screen digital images that have compatible interfaces. The DVI-HDTV input terminal is not intended for models KF-42WE610, KF-50WE610 and KF-60WE610. This manual is for use with the EIA-861 standard ...
Operating Instructions
Page 10
Instructions in this manual are also found on -screen menus and adjust your LCD projection TV settings. It shows you how to install your LCD projection TV, to access on the LCD projection TV console. 10 Similar controls are written for connected equipment. ❑ Favorite Channel Preview: Preview... and to connect the antenna and cable. 2 Using the Features This section shows you how to connect your initial setup. Introducing the Sony LCD Projection TV ❑ Component Video Inputs: Offers the best video quality for DVD (480p, 480i) and Digital Set-top box (1080i, 720p,...
Instructions in this manual are also found on -screen menus and adjust your LCD projection TV settings. It shows you how to install your LCD projection TV, to access on the LCD projection TV console. 10 Similar controls are written for connected equipment. ❑ Favorite Channel Preview: Preview... and to connect the antenna and cable. 2 Using the Features This section shows you how to connect your initial setup. Introducing the Sony LCD Projection TV ❑ Component Video Inputs: Offers the best video quality for DVD (480p, 480i) and Digital Set-top box (1080i, 720p,...
Operating Instructions
Page 11
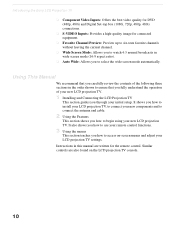
Note the following: ❑ After turning on your LCD projection TV. Projection lamp Your LCD projection TV uses a projection lamp as its surface has a special coating. Enjoying Your LCD Projection TV Introducing the Sony LCD Projection TV Introducing the Sony LCD Projection TV Projection lamp Indicators Screen Indicators The indicators show the current status of your LCD projection TV, it may take a while before cleaning. Read the instructions...
Note the following: ❑ After turning on your LCD projection TV. Projection lamp Your LCD projection TV uses a projection lamp as its surface has a special coating. Enjoying Your LCD Projection TV Introducing the Sony LCD Projection TV Introducing the Sony LCD Projection TV Projection lamp Indicators Screen Indicators The indicators show the current status of your LCD projection TV, it may take a while before cleaning. Read the instructions...
Operating Instructions
Page 12
...Use of time ❑ Turn off the power switch on the main unit or on the lenses inside. When carrying the LCD projection TV ❑ Disconnect the connections. Do not apply heavy press when cleaning. ✍ The supplied Cleaning Cloth is because moisture has ...solution, and can be used for more than 7 days. Introducing the Sony LCD Projection TV Notes on the front of your LCD projection TV before using your LCD projection TV. On moisture condensation ❑ If your LCD projection TV is easily scratched. When the LCD projection TV will continue to sleep or going out.
...Use of time ❑ Turn off the power switch on the main unit or on the lenses inside. When carrying the LCD projection TV ❑ Disconnect the connections. Do not apply heavy press when cleaning. ✍ The supplied Cleaning Cloth is because moisture has ...solution, and can be used for more than 7 days. Introducing the Sony LCD Projection TV Notes on the front of your LCD projection TV before using your LCD projection TV. On moisture condensation ❑ If your LCD projection TV is easily scratched. When the LCD projection TV will continue to sleep or going out.
Operating Instructions
Page 13
...✍ Do not touch the front glass of a new lamp or the glass of the lamp receptacle. Introducing the Sony LCD Projection TV Introducing the Sony LCD Projection TV Replacing the Lamp The projection lamp has a limited life which illuminates the picture. This may cause the lamp to burst. ❑ Do not ... as the surface of the lamp remains extremely hot for at least 30 minutes after removing the lamp. Doing so may damage the LCD projection TV. ❑ Do not remove the lamp for replacement. The Used Lamp The used lamp contains Mercury, Dispose According to follow the instructions ...
...✍ Do not touch the front glass of a new lamp or the glass of the lamp receptacle. Introducing the Sony LCD Projection TV Introducing the Sony LCD Projection TV Replacing the Lamp The projection lamp has a limited life which illuminates the picture. This may cause the lamp to burst. ❑ Do not ... as the surface of the lamp remains extremely hot for at least 30 minutes after removing the lamp. Doing so may damage the LCD projection TV. ❑ Do not remove the lamp for replacement. The Used Lamp The used lamp contains Mercury, Dispose According to follow the instructions ...
Operating Instructions
Page 14
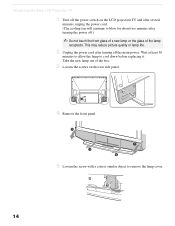
Introducing the Sony LCD Projection TV 1 Turn off the power switch on the LCD projection TV and after several minutes, unplug the power cord. (The cooling fan will continue to blow for about two minutes after turning off .) ✍ Do not ...touch the front glass of a new lamp or the glass of the box. 3 Loosen the screws on the rear side panel. 4 Remove...
Introducing the Sony LCD Projection TV 1 Turn off the power switch on the LCD projection TV and after several minutes, unplug the power cord. (The cooling fan will continue to blow for about two minutes after turning off .) ✍ Do not ...touch the front glass of a new lamp or the glass of the box. 3 Loosen the screws on the rear side panel. 4 Remove...
Operating Instructions
Page 15
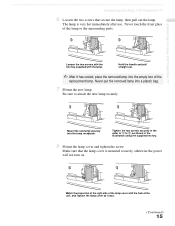
...parts. Hold the handle and pull straight out. ✍ After it was. (Continued) 15 Never put the removed lamp into the lamp receptacle. Match the projection of the right side of the lamp cover with the lamp. The lamp is mounted securely, otherwise the power will not turn on. Tighten the.... Make sure that secure the lamp, then pull out the lamp. Never touch the front glass of 1 to attach the new lamp securely. Introducing the Sony LCD Projection TV Introducing the Sony LCD Projection TV 6 Loosen the two screws that the lamp cover is very hot immediately after use.
...parts. Hold the handle and pull straight out. ✍ After it was. (Continued) 15 Never put the removed lamp into the lamp receptacle. Match the projection of the right side of the lamp cover with the lamp. The lamp is mounted securely, otherwise the power will not turn on. Tighten the.... Make sure that secure the lamp, then pull out the lamp. Never touch the front glass of 1 to attach the new lamp securely. Introducing the Sony LCD Projection TV Introducing the Sony LCD Projection TV 6 Loosen the two screws that the lamp cover is very hot immediately after use.
Operating Instructions
Page 16
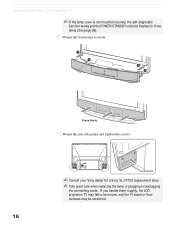
If you handle them roughly, the LCD projection TV may fall or be moved, and the TV stand or floor surfaces may be scratched. 16 Press firmly. 10 Mount the rear side panel and tighten the screws. ✍ Consult your Sony dealer for three times (See page 98). 9 Mount the front panel securely. Introducing the Sony LCD Projection TV ✍ If the lamp cover is not mounted securely, the self-diagnostic function works and the POWER/STANDBY indicator flashes for a Sony XL-2100U replacement lamp. ✍ Take great care when replacing the lamp or plugging in/unplugging the connecting cords.
If you handle them roughly, the LCD projection TV may fall or be moved, and the TV stand or floor surfaces may be scratched. 16 Press firmly. 10 Mount the rear side panel and tighten the screws. ✍ Consult your Sony dealer for three times (See page 98). 9 Mount the front panel securely. Introducing the Sony LCD Projection TV ✍ If the lamp cover is not mounted securely, the self-diagnostic function works and the POWER/STANDBY indicator flashes for a Sony XL-2100U replacement lamp. ✍ Take great care when replacing the lamp or plugging in/unplugging the connecting cords.
Operating Instructions
Page 17
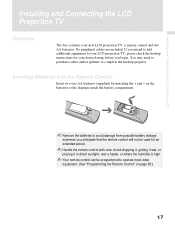
...humidity is high. ✍ Your remote control can be used for your new LCD projection TV, a remote control and two AA batteries. If you intend to add additional equipment to your LCD projection TV, please check the hookup instructions for an extended period. ✍ Handle the remote control...You may need to purchase cables and/or splitters to complete the hookup properly. Installing and Connecting the LCD Projection TV Installing and Connecting the LCD Projection TV Contents The box contains your desired setup before you anticipate that the remote control will not be programmed to ...
...humidity is high. ✍ Your remote control can be used for your new LCD projection TV, a remote control and two AA batteries. If you intend to add additional equipment to your LCD projection TV, please check the hookup instructions for an extended period. ✍ Handle the remote control...You may need to purchase cables and/or splitters to complete the hookup properly. Installing and Connecting the LCD Projection TV Installing and Connecting the LCD Projection TV Contents The box contains your desired setup before you anticipate that the remote control will not be programmed to ...
Operating Instructions
Page 18
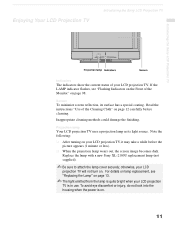
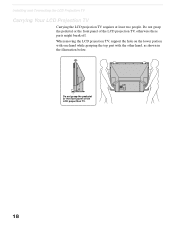
Do not grasp the pedestal or the front panel of the LCD projection TV, otherwise these parts might break off. Do not grasp the pedestal or the front panel of the LCD projecttion TV. 18 When moving the LCD projection TV, support the hole on the lower portion with one hand while grasping the top part with the other hand, as shown in the illustration below. Installing and Connecting the LCD Projection TV Carrying Your LCD Projection TV Carrying the LCD projection TV requires at least two people.
Do not grasp the pedestal or the front panel of the LCD projection TV, otherwise these parts might break off. Do not grasp the pedestal or the front panel of the LCD projecttion TV. 18 When moving the LCD projection TV, support the hole on the lower portion with one hand while grasping the top part with the other hand, as shown in the illustration below. Installing and Connecting the LCD Projection TV Carrying Your LCD Projection TV Carrying the LCD projection TV requires at least two people.
Operating Instructions
Page 19
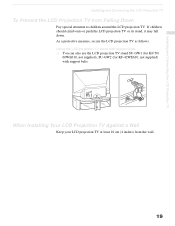
... LCD projection TV. Using the LCD projection TV stand with support belts ❑ You can also use the LCD projection TV stand SU-GW1 (for KF-50/ 60WE610, not supplied), SU-GW2 (for KF-42WE610, not supplied) with support belts. As a protective measure, secure the LCD projection TV as follows. Installing and Connecting the LCD Projection TV Installing and Connecting the LCD Projection TV To...
... LCD projection TV. Using the LCD projection TV stand with support belts ❑ You can also use the LCD projection TV stand SU-GW1 (for KF-50/ 60WE610, not supplied), SU-GW2 (for KF-42WE610, not supplied) with support belts. As a protective measure, secure the LCD projection TV as follows. Installing and Connecting the LCD Projection TV Installing and Connecting the LCD Projection TV To...
Operating Instructions
Page 20
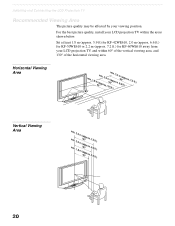
... picture quality, install your viewing position. Horizontal Viewing Area min. 1.8 min. 2.0 m402(a"pprox. Sit at least 1.8 m (approx. 5.9 ft) for KF-42WE610, 2.0 m (approx. 6.6 ft.) for KF-50WE610 or 2.2 m (approx. 7.2 ft.) for KF-60WE610 away from your LCD projection TV, and within the areas shown below. min. 2.2 2.0 1.8 m m m (6a0p"prox. (5a0p"prox. (4a02p"prox. 7.2 6.6 5.9 ft.) ft.) ft.) 30˚...
... picture quality, install your viewing position. Horizontal Viewing Area min. 1.8 min. 2.0 m402(a"pprox. Sit at least 1.8 m (approx. 5.9 ft) for KF-42WE610, 2.0 m (approx. 6.6 ft.) for KF-50WE610 or 2.2 m (approx. 7.2 ft.) for KF-60WE610 away from your LCD projection TV, and within the areas shown below. min. 2.2 2.0 1.8 m m m (6a0p"prox. (5a0p"prox. (4a02p"prox. 7.2 6.6 5.9 ft.) ft.) ft.) 30˚...

Operating Instructions
Page 21
When lit, indicates that the Memory Stick is being read. (Do not remove the Memory Stick when the indicator is lit.) (Continued) 21 Installing and Connecting the LCD Projection TV Installing and Connecting the LCD Projection TV LCD Projection TV Connectors LCD Projection TV Front and Rear Side Connectors How to open the front panel To open OPEN OPEN Push up. Item 1 MEMORY STICK 2 MEMORY STICK ACCESS LED Description Memory Stick insertion slot. For details, see "Inserting and Removing a Memory Stick" on page 57.
When lit, indicates that the Memory Stick is being read. (Do not remove the Memory Stick when the indicator is lit.) (Continued) 21 Installing and Connecting the LCD Projection TV Installing and Connecting the LCD Projection TV LCD Projection TV Connectors LCD Projection TV Front and Rear Side Connectors How to open the front panel To open OPEN OPEN Push up. Item 1 MEMORY STICK 2 MEMORY STICK ACCESS LED Description Memory Stick insertion slot. For details, see "Inserting and Removing a Memory Stick" on page 57.

Operating Instructions
Page 22
Installing and Connecting the LCD Projection TV Rear of LCD projection TV Front left side of LCD projection TV VIDEO 2 INPUT S VIDEO VIDEO L(MONO)-AUDIO-R 22
Installing and Connecting the LCD Projection TV Rear of LCD projection TV Front left side of LCD projection TV VIDEO 2 INPUT S VIDEO VIDEO L(MONO)-AUDIO-R 22


