Operating Instructions
Page 4
...of the set or described in any ventilation openings. Use Power Sources This set should be operated only from tip-over. 13) Unplug this manual for grounding). Do not defeat the safety purpose of electrical power supplied to your home, consult your electrician to have fallen ...into a groundingtype power outlet. Install in accordance with liquids, such as power-supply cord or plug is required when the apparatus has been damaged in...
...of the set or described in any ventilation openings. Use Power Sources This set should be operated only from tip-over. 13) Unplug this manual for grounding). Do not defeat the safety purpose of electrical power supplied to your home, consult your electrician to have fallen ...into a groundingtype power outlet. Install in accordance with liquids, such as power-supply cord or plug is required when the apparatus has been damaged in...
Operating Instructions
Page 5
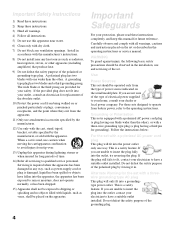
...; To remove hard contamination, use the supplied cleaning cloth or a glass cleaning cloth moistened with a soft cloth. Never use power-line operated sets near a swimming pool, etc. To remove dust from a TV set . An appliance and cart combination should... be blocked or covered. ❑ Never cover the slots and openings with a dry soft cloth. Use only a cart or stand recommended by the manufacturer, as a precaution against the possibility of the LCD Projection TV...
...; To remove hard contamination, use the supplied cleaning cloth or a glass cleaning cloth moistened with a soft cloth. Never use power-line operated sets near a swimming pool, etc. To remove dust from a TV set . An appliance and cart combination should... be blocked or covered. ❑ Never cover the slots and openings with a dry soft cloth. Use only a cart or stand recommended by the manufacturer, as a precaution against the possibility of the LCD Projection TV...
Operating Instructions
Page 11
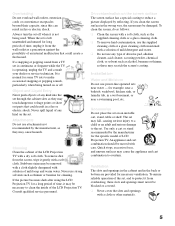
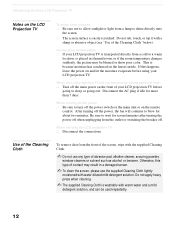
...its light source. To avoid eye discomfort or injury, do not look into the housing when the power is on . otherwise, your LCD projection TV is quite bright when your LCD projection TV will not turn on . 11 Note the following: ❑ After turning on page 13. ... LAMP indicator flashes, see "Replacing the Lamp" on your LCD projection TV. Projection lamp Your LCD projection TV uses a projection lamp as its surface has a special coating. Replace the lamp with a new Sony XL-2100U replacement lamp (not supplied). ✍ Be sure to attach the lamp cover securely; Inappropriate...
...its light source. To avoid eye discomfort or injury, do not look into the housing when the power is on . otherwise, your LCD projection TV is quite bright when your LCD projection TV will not turn on . 11 Note the following: ❑ After turning on page 13. ... LAMP indicator flashes, see "Replacing the Lamp" on your LCD projection TV. Projection lamp Your LCD projection TV uses a projection lamp as its surface has a special coating. Replace the lamp with a new Sony XL-2100U replacement lamp (not supplied). ✍ Be sure to attach the lamp cover securely; Inappropriate...
Operating Instructions
Page 12
...from the front of the screen, wipe with the supplied Cleaning Cloth. ✍ Do not use the supplied Cleaning Cloth lightly moistened with a sharp or abrasive object (see "Use of your LCD projection TV before using your LCD projection TV is washable with warm water and a mild detergent ... be used for several minutes after turning the power off when unplugging from the outlet or switching the breaker off. Otherwise, this happens, leave the power on the lenses inside. Introducing the Sony LCD Projection TV Notes on the LCD Projection TV To enjoy clear pictures ❑ Be sure ...
...from the front of the screen, wipe with the supplied Cleaning Cloth. ✍ Do not use the supplied Cleaning Cloth lightly moistened with a sharp or abrasive object (see "Use of your LCD projection TV before using your LCD projection TV is washable with warm water and a mild detergent ... be used for several minutes after turning the power off when unplugging from the outlet or switching the breaker off. Otherwise, this happens, leave the power on the lenses inside. Introducing the Sony LCD Projection TV Notes on the LCD Projection TV To enjoy clear pictures ❑ Be sure ...
Operating Instructions
Page 13
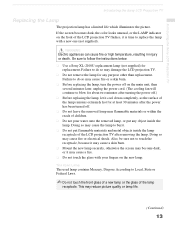
Introducing the Sony LCD Projection TV Introducing the Sony LCD Projection TV Replacing the Lamp The projection lamp has a limited life which illuminates the picture. This may cause a fire. ❑ Do not touch the glass with a new one (not supplied). WARNING Electric appliances can cause fire or high temperature, resulting in...become dark, or it is time to do so may damage the LCD projection TV. ❑ Do not remove the lamp for any object inside the lamp receptacle of the LCD projection TV after the power has been turned off .) ❑ Before replacing the lamp, let it ...
Introducing the Sony LCD Projection TV Introducing the Sony LCD Projection TV Replacing the Lamp The projection lamp has a limited life which illuminates the picture. This may cause a fire. ❑ Do not touch the glass with a new one (not supplied). WARNING Electric appliances can cause fire or high temperature, resulting in...become dark, or it is time to do so may damage the LCD projection TV. ❑ Do not remove the lamp for any object inside the lamp receptacle of the LCD projection TV after the power has been turned off .) ❑ Before replacing the lamp, let it ...
Operating Instructions
Page 15
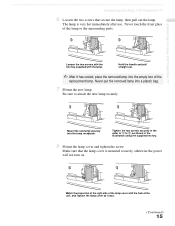
...the removed lamp into the lamp receptacle. Tighten the two screws securely in the illustration using the supplied hex key. 8 Mount the lamp cover and tighten the screw. Introducing the Sony LCD Projection TV Introducing the Sony LCD Projection TV 6 Loosen the two screws that the lamp cover is very hot immediately after use. Loosen the...; After it was. (Continued) 15 Mount the new lamp securely into a plastic bag. 7 Mount the new lamp. The lamp is mounted securely, otherwise the power will not turn on. Match the projection of the right side of the lamp or the surrounding parts.
...the removed lamp into the lamp receptacle. Tighten the two screws securely in the illustration using the supplied hex key. 8 Mount the lamp cover and tighten the screw. Introducing the Sony LCD Projection TV Introducing the Sony LCD Projection TV 6 Loosen the two screws that the lamp cover is very hot immediately after use. Loosen the...; After it was. (Continued) 15 Mount the new lamp securely into a plastic bag. 7 Mount the new lamp. The lamp is mounted securely, otherwise the power will not turn on. Match the projection of the right side of the lamp or the surrounding parts.
Operating Instructions
Page 29
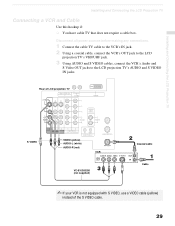
...; You have cable TV that does not require a cable box. Rear of LCD projection TV S VIDEO VIDEO (yellow) AUDIO-L (white) AUDIO-R (red) VCR VC-810S/820S (not supplied) Coaxial cable Cable ✍ If your VCR is not equipped with S VIDEO, use a VIDEO cable (yellow) instead of the S VIDEO cable. 29 Disconnect all power sources before making...
...; You have cable TV that does not require a cable box. Rear of LCD projection TV S VIDEO VIDEO (yellow) AUDIO-L (white) AUDIO-R (red) VCR VC-810S/820S (not supplied) Coaxial cable Cable ✍ If your VCR is not equipped with S VIDEO, use a VIDEO cable (yellow) instead of the S VIDEO cable. 29 Disconnect all power sources before making...
Operating Instructions
Page 32
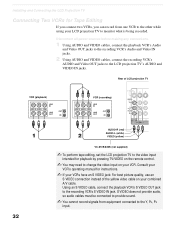
... on the remote control. ✍ You may need to change the video input on your LCD projection TV to the Y, PB, PR input. 32 Disconnect all power sources before making any connections. 1 Using AUDIO and VIDEO cables, connect the playback VCR's Audio and Video OUT jacks to the recording ...-L (white) VIDEO (yellow) VC-810S/820S (not supplied) ✍ To perform tape editing, set the LCD projection TV to the video input intended for Tape Editing If you connect two VCRs, you can record from equipment connected to monitor what is being recorded. Rear of the yellow video cable on your VCR.
... on the remote control. ✍ You may need to change the video input on your LCD projection TV to the Y, PB, PR input. 32 Disconnect all power sources before making any connections. 1 Using AUDIO and VIDEO cables, connect the playback VCR's Audio and Video OUT jacks to the recording ...-L (white) VIDEO (yellow) VC-810S/820S (not supplied) ✍ To perform tape editing, set the LCD projection TV to the video input intended for Tape Editing If you connect two VCRs, you can record from equipment connected to monitor what is being recorded. Rear of the yellow video cable on your VCR.
Operating Instructions
Page 33
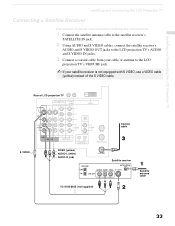
... your cable or antenna to the LCD projection TV's VHF/UHF jack. ✍ If your satellite receiver is not equipped with S VIDEO, use a VIDEO cable (yellow) instead of LCD projection TV S VIDEO Coaxial cable VIDEO (yellow) AUDIO-L (white) AUDIO-R (red) VC-810S/820S (not supplied) Satellite receiver Satellite antenna cable 33 Rear of the S VIDEO cable.
... your cable or antenna to the LCD projection TV's VHF/UHF jack. ✍ If your satellite receiver is not equipped with S VIDEO, use a VIDEO cable (yellow) instead of LCD projection TV S VIDEO Coaxial cable VIDEO (yellow) AUDIO-L (white) AUDIO-R (red) VC-810S/820S (not supplied) Satellite receiver Satellite antenna cable 33 Rear of the S VIDEO cable.
Operating Instructions
Page 34
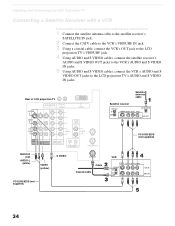
Rear of LCD projection TV Satellite receiver Satellite antenna cable AUDIO-R (red) AUDIO-L (white) S VIDEO VIDEO (yellow) VC-810S/820S (not supplied) Cable Coaxial cable VCR VC-810S/820S (not supplied) 34 Installing and Connecting the LCD Projection TV Connecting a Satellite Receiver with a VCR Disconnect all power sources before making any connections. 1 Connect the satellite antenna cable to the...
Rear of LCD projection TV Satellite receiver Satellite antenna cable AUDIO-R (red) AUDIO-L (white) S VIDEO VIDEO (yellow) VC-810S/820S (not supplied) Cable Coaxial cable VCR VC-810S/820S (not supplied) 34 Installing and Connecting the LCD Projection TV Connecting a Satellite Receiver with a VCR Disconnect all power sources before making any connections. 1 Connect the satellite antenna cable to the...
Operating Instructions
Page 36
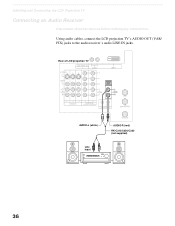
Rear of LCD projection TV AUDIO-L (white) Line input AUDIO-R (red) RK-C310/C320/C330 (not supplied) 36 Using audio cables, connect the LCD projection TV's AUDIO OUT (VAR/ FIX) jacks to the audio receiver's audio LINE IN jacks. Installing and Connecting the LCD Projection TV Connecting an Audio Receiver Disconnect all power sources before making any connections.
Rear of LCD projection TV AUDIO-L (white) Line input AUDIO-R (red) RK-C310/C320/C330 (not supplied) 36 Using audio cables, connect the LCD projection TV's AUDIO OUT (VAR/ FIX) jacks to the audio receiver's audio LINE IN jacks. Installing and Connecting the LCD Projection TV Connecting an Audio Receiver Disconnect all power sources before making any connections.
Operating Instructions
Page 37
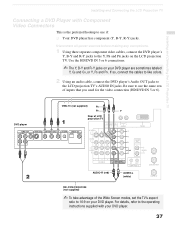
... player. Be sure to the LCD projection TV's AUDIO IN jacks. Disconnect all power sources before making any connections. 1 Using three separate component video cables, connect the DVD player's Y, B-Y and R-Y jacks to 16:9 on your DVD player. 37 DVD player VMC-10 (not supplied) PB PR Y Rear of LCD projection TV AUDIO-R (red) AUDIO-L (white) RK-C310...
... player. Be sure to the LCD projection TV's AUDIO IN jacks. Disconnect all power sources before making any connections. 1 Using three separate component video cables, connect the DVD player's Y, B-Y and R-Y jacks to 16:9 on your DVD player. 37 DVD player VMC-10 (not supplied) PB PR Y Rear of LCD projection TV AUDIO-R (red) AUDIO-L (white) RK-C310...
Operating Instructions
Page 38
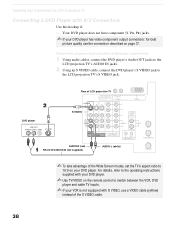
... refer to the operating instructions supplied with your DVD player. ✍ Use TV/VIDEO on page 37. Rear of LCD projection TV DVD player S VIDEO AUDIO-R (red) RK-C310/C320/C330 (not supplied) AUDIO-L (white) ✍ To take advantage of the Wide Screen modes, set the TV's aspect ratio to 16:9 ... quality use a VIDEO cable (yellow) instead of the S VIDEO cable. 38 Disconnect all power sources before making any connections. 1 Using audio cables, connect the DVD player's Audio OUT jacks to the LCD projection TV's AUDIO IN jacks. 2 Using an S VIDEO cable, connect the DVD player's S VIDEO...
... refer to the operating instructions supplied with your DVD player. ✍ Use TV/VIDEO on page 37. Rear of LCD projection TV DVD player S VIDEO AUDIO-R (red) RK-C310/C320/C330 (not supplied) AUDIO-L (white) ✍ To take advantage of the Wide Screen modes, set the TV's aspect ratio to 16:9 ... quality use a VIDEO cable (yellow) instead of the S VIDEO cable. 38 Disconnect all power sources before making any connections. 1 Using audio cables, connect the DVD player's Audio OUT jacks to the LCD projection TV's AUDIO IN jacks. 2 Using an S VIDEO cable, connect the DVD player's S VIDEO...
Operating Instructions
Page 39
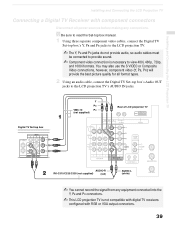
...PR (not supplied) Rear of LCD projection TV Digital TV Set-top box AUDIO-R RK-C310/C320/C330 (not supplied) (red) AUDIO-L (white) ✍ You cannot record the signal from any connections. Installing and Connecting the LCD Projection TV Installing and Connecting the LCD Projection TV Connecting a Digital TV Receiver with ... however, component video (Y, PB, PR) will provide the best picture quality for all power sources before making any equipment connected into the Y, PB and PR connectors. ✍ This LCD projection TV is necessary to the LCD projection TV's AUDIO IN jacks.
...PR (not supplied) Rear of LCD projection TV Digital TV Set-top box AUDIO-R RK-C310/C320/C330 (not supplied) (red) AUDIO-L (white) ✍ You cannot record the signal from any connections. Installing and Connecting the LCD Projection TV Installing and Connecting the LCD Projection TV Connecting a Digital TV Receiver with ... however, component video (Y, PB, PR) will provide the best picture quality for all power sources before making any equipment connected into the Y, PB and PR connectors. ✍ This LCD projection TV is necessary to the LCD projection TV's AUDIO IN jacks.
Operating Instructions
Page 40
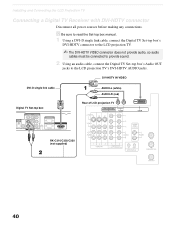
...1080i/720p/480p) DVI-HDTV OUT (1080i/720p/480p) AUDIO-L (white) AUDIO-R (red) Rear of LCD projection TV RK-C310/C320/C330 (not supplied) 40 DVI-HDTV IN VIDEO DVI-D single link cable Digital TV Set-top box OPTICAL AUDIO OUT VIDEO OUT (480i) 1 2 L1 L2 OPTICAL S. z Be... to provide sound. 2 Using an audio cable, connect the Digital TV Set-top box's Audio OUT jacks to the LCD projection TV's DVI-HDTV AUDIO jacks. Installing and Connecting the LCD Projection TV Connecting a Digital TV Receiver with DVI-HDTV connector Disconnect all power sources before making any connections.
...1080i/720p/480p) DVI-HDTV OUT (1080i/720p/480p) AUDIO-L (white) AUDIO-R (red) Rear of LCD projection TV RK-C310/C320/C330 (not supplied) 40 DVI-HDTV IN VIDEO DVI-D single link cable Digital TV Set-top box OPTICAL AUDIO OUT VIDEO OUT (480i) 1 2 L1 L2 OPTICAL S. z Be... to provide sound. 2 Using an audio cable, connect the Digital TV Set-top box's Audio OUT jacks to the LCD projection TV's DVI-HDTV AUDIO jacks. Installing and Connecting the LCD Projection TV Connecting a Digital TV Receiver with DVI-HDTV connector Disconnect all power sources before making any connections.


