
Operating Instructions
Page 5
... of Contents Table of Contents Installing and Connecting the TV Unpacking 6 Inserting Batteries into the Remote Control ... 6 Preventing the TV from Falling Down 6 Connector Types 7 Identifying Front and Rear Connectors .......... 8 Basic Connections (Connecting Cable TV or Antenna 9 Connecting directly to cable or an antenna...Screen Mode manually 30 Changing the Wide Setup 30 Setting the Video Inputs 32 Operating Video Equipment with Your TV Remote Control 33 Programming the remote control 33 Operating optional equipment 35 Using Favorite Channels 36 Setting your favorite channels...
... of Contents Table of Contents Installing and Connecting the TV Unpacking 6 Inserting Batteries into the Remote Control ... 6 Preventing the TV from Falling Down 6 Connector Types 7 Identifying Front and Rear Connectors .......... 8 Basic Connections (Connecting Cable TV or Antenna 9 Connecting directly to cable or an antenna...Screen Mode manually 30 Changing the Wide Setup 30 Setting the Video Inputs 32 Operating Video Equipment with Your TV Remote Control 33 Programming the remote control 33 Operating optional equipment 35 Using Favorite Channels 36 Setting your favorite channels...
Operating Instructions
Page 6
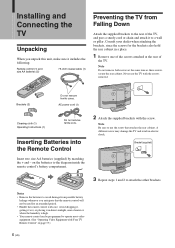
Brackets (2) Do not remove ferrite cores. Never use the screw that the remote control will not be programmed to the diagram inside the remote control's battery compartment. 2 Attach the supplied brackets with Your TV Remote Control" on the batteries to operate most video equipment. (See "Operating Video Equipment with the screw. on page 33.) 6 (US) Inserting Batteries into...
Brackets (2) Do not remove ferrite cores. Never use the screw that the remote control will not be programmed to the diagram inside the remote control's battery compartment. 2 Attach the supplied brackets with Your TV Remote Control" on the batteries to operate most video equipment. (See "Operating Video Equipment with the screw. on page 33.) 6 (US) Inserting Batteries into...
Operating Instructions
Page 9
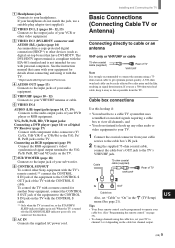
... supplied AC power cord. 1 Headphones jack Connects to the CONTROL S OUT jack of the TV with the CONTROL S cable. To control the TV with a remote control for another Sony equipment, connect the CONTROL S OUT jack of the equipment to the CONTROL S IN jack on the TV with the CONTROL S cable. ** Only when the TV is strongly recommended to connect the antenna using the...
... supplied AC power cord. 1 Headphones jack Connects to the CONTROL S OUT jack of the TV with the CONTROL S cable. To control the TV with a remote control for another Sony equipment, connect the CONTROL S OUT jack of the equipment to the CONTROL S IN jack on the TV with the CONTROL S cable. ** Only when the TV is strongly recommended to connect the antenna using the...
Operating Instructions
Page 12
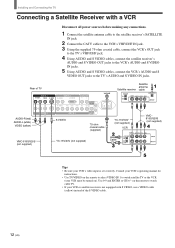
...instructions. • Use TV/VIDEO on the remote to select VIDEO IN 1 to watch satellite TV or the VCR (your VCR must be turned on the remote to the TV's AUDIO and S VIDEO IN jacks. on ). Rear of the S VIDEO cable. 12 (US) Installing and Connecting the TV Connecting a Satellite Receiver with...VCR's video input is not equipped with S VIDEO, use a VIDEO cable (yellow) instead of TV VIDEO IN 1 R AUDIO L VIDEO S VIDEO VIDEO IN 2 VIDEO IN 3 R AUDIO L DVI-HDTV AUDIO OUT R L R AUDIO L Y/G PB/B PR/R HD CONTROL S IN VD OUT VIDEO IN 4 SUB WOOFER VHF/UHF AC IN AUDIO-R (red) AUDIO-L ...
...instructions. • Use TV/VIDEO on the remote to select VIDEO IN 1 to watch satellite TV or the VCR (your VCR must be turned on the remote to the TV's AUDIO and S VIDEO IN jacks. on ). Rear of the S VIDEO cable. 12 (US) Installing and Connecting the TV Connecting a Satellite Receiver with...VCR's video input is not equipped with S VIDEO, use a VIDEO cable (yellow) instead of TV VIDEO IN 1 R AUDIO L VIDEO S VIDEO VIDEO IN 2 VIDEO IN 3 R AUDIO L DVI-HDTV AUDIO OUT R L R AUDIO L Y/G PB/B PR/R HD CONTROL S IN VD OUT VIDEO IN 4 SUB WOOFER VHF/UHF AC IN AUDIO-R (red) AUDIO-L ...

Operating Instructions
Page 15
...(yellow) instead of the S VIDEO cable. Tips • To take advantage of TV AUDIO-R (red) AUDIO-L (white) VIDEO IN 1 R AUDIO L VIDEO S VIDEO VIDEO IN 2 VIDEO IN 3 R AUDIO L DVI-HDTV AUDIO OUT R L R AUDIO L Y/G PB/B PR/R HD CONTROL S IN VD OUT VIDEO IN 4 SUB WOOFER S VIDEO VHF/UHF AC IN ...the pictures input from the S VIDEO input jack, set the TV's aspect ratio to 16:9 on your DVD player. Installing and Connecting the TV Connecting a DVD Player with your DVD player. • Use TV/VIDEO on the remote to switch between the VCR and DVD player inputs. Disconnect all...
...(yellow) instead of the S VIDEO cable. Tips • To take advantage of TV AUDIO-R (red) AUDIO-L (white) VIDEO IN 1 R AUDIO L VIDEO S VIDEO VIDEO IN 2 VIDEO IN 3 R AUDIO L DVI-HDTV AUDIO OUT R L R AUDIO L Y/G PB/B PR/R HD CONTROL S IN VD OUT VIDEO IN 4 SUB WOOFER S VIDEO VHF/UHF AC IN ...the pictures input from the S VIDEO input jack, set the TV's aspect ratio to 16:9 on your DVD player. Installing and Connecting the TV Connecting a DVD Player with your DVD player. • Use TV/VIDEO on the remote to switch between the VCR and DVD player inputs. Disconnect all...
Operating Instructions
Page 20
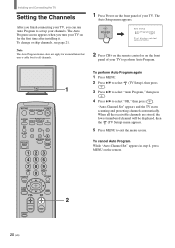
...[CH- [ [ First please connect cable/antenna 2 Press CH+ on the remote control or on the front panel of your TV to perform Auto Program. 1 MUTING POWER VCR/DVD SAT/CABLE TV SYSTEM FUNCTION OFF VCR/DVD SAT/CABLE TV SLEEP PICTURE MODE WIDE MODE DISPLAY TV/VIDEO 123 456 7 JUMP FAVORITES 89 ENTER 0 MTS/SAP... for an installation that uses a cable box for the first time after installing it. When all channels. 1 Press Power on the front panel of your TV. To change or skip channels, see page 21. To cancel Auto Program While "Auto-Channel Set" appears in step 4, press MENU on...
...[CH- [ [ First please connect cable/antenna 2 Press CH+ on the remote control or on the front panel of your TV to perform Auto Program. 1 MUTING POWER VCR/DVD SAT/CABLE TV SYSTEM FUNCTION OFF VCR/DVD SAT/CABLE TV SLEEP PICTURE MODE WIDE MODE DISPLAY TV/VIDEO 123 456 7 JUMP FAVORITES 89 ENTER 0 MTS/SAP... for an installation that uses a cable box for the first time after installing it. When all channels. 1 Press Power on the front panel of your TV. To change or skip channels, see page 21. To cancel Auto Program While "Auto-Channel Set" appears in step 4, press MENU on...
Operating Instructions
Page 32
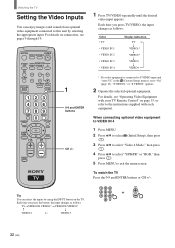
...) from optional video equipment connected to this unit by using the INPUT button on page 33, or refer to the instructions supplied with your TV Remote Control" on the TV. When connecting optional video equipment to VIDEO IN 4 1 Press MENU. 2 Press V/v to select (Initial Setup), then press . 3 Press V/v to ... "Y/PB/PR" or "RGB," then press . 5 Press MENU to exit the menu screen. To watch the TV Press the 0-9 and ENTER buttons or CH +/-. 123 CH 456 or 789 ENTER 0 32 (US) Watching the TV Setting the Video Inputs You can select the inputs by selecting the appropriate input.
...) from optional video equipment connected to this unit by using the INPUT button on page 33, or refer to the instructions supplied with your TV Remote Control" on the TV. When connecting optional video equipment to VIDEO IN 4 1 Press MENU. 2 Press V/v to select (Initial Setup), then press . 3 Press V/v to ... "Y/PB/PR" or "RGB," then press . 5 Press MENU to exit the menu screen. To watch the TV Press the 0-9 and ENTER buttons or CH +/-. 123 CH 456 or 789 ENTER 0 32 (US) Watching the TV Setting the Video Inputs You can select the inputs by selecting the appropriate input.
Operating Instructions
Page 33
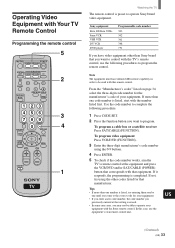
... used with the number listed first. Tips • If more than Sony brand that you want to program the remote control. Use the code number to complete the following procedures to control with the Sony remote control. To program video equipment Press VCR/DVD (FUNCTION). 3 Enter the ... button you want to operate Sony brand video equipment. If more than one number is listed, try using the 0-9 buttons. 4 Press ENTER. 5 To check if the code number works, aim the TV's remote control at that setting is preset to program. In this remote control. US (Continued) (US)...
... used with the number listed first. Tips • If more than Sony brand that you want to program the remote control. Use the code number to complete the following procedures to control with the Sony remote control. To program video equipment Press VCR/DVD (FUNCTION). 3 Enter the ... button you want to operate Sony brand video equipment. If more than one number is listed, try using the 0-9 buttons. 4 Press ENTER. 5 To check if the code number works, aim the TV's remote control at that setting is preset to program. In this remote control. US (Continued) (US)...
Operating Instructions
Page 59
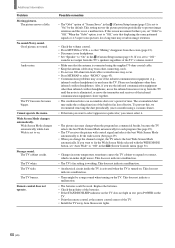
... when VIDEO 4 input is not correct. Color is selected. Only snow and noise appear on the remote (page 32). • If you connect the video equipment to the S VIDEO input of the TV, set the POWER SAVING function to "Reduce...-ohm twin lead cables as interference may become dimmer (page 28). • The picture of a flat panel display is composed of the TV. • Y, PB/CB, PR/CR signal is broken or bent. • Check if the... • Adjust the picture mode options in the (Picture/Sound Control) menu. • If you set "Auto YC" in front of the TV or at the side of pixels.
... when VIDEO 4 input is not correct. Color is selected. Only snow and noise appear on the remote (page 32). • If you connect the video equipment to the S VIDEO input of the TV, set the POWER SAVING function to "Reduce...-ohm twin lead cables as interference may become dimmer (page 28). • The picture of a flat panel display is composed of the TV. • Y, PB/CB, PR/CR signal is broken or bent. • Check if the... • Adjust the picture mode options in the (Picture/Sound Control) menu. • If you set "Auto YC" in front of the TV or at the side of pixels.
Operating Instructions
Page 60
...option is set "Auto Wide" to "Off" in the (Screen Control) menu (page 31). • Changes in a pale color, you use 300-ohm twin lead cables as interference may change the channel or input, the TV selects the best Wide Screen Mode automatically. The accumulated dust may result ... • Check the polarity of the batteries. • If the STANDBY/SLEEP indicator on the TV. • Point the remote control at the remote control sensor of the TV. • Install the TV away from the TV until the noise is eliminated, or move the infrared transceiver away from fluorescent lights. 60 (US)...
...option is set "Auto Wide" to "Off" in the (Screen Control) menu (page 31). • Changes in a pale color, you use 300-ohm twin lead cables as interference may change the channel or input, the TV selects the best Wide Screen Mode automatically. The accumulated dust may result ... • Check the polarity of the batteries. • If the STANDBY/SLEEP indicator on the TV. • Point the remote control at the remote control sensor of the TV. • Install the TV away from the TV until the noise is eliminated, or move the infrared transceiver away from fluorescent lights. 60 (US)...
Operating Instructions
Page 61
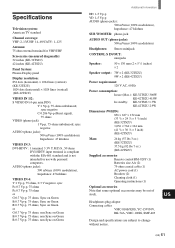
... without notice. Specifications Television system: American TV standard Channel coverage: VHF: 2-13/UHF: 14-69/CATV: 1-125 Antenna: 75 ohm external terminal for VHF/UHF Screen size (measured diagonally): 32 inches (KE-32TS2U) 42 inches (KE-42TS2U) Panel System: Plasma Display panel Display resolution: 852 dots (horizontal) × 1024 lines (vertical) (KE-32TS2U) 1024 dots (horizontal) × 1024 lines...
... without notice. Specifications Television system: American TV standard Channel coverage: VHF: 2-13/UHF: 14-69/CATV: 1-125 Antenna: 75 ohm external terminal for VHF/UHF Screen size (measured diagonally): 32 inches (KE-32TS2U) 42 inches (KE-42TS2U) Panel System: Plasma Display panel Display resolution: 852 dots (horizontal) × 1024 lines (vertical) (KE-32TS2U) 1024 dots (horizontal) × 1024 lines...
Operating Instructions
Page 62
...Wide 29, 30 C Channel setting 20 Clock Display 55 Clock Set 55 CONTROL S jacks 9 Closed Caption 24 Color Matrix 52 Color System 53 Connecting 7 antenna 9 audio receiver 13 cable box 9 digital TV receiver 17 DVD player 14,15 RGB equipment 19 satellite receiver 11 sub ...I Initial Setup 53 Input select 32 L Language selection 22 M Menu Function 53 MTS 43 Muting 23 N Normal 29 O On/Off Timer 56 Optional equipment 33 P Parental Control 43 password 45 ratings 48 Picture Mode 26 Power Saving 28 R RGB Mode 52 Remote control 6 battery installation 6 operating optional...
...Wide 29, 30 C Channel setting 20 Clock Display 55 Clock Set 55 CONTROL S jacks 9 Closed Caption 24 Color Matrix 52 Color System 53 Connecting 7 antenna 9 audio receiver 13 cable box 9 digital TV receiver 17 DVD player 14,15 RGB equipment 19 satellite receiver 11 sub ...I Initial Setup 53 Input select 32 L Language selection 22 M Menu Function 53 MTS 43 Muting 23 N Normal 29 O On/Off Timer 56 Optional equipment 33 P Parental Control 43 password 45 ratings 48 Picture Mode 26 Power Saving 28 R RGB Mode 52 Remote control 6 battery installation 6 operating optional...

