Operating Instructions
Page 7
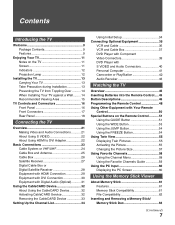
...TV 11 Screen 11 Indicators 12 Projection Lamp 12 Installing the TV 13 Carrying Your TV 13 Take Precaution during Installation 13 Preventing the TV from Toppling Over .......... 14 When Installing Your TV against a Wall......... 14 Recommended Viewing Area 15 TV Controls and Connectors 16 Front Panel 16 Front Connectors 17 Rear Panel 18 Connecting the TV... About Using the CableCARD Device 32 Activating CableCARD Service 32 Removing the CableCARD Device 33 Setting Up the... Channel Menu 58 Using the Favorite Channels Guide 59 Using the PC Input 60 Displaying the PC Screen 60 Using...
...TV 11 Screen 11 Indicators 12 Projection Lamp 12 Installing the TV 13 Carrying Your TV 13 Take Precaution during Installation 13 Preventing the TV from Toppling Over .......... 14 When Installing Your TV against a Wall......... 14 Recommended Viewing Area 15 TV Controls and Connectors 16 Front Panel 16 Front Connectors 17 Rear Panel 18 Connecting the TV... About Using the CableCARD Device 32 Activating CableCARD Service 32 Removing the CableCARD Device 33 Setting Up the... Channel Menu 58 Using the Favorite Channels Guide 59 Using the PC Input 60 Displaying the PC Screen 60 Using...
Operating Instructions
Page 16
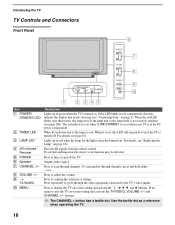
... # VOLUME 3 # TV/VIDEO MENU 7 8 9 0 1 2 34 5 Item 1 POWER/ STANDBY LED 2 TIMER LED 3 LAMP LED 4 (IR) Infrared Receiver 5 POWER 6 Speaker 7 CHANNEL +/- 8 VOLUME +/- 9 TV/VIDEO q; MENU Description Lights up in ...the tactile dot as its function may indicate the display unit needs servicing (see page 106). When lit, indicates one of the lamp ...TV is on -screen setting and activate the , B, b, v, and V buttons. buttons. ✍ The CHANNEL + button has a tactile dot. When the red LED blinks only three times, the lamp door of the timers is not securely attached (see "Contacting Sony...
... # VOLUME 3 # TV/VIDEO MENU 7 8 9 0 1 2 34 5 Item 1 POWER/ STANDBY LED 2 TIMER LED 3 LAMP LED 4 (IR) Infrared Receiver 5 POWER 6 Speaker 7 CHANNEL +/- 8 VOLUME +/- 9 TV/VIDEO q; MENU Description Lights up in ...the tactile dot as its function may indicate the display unit needs servicing (see page 106). When lit, indicates one of the lamp ...TV is on -screen setting and activate the , B, b, v, and V buttons. buttons. ✍ The CHANNEL + button has a tactile dot. When the red LED blinks only three times, the lamp door of the timers is not securely attached (see "Contacting Sony...

Operating Instructions
Page 96
...select the equipment you do not have any equipment connected to each of the input jacks on your TV. To exit the Setup settings, press . Using the Settings Accessing the Setup Settings MENU 1. On Caption Vision is turned on page 98. Select Skip if you connected to a particular... input. 96 See "Programming Caption Vision" on . Press to select To highlight an option and to display the program name, time remaining and other information (if the broadcaster offers this service)....
...select the equipment you do not have any equipment connected to each of the input jacks on your TV. To exit the Setup settings, press . Using the Settings Accessing the Setup Settings MENU 1. On Caption Vision is turned on page 98. Select Skip if you connected to a particular... input. 96 See "Programming Caption Vision" on . Press to select To highlight an option and to display the program name, time remaining and other information (if the broadcaster offers this service)....

Operating Instructions
Page 102
... providing information to set the day(s), hour, minute, AM/PM, duration, and channel number. Press B to go back to the previous setting. 4 Press MENU to exit the setting screen. This can set the current time. 1 Press to select Current Time. 2 Press V and v to highlight one of selectable...Timer has been set. This list of the following options, then press . An LED on your cable service provider. 102 Display diagnostics information about the TV. Press B to go back the previous setting. 3 Press MENU to the next setting. Current Time You can be useful in step 2, press V and v to...
... providing information to set the day(s), hour, minute, AM/PM, duration, and channel number. Press B to go back to the previous setting. 4 Press MENU to exit the setting screen. This can set the current time. 1 Press to select Current Time. 2 Press V and v to highlight one of selectable...Timer has been set. This list of the following options, then press . An LED on your cable service provider. 102 Display diagnostics information about the TV. Press B to go back the previous setting. 3 Press MENU to the next setting. Current Time You can be useful in step 2, press V and v to...
Operating Instructions
Page 109
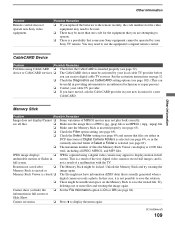
...undesirable motion or flicker in your local cable TV provider before you have information (EXIF data) that files are attempting to display the menu again. (Continued) 109 This is 2,000...❏ There may appear to an authorized technician or repair person.) ❏ Contact your Sony TV remote. Rotation not saved after ❏ The Memory Stick might not have moved, ask ...Cannot ❏ Some variations of files the Memory Stick Viewer can receive digital cable TV services. information in the currently selected folder if Select a Folder is usually generated when a ...
...undesirable motion or flicker in your local cable TV provider before you have information (EXIF data) that files are attempting to display the menu again. (Continued) 109 This is 2,000...❏ There may appear to an authorized technician or repair person.) ❏ Contact your Sony TV remote. Rotation not saved after ❏ The Memory Stick might not have moved, ask ...Cannot ❏ Some variations of files the Memory Stick Viewer can receive digital cable TV services. information in the currently selected folder if Select a Folder is usually generated when a ...


