Operating Instructions
Page 7
...TV 11 Screen 11 Indicators 12 Projection Lamp 12 Installing the TV 13 Carrying Your TV 13 Take Precaution during Installation 13 Preventing the TV from Toppling Over .......... 14 When Installing Your TV against a Wall......... 14 Recommended Viewing Area 15 TV Controls and Connectors 16 Front Panel 16 Front Connectors 17 Rear Panel 18 Connecting the TV... 33 Setting Up the Channel List 34 Using Initial Setup 34 Connecting Optional Equipment 35 VCR and Cable 36 ... Channels Guide 59 Using the PC Input 60 Displaying the PC Screen 60 Using the Memory Stick Viewer About Memory ...
...TV 11 Screen 11 Indicators 12 Projection Lamp 12 Installing the TV 13 Carrying Your TV 13 Take Precaution during Installation 13 Preventing the TV from Toppling Over .......... 14 When Installing Your TV against a Wall......... 14 Recommended Viewing Area 15 TV Controls and Connectors 16 Front Panel 16 Front Connectors 17 Rear Panel 18 Connecting the TV... 33 Setting Up the Channel List 34 Using Initial Setup 34 Connecting Optional Equipment 35 VCR and Cable 36 ... Channels Guide 59 Using the PC Input 60 Displaying the PC Screen 60 Using the Memory Stick Viewer About Memory ...

Operating Instructions
Page 8
... 71 Using i.LINK Connecting i.LINK Devices 73 Selecting an i.LINK Device 75 Using the i.LINK Control Panel 76 i.LINK Setup 78 Using the Settings Overview 79 Accessing the Video Settings 81 Selecting Video Options 81 Selecting PC Video Options 85 Accessing the... Selecting Custom Rating Options 94 Accessing the Setup Settings 96 Selecting Setup Options 96 Programming Caption Vision 98 Selecting PC Setup Options 99 Accessing the Applications Settings 101 Selecting Applications Options 101 Other Information Overview 103 Contacting Sony 103 Replacing the Lamp 104 How to ...
... 71 Using i.LINK Connecting i.LINK Devices 73 Selecting an i.LINK Device 75 Using the i.LINK Control Panel 76 i.LINK Setup 78 Using the Settings Overview 79 Accessing the Video Settings 81 Selecting Video Options 81 Selecting PC Video Options 85 Accessing the... Selecting Custom Rating Options 94 Accessing the Setup Settings 96 Selecting Setup Options 96 Programming Caption Vision 98 Selecting PC Setup Options 99 Accessing the Applications Settings 101 Selecting Applications Options 101 Other Information Overview 103 Contacting Sony 103 Replacing the Lamp 104 How to ...
Operating Instructions
Page 32
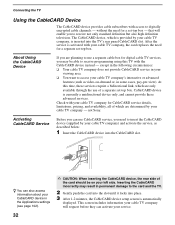
...Sony. After the service is automatically displayed. Inserting the CableCARD incorrectly may be on your cable TV company's interactive or advanced features (such as described below: 1 Insert the CableCARD device into the CableCARD slot. Check with the CableCARD device instead - CableCARD device is inserted into place. 3 After 1-2 minutes, the CableCARD device setup... Applications settings (see page 102). 32 ✍ CAUTION: When inserting the CableCARD device, the rear side of the card should be able to receive not only standard definition but also high definition ...
...Sony. After the service is automatically displayed. Inserting the CableCARD incorrectly may be on your cable TV company's interactive or advanced features (such as described below: 1 Insert the CableCARD device into the CableCARD slot. Check with the CableCARD device instead - CableCARD device is inserted into place. 3 After 1-2 minutes, the CableCARD device setup... Applications settings (see page 102). 32 ✍ CAUTION: When inserting the CableCARD device, the rear side of the card should be able to receive not only standard definition but also high definition ...
Operating Instructions
Page 34
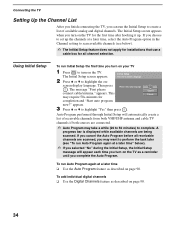
...; Use the Auto Program feature as described on page 90. 34 appears. The Initial Setup screen appears. 2 Press V or v to create a list of receivable channels from both VHF/UHF antenna and cable TV channels if both sources are being scanned. If you cancel the Auto Program before all channel.... The message "First please connect cable/antenna." If you turn on your TV 1 Press to turn on the TV for the first time after hooking it up the channels at a later time" below ). ✍ The Intitial Setup feature does not apply for installations that use a cable box for completion and...
...; Use the Auto Program feature as described on page 90. 34 appears. The Initial Setup screen appears. 2 Press V or v to create a list of receivable channels from both VHF/UHF antenna and cable TV channels if both sources are being scanned. If you cancel the Auto Program before all channel.... The message "First please connect cable/antenna." If you turn on your TV 1 Press to turn on the TV for the first time after hooking it up the channels at a later time" below ). ✍ The Intitial Setup feature does not apply for installations that use a cable box for completion and...

Operating Instructions
Page 35
This section provides some of optional equipment to the separate Quick Setup Guide. If You Are Connecting VCR and Cable VCR and Cable Box DVD Player with Component Video Connectors DVD Player with S VIDEO and Audio Connectors Personal Computer Camcorder or PlayStation Audio Receiver See Page 36 37 39 40 41 42 43 Connecting the TV 35 For multiple connections, refer to your TV. Connecting the TV Connecting Optional Equipment You can connect a variety of the individual connections you can make.
This section provides some of optional equipment to the separate Quick Setup Guide. If You Are Connecting VCR and Cable VCR and Cable Box DVD Player with Component Video Connectors DVD Player with S VIDEO and Audio Connectors Personal Computer Camcorder or PlayStation Audio Receiver See Page 36 37 39 40 41 42 43 Connecting the TV 35 For multiple connections, refer to your TV. Connecting the TV Connecting Optional Equipment You can connect a variety of the individual connections you can make.
Operating Instructions
Page 37
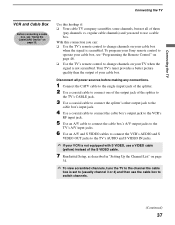
... AUDIO and S VIDEO OUT jacks to switch channels. (Continued) 37 To program your Sony remote control to operate your cable box, see "Using the CableCARD Device" on page 34. ✍ To view scrambled channels, tune the TV to the channel the cable box is set to (usually channel 3 or 4) and ... vs. regular cable channels) and you can: ❑ Use the TV's remote control to use a VIDEO cable (yellow) instead of your cable box. Your TV's tuner provides a better picture quality than the output of the S VIDEO cable. 7 Run Initial Setup, as described in "Setting Up the Channel List" on page 32....
... AUDIO and S VIDEO OUT jacks to switch channels. (Continued) 37 To program your Sony remote control to operate your cable box, see "Using the CableCARD Device" on page 34. ✍ To view scrambled channels, tune the TV to the channel the cable box is set to (usually channel 3 or 4) and ... vs. regular cable channels) and you can: ❑ Use the TV's remote control to use a VIDEO cable (yellow) instead of your cable box. Your TV's tuner provides a better picture quality than the output of the S VIDEO cable. 7 Run Initial Setup, as described in "Setting Up the Channel List" on page 32....
Operating Instructions
Page 74
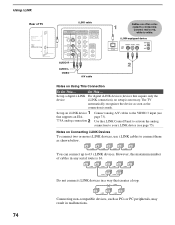
...A B i.LINK C i.LINK D i.LINK E i.LINK F i.LINK G i.LINK Do not connect i.LINK devices in any serial route is 16. Using i.LINK Rear of cables in a way that creates a loop. Set up a digital i.LINK For digital i.LINK devices (devices that supports an EIA- 775A analog connection 2 Connect ...You can connect up an i.LINK device 1 that require only the device i.LINK connection), no setup is made. However, the maximum number of TV DIGITAL AUDIO (OPTICAL) OUT PCM/DOLBY DIGITAL S400 i.LINK (DV/HDV/MICROMV/TV) i.LINK cable VIDEO IN 1 3 HD/DVD IN (1080i/720p/480p/480i) 4 5 ...
...A B i.LINK C i.LINK D i.LINK E i.LINK F i.LINK G i.LINK Do not connect i.LINK devices in any serial route is 16. Using i.LINK Rear of cables in a way that creates a loop. Set up a digital i.LINK For digital i.LINK devices (devices that supports an EIA- 775A analog connection 2 Connect ...You can connect up an i.LINK device 1 that require only the device i.LINK connection), no setup is made. However, the maximum number of TV DIGITAL AUDIO (OPTICAL) OUT PCM/DOLBY DIGITAL S400 i.LINK (DV/HDV/MICROMV/TV) i.LINK cable VIDEO IN 1 3 HD/DVD IN (1080i/720p/480p/480i) 4 5 ...

Operating Instructions
Page 76
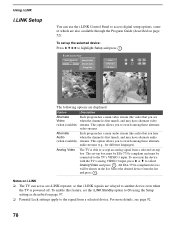
... desired device from the list and press to display the Control Panel. 2 Press V v B b on the remote control. ✍ If i.LINK is pressed while the TV is displaying an analog or digital channel (not the i.LINK device), then the Device List will appear. Using i.LINK Using the i.LINK Control Panel After... a desired option. 4 Press EXIT to exit the Control Panel and view the i.LINK device in full- i.LINK Control Panel 52.3 Back to Device List Setup Exit i.LINK Power Swap Audio Full Screen VICTOR HM-DH35000 The DTV window appears only if the i.LINK menus were entered while watching a digital...
... desired device from the list and press to display the Control Panel. 2 Press V v B b on the remote control. ✍ If i.LINK is pressed while the TV is displaying an analog or digital channel (not the i.LINK device), then the Device List will appear. Using i.LINK Using the i.LINK Control Panel After... a desired option. 4 Press EXIT to exit the Control Panel and view the i.LINK device in full- i.LINK Control Panel 52.3 Back to Device List Setup Exit i.LINK Power Swap Audio Full Screen VICTOR HM-DH35000 The DTV window appears only if the i.LINK menus were entered while watching a digital...

Operating Instructions
Page 77
... Not all functions are supported for all i.LINK devices. ❑ If you are using the equivalent buttons on the device being played from TV to the selected i.LINK If the (Record) button is available, press V v B b to highlight digital VCR and press . off ... Power and press . For more details on and Press V v B b to highlight Setup and press . Change the audio being controlled. ❑ Only i.LINK-equipped digital camcorders and digital VCRs can be available, depending on the TV's remote control. the selected i.LINK camcorder or digital VCR Record from the Press V v...
... Not all functions are supported for all i.LINK devices. ❑ If you are using the equivalent buttons on the device being played from TV to the selected i.LINK If the (Record) button is available, press V v B b to highlight digital VCR and press . off ... Power and press . For more details on and Press V v B b to highlight Setup and press . Change the audio being controlled. ❑ Only i.LINK-equipped digital camcorders and digital VCRs can be available, depending on the TV's remote control. the selected i.LINK camcorder or digital VCR Record from the Press V v...
Operating Instructions
Page 78
...) streams. This option allows you to another device even when the TV is powered off. The set -top box. i.LINK Control Panel Back to Device List Setup 888.888 Alternate Video Alternate Audio Analog Video Power Swap Audio Full Screen Sony DV-VCR The following options are displayed: Option Description Alternate Each program...
...) streams. This option allows you to another device even when the TV is powered off. The set -top box. i.LINK Control Panel Back to Device List Setup 888.888 Alternate Video Alternate Audio Analog Video Power Swap Audio Full Screen Sony DV-VCR The following options are displayed: Option Description Alternate Each program...

Operating Instructions
Page 96
... of the input jacks on your TV. Allows you to label the audio/video equipment you connected to set basic and advanced Caption Vision options. Press to display the program name, time remaining and other information (if the broadcaster offers this service). To exit the Setup settings, press . On Caption Vision is...
... of the input jacks on your TV. Allows you to label the audio/video equipment you connected to set basic and advanced Caption Vision options. Press to display the program name, time remaining and other information (if the broadcaster offers this service). To exit the Setup settings, press . On Caption Vision is...
Operating Instructions
Page 99
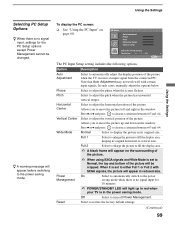
... original horizontal-to-vertical ratio. Using the Settings Using the Settings Selecting PC Setup Options z When there is no signal input for the PC Setup options except Power Management cannot be cropped. To display the PC screen: &#... the power saving mode when there is set to adjust the vertical position of the picture when the TV receives an input signal from the connected PC. Select to adjust the phase when the screen flickers...., manually adjust the options below. z A warning message will appear on page 60. Press B or b and press to the power saving mode.
... original horizontal-to-vertical ratio. Using the Settings Using the Settings Selecting PC Setup Options z When there is no signal input for the PC Setup options except Power Management cannot be cropped. To display the PC screen: &#... the power saving mode when there is set to adjust the vertical position of the picture when the TV receives an input signal from the connected PC. Select to adjust the phase when the screen flickers...., manually adjust the options below. z A warning message will appear on page 60. Press B or b and press to the power saving mode.
Operating Instructions
Page 108
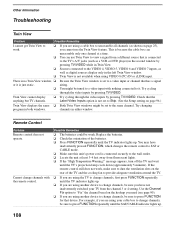
... display only in Twin View. ❏ Sources connected to the VIDEO 4, VIDEO 5, VIDEO 6 and VIDEO 7 inputs, as well as shown on the rear of the batteries. ❏ Press FUNCTION repeatedly until the TV's projection lamp cools down (approximately 5 minutes). channels in both windows. Twin View cannot display anything but...10063; Twin View is not set to Skip. (See the Setup setting on the hookup you used (see page 90). ❏ If you are using VIDEO 8 (PC) IN or i.LINK input. For example, if you are using the TV to change channels, first press FUNCTION repeatedly until the SAT/CABLE...
... display only in Twin View. ❏ Sources connected to the VIDEO 4, VIDEO 5, VIDEO 6 and VIDEO 7 inputs, as well as shown on the rear of the batteries. ❏ Press FUNCTION repeatedly until the TV's projection lamp cools down (approximately 5 minutes). channels in both windows. Twin View cannot display anything but...10063; Twin View is not set to Skip. (See the Setup setting on the hookup you used (see page 90). ❏ If you are using VIDEO 8 (PC) IN or i.LINK input. For example, if you are using the TV to change channels, first press FUNCTION repeatedly until the SAT/CABLE...
Operating Instructions
Page 111
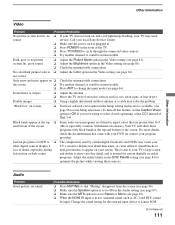
...a text option in the Setup setting and no text is available. (see page 83) to optimize the picture while viewing these programs with theatrical releases). the screen. ❏ Try another channel; Dotted lines or stripes. ❏ Adjust the antenna. ❏ Move the TV away from the screen (.... For more details, check the documentation that "Muting" disappears from noise sources such as AC-3 and DTS, cannot be input. Call your local Sony Service Center. ❏ Make sure the power cord is plugged in. ❏ Press POWER on DVD or ❏ other digital sources display a...
...a text option in the Setup setting and no text is available. (see page 83) to optimize the picture while viewing these programs with theatrical releases). the screen. ❏ Try another channel; Dotted lines or stripes. ❏ Adjust the antenna. ❏ Move the TV away from the screen (.... For more details, check the documentation that "Muting" disappears from noise sources such as AC-3 and DTS, cannot be input. Call your local Sony Service Center. ❏ Make sure the power cord is plugged in. ❏ Press POWER on DVD or ❏ other digital sources display a...
Operating Instructions
Page 116
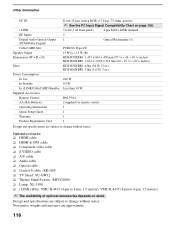
... In i.LINK/CableCARD Standby Supplied Accessories Remote Control AA (R6) Batteries Operating Instructions Quick Setup Guide Warranty Product Registration Card D-sub 15-pin, analog RGB, 0.7 Vp-p, 75 ohms...(57 1/4 × 34 × 18 7/8 inches) KDS-R60XBR1 1,674 × 1,009 × 514 mm (66 × 39 3/4 × 20 1/4 inches) KDS-R50XBR1 43kg (94 lb. 13 oz.) KDS-R60XBR1 51kg (112 lb. 7 oz.) 240 W 0.5 W ...❑ Audio cable ❑ Optical cable ❑ Control S cable : RK-G69 ❑ TV Stand : SU-GW12 ❑ Theatre Stand System : RHT-G2000 ❑ Lamp : XL-5100 ❑ i....
... In i.LINK/CableCARD Standby Supplied Accessories Remote Control AA (R6) Batteries Operating Instructions Quick Setup Guide Warranty Product Registration Card D-sub 15-pin, analog RGB, 0.7 Vp-p, 75 ohms...(57 1/4 × 34 × 18 7/8 inches) KDS-R60XBR1 1,674 × 1,009 × 514 mm (66 × 39 3/4 × 20 1/4 inches) KDS-R50XBR1 43kg (94 lb. 13 oz.) KDS-R60XBR1 51kg (112 lb. 7 oz.) 240 W 0.5 W ...❑ Audio cable ❑ Optical cable ❑ Control S cable : RK-G69 ❑ TV Stand : SU-GW12 ❑ Theatre Stand System : RHT-G2000 ❑ Lamp : XL-5100 ❑ i....
Operating Instructions
Page 118
... Country 93 Select Folder 69 Settings Applications 80, 101 Audio 79, 86 Channel 80, 90 Parental Lock 80, 92 Screen 79, 88 Setup 80, 96 Video 79, 81 Setup settings 80, 96 Sharpness, adjusting 81 Show/Hide Channels 91 SLEEP button 46 Slide Advance 68 Slide Show 67 Sound Mode 86, 87... indictor 12 set current 102 TIMER LED 16 Timer setting 101 Transition Effect 68 Treble, adjusting 86 Troubleshooting 108-114 Turning on/off the TV 16 TV Rating 94 TV/VIDEO button 47 Twin View 55 Twin View button 46 U.S.A. button 16 W, X, Y White Balance 84 WIDE button 46 Wide Mode 88 Wide Screen...
... Country 93 Select Folder 69 Settings Applications 80, 101 Audio 79, 86 Channel 80, 90 Parental Lock 80, 92 Screen 79, 88 Setup 80, 96 Video 79, 81 Setup settings 80, 96 Sharpness, adjusting 81 Show/Hide Channels 91 SLEEP button 46 Slide Advance 68 Slide Show 67 Sound Mode 86, 87... indictor 12 set current 102 TIMER LED 16 Timer setting 101 Transition Effect 68 Treble, adjusting 86 Troubleshooting 108-114 Turning on/off the TV 16 TV Rating 94 TV/VIDEO button 47 Twin View 55 Twin View button 46 U.S.A. button 16 W, X, Y White Balance 84 WIDE button 46 Wide Mode 88 Wide Screen...
