Operating Instructions
Page 7
...Your TV 11 Notes on the TV 11 Screen 11 Indicators 12 Projection Lamp 12 Installing the TV 13 Carrying Your TV 13 Take ... Rear Panel 18 Connecting the TV Overview 21 Making Video and Audio Connections 21 About Using S VIDEO 22 About Using HDMI to DVI Adapter 22 Basic Connections ...Programming the Remote Control 48 Using Other Equipment with Your Remote Control 50 Special Buttons on the Remote Control ...........51 Using the GUIDE Button ...Menu 58 Using the Favorite Channels Guide 59 Using the PC Input 60 Displaying the PC Screen 60 Using the Memory Stick Viewer About Memory ...
...Your TV 11 Notes on the TV 11 Screen 11 Indicators 12 Projection Lamp 12 Installing the TV 13 Carrying Your TV 13 Take ... Rear Panel 18 Connecting the TV Overview 21 Making Video and Audio Connections 21 About Using S VIDEO 22 About Using HDMI to DVI Adapter 22 Basic Connections ...Programming the Remote Control 48 Using Other Equipment with Your Remote Control 50 Special Buttons on the Remote Control ...........51 Using the GUIDE Button ...Menu 58 Using the Favorite Channels Guide 59 Using the PC Input 60 Displaying the PC Screen 60 Using the Memory Stick Viewer About Memory ...

Operating Instructions
Page 8
...Viewer 65 Using the Movie Viewer 66 Using the Menu Bar Options 67 Memory Stick Precautions 70 Memory Stick Functionality 71 Using i.LINK Connecting i.LINK Devices 73 Selecting an i.LINK Device 75 Using the i.LINK Control Panel 76 i.LINK Setup 78 Using the Settings Overview... the Setup Settings 96 Selecting Setup Options 96 Programming Caption Vision 98 Selecting PC Setup Options 99 Accessing the Applications Settings 101 Selecting Applications Options 101 Other Information Overview 103 Contacting Sony 103 Replacing the Lamp 104 How to Replace the Lamp 105 Troubleshooting 108 ...
...Viewer 65 Using the Movie Viewer 66 Using the Menu Bar Options 67 Memory Stick Precautions 70 Memory Stick Functionality 71 Using i.LINK Connecting i.LINK Devices 73 Selecting an i.LINK Device 75 Using the i.LINK Control Panel 76 i.LINK Setup 78 Using the Settings Overview... the Setup Settings 96 Selecting Setup Options 96 Programming Caption Vision 98 Selecting PC Setup Options 99 Accessing the Applications Settings 101 Selecting Applications Options 101 Other Information Overview 103 Contacting Sony 103 Replacing the Lamp 104 How to Replace the Lamp 105 Troubleshooting 108 ...
Operating Instructions
Page 10
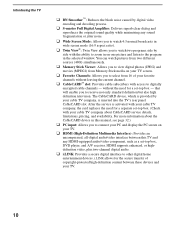
... i.LINK: Provides a secure digital interface to receive not only standard definition but also high definition television. Introducing the TV ❑ BN Smoother™: Reduces the block noise caused by digital video encoding... i.LINK allows for a set-top box - After the service is inserted into the TV's rear panel CableCARD slot. that will enable you to digitally encrypted cable channels - The CableCARD device, ...10065; Twin View®: Twin View allows you to connect your PC and display the PC screen on your cable TV company about the CableCARD device in this manual, see ...
... i.LINK: Provides a secure digital interface to receive not only standard definition but also high definition television. Introducing the TV ❑ BN Smoother™: Reduces the block noise caused by digital video encoding... i.LINK allows for a set-top box - After the service is inserted into the TV's rear panel CableCARD slot. that will enable you to digitally encrypted cable channels - The CableCARD device, ...10065; Twin View®: Twin View allows you to connect your PC and display the PC screen on your cable TV company about the CableCARD device in this manual, see ...
Operating Instructions
Page 16
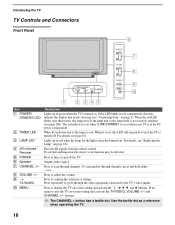
...on or when your TV is turned off the TV. Outputs audio signal. To scan quickly through the video equipment connected to the TV's video inputs. Press again to turn on -screen setting and activate the , B, b, v,... CHANNEL + button has a tactile dot. For details, see page 106). and CHANNEL +/- For details, see "Contacting Sony" on page 2). Press to display the TV on and off . Press repeatedly to cycle through channels, press and hold... remain lit even if the TV is in the PC power saving mode. MENU Description Lights up in green when the TV is turned on page 104...
...on or when your TV is turned off the TV. Outputs audio signal. To scan quickly through the video equipment connected to the TV's video inputs. Press again to turn on -screen setting and activate the , B, b, v,... CHANNEL + button has a tactile dot. For details, see page 106). and CHANNEL +/- For details, see "Contacting Sony" on page 2). Press to display the TV on and off . Press repeatedly to cycle through channels, press and hold... remain lit even if the TV is in the PC power saving mode. MENU Description Lights up in green when the TV is turned on page 104...
Operating Instructions
Page 18
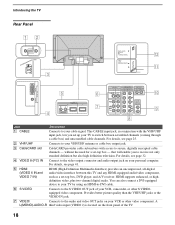
...by using an HDMI-to-DVI cable. 6 S VIDEO Connects to the S VIDEO OUT jack of the TV. 18 This CABLE input jack, in conjunction with access to secure, digitally encrypted cable channels - Introducing the TV Rear Panel 12 CABLE VHF/UHF 3 DIGITAL AUDIO (OPTICAL) ...PC IN 8 AUDIO 4 6 AUDIO IN IN 7 7 AUDIO OUT (VAR/FIX) 8 9 Jack Description 1 CABLE Connects to your VHF/UHF antenna or cable box output jack. 3 CableCARD slot CableCARD provides cable subscribers with the VHF/UHF input jack, lets you to receive not only standard definition but also high definition television...
...by using an HDMI-to-DVI cable. 6 S VIDEO Connects to the S VIDEO OUT jack of the TV. 18 This CABLE input jack, in conjunction with access to secure, digitally encrypted cable channels - Introducing the TV Rear Panel 12 CABLE VHF/UHF 3 DIGITAL AUDIO (OPTICAL) ...PC IN 8 AUDIO 4 6 AUDIO IN IN 7 7 AUDIO OUT (VAR/FIX) 8 9 Jack Description 1 CABLE Connects to your VHF/UHF antenna or cable box output jack. 3 CableCARD slot CableCARD provides cable subscribers with the VHF/UHF input jack, lets you to receive not only standard definition but also high definition television...
Operating Instructions
Page 41
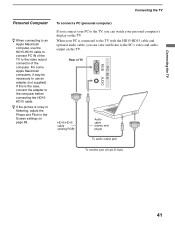
To connect a PC (personal computer) If you connect your personal computer's display on the TV. Rear of the computer. If this is noisy or flickering, adjust the Phase and Pitch in the Screen settings on the TV. For some Apple Macintosh computers, it may be necessary to use the HD15-HD15 cable to connect PC IN of... the TV to the video output connector of TV HD15-HD15 cable (analog RGB) Audio cable (stereo mini plugs) To audio output jack To monitor port (15-pin D-Sub) 41 When your PC is connected to the TV with the HD15-HD15...
To connect a PC (personal computer) If you connect your personal computer's display on the TV. Rear of the computer. If this is noisy or flickering, adjust the Phase and Pitch in the Screen settings on the TV. For some Apple Macintosh computers, it may be necessary to use the HD15-HD15 cable to connect PC IN of... the TV to the video output connector of TV HD15-HD15 cable (analog RGB) Audio cable (stereo mini plugs) To audio output jack To monitor port (15-pin D-Sub) 41 When your PC is connected to the TV with the HD15-HD15...

Operating Instructions
Page 47
.... Press to your TV's video inputs: TV, VIDEO 1, VIDEO 2, VIDEO 3, VIDEO 4, VIDEO 5, VIDEO 6, VIDEO 7 and VIDEO 8. Press to scan through the video equipment connected to display the TV on page 48. For details, see "Using the FREEZE Button" on -screen setting or display and return to exit the on... Display off the TV and other audio/video equipment you have programmed into the remote control. Press to exit from the setting. Also available in PC menu, Advanced Video, and White Balance. wh EXIT Description Press to turn on and on/off . Press to the factory defaults. ✍ ...
.... Press to your TV's video inputs: TV, VIDEO 1, VIDEO 2, VIDEO 3, VIDEO 4, VIDEO 5, VIDEO 6, VIDEO 7 and VIDEO 8. Press to scan through the video equipment connected to display the TV on page 48. For details, see "Using the FREEZE Button" on -screen setting or display and return to exit the on... Display off the TV and other audio/video equipment you have programmed into the remote control. Press to exit from the setting. Also available in PC menu, Advanced Video, and White Balance. wh EXIT Description Press to turn on and on/off . Press to the factory defaults. ✍ ...
Operating Instructions
Page 60
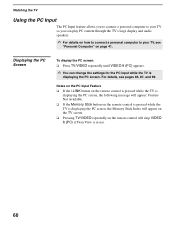
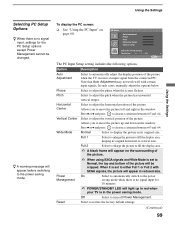
...on page 41. Watching the TV Using the PC Input The PC Input feature allows you to connect a personal computer to your TV so you can change the settings for the PC input while the TV is in use. 60 Displaying the PC Screen To display the PC screen: ❑ Press TV/VIDEO repeatedly ...until VIDEO 8 (PC) appears. ✍ You can play PC content through the TV's large display and audio speakers. ✍ For details on how to connect a personal computer to your TV, see pages 85...
...on page 41. Watching the TV Using the PC Input The PC Input feature allows you to connect a personal computer to your TV so you can change the settings for the PC input while the TV is in use. 60 Displaying the PC Screen To display the PC screen: ❑ Press TV/VIDEO repeatedly ...until VIDEO 8 (PC) appears. ✍ You can play PC content through the TV's large display and audio speakers. ✍ For details on how to connect a personal computer to your TV, see pages 85...
Operating Instructions
Page 74
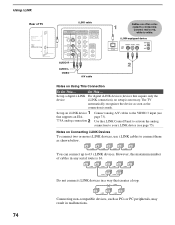
...see page 73). The TV automatically recognizes the device as soon as the connection is 16. Using i.LINK Rear of cables in a way that creates a loop. A B i.LINK C i.LINK D i.LINK E i.LINK You can connect up a digital i.LINK For digital i.LINK devices (devices that supports an... (see page 75). Set up to connect them as PCs or PC peripherals, may result in malfunctions. 74 A B i.LINK C i.LINK D i.LINK E i.LINK F i.LINK G i.LINK Do not connect i.LINK devices in any serial route is made. Notes on Using This Connection To Do This ... i.LINK-equipped device...
...see page 73). The TV automatically recognizes the device as soon as the connection is 16. Using i.LINK Rear of cables in a way that creates a loop. A B i.LINK C i.LINK D i.LINK E i.LINK You can connect up a digital i.LINK For digital i.LINK devices (devices that supports an... (see page 75). Set up to connect them as PCs or PC peripherals, may result in malfunctions. 74 A B i.LINK C i.LINK D i.LINK E i.LINK F i.LINK G i.LINK Do not connect i.LINK devices in any serial route is made. Notes on Using This Connection To Do This ... i.LINK-equipped device...

Operating Instructions
Page 97
..., Cable Box, 8mm, DTV, Game, LD, Beta, Skip Video 4-7 Video 4-7, DVD, Satellite, Cable Box, DTV, HD, Game, PVR, Skip Video 8 (PC) Video 8 (PC), Skip ✍ If you select Skip, your language of 5,000 feet (1,500 m) or higher. The picture becomes darker, but also enhances the black level. On... Enables you press TV/VIDEO. Select Off to select a specific color for the on -screen settings in your TV skips the selected connection when you to use the TV at normal altitude. Standard Select to view picture with reduced power consumption. The front panel POWER/STANDBY...
..., Cable Box, 8mm, DTV, Game, LD, Beta, Skip Video 4-7 Video 4-7, DVD, Satellite, Cable Box, DTV, HD, Game, PVR, Skip Video 8 (PC) Video 8 (PC), Skip ✍ If you select Skip, your language of 5,000 feet (1,500 m) or higher. The picture becomes darker, but also enhances the black level. On... Enables you press TV/VIDEO. Select Off to select a specific color for the on -screen settings in your TV skips the selected connection when you to use the TV at normal altitude. Standard Select to view picture with reduced power consumption. The front panel POWER/STANDBY...
Operating Instructions
Page 99
... +63 and -64. Full 1 Select to enlarge the picture to fill the display area, keeping its original size. To display the PC screen: ❑ See "Using the PC Input" on the surrounding of the picture. ✍ When using SXGA signals and Wide Mode is set to Normal, the top and ... Center Wide Mode Power Management Reset Description Select to adjust the vertical position of the picture when the TV receives an input signal from the connected PC. Off Select to restore the factory default settings. (Continued) 99 When it is in red when your TV is set to either Full 1 or...
... +63 and -64. Full 1 Select to enlarge the picture to fill the display area, keeping its original size. To display the PC screen: ❑ See "Using the PC Input" on the surrounding of the picture. ✍ When using SXGA signals and Wide Mode is set to Normal, the top and ... Center Wide Mode Power Management Reset Description Select to adjust the vertical position of the picture when the TV receives an input signal from the connected PC. Off Select to restore the factory default settings. (Continued) 99 When it is in red when your TV is set to either Full 1 or...
Operating Instructions
Page 108
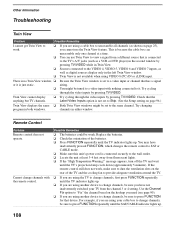
... "Fix" the channel based on the hookup you used (see page 90). ❏ If you are using VIDEO 8 (PC) IN or i.LINK input. Cannot change channels with nothing connected to it is just static. ❏ Be sure the Twin View window is set to Skip. (See the Setup setting...Twin View Problem Possible Remedies I cannot get Twin View to work , make sure to dust the ventilation slots on the rear of the batteries. ❏ Press FUNCTION repeatedly until the TV's projection lamp cools down (approximately 5 minutes). Check that device. If the remote control still does not work . ❏ ...
... "Fix" the channel based on the hookup you used (see page 90). ❏ If you are using VIDEO 8 (PC) IN or i.LINK input. Cannot change channels with nothing connected to it is just static. ❏ Be sure the Twin View window is set to Skip. (See the Setup setting...Twin View Problem Possible Remedies I cannot get Twin View to work , make sure to dust the ventilation slots on the rear of the batteries. ❏ Press FUNCTION repeatedly until the TV's projection lamp cools down (approximately 5 minutes). Check that device. If the remote control still does not work . ❏ ...
Operating Instructions
Page 118
... TV 16 On, turning on the TV 16 Overscan 89 P, Q Parental Lock settings 80, 92 Password, changing 93 PC IN jack 18 PC Input 85, 87, 99 Personal Computer connecting 41 Picture 81, 85 118 PICTURE button 46 Picture Mode 81 Pro 81 Standard 81 Vivid 81 POWER button 16, 47... Device 33 Repeat 68 Reset 85 RESET button 47 S S VIDEO jack, described 17, 18 Satellite receiver connecting 27 Satellite receiver, using with remote control 50 with cable box, connecting 37 with remote control 50 Screen settings 79, 88 Select Country 93 Select Folder 69 Settings Applications 80, 101 Audio 79, 86 Channel...
... TV 16 On, turning on the TV 16 Overscan 89 P, Q Parental Lock settings 80, 92 Password, changing 93 PC IN jack 18 PC Input 85, 87, 99 Personal Computer connecting 41 Picture 81, 85 118 PICTURE button 46 Picture Mode 81 Pro 81 Standard 81 Vivid 81 POWER button 16, 47... Device 33 Repeat 68 Reset 85 RESET button 47 S S VIDEO jack, described 17, 18 Satellite receiver connecting 27 Satellite receiver, using with remote control 50 with cable box, connecting 37 with remote control 50 Screen settings 79, 88 Select Country 93 Select Folder 69 Settings Applications 80, 101 Audio 79, 86 Channel...
Quick Setup Guide
Page 1
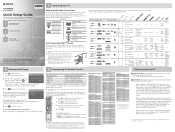
...connected. Inserting the CableCARD incorrectly may require 50+ minutes for the manufacturer of audio jacks; Connections... video S VIDEO CableCARD (optional) VCR DVD PC Player Cable Box Satellite Receiver VCR DVD PC Player AV Receiver Composite video RF/Coaxial Activating CableCARD...on this guide for Sony instead. If you enter the code for Aiwa, enter the code for your TV: 1 Connecting Your TV (See ...the center of the projection lamp will maintain the picture quality. Notes on -screen display language. 2-637-152-11(1) KDS-R50XBR1 KDS-R60XBR1 Quick Setup ...
...connected. Inserting the CableCARD incorrectly may require 50+ minutes for the manufacturer of audio jacks; Connections... video S VIDEO CableCARD (optional) VCR DVD PC Player Cable Box Satellite Receiver VCR DVD PC Player AV Receiver Composite video RF/Coaxial Activating CableCARD...on this guide for Sony instead. If you enter the code for Aiwa, enter the code for your TV: 1 Connecting Your TV (See ...the center of the projection lamp will maintain the picture quality. Notes on -screen display language. 2-637-152-11(1) KDS-R50XBR1 KDS-R60XBR1 Quick Setup ...

Quick Setup Guide
Page 2
...diagram if you have : Cable/SAT Antenna Cable Box or Satellite Receiver Sony VCR Dream System Cables Required Splitter 1 Coaxial 5 Composite 2 Video 1 Digital Optical 1 Audio If you are not using a cable box, connect your DVD player or satellite receiver has an HDMI jack, use that ...IN jack. Cable Splitter VCR IN OUT LINE IN R L AUDIO LINE OUT VIDEO Terrestrial Antenna CABLE VHF/UHF AUDIO PC IN 8 RGB Rear of the video connections shown here. Cable Terrestrial Antenna If your cable TV provider. See the Operating Instructions for details. * Cable box may ...
...diagram if you have : Cable/SAT Antenna Cable Box or Satellite Receiver Sony VCR Dream System Cables Required Splitter 1 Coaxial 5 Composite 2 Video 1 Digital Optical 1 Audio If you are not using a cable box, connect your DVD player or satellite receiver has an HDMI jack, use that ...IN jack. Cable Splitter VCR IN OUT LINE IN R L AUDIO LINE OUT VIDEO Terrestrial Antenna CABLE VHF/UHF AUDIO PC IN 8 RGB Rear of the video connections shown here. Cable Terrestrial Antenna If your cable TV provider. See the Operating Instructions for details. * Cable box may ...

Marketing Specifications
Page 2
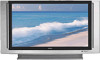
...of Cable Television Laboratories, Inc. All other trademarks are approximate. KDS-R50XBR1 Grand WEGA™ SXRD™ Rear Projection Television Features General... 50"1 Video Native Resolution: 1080p Horizontal Scan (KHz) for current information at www.sony.com/dn Sony Electronics...sony.com Last Updated: 08/31/2006 Memory Stick Duo™ , Memory Stick PRO Duo™ , Memory Stick PRO™ Media Compatibility RF Connection Input(s): 2 (Rear) S-Video Input(s): 3 (1 Front/2 Rear) PC Audio Input(s): 1 (Rear) PC Video Input(s): 1 (Rear) HDMI™ Connection(s): 2 (Rear) - 1 rear...
...of Cable Television Laboratories, Inc. All other trademarks are approximate. KDS-R50XBR1 Grand WEGA™ SXRD™ Rear Projection Television Features General... 50"1 Video Native Resolution: 1080p Horizontal Scan (KHz) for current information at www.sony.com/dn Sony Electronics...sony.com Last Updated: 08/31/2006 Memory Stick Duo™ , Memory Stick PRO Duo™ , Memory Stick PRO™ Media Compatibility RF Connection Input(s): 2 (Rear) S-Video Input(s): 3 (1 Front/2 Rear) PC Audio Input(s): 1 (Rear) PC Video Input(s): 1 (Rear) HDMI™ Connection(s): 2 (Rear) - 1 rear...


