
Operating Instructions
Page 2
.../or its related affiliates be fully inserted. ❑ Operate the TV only on 120-240 V AC. ❑ Avoid operating the TV at the rear of Sony Corporation. Changes to them whenever you call upon such changed settings, the power consumption may exceed the limits required for the ENERGY ... trademark of the program schedule information or other countries. TV Guide, Picture/Sound, Light Sensor, Power Savings) can be liable for the 40, 46 and 52 inch BRAVIA KDL-XBR9 series models with the accuracy or availability of Sony Computer Entertainment Inc. This manual is for any way ...
.../or its related affiliates be fully inserted. ❑ Operate the TV only on 120-240 V AC. ❑ Avoid operating the TV at the rear of Sony Corporation. Changes to them whenever you call upon such changed settings, the power consumption may exceed the limits required for the ENERGY ... trademark of the program schedule information or other countries. TV Guide, Picture/Sound, Light Sensor, Power Savings) can be liable for the 40, 46 and 52 inch BRAVIA KDL-XBR9 series models with the accuracy or availability of Sony Computer Entertainment Inc. This manual is for any way ...

Operating Instructions
Page 3
...44 Troubleshooting 44 Specifications 46 Index 47 Welcome to the World of your TV. Use the documentation listed below to get the most complete TV operation information available for purchasing this information prior to setting up your TV safe. Quick Setup Guide Provides TV setup information, illustrates.... 3 The TV operation information above has been designed in an eco-friendly manner to keep you for your TV and presents advanced customization details. Reference Book Offers the most out of BRAVIA® HDTV Thank you and your TV. Read this Sony BRAVIA® ...
...44 Troubleshooting 44 Specifications 46 Index 47 Welcome to the World of your TV. Use the documentation listed below to get the most complete TV operation information available for purchasing this information prior to setting up your TV safe. Quick Setup Guide Provides TV setup information, illustrates.... 3 The TV operation information above has been designed in an eco-friendly manner to keep you for your TV and presents advanced customization details. Reference Book Offers the most out of BRAVIA® HDTV Thank you and your TV. Read this Sony BRAVIA® ...

Operating Instructions
Page 4
... you compare a high-definition signal to a standard definition signal, you need access to a Full HD Experience Set, Source, Sound, and Setup Along with Your BRAVIA TV To experience the stunning detail of HD programming, an HD sound system, and a proper connection setup. The Four... Steps to high-definition (HD) programming. Introducing Your BRAVIA® TV Experiencing Stunning HD with your BRAVIA TV set, a complete HD system requires a source of your new BRAVIA TV, you will notice a big difference in picture quality. You can receive and display HD ...
... you compare a high-definition signal to a standard definition signal, you need access to a Full HD Experience Set, Source, Sound, and Setup Along with Your BRAVIA TV To experience the stunning detail of HD programming, an HD sound system, and a proper connection setup. The Four... Steps to high-definition (HD) programming. Introducing Your BRAVIA® TV Experiencing Stunning HD with your BRAVIA TV set, a complete HD system requires a source of your new BRAVIA TV, you will notice a big difference in picture quality. You can receive and display HD ...

Operating Instructions
Page 5
... from DLNA CertifiedTM networked equipment or Sony USB equipment. Introducing Your BRAVIA® TV TV Feature Highlights Your BRAVIA TV is equipped with the latest in TV technology. ➢ Broadband Internet Connectivity: BRAVIA Internet Video brings videos, movies and much more. Product Support Preferences Settings Picture & Display Sound Channel & Inputs Network TV 5 Displayed here is Photo USB...
... from DLNA CertifiedTM networked equipment or Sony USB equipment. Introducing Your BRAVIA® TV TV Feature Highlights Your BRAVIA TV is equipped with the latest in TV technology. ➢ Broadband Internet Connectivity: BRAVIA Internet Video brings videos, movies and much more. Product Support Preferences Settings Picture & Display Sound Channel & Inputs Network TV 5 Displayed here is Photo USB...

Operating Instructions
Page 6
...; Correct hand placement while carrying the TV is completed, be sure to secure the TV to a stable surface or mount it to a wall. The designated Sony wall-mount bracket model and TV stand model name(s) are available under the "Other Information" section of people; Getting Started Setting Up Your TV Some TV models are packaged with a detached...
...; Correct hand placement while carrying the TV is completed, be sure to secure the TV to a stable surface or mount it to a wall. The designated Sony wall-mount bracket model and TV stand model name(s) are available under the "Other Information" section of people; Getting Started Setting Up Your TV Some TV models are packaged with a detached...

Operating Instructions
Page 7
... diagonally) model can be mounted to a wall using the Table-Top Stand, be performed by a Sony dealer or licensed contractor. • Follow the instruction guide provided with the Wall-Mount Bracket for your TV model. Prepare the TV for the Table-Top Stand attachment.) The supplied M6 screws are designed so that you... cause it to fall, etc. 8-12 mm M6 screw (supplied with the Wall-Mount Bracket when attaching the mounting hooks to the TV set • Be sure to use the screws supplied with the Wall-Mount Bracket) Mounting Hook Rear of the wall for your model. For removing the ...
... diagonally) model can be mounted to a wall using the Table-Top Stand, be performed by a Sony dealer or licensed contractor. • Follow the instruction guide provided with the Wall-Mount Bracket for your TV model. Prepare the TV for the Table-Top Stand attachment.) The supplied M6 screws are designed so that you... cause it to fall, etc. 8-12 mm M6 screw (supplied with the Wall-Mount Bracket when attaching the mounting hooks to the TV set • Be sure to use the screws supplied with the Wall-Mount Bracket) Mounting Hook Rear of the wall for your model. For removing the ...
Operating Instructions
Page 9
...the adapter to the computer before connecting the HD15-HD15 cable. For some Apple Macintosh computers, it may need to adjust the TV settings or your analog audio equipment. If an adapter is PCM/Dolby* OUT (OPTICAL) Digital compatible. 8 CABLE/ ANTENNA RF input ... input type, press HOME, select Settings, then Channels & Inputs, then select Video/Component 1 Selection. 4 COMPONENT Component video provides better picture quality than the S Video and composite IN 2 video. L-AUDIO-R digital audio/video interface between this TV will automatically detect and switch between VIDEO 1...
...the adapter to the computer before connecting the HD15-HD15 cable. For some Apple Macintosh computers, it may need to adjust the TV settings or your analog audio equipment. If an adapter is PCM/Dolby* OUT (OPTICAL) Digital compatible. 8 CABLE/ ANTENNA RF input ... input type, press HOME, select Settings, then Channels & Inputs, then select Video/Component 1 Selection. 4 COMPONENT Component video provides better picture quality than the S Video and composite IN 2 video. L-AUDIO-R digital audio/video interface between this TV will automatically detect and switch between VIDEO 1...

Operating Instructions
Page 10
... to a high-definition service or a highdefinition satellite service. This TV is strongly recommended that you connect this equipment to your TV. Antenna B Set the Cable/Antenna setting found Rear of TV CABLE/ANTENNA under the Settings on the back of input signal you choose. Connecting the TV Cable System or VHF/UHF Antenna System You can enjoy...
... to a high-definition service or a highdefinition satellite service. This TV is strongly recommended that you connect this equipment to your TV. Antenna B Set the Cable/Antenna setting found Rear of TV CABLE/ANTENNA under the Settings on the back of input signal you choose. Connecting the TV Cable System or VHF/UHF Antenna System You can enjoy...
Operating Instructions
Page 12
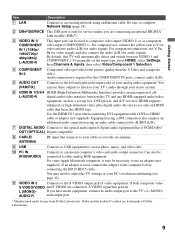
... (stereo mini plugs) IN 3 IN 4 S VIDEO VIDEO L (MONO) AUDIO R 2 VIDEO IN PC Input Signal Reference Chart After connecting the PC to the TV, set Scene Select to Graphics, Wide Mode to Full, and Display Area to Full Pixel. • Connect the PC IN jack to the PC using an...-HD15 cable with ferrite core (analog RGB) and audio cable (see page 9). • The TV enters the standby mode automatically when the PC is recommended to the right. This affects Picture settings and Wide Mode settings. Supported resolutions Signal VGA Horizontal × (Pixel) 640 × SVGA 800 × XGA ...
... (stereo mini plugs) IN 3 IN 4 S VIDEO VIDEO L (MONO) AUDIO R 2 VIDEO IN PC Input Signal Reference Chart After connecting the PC to the TV, set Scene Select to Graphics, Wide Mode to Full, and Display Area to Full Pixel. • Connect the PC IN jack to the PC using an...-HD15 cable with ferrite core (analog RGB) and audio cable (see page 9). • The TV enters the standby mode automatically when the PC is recommended to the right. This affects Picture settings and Wide Mode settings. Supported resolutions Signal VGA Horizontal × (Pixel) 640 × SVGA 800 × XGA ...

Operating Instructions
Page 15
... 4 inches (10 cm) 11 7/8 inches (30 cm) 4 inches (10 cm) Leave at least this much space around the TV as illustrated. Allow enough space around the set as follows: Air circulation is blocked. Air circulation is blocked. Do not bundle the AC power cord with stand Installed on the...Table-Top Stand as shown below 41 °F (5 °C). Avoid operating the TV at least this much space around the set. Bundling the Connecting Cables Use the attached cable clamper to a wall. Never install the TV set . 4 inches (10 cm) Leave at temperatures below . Refer to the ...
... 4 inches (10 cm) 11 7/8 inches (30 cm) 4 inches (10 cm) Leave at least this much space around the TV as illustrated. Allow enough space around the set as follows: Air circulation is blocked. Air circulation is blocked. Do not bundle the AC power cord with stand Installed on the...Table-Top Stand as shown below 41 °F (5 °C). Avoid operating the TV at least this much space around the set. Bundling the Connecting Cables Use the attached cable clamper to a wall. Never install the TV set . 4 inches (10 cm) Leave at temperatures below . Refer to the ...

Operating Instructions
Page 16
Securing the TV Sony strongly recommends taking measures to a TV stand (not supplied). 1 Secure the stand for the TV. Recommended Measures to Secure the TV Consider the following measures when securing your TV to prevent the TV from Toppling ❑ Secure the TV to a wall and/or stand. ❑ Do not allow ...power cords and connecting cables so that they are not accessible to play or climb on furniture and TV sets. ❑ Avoid placing or hanging items on the TV. ❑ Never install the TV on: • slippery, unstable and/or uneven surfaces. • furniture that can easily be ...
Securing the TV Sony strongly recommends taking measures to a TV stand (not supplied). 1 Secure the stand for the TV. Recommended Measures to Secure the TV Consider the following measures when securing your TV to prevent the TV from Toppling ❑ Secure the TV to a wall and/or stand. ❑ Do not allow ...power cords and connecting cables so that they are not accessible to play or climb on furniture and TV sets. ❑ Avoid placing or hanging items on the TV. ❑ Never install the TV on: • slippery, unstable and/or uneven surfaces. • furniture that can easily be ...
Operating Instructions
Page 18
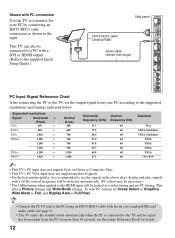
...stream is complete. see page 38. • If the language that you receive channels from the network features included on this setting is only available for the on TV Guide On Screen, see page 46. • For more details. Then select Network Setup. 18 Bienvenue! If you selected in the Language... setting is in tuner, select Skip. Follow the instructions on the screen to complete Network Setup, or select Skip to the online...
...stream is complete. see page 38. • If the language that you receive channels from the network features included on this setting is only available for the on TV Guide On Screen, see page 46. • For more details. Then select Network Setup. 18 Bienvenue! If you selected in the Language... setting is in tuner, select Skip. Follow the instructions on the screen to complete Network Setup, or select Skip to the online...
Operating Instructions
Page 20
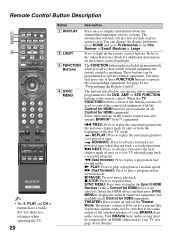
... advance forward to the next chapter mark (if any ) or from the beginning of the live TV when playing back a recorded program. See page 24 for a cinema-like experience and the audio will be set period of the remote control. PREV: Press to operate the corresponding equipment. m (fast reverse): ...Press to display the menu of your TV (see page 43 for HDMI equipment). Select the HDMI device and then press SYNC...
... advance forward to the next chapter mark (if any ) or from the beginning of the live TV when playing back a recorded program. See page 24 for a cinema-like experience and the audio will be set period of the remote control. PREV: Press to operate the corresponding equipment. m (fast reverse): ...Press to display the menu of your TV (see page 43 for HDMI equipment). Select the HDMI device and then press SYNC...
Operating Instructions
Page 21
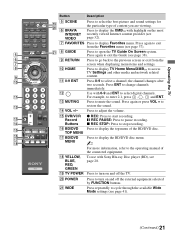
...immediately. w; Press repeatedly to start recording. Press to display the XMB™ with Sony Blu-ray Disc player (BD), see page 28. q; z REC: Press to cycle through the available Wide Mode settings (see page 38). POWER wa WIDE Press to display the top menu of the ... Press to turn on and off the external equipment selected by FUNCTION buttons. Press again to stop recording. qa 0-9 ENT Press 0-9 to access TV Settings and other media and network related 9 content. Press to go back to the previous screen or exit from the Favorites menu (see page 32)....
...immediately. w; Press repeatedly to start recording. Press to display the XMB™ with Sony Blu-ray Disc player (BD), see page 28. q; z REC: Press to cycle through the available Wide Mode settings (see page 38). POWER wa WIDE Press to display the top menu of the ... Press to turn on and off the external equipment selected by FUNCTION buttons. Press again to stop recording. qa 0-9 ENT Press 0-9 to access TV Settings and other media and network related 9 content. Press to go back to the previous screen or exit from the Favorites menu (see page 32)....
Operating Instructions
Page 23
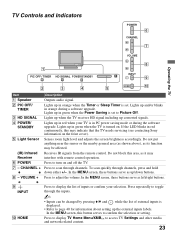
...to Picture Off. To scan quickly through channels. Press to toggle through the inputs. ~ • Inputs can be affected. Press to access TV Settings and other media and network related content. 23 Press repeatedly to scan through channels, press and hold down buttons. Lights up the external inputs... servicing (see contacting Sony information on and off the TV. In the MENU screen, these buttons serve as its function may be changed by pressing V/v and while the list of inputs or confirm your TV is set to turn on the front cover). Lights up converted signals. Do not ...
...to Picture Off. To scan quickly through channels. Press to toggle through the inputs. ~ • Inputs can be affected. Press to access TV Settings and other media and network related content. 23 Press repeatedly to scan through channels, press and hold down buttons. Lights up the external inputs... servicing (see contacting Sony information on and off the TV. In the MENU screen, these buttons serve as its function may be changed by pressing V/v and while the list of inputs or confirm your TV is set to turn on the front cover). Lights up converted signals. Do not ...
Operating Instructions
Page 28
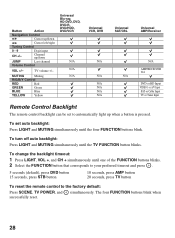
...N/A N/A N/A Universal VCR, DVR N/A N/A N/A N/A N/A N/A Universal SAT/CBL N/A Universal AMP/Receiver N/A AMP/RECEIVER Vol. To set to the factory default: Press SCENE, TV POWER, and successfully reset. To change the backlight timeout: 1 Press LIGHT, VOL +, and CH + simultaneously until one of the FUNCTION... 1 or A/V Input SAT or Cable Input TV or Tuner Input Remote Control Backlight The remote control backlight can be set auto backlight: Press LIGHT and MUTING simultaneously until the TV FUNCTION button blinks. TV volume +/- Button Action Navigation Control V/v Cursor up...
...N/A N/A N/A Universal VCR, DVR N/A N/A N/A N/A N/A N/A Universal SAT/CBL N/A Universal AMP/Receiver N/A AMP/RECEIVER Vol. To set to the factory default: Press SCENE, TV POWER, and successfully reset. To change the backlight timeout: 1 Press LIGHT, VOL +, and CH + simultaneously until one of the FUNCTION... 1 or A/V Input SAT or Cable Input TV or Tuner Input Remote Control Backlight The remote control backlight can be set auto backlight: Press LIGHT and MUTING simultaneously until the TV FUNCTION button blinks. TV volume +/- Button Action Navigation Control V/v Cursor up...
Operating Instructions
Page 29
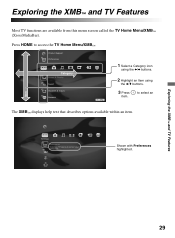
.... 2 Highlight an Item using the V/v buttons. 3 Press item. to access the TV Home Menu/XMB™. Exploring the XMB™ and TV Features Most TV functions are available from this menu screen called the TV Home Menu/XMB™ (XrossMediaBar). Settings Preferences Customize TV features to suit personal preferences Shown with Preferences highlighted. Exploring the XMB...
.... 2 Highlight an Item using the V/v buttons. 3 Press item. to access the TV Home Menu/XMB™. Exploring the XMB™ and TV Features Most TV functions are available from this menu screen called the TV Home Menu/XMB™ (XrossMediaBar). Settings Preferences Customize TV features to suit personal preferences Shown with Preferences highlighted. Exploring the XMB...
Operating Instructions
Page 30
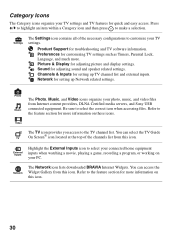
... BRAVIA Internet Widgets. Refer to the feature section for more information on your TV settings and TV features for setting up TV channel list and external inputs. Sound for troubleshooting and TV software information. Network for quick and easy access. You can access the Widget... Gallery from Internet content providers, DLNA Certified media servers, and Sony USB Music connected equipment. Category...
... BRAVIA Internet Widgets. Refer to the feature section for more information on your TV settings and TV features for setting up TV channel list and external inputs. Sound for troubleshooting and TV software information. Network for quick and easy access. You can access the Widget... Gallery from Internet content providers, DLNA Certified media servers, and Sony USB Music connected equipment. Category...

Operating Instructions
Page 31
..., and Video Content You can also be accessed once you have set up a DLNA Certified equipment or after plugging in Sony USB equipment directly to your TV. Photo Internet content provider, page 32 DLNA Certified media server, page 33 Sony USB, page 33 Sample Images, page 33 Exploring the XMB™...; and TV Features • The items displayed may vary for each ...
..., and Video Content You can also be accessed once you have set up a DLNA Certified equipment or after plugging in Sony USB equipment directly to your TV. Photo Internet content provider, page 32 DLNA Certified media server, page 33 Sony USB, page 33 Sample Images, page 33 Exploring the XMB™...; and TV Features • The items displayed may vary for each ...
Operating Instructions
Page 32
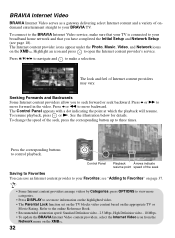
...8482;. Press b or M to move backward. see more categories. • Press DISPLAY to see "Adding to Favorites" on the appropriate TV or Movie Rating. BRAVIA Internet Video BRAVIA Internet Video serves as a gateway delivering select Internet content and a variety of ondemand entertainment straight ... your broadband home network and that you to view more information on the highlighted video. • The Parental Lock function set on the TV blocks video content based on page 37. • Some Internet content providers arrange videos by Categories; Seeking Forwards and Backwards...
...8482;. Press b or M to move backward. see more categories. • Press DISPLAY to see "Adding to Favorites" on the appropriate TV or Movie Rating. BRAVIA Internet Video BRAVIA Internet Video serves as a gateway delivering select Internet content and a variety of ondemand entertainment straight ... your broadband home network and that you to view more information on the highlighted video. • The Parental Lock function set on the TV blocks video content based on page 37. • Some Internet content providers arrange videos by Categories; Seeking Forwards and Backwards...


