
Operating Instructions
Page 1
Operating Instructions LCD Digital Color TV KDL-52XBR9 KDL-46XBR9 KDL-40XBR9 © 2009 Sony Corporation Sony Customer Support U.S.A.: www.sony.com/tvsupport Canada: www.sony.ca/support United States 1.800.222.SONY Canada 1.877.899.SONY Please Do Not Return the Product to the Store
Operating Instructions LCD Digital Color TV KDL-52XBR9 KDL-46XBR9 KDL-40XBR9 © 2009 Sony Corporation Sony Customer Support U.S.A.: www.sony.com/tvsupport Canada: www.sony.ca/support United States 1.800.222.SONY Canada 1.877.899.SONY Please Do Not Return the Product to the Store

Operating Instructions
Page 2
... and serial numbers are located at temperatures below . Record these government agencies, designed to certain features, settings, and functionalities of Sony Corporation. Refer to Gemstar-TV Guide International, Inc. DLNA®, the DLNA Logo and DLNA CERTIFIED™ are trademarks or registered marks of this...; 6,239,794 to them whenever you call upon such changed settings, the power consumption may exceed the limits required for the 40, 46 and 52 inch BRAVIA KDL-XBR9 series models with the accuracy or availability of Energy. Depending upon your area. This manual is for...
... and serial numbers are located at temperatures below . Record these government agencies, designed to certain features, settings, and functionalities of Sony Corporation. Refer to Gemstar-TV Guide International, Inc. DLNA®, the DLNA Logo and DLNA CERTIFIED™ are trademarks or registered marks of this...; 6,239,794 to them whenever you call upon such changed settings, the power consumption may exceed the limits required for the 40, 46 and 52 inch BRAVIA KDL-XBR9 series models with the accuracy or availability of Energy. Depending upon your area. This manual is for...

Operating Instructions
Page 3
... connection diagrams, and highlights TV features. Access it at www.sony.com/referencebook. Contents Introducing Your BRAVIA® TV Experiencing Stunning HD with Your BRAVIA TV 4 The Four Steps to a Full HD Experience . . . .4 TV Feature Highlights 5 Getting Started Setting Up Your TV 6 Using a Wall-Mount....43 Other Information How to Care for Your BRAVIA 44 Troubleshooting 44 Specifications 46 Index 47 Welcome to the World of BRAVIA® HDTV Thank you and your TV safe. Read this Sony BRAVIA® high-definition television. Use the documentation listed below to keep ...
... connection diagrams, and highlights TV features. Access it at www.sony.com/referencebook. Contents Introducing Your BRAVIA® TV Experiencing Stunning HD with Your BRAVIA TV 4 The Four Steps to a Full HD Experience . . . .4 TV Feature Highlights 5 Getting Started Setting Up Your TV 6 Using a Wall-Mount....43 Other Information How to Care for Your BRAVIA 44 Troubleshooting 44 Specifications 46 Index 47 Welcome to the World of BRAVIA® HDTV Thank you and your TV safe. Read this Sony BRAVIA® high-definition television. Use the documentation listed below to keep ...

Operating Instructions
Page 4
...you compare a high-definition signal to the Quick Setup Guide, enclosed separately, for connecting other HD compatible external equipment Contact your new BRAVIA TV, you need access to high-definition (HD) programming. When you will notice a big difference in picture quality. If black bars appear ...as shown here. Introducing Your BRAVIA® TV Experiencing Stunning HD with your BRAVIA TV set, a complete HD system requires a source of your cable, satellite or HD service provider for information on the remote...
...you compare a high-definition signal to the Quick Setup Guide, enclosed separately, for connecting other HD compatible external equipment Contact your new BRAVIA TV, you need access to high-definition (HD) programming. When you will notice a big difference in picture quality. If black bars appear ...as shown here. Introducing Your BRAVIA® TV Experiencing Stunning HD with your BRAVIA TV set, a complete HD system requires a source of your cable, satellite or HD service provider for information on the remote...

Operating Instructions
Page 5
...10146; Channel Programming Information: TV Guide On Screen® provides TV programming information (page 38). ➢ TV Home Menu: XMBTM (XrossMediaBar) TV menu provides you to access local weather, news, and much more from DLNA CertifiedTM networked equipment or Sony USB equipment. Product Support ...Preferences Settings Picture & Display Sound Channel & Inputs Network TV 5 Displayed here is Photo USB (page 33). ➢ Central Location for quick ...
...10146; Channel Programming Information: TV Guide On Screen® provides TV programming information (page 38). ➢ TV Home Menu: XMBTM (XrossMediaBar) TV menu provides you to access local weather, news, and much more from DLNA CertifiedTM networked equipment or Sony USB equipment. Product Support ...Preferences Settings Picture & Display Sound Channel & Inputs Network TV 5 Displayed here is Photo USB (page 33). ➢ Central Location for quick ...

Operating Instructions
Page 6
... a room with reflective wall and floor materials. • Avoid moving the TV from a cold area to a warm area. The designated Sony wall-mount bracket model and TV stand model name(s) are not mounting the TV to a wall, you can mount your TV has adequate ventilation, see page 16. 6 For details on . • Read the supplied...
... a room with reflective wall and floor materials. • Avoid moving the TV from a cold area to a warm area. The designated Sony wall-mount bracket model and TV stand model name(s) are not mounting the TV to a wall, you can mount your TV has adequate ventilation, see page 16. 6 For details on . • Read the supplied...

Operating Instructions
Page 7
... • Follow the instruction guide provided with the Wall-Mount Bracket) Mounting Hook Rear of the mounting hook. Sony strongly recommends that you use the Wall-Mount Bracket model designed for your TV should be sure to a wall, remove the Table-Top Stand. Sufficient expertise is required in internal damage to ... to attach the Table-Top Stand. Use of screws other than those supplied with the bracket may also need to refer to the TV. Prepare the TV for your TV (see page 45) and that they are 8 mm to 12 mm in length when measured from small children. Keep the screws away...
... • Follow the instruction guide provided with the Wall-Mount Bracket) Mounting Hook Rear of the mounting hook. Sony strongly recommends that you use the Wall-Mount Bracket model designed for your TV should be sure to a wall, remove the Table-Top Stand. Sufficient expertise is required in internal damage to ... to attach the Table-Top Stand. Use of screws other than those supplied with the bracket may also need to refer to the TV. Prepare the TV for your TV (see page 45) and that they are 8 mm to 12 mm in length when measured from small children. Keep the screws away...
Operating Instructions
Page 8
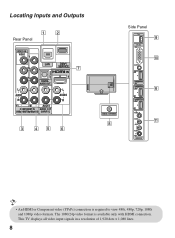
The 1080/24p video format is required to view 480i, 480p, 720p, 1080i and 1080p video formats. This TV displays all video input signals in a resolution of 1,920 dots × 1,080 lines. 8 Locating Inputs and Outputs 12 Rear Panel VIDEO IN VIDEO Y LAN PB ...
The 1080/24p video format is required to view 480i, 480p, 720p, 1080i and 1080p video formats. This TV displays all video input signals in a resolution of 1,920 dots × 1,080 lines. 8 Locating Inputs and Outputs 12 Rear Panel VIDEO IN VIDEO Y LAN PB ...
Operating Instructions
Page 9
.... 0 PC IN (RGB/AUDIO) Connects to a personal computer's video and audio output connector. L-AUDIO-R digital audio/video interface between this TV will automatically detect and switch between VIDEO 1 and COMPONENT 1. You may be connected to -HDMI cable or adapter (not supplied). Audio connection ... 12). HDMI supports enhanced, or high-definition video, plus digital audio. For some Apple Macintosh computers, it may need to adjust the TV settings or your analog audio equipment. If both composite video S VIDEO/VIDEO and S VIDEO are connected, S VIDEO signal has priority. Getting...
.... 0 PC IN (RGB/AUDIO) Connects to a personal computer's video and audio output connector. L-AUDIO-R digital audio/video interface between this TV will automatically detect and switch between VIDEO 1 and COMPONENT 1. You may be connected to -HDMI cable or adapter (not supplied). Audio connection ... 12). HDMI supports enhanced, or high-definition video, plus digital audio. For some Apple Macintosh computers, it may need to adjust the TV settings or your analog audio equipment. If both composite video S VIDEO/VIDEO and S VIDEO are connected, S VIDEO signal has priority. Getting...

Operating Instructions
Page 10
...QAM and 8VSB) and external VHF/UHF antenna (ATSC). For the best possible picture, make sure you connect this equipment to your TV via the HDMI or component video (with audio) input located on the XMB™ to a high-definition service or a highdefinition satellite service. ...HD Cable Box/HD Satellite Box You can enjoy high-definition and standard-definition digital programming (if available in signal degradation. Connecting the TV Cable System or VHF/UHF Antenna System You can enjoy high-definition programming by radio frequency interference, resulting in your area) along with...
...QAM and 8VSB) and external VHF/UHF antenna (ATSC). For the best possible picture, make sure you connect this equipment to your TV via the HDMI or component video (with audio) input located on the XMB™ to a high-definition service or a highdefinition satellite service. ...HD Cable Box/HD Satellite Box You can enjoy high-definition and standard-definition digital programming (if available in signal degradation. Connecting the TV Cable System or VHF/UHF Antenna System You can enjoy high-definition programming by radio frequency interference, resulting in your area) along with...

Operating Instructions
Page 11
Shown with DVI Connection Rear of TV DVI-to-HDMI cable HD cable box/ HD satellite box CATV/ Satellite antenna cable Getting Started AUDIO-R (red) AUDIO-L (white) Audio cable • If your ... 1 (with Component Connection Rear of HDMI IN 1. Shown with DVI-to-HDMI cable or adapter) and connect the audio output to the AUDIO IN (L/R) of TV CATV/Satellite antenna cable HD cable box/ HD satellite box AUDIO-R (red) AUDIO-L (white) PR (red) PB (blue) Y (green) Component video cable Audio cable (Continued...
Shown with DVI Connection Rear of TV DVI-to-HDMI cable HD cable box/ HD satellite box CATV/ Satellite antenna cable Getting Started AUDIO-R (red) AUDIO-L (white) Audio cable • If your ... 1 (with Component Connection Rear of HDMI IN 1. Shown with DVI-to-HDMI cable or adapter) and connect the audio output to the AUDIO IN (L/R) of TV CATV/Satellite antenna cable HD cable box/ HD satellite box AUDIO-R (red) AUDIO-L (white) PR (red) PB (blue) Y (green) Component video cable Audio cable (Continued...
Operating Instructions
Page 12
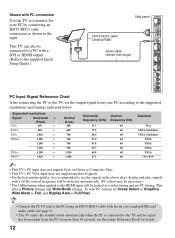
... S VIDEO VIDEO L (MONO) AUDIO R 2 VIDEO IN PC Input Signal Reference Chart After connecting the PC to the TV, set Scene Select to Graphics, Wide Mode to Full, and Display Area to Full Pixel. • Connect the PC... IN jack to use the signals in the above chart. Shown with PC connection Use the TV as a monitor for your PC according to the right. This affects Picture settings and Wide Mode ... the output signal from the PC for more than 30 seconds, see page 9). • The TV enters the standby mode automatically when the PC is recommended to the PC using an HD15-HD15 cable...
... S VIDEO VIDEO L (MONO) AUDIO R 2 VIDEO IN PC Input Signal Reference Chart After connecting the PC to the TV, set Scene Select to Graphics, Wide Mode to Full, and Display Area to Full Pixel. • Connect the PC... IN jack to use the signals in the above chart. Shown with PC connection Use the TV as a monitor for your PC according to the right. This affects Picture settings and Wide Mode ... the output signal from the PC for more than 30 seconds, see page 9). • The TV enters the standby mode automatically when the PC is recommended to the PC using an HD15-HD15 cable...

Operating Instructions
Page 13
Getting Started Connecting Internet & DLNA Certified™ Networks Connect an Ethernet cable from your home network to the LAN input of your TV to enjoy BRAVIA Internet features and/or connect to DLNA Certified™ media servers, see page 31 to your DLNA Certified equipment's operating instructions for ... R 1 2 AUDIO COMPONENT IN AUDIO OUT (1080p/1080i/720p/480p/480i) (VAR/FIX) (OPTICAL) IN 1 L AUDIO R • For more about compatible wireless bridges, visit https://internet.sony.tv • Refer to learn more information about these features.
Getting Started Connecting Internet & DLNA Certified™ Networks Connect an Ethernet cable from your home network to the LAN input of your TV to enjoy BRAVIA Internet features and/or connect to DLNA Certified™ media servers, see page 31 to your DLNA Certified equipment's operating instructions for ... R 1 2 AUDIO COMPONENT IN AUDIO OUT (1080p/1080i/720p/480p/480i) (VAR/FIX) (OPTICAL) IN 1 L AUDIO R • For more about compatible wireless bridges, visit https://internet.sony.tv • Refer to learn more information about these features.

Operating Instructions
Page 14
... equipment equipment (A/V Receiver/Home Theater) CABLE/ANTENNA VCR/ Game system/ Camcorder • Refer to the Quick Setup Guide (supplied) when connecting other equipment to your TV. 14
... equipment equipment (A/V Receiver/Home Theater) CABLE/ANTENNA VCR/ Game system/ Camcorder • Refer to the Quick Setup Guide (supplied) when connecting other equipment to your TV. 14

Operating Instructions
Page 15
Allow enough space around the set. Air circulation is blocked. Refer to the online Reference Book when mounting the TV to bundle the connecting cables. Installed with other connecting cables. The cable clamper is located on the wall 4 inches (10 cm) 11 7/8 inches ... cord with stand Installed on the Table-Top Stand as shown below 41 °F (5 °C). Avoid operating the TV at least this much space around the TV as illustrated. Never install the TV set . 4 inches (10 cm) Leave at temperatures below . Bundling the Connecting Cables Use the attached cable clamper ...
Allow enough space around the set. Air circulation is blocked. Refer to the online Reference Book when mounting the TV to bundle the connecting cables. Installed with other connecting cables. The cable clamper is located on the wall 4 inches (10 cm) 11 7/8 inches ... cord with stand Installed on the Table-Top Stand as shown below 41 °F (5 °C). Avoid operating the TV at least this much space around the TV as illustrated. Never install the TV set . 4 inches (10 cm) Leave at temperatures below . Bundling the Connecting Cables Use the attached cable clamper ...

Operating Instructions
Page 16
...16 Preventing the TV from toppling over . ❑ Route all AC power cords and connecting cables so that they are not accessible to curious children. Use two angle braces (not supplied) to secure the stand. Securing the TV Sony strongly recommends taking measures to prevent the TV from Toppling &#...10065; Secure the TV to a wall and/or stand. ❑ Do not allow children to play or climb on furniture ...
...16 Preventing the TV from toppling over . ❑ Route all AC power cords and connecting cables so that they are not accessible to curious children. Use two angle braces (not supplied) to secure the stand. Securing the TV Sony strongly recommends taking measures to prevent the TV from Toppling &#...10065; Secure the TV to a wall and/or stand. ❑ Do not allow children to play or climb on furniture ...

Operating Instructions
Page 17
...States call: 1-800-488-7669 or visit: www.sony.com/accessories For Canada call: 1-877-899-7669 • Measure 2 provides minimal protection against the TV toppling over. Anchor bolts Wallmount holes Rope or chain Wallanchor • Contact Sony Customer Support to the stand. For further protection, follow... all three measures recommended above. 17 Getting Started 2 Secure the TV to obtain the optional Support Belt Kit by providing your TV model name. Make sure that there is with an optional Sony Support Belt Kit. An alternative way to the wall. Use the hardware ...
...States call: 1-800-488-7669 or visit: www.sony.com/accessories For Canada call: 1-877-899-7669 • Measure 2 provides minimal protection against the TV toppling over. Anchor bolts Wallmount holes Rope or chain Wallanchor • Contact Sony Customer Support to the stand. For further protection, follow... all three measures recommended above. 17 Getting Started 2 Secure the TV to obtain the optional Support Belt Kit by providing your TV model name. Make sure that there is with an optional Sony Support Belt Kit. An alternative way to the wall. Use the hardware ...
Operating Instructions
Page 18
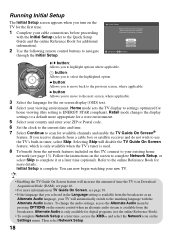
...is available from a cable box or satellite receiver and do not wish to use the TV's built-in the Language setting is available from the network features included on TV Guide On Screen, see page 46. • For more appropriate for a store environment. 5 Select your country and ...enter your new TV. • Enabling the TV Guide On Screen feature will automatically switch to the matching language ...
...is available from a cable box or satellite receiver and do not wish to use the TV's built-in the Language setting is available from the network features included on TV Guide On Screen, see page 46. • For more appropriate for a store environment. 5 Select your country and ...enter your new TV. • Enabling the TV Guide On Screen feature will automatically switch to the matching language ...

Operating Instructions
Page 19
... the Remote Control Inserting Batteries into the Remote Control Insert two size AA batteries (supplied) by matching e and E on your TV. • Fluorescent lamps can interfere with your batteries and make sure that no objects are correctly inserted. Push to the diagram inside the battery ...remote control, reinsert or replace your remote control; Guidelines for Remote Control • Point your remote control directly at the IR sensor located on your TV. • Make sure that they are blocking the path between the remote control and the IR sensor on the batteries to open 19
... the Remote Control Inserting Batteries into the Remote Control Insert two size AA batteries (supplied) by matching e and E on your TV. • Fluorescent lamps can interfere with your batteries and make sure that no objects are correctly inserted. Push to the diagram inside the battery ...remote control, reinsert or replace your remote control; Guidelines for Remote Control • Point your remote control directly at the IR sensor located on your TV. • Make sure that they are blocking the path between the remote control and the IR sensor on the batteries to open 19
Operating Instructions
Page 20
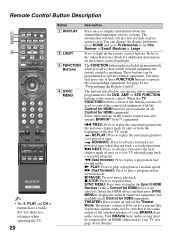
...operate the corresponding equipment. The buttons listed below can be connected by an HDMI connection to your BRAVIA Sync audio system. When the TV FUNCTION button is selected, the buttons can change the display preference, press HOME and go to Preferences to set for details). X ... display the Sync'd HDMI Devices (while a Control for HDMI equipment). Remote Control Button Description 1 2 3 4 DISPLAY LIGHT POWER TV POWER DVD AMP STB TV FUNCTION PREV REPLAY ADVANCE NEXT PLAY SYNC MENU PAUSE STOP THEATER SCENE CC WIDE VIDEO WIDGETS BRAVIA INTERNET VOL MUTING CH JUMP REC...
...operate the corresponding equipment. The buttons listed below can be connected by an HDMI connection to your BRAVIA Sync audio system. When the TV FUNCTION button is selected, the buttons can change the display preference, press HOME and go to Preferences to set for details). X ... display the Sync'd HDMI Devices (while a Control for HDMI equipment). Remote Control Button Description 1 2 3 4 DISPLAY LIGHT POWER TV POWER DVD AMP STB TV FUNCTION PREV REPLAY ADVANCE NEXT PLAY SYNC MENU PAUSE STOP THEATER SCENE CC WIDE VIDEO WIDGETS BRAVIA INTERNET VOL MUTING CH JUMP REC...
