
Operating Instructions
Page 1
LCD TV Operating Instructions 4-418-730-11(1) Introducing Your New BRAVIA® Getting Started Operating the TV Using Features Using the Menus Other Information KDL-55EX640/46EX640/40EX640 Sony Customer Support U.S.A.: http://www.sony.com/tvsupport Canada: http://www.sony.ca/support United States 1.800.222.SONY Canada 1.877.899.SONY Please Do Not Return the Product to the Store
LCD TV Operating Instructions 4-418-730-11(1) Introducing Your New BRAVIA® Getting Started Operating the TV Using Features Using the Menus Other Information KDL-55EX640/46EX640/40EX640 Sony Customer Support U.S.A.: http://www.sony.com/tvsupport Canada: http://www.sony.ca/support United States 1.800.222.SONY Canada 1.877.899.SONY Please Do Not Return the Product to the Store
Operating Instructions
Page 2
...increase or change the power consumption. Dolby and the double-D symbol are trademarks or registered marks of Sony Corporation. "BRAVIA" and , BRAVIA Sync, and are trademarks of this TV (i.e. It meets strict energy efficiency guidelines set by the U.S. The 55 class has a 54.6 .... HDMI, the HDMI logo, and High-Definition Multimedia Interface are trademarks, service marks, or certification marks of Energy. Depending upon your Sony dealer regarding this polarized AC plug with a solution of mild soap and warm water. • If using a chemically pretreated cloth, please...
...increase or change the power consumption. Dolby and the double-D symbol are trademarks or registered marks of Sony Corporation. "BRAVIA" and , BRAVIA Sync, and are trademarks of this TV (i.e. It meets strict energy efficiency guidelines set by the U.S. The 55 class has a 54.6 .... HDMI, the HDMI logo, and High-Definition Multimedia Interface are trademarks, service marks, or certification marks of Energy. Depending upon your Sony dealer regarding this polarized AC plug with a solution of mild soap and warm water. • If using a chemically pretreated cloth, please...
Operating Instructions
Page 3
... Cannot Connect to the Internet . . . . . 44 Adjusting the Server Display Settings. . . . . . 44 Browsing Websites 45 Enjoying Sony Entertainment Network . . . . . 45 Enjoying Yahoo! Contents Introducing Your New BRAVIA® Welcome to the World of BRAVIA 4 Experiencing Stunning HD...TV Controls and Indicators 28 Using Features BRAVIA® Sync™ with Control for PC and HDMI IN 67 Using a Wall-Mount Bracket 68 Installing the Wall-Mount Bracket 69 Troubleshooting 74 Important Notices 81 Specifications 82 Index 84 On-line Registration United States http://productregistration.sony...
... Cannot Connect to the Internet . . . . . 44 Adjusting the Server Display Settings. . . . . . 44 Browsing Websites 45 Enjoying Sony Entertainment Network . . . . . 45 Enjoying Yahoo! Contents Introducing Your New BRAVIA® Welcome to the World of BRAVIA 4 Experiencing Stunning HD...TV Controls and Indicators 28 Using Features BRAVIA® Sync™ with Control for PC and HDMI IN 67 Using a Wall-Mount Bracket 68 Installing the Wall-Mount Bracket 69 Troubleshooting 74 Important Notices 81 Specifications 82 Index 84 On-line Registration United States http://productregistration.sony...
Operating Instructions
Page 4
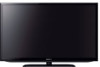
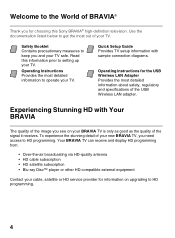
... • Blu-ray Disc™ player or other HD compatible external equipment Contact your cable, satellite or HD service provider for information on your BRAVIA TV is only as good as the quality of the USB Wireless LAN adapter. Operating Instructions Provides the most detailed information to HD programming. 4 ®...to get the most detailed information about safety, regulatory and specifications of the signal it receives. To experience the stunning detail of your new BRAVIA TV, you see on upgrading to operate your TV. Read this Sony BRAVIA® high-definition television.
... • Blu-ray Disc™ player or other HD compatible external equipment Contact your cable, satellite or HD service provider for information on your BRAVIA TV is only as good as the quality of the USB Wireless LAN adapter. Operating Instructions Provides the most detailed information to HD programming. 4 ®...to get the most detailed information about safety, regulatory and specifications of the signal it receives. To experience the stunning detail of your new BRAVIA TV, you see on upgrading to operate your TV. Read this Sony BRAVIA® high-definition television.
Operating Instructions
Page 5
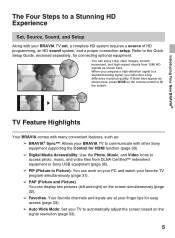
...from 1080 HD signals as : ➢ BRAVIA® Sync™: Allows your BRAVIA TV to communicate with other Sony equipment supporting the Control for easy access (page 33). ➢ Auto Wide Mode: Set your TV to fill the screen. Refer to a standard analog signal, you compare a high-...Digital Media Accessibility: Use the Photo, Music, and Video icons to access photo, music, and video files from DLNA Certified™ networked equipment or Sony USB equipment (page 35). ➢ PIP (Picture in picture quality. Introducing Your New BRAVIA® The Four Steps to a Stunning HD Experience ...
...from 1080 HD signals as : ➢ BRAVIA® Sync™: Allows your BRAVIA TV to communicate with other Sony equipment supporting the Control for easy access (page 33). ➢ Auto Wide Mode: Set your TV to fill the screen. Refer to a standard analog signal, you compare a high-...Digital Media Accessibility: Use the Photo, Music, and Video icons to access photo, music, and video files from DLNA Certified™ networked equipment or Sony USB equipment (page 35). ➢ PIP (Picture in picture quality. Introducing Your New BRAVIA® The Four Steps to a Stunning HD Experience ...
Operating Instructions
Page 6
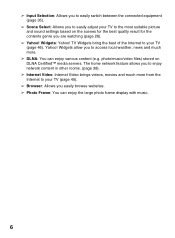
...Video: Internet Video brings videos, movies and much more from the Internet to your TV (page 45). ➢ Browser: Allows you easily browse websites. ➢ Photo Frame: You can enjoy various content (e.g. TV Widgets bring the best of the Internet to access local weather, news and much more...; Input Selection: Allows you to easily switch between the connected equipment (page 35). ➢ Scene Select: Allows you to easily adjust your TV to the most suitable picture and sound settings based on DLNA Certified™ media servers. Widgets allow you are watching (page 26). ➢...
...Video: Internet Video brings videos, movies and much more from the Internet to your TV (page 45). ➢ Browser: Allows you easily browse websites. ➢ Photo Frame: You can enjoy various content (e.g. TV Widgets bring the best of the Internet to access local weather, news and much more...; Input Selection: Allows you to easily switch between the connected equipment (page 35). ➢ Scene Select: Allows you to easily adjust your TV to the most suitable picture and sound settings based on DLNA Certified™ media servers. Widgets allow you are watching (page 26). ➢...
Operating Instructions
Page 7
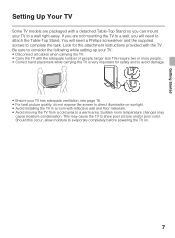
...Be sure to consider the following while setting up your TV to a wall right away. Getting Started Getting Started Setting Up Your TV Some TV models are not mounting the TV to evaporate completely before powering the TV on. 7 larger size TVs require two or more people. • Correct hand ... moisture condensation. You will need a Phillips screwdriver and the supplied screws to direct illumination or sunlight. • Avoid installing the TV in a room with the TV. If you are packaged with a detached Table-Top Stand so you will need to attach the Table-Top Stand. Should this...
...Be sure to consider the following while setting up your TV to a wall right away. Getting Started Getting Started Setting Up Your TV Some TV models are not mounting the TV to evaporate completely before powering the TV on. 7 larger size TVs require two or more people. • Correct hand ... moisture condensation. You will need a Phillips screwdriver and the supplied screws to direct illumination or sunlight. • Avoid installing the TV in a room with the TV. If you are packaged with a detached Table-Top Stand so you will need to attach the Table-Top Stand. Should this...
Operating Instructions
Page 8
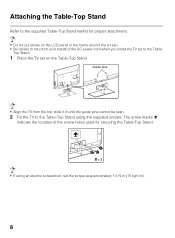
... panel or the frame around the screen. • Be careful to not pinch your hands or the AC power cord when you install the TV set on the Table-Top Stand. Guide pins • Align the TV from the top, slide it in until the guide pins cannot be seen. 2 Fix the... TV to the Table- Top Stand. 1 Place the TV set to the Table-Top Stand using an electric screwdriver, set the torque at approximately 1.5 N·m {15 kgf...
... panel or the frame around the screen. • Be careful to not pinch your hands or the AC power cord when you install the TV set on the Table-Top Stand. Guide pins • Align the TV from the top, slide it in until the guide pins cannot be seen. 2 Fix the... TV to the Table- Top Stand. 1 Place the TV set to the Table-Top Stand using an electric screwdriver, set the torque at approximately 1.5 N·m {15 kgf...
Operating Instructions
Page 9
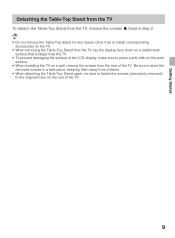
...; To prevent damaging the surface of the LCD display, make sure to place a soft cloth on the work surface. • When installing the TV on a wall, remove the screws from children. • When attaching the Table-Top Stand again, be sure to fasten the screws (previously removed) to the ...original holes on the rear of the TV. Getting Started Detaching the Table-Top Stand from the TV To detach the Table-Top Stand from the TV, remove the screws fixed in a safe place, keeping them away from the rear of the...
...; To prevent damaging the surface of the LCD display, make sure to place a soft cloth on the work surface. • When installing the TV on a wall, remove the screws from children. • When attaching the Table-Top Stand again, be sure to fasten the screws (previously removed) to the ...original holes on the rear of the TV. Getting Started Detaching the Table-Top Stand from the TV To detach the Table-Top Stand from the TV, remove the screws fixed in a safe place, keeping them away from the rear of the...
Operating Instructions
Page 10
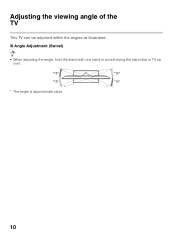
x Angle Adjustment (Swivel) • When adjusting the angle, hold the stand with one hand to avoid having the stand slip or TV tip over. *15° *15° *15° *15° * The angle is approximate value. 10 Adjusting the viewing angle of the TV This TV can be adjusted within the angles as illustrated.
x Angle Adjustment (Swivel) • When adjusting the angle, hold the stand with one hand to avoid having the stand slip or TV tip over. *15° *15° *15° *15° * The angle is approximate value. 10 Adjusting the viewing angle of the TV This TV can be adjusted within the angles as illustrated.
Operating Instructions
Page 11
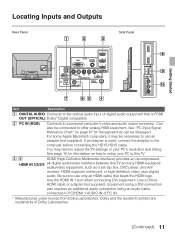
...'s resolution and timing. HDMI supports enhanced, or high-definition video, plus digital audio. Use a DVI-to this TV. 3, 9 HDMI (High-Definition Multimedia Interface) provides an uncompressed, HDMI IN 1/2/3/4 all-digital audio/video interface between this TV and any HDMI-equipped audio/video equipment, such as a set-top box, DVD player, and A/V receiver... connecting the HD15-HD15 cable. Use the HDMI IN 1 port when connecting DVI equipment. For some Apple Macintosh computers, it may need to adjust the TV settings or your PC to -
...'s resolution and timing. HDMI supports enhanced, or high-definition video, plus digital audio. Use a DVI-to this TV. 3, 9 HDMI (High-Definition Multimedia Interface) provides an uncompressed, HDMI IN 1/2/3/4 all-digital audio/video interface between this TV and any HDMI-equipped audio/video equipment, such as a set-top box, DVD player, and A/V receiver... connecting the HD15-HD15 cable. Use the HDMI IN 1 port when connecting DVI equipment. For some Apple Macintosh computers, it may need to adjust the TV settings or your PC to -
Operating Instructions
Page 12
... via a network (page 35), and also IPTV, Yahoo! You can be used as a composite video input (VIDEO 1) or as an optional accessory. This TV can use , connect the yellow jack to view 480i, 480p, 720p, 1080i and 1080p video formats. 1080/24p is available only with HDMI connection. 12..., select Settings, and then select the Setup settings. For composite use this output to listen to your TV's audio through your stereo system. If you have mono equipment, connect its audio output port to the TV's L (MONO) audio input port. • An HDMI or Component video (YPBPR) connection is required ...
... via a network (page 35), and also IPTV, Yahoo! You can be used as a composite video input (VIDEO 1) or as an optional accessory. This TV can use , connect the yellow jack to view 480i, 480p, 720p, 1080i and 1080p video formats. 1080/24p is available only with HDMI connection. 12..., select Settings, and then select the Setup settings. For composite use this output to listen to your TV's audio through your stereo system. If you have mono equipment, connect its audio output port to the TV's L (MONO) audio input port. • An HDMI or Component video (YPBPR) connection is required ...

Operating Instructions
Page 13
... can easily be affected by radio frequency interference, resulting in your input signal (page 56). 13 Cable Antenna A/B RF Switch A B Rear of TV CABLE/ANTENNA • It is capable of receiving unscrambled digital programming for your area) along with standard-definition analog programming. A 300-ohm twin lead... to Cable or Antenna found under the Channel settings for both cable (QAM and 8VSB) and external VHF/UHF antenna (ATSC). This TV is strongly recommended that you connect the CABLE/ANTENNA input using a 75-ohm coaxial cable to switch between the cable and over-theair ...
... can easily be affected by radio frequency interference, resulting in your input signal (page 56). 13 Cable Antenna A/B RF Switch A B Rear of TV CABLE/ANTENNA • It is capable of receiving unscrambled digital programming for your area) along with standard-definition analog programming. A 300-ohm twin lead... to Cable or Antenna found under the Channel settings for both cable (QAM and 8VSB) and external VHF/UHF antenna (ATSC). This TV is strongly recommended that you connect the CABLE/ANTENNA input using a 75-ohm coaxial cable to switch between the cable and over-theair ...

Operating Instructions
Page 14
.... HD Cable Box/HD Satellite Box You can enjoy high-definition programming by subscribing to your TV via the HDMI or component video (with DVI Connection Rear of your TV. x Shown with HDMI Connection Rear of TV CATV/Satellite antenna cable HD cable box/ HD satellite box HDMI cable x Shown with audio)... input located on the back of TV DVI-to-HDMI cable HD cable box/ HD satellite box CATV...
.... HD Cable Box/HD Satellite Box You can enjoy high-definition programming by subscribing to your TV via the HDMI or component video (with DVI Connection Rear of your TV. x Shown with HDMI Connection Rear of TV CATV/Satellite antenna cable HD cable box/ HD satellite box HDMI cable x Shown with audio)... input located on the back of TV DVI-to-HDMI cable HD cable box/ HD satellite box CATV...
Operating Instructions
Page 15
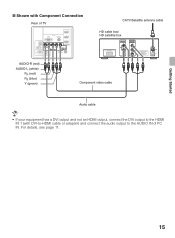
For details, see page 11. 15 Getting Started x Shown with Component Connection Rear of TV CATV/Satellite antenna cable HD cable box/ HD satellite box AUDIO-R (red) AUDIO-L (white) PR (red) PB (blue) Y (green) Component video cable Audio cable • If your equipment has a DVI output and not an HDMI output, connect the DVI output to the HDMI IN 1 (with DVI-to-HDMI cable or adapter) and connect the audio output to the AUDIO IN of PC IN.
For details, see page 11. 15 Getting Started x Shown with Component Connection Rear of TV CATV/Satellite antenna cable HD cable box/ HD satellite box AUDIO-R (red) AUDIO-L (white) PR (red) PB (blue) Y (green) Component video cable Audio cable • If your equipment has a DVI output and not an HDMI output, connect the DVI output to the HDMI IN 1 (with DVI-to-HDMI cable or adapter) and connect the audio output to the AUDIO IN of PC IN.

Operating Instructions
Page 16
PC Use the TV as a monitor for your PC by connecting an HD15-HD15 cable connection as shown below. This TV can also be connected to a PC with a DVI or HDMI output. (Refer to the separate Quick Setup Guide.) Rear of TV HD15-HD15 cable (analog RGB) Audio cable (stereo mini plugs) • Connect the PC IN jack to the PC using an HD15-HD15 cable with ferrite core (analog RGB) and audio cable (page 11). 16
PC Use the TV as a monitor for your PC by connecting an HD15-HD15 cable connection as shown below. This TV can also be connected to a PC with a DVI or HDMI output. (Refer to the separate Quick Setup Guide.) Rear of TV HD15-HD15 cable (analog RGB) Audio cable (stereo mini plugs) • Connect the PC IN jack to the PC using an HD15-HD15 cable with ferrite core (analog RGB) and audio cable (page 11). 16

Operating Instructions
Page 17
Connecting Other Equipment Blu-ray Disc Player/"PS3" DVD player Digital satellite Digital receiver cable box Audio system Digital audio equipment (A/V Receiver/ Home Theater) Personal computer USB Getting Started Router/ Modem Analog audio Digital equipment recorder (A/V Receiver/ HomeTheater) CABLE/ ANTENNA VCR/Game system/ Camcorder • Refer to the Quick Setup Guide (supplied) when connecting other equipment to your TV. 17
Connecting Other Equipment Blu-ray Disc Player/"PS3" DVD player Digital satellite Digital receiver cable box Audio system Digital audio equipment (A/V Receiver/ Home Theater) Personal computer USB Getting Started Router/ Modem Analog audio Digital equipment recorder (A/V Receiver/ HomeTheater) CABLE/ ANTENNA VCR/Game system/ Camcorder • Refer to the Quick Setup Guide (supplied) when connecting other equipment to your TV. 17

Operating Instructions
Page 18
...11 7/8 inches (30 cm) 4 inches (10 cm) 4 inches (10 cm) Leave at least this much space around the set . Avoid operating the TV at least this much space around the set . Air circulation is blocked. Wall Wall • Inadequate ventilation can lead to overheating of the... TV and may cause TV damage or cause a fire. 18 Installed with stand 4 inches (10 cm) 11 7/8 inches (30 cm) 4 inches (10 cm) 2 3/8 inches (6 cm) Leave...
...11 7/8 inches (30 cm) 4 inches (10 cm) 4 inches (10 cm) Leave at least this much space around the set . Avoid operating the TV at least this much space around the set . Air circulation is blocked. Wall Wall • Inadequate ventilation can lead to overheating of the... TV and may cause TV damage or cause a fire. 18 Installed with stand 4 inches (10 cm) 11 7/8 inches (30 cm) 4 inches (10 cm) 2 3/8 inches (6 cm) Leave...
Operating Instructions
Page 19
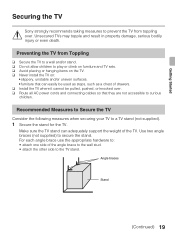
... attach the other side to the TV stand. Make sure the TV stand can easily be pulled, pushed, or knocked over . Angle braces Stand (Continued) 19 Getting Started Securing the TV Sony strongly recommends taking measures to prevent the TV from Toppling ❑ Secure the TV to a wall and/or stand.... ❑ Do not allow children to play or climb on furniture and TV sets. ❑ Avoid placing or hanging items...
... attach the other side to the TV stand. Make sure the TV stand can easily be pulled, pushed, or knocked over . Angle braces Stand (Continued) 19 Getting Started Securing the TV Sony strongly recommends taking measures to prevent the TV from Toppling ❑ Secure the TV to a wall and/or stand.... ❑ Do not allow children to play or climb on furniture and TV sets. ❑ Avoid placing or hanging items...
Operating Instructions
Page 20
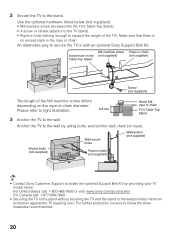
... over. Wall-mount holes Wall-anchor (not supplied) Anchor bolts (not supplied) Rope or chain (not supplied) • Contact Sony Customer Support to secure the TV is no excess slack in the rope or chain. An alternative way to obtain the optional Support Belt Kit by using bolts, wall anchor and... on the Table-Top Stand M4 machine screw (not supplied) Rope or chain (not supplied) Screw (not supplied) The length of the TV). Make sure that there is with an optional Sony Support Belt Kit. 2 Secure the TV to the wall. Please refer to right illustration. 6-8 mm Screw M4 rope or chain...
... over. Wall-mount holes Wall-anchor (not supplied) Anchor bolts (not supplied) Rope or chain (not supplied) • Contact Sony Customer Support to secure the TV is no excess slack in the rope or chain. An alternative way to obtain the optional Support Belt Kit by using bolts, wall anchor and... on the Table-Top Stand M4 machine screw (not supplied) Rope or chain (not supplied) Screw (not supplied) The length of the TV). Make sure that there is with an optional Sony Support Belt Kit. 2 Secure the TV to the wall. Please refer to right illustration. 6-8 mm Screw M4 rope or chain...


