Operating Instructions
Page 8
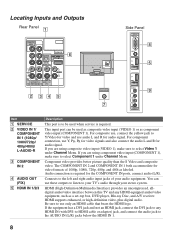
... to be used when service is required for audio signal. If you are using component video input (COMPONENT 1), make sure to your TV's audio through your audio equipment. You can be used as composite video input (VIDEO 1) or as a set-top box, DVD player, Blu-ray Disc, and A/V receiver...High-Definition Multimedia Interface) provides an uncompressed, alldigital audio/video interface between this TV and any HDMI IN (with DVI-to-HDMI cable or adapter) jack, and connect the audio jack to use these outputs to listen to select Video 1 under Channel Menu. This input port can use ...
... to be used when service is required for audio signal. If you are using component video input (COMPONENT 1), make sure to your TV's audio through your audio equipment. You can be used as composite video input (VIDEO 1) or as a set-top box, DVD player, Blu-ray Disc, and A/V receiver...High-Definition Multimedia Interface) provides an uncompressed, alldigital audio/video interface between this TV and any HDMI IN (with DVI-to-HDMI cable or adapter) jack, and connect the audio jack to use these outputs to listen to select Video 1 under Channel Menu. This input port can use ...
Operating Instructions
Page 9
... resolution and timing, see page 19 to setup your PC to this TV. 9 VIDEO IN 2 S VIDEO VIDEO/ L (MONO)AUDIO-R Connects to the composite video and audio output jacks on the left side panel of the TV. Getting Started Item Description 6 DIGITAL AUDIO Connects to the optical audio ... (OPTICAL) compatible. 7 CABLE/ ANTENNA RF input that has S VIDEO which provides better picture quality than composite video. This TV displays all picture format types in a resolution of your equipment properly and playback the video with capable equipment. You may be connected to your A/V equipment such...
... resolution and timing, see page 19 to setup your PC to this TV. 9 VIDEO IN 2 S VIDEO VIDEO/ L (MONO)AUDIO-R Connects to the composite video and audio output jacks on the left side panel of the TV. Getting Started Item Description 6 DIGITAL AUDIO Connects to the optical audio ... (OPTICAL) compatible. 7 CABLE/ ANTENNA RF input that has S VIDEO which provides better picture quality than composite video. This TV displays all picture format types in a resolution of your equipment properly and playback the video with capable equipment. You may be connected to your A/V equipment such...
Operating Instructions
Page 10
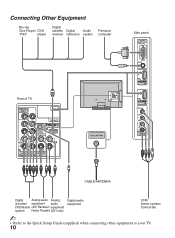
Connecting Other Equipment Blu-ray Disc Player/ DVD "PS3" player Digital satellite Digital Audio receiver cable box system Personal computer Rear of TV VIDEO IN VIDEO Y SERVICE PB IN (OPTICAL) PR 1 DIGITAL AUDIO OUT L AUDIO R 1 2 AUDIO COMPONENT IN AUDIO OUT (1080p/1080i.../720p/480p/480i) (FIX) L AUDIO R CABLE/ANTENNA Side panel PC IN RGB AUDIO 2 IN 3 IN S VIDEO VIDEO L (MONO) AUDIO R 2 VIDEO IN CABLE/ANTENNA Digital Analog audio Analog recorder/ equipment audio DVD/Game (A/V Receiver/ equipment system Home Theater) (DVI only) Digital audio ...
Connecting Other Equipment Blu-ray Disc Player/ DVD "PS3" player Digital satellite Digital Audio receiver cable box system Personal computer Rear of TV VIDEO IN VIDEO Y SERVICE PB IN (OPTICAL) PR 1 DIGITAL AUDIO OUT L AUDIO R 1 2 AUDIO COMPONENT IN AUDIO OUT (1080p/1080i.../720p/480p/480i) (FIX) L AUDIO R CABLE/ANTENNA Side panel PC IN RGB AUDIO 2 IN 3 IN S VIDEO VIDEO L (MONO) AUDIO R 2 VIDEO IN CABLE/ANTENNA Digital Analog audio Analog recorder/ equipment audio DVD/Game (A/V Receiver/ equipment system Home Theater) (DVI only) Digital audio ...

Operating Instructions
Page 17
...Highlight Remove from Favorites and press . • Auto Program will clear your TV channels from Favorites 1 Press TOOLS to remove the current channel or input while you can manage your preferred TV channels and External Inputs. Removing from Favorites (see page 12). 17 Displaying ...Favorites Press FAVORITES on the remote control. Video 1 Channel PC Recently viewed items Saved channel or external input Navigating ...
...Highlight Remove from Favorites and press . • Auto Program will clear your TV channels from Favorites 1 Press TOOLS to remove the current channel or input while you can manage your preferred TV channels and External Inputs. Removing from Favorites (see page 12). 17 Displaying ...Favorites Press FAVORITES on the remote control. Video 1 Channel PC Recently viewed items Saved channel or external input Navigating ...

Operating Instructions
Page 18
...; Normal is available with 480i or 480p sources only as they are standard-definition and not from high-definition source such as component video input, HDMI input and digital TV. • Full Pixel is not available. How to set to On. Full Zoom Zoom Full Pixel This mode is available only ...excluding Cable/Antenna input. • Full Pixel displays the picture in its native resolution. 18 You can manually change the Wide Mode setting while watching TV by pressing the WIDE button on the original source, a black frame or black bars may surround the picture. Select Auto Wide and set to ...
...; Normal is available with 480i or 480p sources only as they are standard-definition and not from high-definition source such as component video input, HDMI input and digital TV. • Full Pixel is not available. How to set to On. Full Zoom Zoom Full Pixel This mode is available only ...excluding Cable/Antenna input. • Full Pixel displays the picture in its native resolution. 18 You can manually change the Wide Mode setting while watching TV by pressing the WIDE button on the original source, a black frame or black bars may surround the picture. Select Auto Wide and set to ...
Operating Instructions
Page 21
...: ❑ Turn on your remote control; Do not plug the TV back until the moisture from cleaning has evaporated. • The TV should also be watching the wrong input. • If there is no picture from some video sources, check the Input selection by pressing INPUT button. You may ...technical assistance related to factory defaults. Press and hold down the V button on the remote, press the POWER button on securing the TV section or use of your Sony TV even after you to wall. Release the V button. ❑ Select Product Support option under Setup menu and select OK on ...
...: ❑ Turn on your remote control; Do not plug the TV back until the moisture from cleaning has evaporated. • The TV should also be watching the wrong input. • If there is no picture from some video sources, check the Input selection by pressing INPUT button. You may ...technical assistance related to factory defaults. Press and hold down the V button on the remote, press the POWER button on securing the TV section or use of your Sony TV even after you to wall. Release the V button. ❑ Select Product Support option under Setup menu and select OK on ...

Operating Instructions
Page 22
... 65.9 Remote control RM-YD028 (1) / Size AA batteries (2) / Cable holder (1 attached to the TV) / Operating Instructions (1) / Quick Setup Guide (1) / Warranty Card (1) / Safety and Regulatory Booklet (1)... 1 - 135 / Digital Cable: 1 - 135 LCD (Liquid Crystal Display) Panel 10 W + 10 W 75-ohm external terminal for RF inputs S VIDEO (4-pin mini DIN) (VIDEO 2 only): Y: 1.0 Vp-p, 75 ohms unbalanced,...215; 536 × 89 987 × 636 × 93 1,123 × 723 × 96 1,262 × 822 × 115 31 1/2 × 21 1/8 × 3 5/8 38 7/8 × 25 1/8 × 3 3/4 44 1/4 × 28 1/2 × ...
... 65.9 Remote control RM-YD028 (1) / Size AA batteries (2) / Cable holder (1 attached to the TV) / Operating Instructions (1) / Quick Setup Guide (1) / Warranty Card (1) / Safety and Regulatory Booklet (1)... 1 - 135 / Digital Cable: 1 - 135 LCD (Liquid Crystal Display) Panel 10 W + 10 W 75-ohm external terminal for RF inputs S VIDEO (4-pin mini DIN) (VIDEO 2 only): Y: 1.0 Vp-p, 75 ohms unbalanced,...215; 536 × 89 987 × 636 × 93 1,123 × 723 × 96 1,262 × 822 × 115 31 1/2 × 21 1/8 × 3 5/8 38 7/8 × 25 1/8 × 3 3/4 44 1/4 × 28 1/2 × ...

Operating Instructions
Page 23
... IN 9 PIC OFF/TIMER 15 POWER button 14, 15 POWER LED 15 R RETURN button 13 S STANDBY LED 15 T TOOLS button 14 Troubleshooting 21 U Using 16 V VIDEO/AUDIO (L/R) jacks, described 8, 9 VOL +/- button 14, 15 W WIDE button 13 Other Information 23
... IN 9 PIC OFF/TIMER 15 POWER button 14, 15 POWER LED 15 R RETURN button 13 S STANDBY LED 15 T TOOLS button 14 Troubleshooting 21 U Using 16 V VIDEO/AUDIO (L/R) jacks, described 8, 9 VOL +/- button 14, 15 W WIDE button 13 Other Information 23


