
Brochure
Page 1
... music. Four HD inputs Plug into the action with ultra-crisp HD clarity and less grain. KDL-32BX330 32" Class (31.5" diag.) Sony BX330 HDTV Watch your favorite movies and TV shows in whatever you're watching with meticulous processing. Digital Noise Reduction enhances detail in brilliant... Sony HD picture quality. This 32" Class (31.5" diag.) HDTV is optimized for the bedroom or office. Four HD inputs include two HDMI®...
... music. Four HD inputs Plug into the action with ultra-crisp HD clarity and less grain. KDL-32BX330 32" Class (31.5" diag.) Sony BX330 HDTV Watch your favorite movies and TV shows in whatever you're watching with meticulous processing. Digital Noise Reduction enhances detail in brilliant... Sony HD picture quality. This 32" Class (31.5" diag.) HDTV is optimized for the bedroom or office. Four HD inputs include two HDMI®...

Brochure
Page 2
...Star Power Consumption (Standby Mode) for Energy Star 0.3W General Features Closed Captions (CC) Analog, Digital Finish (Surface Color) Black Start Up Sony Logo Display Yes Inputs and Outputs AC Power Input 1 (Rear) Analog Audio Input(s) (Total) 1 (Rear) Analog Audio Input(s) for HDMI... Terrestrial) VHF: 2-13/UHF: 14-69 Color System NTSC 3.58 Number of Tuners (Terrestrial/Cable) 1(Digital/Analog) TV System (Analog) M TV System (Digital Cable) Clear QAM TV System (Digital Terrestrial) ATSC Video Video Signal 1080/24p (HDMI™ only), 1080/60i, 1080/60p (HDMI™...
...Star Power Consumption (Standby Mode) for Energy Star 0.3W General Features Closed Captions (CC) Analog, Digital Finish (Surface Color) Black Start Up Sony Logo Display Yes Inputs and Outputs AC Power Input 1 (Rear) Analog Audio Input(s) (Total) 1 (Rear) Analog Audio Input(s) for HDMI... Terrestrial) VHF: 2-13/UHF: 14-69 Color System NTSC 3.58 Number of Tuners (Terrestrial/Cable) 1(Digital/Analog) TV System (Analog) M TV System (Digital Cable) Clear QAM TV System (Digital Terrestrial) ATSC Video Video Signal 1080/24p (HDMI™ only), 1080/60i, 1080/60p (HDMI™...

User Manual
Page 1
LCD TV Operating Instructions 4-420-038-11(2) Introducing Your New BRAVIA® Getting Started Operating the TV Using Features Using the Menus Other Information KDL-32BX330 / 32BX331 Sony Customer Support U.S.A.: http://www.sony.com/tvsupport Canada: http://www.sony.ca/support United States 1.800.222.SONY Canada 1.877.899.SONY Please Do Not Return the Product to the Store
LCD TV Operating Instructions 4-420-038-11(2) Introducing Your New BRAVIA® Getting Started Operating the TV Using Features Using the Menus Other Information KDL-32BX330 / 32BX331 Sony Customer Support U.S.A.: http://www.sony.com/tvsupport Canada: http://www.sony.ca/support United States 1.800.222.SONY Canada 1.877.899.SONY Please Do Not Return the Product to the Store

User Manual
Page 2
...be fully inserted. ❑ Operating on the package. • Never use this TV. and other countries. Cleaning When cleaning, be sure to unplug the power cord to them whenever you call upon your Sony dealer regarding this AC plug with a solution of mild soap and warm water. ... provided on 120 V AC. ❑ Avoid operating the TV at the side and rear of the TV. Record these numbers in the spaces provided below 41°F (5°C). Dolby and the double-D symbol are trademarks or registered marks of Sony Corporation. "PlayStation" is a registered trademark and "PS3" ...
...be fully inserted. ❑ Operating on the package. • Never use this TV. and other countries. Cleaning When cleaning, be sure to unplug the power cord to them whenever you call upon your Sony dealer regarding this AC plug with a solution of mild soap and warm water. ... provided on 120 V AC. ❑ Avoid operating the TV at the side and rear of the TV. Record these numbers in the spaces provided below 41°F (5°C). Dolby and the double-D symbol are trademarks or registered marks of Sony Corporation. "PlayStation" is a registered trademark and "PS3" ...
User Manual
Page 3
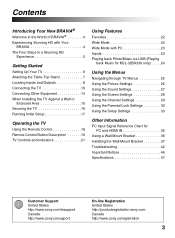
... Mode with PC 23 Inputs 23 Playing back Photo/Music via USB (Playing back Music for KDL-32BX330 only) . . . . . 24 Using the Menus Navigating through TV Menus 25 Using the Picture Settings 26 Using the Sound Settings 27 Using the Screen Settings 28 Using the Channel Settings 29 Using the Parental... 35 Using a Wall-Mount Bracket 36 Installing the Wall-Mount Bracket 37 Troubleshooting 42 Important Notices 46 Specifications 47 Customer Support United States http://www.sony.com/tvsupport Canada http://www.sony.ca/support On-line Registration United States http://productregistration...
... Mode with PC 23 Inputs 23 Playing back Photo/Music via USB (Playing back Music for KDL-32BX330 only) . . . . . 24 Using the Menus Navigating through TV Menus 25 Using the Picture Settings 26 Using the Sound Settings 27 Using the Screen Settings 28 Using the Channel Settings 29 Using the Parental... 35 Using a Wall-Mount Bracket 36 Installing the Wall-Mount Bracket 37 Troubleshooting 42 Important Notices 46 Specifications 47 Customer Support United States http://www.sony.com/tvsupport Canada http://www.sony.ca/support On-line Registration United States http://productregistration...

User Manual
Page 4
Read this Sony BRAVIA® high-definition television. Your BRAVIA TV can receive and display HD programming from: • Over-the-air broadcasting via HD-quality antenna • HD cable subscription • HD satellite subscription • ... stunning detail of the image you see on upgrading to HD programming. 4 Safety Booklet Contains precautionary measures to keep you need access to operate your TV safe. Quick Setup Guide Provides TV setup information with sample connection diagrams. Experiencing Stunning HD with Your BRAVIA The quality of your new BRAVIA...
Read this Sony BRAVIA® high-definition television. Your BRAVIA TV can receive and display HD programming from: • Over-the-air broadcasting via HD-quality antenna • HD cable subscription • HD satellite subscription • ... stunning detail of the image you see on upgrading to HD programming. 4 Safety Booklet Contains precautionary measures to keep you need access to operate your TV safe. Quick Setup Guide Provides TV setup information with sample connection diagrams. Experiencing Stunning HD with Your BRAVIA The quality of your new BRAVIA...

User Manual
Page 5
...; The Four Steps to a standard analog signal, you compare a high-definition signal to a Stunning HD Experience Set, Source, Sound, and Setup Along with your BRAVIA TV set, a complete HD system requires a source of HD programming, an HD sound system, and a proper connection setup. Refer to fill the screen. 5
...; The Four Steps to a standard analog signal, you compare a high-definition signal to a Stunning HD Experience Set, Source, Sound, and Setup Along with your BRAVIA TV set, a complete HD system requires a source of HD programming, an HD sound system, and a proper connection setup. Refer to fill the screen. 5

User Manual
Page 6
...screwdriver and the supplied screws to a warm area. Sudden room temperature changes may cause the TV to evaporate completely before powering the TV on. 6 Look for safety and to avoid damage. • Ensure your TV has adequate ventilation, see page 15. • For best picture quality, do not ...with a detached Table-Top Stand so you will need to consider the following while setting up your TV: • Disconnect all cables when carrying the TV. • Carry the TV with the TV. Be sure to attach the Table-Top Stand. This may cause moisture condensation. Should this occur...
...screwdriver and the supplied screws to a warm area. Sudden room temperature changes may cause the TV to evaporate completely before powering the TV on. 6 Look for safety and to avoid damage. • Ensure your TV has adequate ventilation, see page 15. • For best picture quality, do not ...with a detached Table-Top Stand so you will need to consider the following while setting up your TV: • Disconnect all cables when carrying the TV. • Carry the TV with the TV. Be sure to attach the Table-Top Stand. This may cause moisture condensation. Should this occur...
User Manual
Page 7
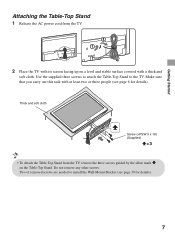
... this task with a thick and soft cloth. Two of removed screws are needed to the TV. Thick and soft cloth Screw (+PSW 5 x 16) (Supplied) • To detach the Table-Top Stand from the TV. 2 Place the TV with its screen facing up on the Table-Top Stand. Getting Started Attaching the Table-Top... Stand 1 Release the AC power cord from the TV, remove the three screws guided by the allow mark on a level and stable surface covered with at least two or three people (see page 39 ...
... this task with a thick and soft cloth. Two of removed screws are needed to the TV. Thick and soft cloth Screw (+PSW 5 x 16) (Supplied) • To detach the Table-Top Stand from the TV. 2 Place the TV with its screen facing up on the Table-Top Stand. Getting Started Attaching the Table-Top... Stand 1 Release the AC power cord from the TV, remove the three screws guided by the allow mark on a level and stable surface covered with at least two or three people (see page 39 ...

User Manual
Page 8
... Y for video and use Y, PB, PR for video signals and also connect the audio L (mono) and R for the signals that bears the HDMI logo. This TV can be used , connect the adapter to the computer before connecting the HD15-HD15 cable. See "PC Input Signal Reference Chart" on how to setup... sure to use an adapter (not supplied). Can also be necessary to use only an HDMI cable that can auto detect and switch between this TV. You may be connected to -HDMI cable or adapter (not supplied). See page 13 for information on page 35 for audio signal. Use a DVI-to...
... Y for video and use Y, PB, PR for video signals and also connect the audio L (mono) and R for the signals that bears the HDMI logo. This TV can be used , connect the adapter to the computer before connecting the HD15-HD15 cable. See "PC Input Signal Reference Chart" on how to setup... sure to use an adapter (not supplied). Can also be necessary to use only an HDMI cable that can auto detect and switch between this TV. You may be connected to -HDMI cable or adapter (not supplied). See page 13 for information on page 35 for audio signal. Use a DVI-to...

User Manual
Page 9
... Started 9 Item Description 4 DIGITAL AUDIO Connects to the optical audio input of your analog audio equipment. You can use these outputs to listen to your TV's audio through your stereo system. 6 CABLE/ ANTENNA RF input that is available only with HDMI connection.
... Started 9 Item Description 4 DIGITAL AUDIO Connects to the optical audio input of your analog audio equipment. You can use these outputs to listen to your TV's audio through your stereo system. 6 CABLE/ ANTENNA RF input that is available only with HDMI connection.

User Manual
Page 10
...radio frequency interference, resulting in your input signal (page 29). 10 Cable or VHF/UHF (or VHF only) 75-ohm coaxial cable Rear of TV CABLE/ANTENNA • Be sure to set the Signal Type setting to Cable or Antenna found under the Channel settings for both cable (QAM ... and VHF/UHF Antenna System Use an optional A-B RF switch (not supplied) to receive optimum picture quality. Cable Antenna A/B RF Switch A B Rear of TV CABLE/ANTENNA • It is capable of receiving unscrambled digital programming for your area) along with standard-definition analog programming. This...
...radio frequency interference, resulting in your input signal (page 29). 10 Cable or VHF/UHF (or VHF only) 75-ohm coaxial cable Rear of TV CABLE/ANTENNA • Be sure to set the Signal Type setting to Cable or Antenna found under the Channel settings for both cable (QAM ... and VHF/UHF Antenna System Use an optional A-B RF switch (not supplied) to receive optimum picture quality. Cable Antenna A/B RF Switch A B Rear of TV CABLE/ANTENNA • It is capable of receiving unscrambled digital programming for your area) along with standard-definition analog programming. This...
User Manual
Page 11
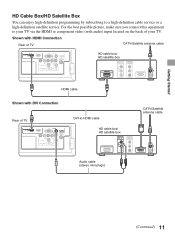
... -HDMI cable HD cable box/ HD satellite box CATV/Satellite antenna cable Audio cable (stereo mini plugs) (Continued) 11 Shown with HDMI Connection Rear of TV CATV/Satellite antenna cable HD cable box/ HD satellite box HDMI cable Shown with audio) input located on the back of... TV DVI-to a high-definition cable service or a high-definition satellite service. For the best possible picture, make sure you connect this equipment to your TV via the HDMI or component video (with DVI Connection Rear of your...
... -HDMI cable HD cable box/ HD satellite box CATV/Satellite antenna cable Audio cable (stereo mini plugs) (Continued) 11 Shown with HDMI Connection Rear of TV CATV/Satellite antenna cable HD cable box/ HD satellite box HDMI cable Shown with audio) input located on the back of... TV DVI-to a high-definition cable service or a high-definition satellite service. For the best possible picture, make sure you connect this equipment to your TV via the HDMI or component video (with DVI Connection Rear of your...

User Manual
Page 12
For details, see page 8. 12 Shown with Component Connection Rear of TV CATV/Satellite antenna cable HD cable box/ HD satellite box AUDIO-R (red) AUDIO-L (white) PR (red) PB (blue) Y (green) Component video cable Audio cable • If your equipment has a DVI output and not an HDMI output, connect the DVI output to the HDMI IN 1 (with DVI-to-HDMI cable or adapter) and connect the audio output to the AUDIO IN of PC IN.
For details, see page 8. 12 Shown with Component Connection Rear of TV CATV/Satellite antenna cable HD cable box/ HD satellite box AUDIO-R (red) AUDIO-L (white) PR (red) PB (blue) Y (green) Component video cable Audio cable • If your equipment has a DVI output and not an HDMI output, connect the DVI output to the HDMI IN 1 (with DVI-to-HDMI cable or adapter) and connect the audio output to the AUDIO IN of PC IN.
User Manual
Page 13
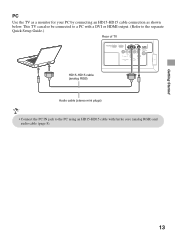
This TV can also be connected to a PC with a DVI or HDMI output. (Refer to the separate Quick Setup Guide.) Rear of TV HD15-HD15 cable (analog RGB) Audio cable (stereo mini plugs) • Connect the PC IN jack to the PC using an HD15-HD15 cable with ferrite core (analog RGB) and audio cable (page 8). 13 Getting Started PC Use the TV as a monitor for your PC by connecting an HD15-HD15 cable connection as shown below.
This TV can also be connected to a PC with a DVI or HDMI output. (Refer to the separate Quick Setup Guide.) Rear of TV HD15-HD15 cable (analog RGB) Audio cable (stereo mini plugs) • Connect the PC IN jack to the PC using an HD15-HD15 cable with ferrite core (analog RGB) and audio cable (page 8). 13 Getting Started PC Use the TV as a monitor for your PC by connecting an HD15-HD15 cable connection as shown below.
User Manual
Page 14
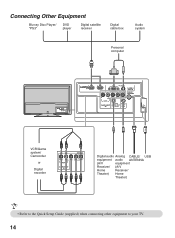
Connecting Other Equipment Blu-ray Disc Player/ "PS3" DVD player Digital satellite receiver Digital cable box Audio system Personal computer VCR/Game system/ Camcorder or Digital recorder Digital audio Analog CABLE/ USB equipment audio ANTENNA (A/V equipment Receiver/ (A/V Home Receiver/ Theater) Home Theater) • Refer to the Quick Setup Guide (supplied) when connecting other equipment to your TV. 14
Connecting Other Equipment Blu-ray Disc Player/ "PS3" DVD player Digital satellite receiver Digital cable box Audio system Personal computer VCR/Game system/ Camcorder or Digital recorder Digital audio Analog CABLE/ USB equipment audio ANTENNA (A/V equipment Receiver/ (A/V Home Receiver/ Theater) Home Theater) • Refer to the Quick Setup Guide (supplied) when connecting other equipment to your TV. 14

User Manual
Page 15
... follows: Air circulation is blocked. Air circulation is blocked. Avoid operating the TV at temperatures below . Wall Wall • Inadequate ventilation can lead to overheating of the TV and may cause TV damage or cause a fire. 15 Installed on the wall 4 inches (10 cm) 11 7/8 inches (30 cm) 4 inches (10 cm) 4 inches (10... (10 cm) 11 7/8 inches (30 cm) 4 inches (10 cm) 2 3/8 inches (6 cm) Leave at least this much space around the set. Getting Started When Installing the TV Against a Wall or Enclosed Area Make sure that your...
... follows: Air circulation is blocked. Air circulation is blocked. Avoid operating the TV at temperatures below . Wall Wall • Inadequate ventilation can lead to overheating of the TV and may cause TV damage or cause a fire. 15 Installed on the wall 4 inches (10 cm) 11 7/8 inches (30 cm) 4 inches (10 cm) 4 inches (10... (10 cm) 11 7/8 inches (30 cm) 4 inches (10 cm) 2 3/8 inches (6 cm) Leave at least this much space around the set. Getting Started When Installing the TV Against a Wall or Enclosed Area Make sure that your...

User Manual
Page 16
... chain (not supplied) Wall-anchor (not supplied) Use two angle braces (not supplied) to a TV stand (not supplied). 1 Secure the stand for the TV. Securing the TV Sony strongly recommends taking measures to prevent the TV from Toppling ❑ Secure the TV to a wall. ❑ Do not allow children to play or climb on furniture and...
... chain (not supplied) Wall-anchor (not supplied) Use two angle braces (not supplied) to a TV stand (not supplied). 1 Secure the stand for the TV. Securing the TV Sony strongly recommends taking measures to prevent the TV from Toppling ❑ Secure the TV to a wall. ❑ Do not allow children to play or climb on furniture and...

User Manual
Page 17
... Program at later time. The Initial Setup screen will scan for sample connection diagrams. Initial Setup Please select your cable or antenna to the TV (you to select the highlighted option and advance to the next screen. 3 Auto Program will appear. 2 Use the remote control buttons described...to navigate through the Initial Setup. Refer to the Quick Setup Guide (supplied) for available channels from the signal source directly connected to the TV's CABLE/ANTENNA input. To run the Auto Program. • Select Cancel to stop or cancel the Auto Program. Follow the help text ...
... Program at later time. The Initial Setup screen will scan for sample connection diagrams. Initial Setup Please select your cable or antenna to the TV (you to select the highlighted option and advance to the next screen. 3 Auto Program will appear. 2 Use the remote control buttons described...to navigate through the Initial Setup. Refer to the Quick Setup Guide (supplied) for available channels from the signal source directly connected to the TV's CABLE/ANTENNA input. To run the Auto Program. • Select Cancel to stop or cancel the Auto Program. Follow the help text ...
User Manual
Page 18
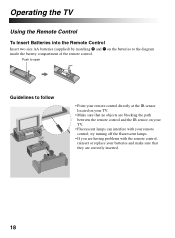
... having problems with your remote control; Push to open Guidelines to follow • Point your remote control directly at the IR sensor located on your TV. • Make sure that they are blocking the path between the remote control and the IR sensor on the batteries to the diagram inside the... battery compartment of the remote control. Operating the TV Using the Remote Control To Insert Batteries into the Remote Control Insert two size AA batteries (supplied) by matching e and E on your...
... having problems with your remote control; Push to open Guidelines to follow • Point your remote control directly at the IR sensor located on your TV. • Make sure that they are blocking the path between the remote control and the IR sensor on the batteries to the diagram inside the... battery compartment of the remote control. Operating the TV Using the Remote Control To Insert Batteries into the Remote Control Insert two size AA batteries (supplied) by matching e and E on your...


