Instructions (SU-WL500 Wall-Mount Bracket)
Page 8
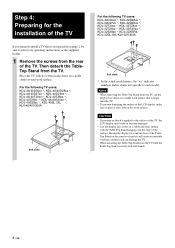
... • To prevent damaging the surface of the LCD display, make sure to the surface of the TV, the LCD display may break or become damaged. • Lay the display face down on a stable and level surface with the...users: KDL-46/40D30xx *, KDL-46/40D28xx *, KDL-46/40D27xx *, KDL-40D26xx *, KDL-46/40T30xx *, KDL-40T28xx *, KDL-40T26xx *, KDL-46/40S30xx *, KDL-40S28xx *, KDL-40SL130, KLV-46/40V300A Soft cloth For the following TV users: KDL-32D30xx *, KDL-32D28xx *, KDL-32D27xx *, KDL-32D26xx *, KDL-32T30xx *, KDL-32T28xx *, KDL-32T26xx *, KDL-32S30xx *, KDL-32S28xx *, KDL-32XBR4, KDL-32SL130, ...
... • To prevent damaging the surface of the LCD display, make sure to the surface of the TV, the LCD display may break or become damaged. • Lay the display face down on a stable and level surface with the...users: KDL-46/40D30xx *, KDL-46/40D28xx *, KDL-46/40D27xx *, KDL-40D26xx *, KDL-46/40T30xx *, KDL-40T28xx *, KDL-40T26xx *, KDL-46/40S30xx *, KDL-40S28xx *, KDL-40SL130, KLV-46/40V300A Soft cloth For the following TV users: KDL-32D30xx *, KDL-32D28xx *, KDL-32D27xx *, KDL-32D26xx *, KDL-32T30xx *, KDL-32T28xx *, KDL-32T26xx *, KDL-32S30xx *, KDL-32S28xx *, KDL-32XBR4, KDL-32SL130, ...
Instructions (SU-WL500 Wall-Mount Bracket)
Page 12
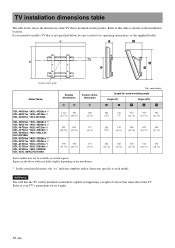
Screen centre point Model Name Display dimensions A B Screen centre dimension C Unit: mm (inches) Length for its operating ...;) Angle (20º) D E F G H KDL-46D30xx */KDL-46D28xx */ KDL-46D27xx */KDL-46T30xx */ KDL-46S30xx */KLV-46V300A KDL-40D30xx */KDL-40D28xx */ KDL-40D27xx */KDL-40D26xx */ KDL-40T30xx */KDL-40T28xx */ KDL-40T26xx */KDL-40S30xx */ KDL-40S28xx */KDL-40SL130/ KLV-40V300A KDL-32D30xx */KDL-32D28xx */ KDL-32D27xx */KDL-32D26xx */ KDL-32T30xx */KDL-32T28xx */ KDL-32T26xx */KDL-32S30xx */ KDL-32S28xx */KDL-32XBR4/ KDL-32SL130/KLV-32V300A 1,114 730 (43 7/8) (28 ...
Screen centre point Model Name Display dimensions A B Screen centre dimension C Unit: mm (inches) Length for its operating ...;) Angle (20º) D E F G H KDL-46D30xx */KDL-46D28xx */ KDL-46D27xx */KDL-46T30xx */ KDL-46S30xx */KLV-46V300A KDL-40D30xx */KDL-40D28xx */ KDL-40D27xx */KDL-40D26xx */ KDL-40T30xx */KDL-40T28xx */ KDL-40T26xx */KDL-40S30xx */ KDL-40S28xx */KDL-40SL130/ KLV-40V300A KDL-32D30xx */KDL-32D28xx */ KDL-32D27xx */KDL-32D26xx */ KDL-32T30xx */KDL-32T28xx */ KDL-32T26xx */KDL-32S30xx */ KDL-32S28xx */KDL-32XBR4/ KDL-32SL130/KLV-32V300A 1,114 730 (43 7/8) (28 ...
Installing the Wall-Mount Bracket (SU-WL500)
Page 2
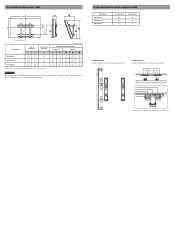
... installation dimensions table Screw and Hook locations diagram/table Model Name KDL-40VL130 KDL-46VL130 KDL-52WL130 Screw location e, g e, g d, g Hook location b b a 320 (12 5/8) Screen center point Model Name Display dimensions Screen center dimensions A B C KDL-40VL130 992 643 176 (39 1/8) (25 3/8) (7) KDL-46VL130 1135 734 (44 3/4) (29) 128 (5 1/8) KDL-52WL130 1278 (50 3/8) 832 (32 7/8) 73 (2 7/8) Figures in the table above...
... installation dimensions table Screw and Hook locations diagram/table Model Name KDL-40VL130 KDL-46VL130 KDL-52WL130 Screw location e, g e, g d, g Hook location b b a 320 (12 5/8) Screen center point Model Name Display dimensions Screen center dimensions A B C KDL-40VL130 992 643 176 (39 1/8) (25 3/8) (7) KDL-46VL130 1135 734 (44 3/4) (29) 128 (5 1/8) KDL-52WL130 1278 (50 3/8) 832 (32 7/8) 73 (2 7/8) Figures in the table above...
Operating Instructions
Page 3
... TV Controls 20 Indicators 25 Programming the Remote Control 26 Operating Sony Brand Video Equipment......26 Programming Non-Sony Video Equipment 26 Using Other Equipment with Your Remote Control 28 Using P&P and PIP Features 31 To Display the Sub Window 31 To Change Inputs or Channels in the ...Window 31 To Change the Window Size of P&P............31 To Exit from Toppling Over .........10 Preparation for BRAVIA ...
... TV Controls 20 Indicators 25 Programming the Remote Control 26 Operating Sony Brand Video Equipment......26 Programming Non-Sony Video Equipment 26 Using Other Equipment with Your Remote Control 28 Using P&P and PIP Features 31 To Display the Sub Window 31 To Change Inputs or Channels in the ...Window 31 To Change the Window Size of P&P............31 To Exit from Toppling Over .........10 Preparation for BRAVIA ...
Operating Instructions
Page 7
... TV is in safe operating condition, and to direct illumination or direct sunlight. If the surface of the LCD panel and is in use . Handling of the TV. Replacement parts When replacement parts are displayed continuously. Safety check Upon completion of the screen height, and in moderate brightness. For Customers in the...
... TV is in safe operating condition, and to direct illumination or direct sunlight. If the surface of the LCD panel and is in use . Handling of the TV. Replacement parts When replacement parts are displayed continuously. Safety check Upon completion of the screen height, and in moderate brightness. For Customers in the...
Operating Instructions
Page 8
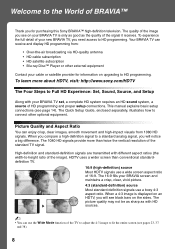
...sharp as the quality of the signal it receives. The quality of the image you need access to HD programming. Your BRAVIA TV can receive and display HD programming from 1080 HD signals. This manual explains basic setup connections (see page 14). High-definition and standard-definition signals...The Four Steps to Full HD Experience: Set, Sound, Source, and Setup Along with your cable or satellite provider for purchasing this Sony BRAVIA™ high-definition television. When a 4:3 image is only as good as with different aspect ratios (the width-to-height ratio of the image). To experience...
...sharp as the quality of the signal it receives. The quality of the image you need access to HD programming. Your BRAVIA TV can receive and display HD programming from 1080 HD signals. This manual explains basic setup connections (see page 14). High-definition and standard-definition signals...The Four Steps to Full HD Experience: Set, Sound, Source, and Setup Along with your cable or satellite provider for purchasing this Sony BRAVIA™ high-definition television. When a 4:3 image is only as good as with different aspect ratios (the width-to-height ratio of the image). To experience...
Operating Instructions
Page 9
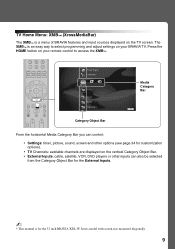
... other inputs can also be selected from the Category Object Bar for the External Inputs. ~ • This manual is a menu of BRAVIA features and input sources displayed on the TV screen. Press the HOME button on your remote control to access the XMB™. The XMB™ is an easy... way to select programming and adjust settings on your BRAVIA TV. TV Home Menu: XMB™ (XrossMediaBar) The XMB™ is for the 52 inch BRAVIA KDL-W Series model...
... other inputs can also be selected from the Category Object Bar for the External Inputs. ~ • This manual is a menu of BRAVIA features and input sources displayed on the TV screen. Press the HOME button on your remote control to access the XMB™. The XMB™ is an easy... way to select programming and adjust settings on your BRAVIA TV. TV Home Menu: XMB™ (XrossMediaBar) The XMB™ is for the 52 inch BRAVIA KDL-W Series model...

Operating Instructions
Page 11
... Interface) provides an uncompressed, all-digital audio/video interface between this TV and any HDMI-equipped audio/video equipment, such as a set up this TV displays all video input signals in a resolution of 1,920 dots × 1,080 lines. • Be sure to use a suitable plug adapter (not supplied). ~ • While headphones...
... Interface) provides an uncompressed, all-digital audio/video interface between this TV and any HDMI-equipped audio/video equipment, such as a set up this TV displays all video input signals in a resolution of 1,920 dots × 1,080 lines. • Be sure to use a suitable plug adapter (not supplied). ~ • While headphones...

Operating Instructions
Page 12
...; If the picture is noisy, flickering or not clear, adjust Phase and Pitch of Screen settings on page 16 for the signals that can be displayed. ~ • For some Apple Macintosh computers, it may be connected to other analog RGB equipment. VHF/UHF/CABLE qa Item 1 PC IN (RGB/AUDIO) 12...
...; If the picture is noisy, flickering or not clear, adjust Phase and Pitch of Screen settings on page 16 for the signals that can be displayed. ~ • For some Apple Macintosh computers, it may be connected to other analog RGB equipment. VHF/UHF/CABLE qa Item 1 PC IN (RGB/AUDIO) 12...

Operating Instructions
Page 13
... and audio (VIDEO IN 2) is AUDIO-R located on your A/V equipment such as VIDEO/L(MONO)- a VCR or other video equipment that this TV displays all video input signals in a resolution of 1,920 dots × 1,080 lines. Component video provides better picture quality than composite video (5) connection... to view 480i, 480p, 720p, 1080i, 1080p and 1080/24p formats. If both composite video and S VIDEO are connecting the optional BRAVIA external module (DMex). 8 DIGITAL OUT (OPTICAL) Connects to the AUDIO IN (L/R) jacks of your VCR or other video equipment. You ...
... and audio (VIDEO IN 2) is AUDIO-R located on your A/V equipment such as VIDEO/L(MONO)- a VCR or other video equipment that this TV displays all video input signals in a resolution of 1,920 dots × 1,080 lines. Component video provides better picture quality than composite video (5) connection... to view 480i, 480p, 720p, 1080i, 1080p and 1080/24p formats. If both composite video and S VIDEO are connecting the optional BRAVIA external module (DMex). 8 DIGITAL OUT (OPTICAL) Connects to the AUDIO IN (L/R) jacks of your VCR or other video equipment. You ...

Operating Instructions
Page 19
... to create a list of 5 Please select a language. You may be used for all the on page 40. (Useful for antenna installations.) To Display the Picture in Your Preferred Aspect Ratio Select the proper Wide Mode as default audio for available channels. button: Allows you turn off the TV... during the Initial Setup process, the Initial Setup will display how many analog and digital channels are being scanned. To Add Digital Channels Use the Add Digital Channels feature as described on -screen settings....
... to create a list of 5 Please select a language. You may be used for all the on page 40. (Useful for antenna installations.) To Display the Picture in Your Preferred Aspect Ratio Select the proper Wide Mode as default audio for available channels. button: Allows you turn off the TV... during the Initial Setup process, the Initial Setup will display how many analog and digital channels are being scanned. To Add Digital Channels Use the Add Digital Channels feature as described on -screen settings....

Operating Instructions
Page 20
...Info Banner on page 45. 2 LIGHT Press to illuminate the buttons on the remote control so that you can also set the display to show which external equipment the remote control is dark. 3 FUNCTION The FUNCTION button indicator lights up momentarily Buttons when pressed to... e and E on the 1 remote control. 2 3 4 HOME ~ • The 5 button, PLAY and CH + have a tactile dot. Button Description 1 DISPLAY Press once to display the information pertaining to open. Push and slide to the channel and/or program when available. Remote Control and TV Controls Buttons located at...
...Info Banner on page 45. 2 LIGHT Press to illuminate the buttons on the remote control so that you can also set the display to show which external equipment the remote control is dark. 3 FUNCTION The FUNCTION button indicator lights up momentarily Buttons when pressed to... e and E on the 1 remote control. 2 3 4 HOME ~ • The 5 button, PLAY and CH + have a tactile dot. Button Description 1 DISPLAY Press once to display the information pertaining to open. Push and slide to the channel and/or program when available. Remote Control and TV Controls Buttons located at...

Operating Instructions
Page 21
... will exit from Favorites" will deactivate Freeze and display the XMB™. 6 7 CC Press to turn...to the previous screen or exit from the screen when displaying menu items and settings. ~ • While the ... Press to access features in your Favorites list. Press once to display a frozen image with 0-9 and ENT to select digital channels....the Sound Booster setting. 0 FAVORITES Press once to display the stored favorite channel list. How to Remove ...confirmation message of "Channel added to 30 channels in the optional BRAVIA external module. Press again to return to enter 2.1, press ...
... will exit from Favorites" will deactivate Freeze and display the XMB™. 6 7 CC Press to turn...to the previous screen or exit from the screen when displaying menu items and settings. ~ • While the ... Press to access features in your Favorites list. Press once to display a frozen image with 0-9 and ENT to select digital channels....the Sound Booster setting. 0 FAVORITES Press once to display the stored favorite channel list. How to Remove ...confirmation message of "Channel added to 30 channels in the optional BRAVIA external module. Press again to return to enter 2.1, press ...

Operating Instructions
Page 22
.... REPLAY: Press to advance forward a set period of time. ADVANCE: Press to replay the current program for a set for details). x STOP: Press to your BRAVIA Theatre Sync audio system. The picture settings will be set period of time when playing back a recorded program. qg VOL +/- TV Press to play a program...Off appears. 22 wa m (fast reverse): Press to live TV cache. qd THEATER Press to remain on and off the TV. H PLAY: Press to display the BD/DVD disc menu. qh qj BD/DVD Press to pause playback. To cancel Sleep Timer, press SLEEP repeatedly until the TV...
.... REPLAY: Press to advance forward a set period of time. ADVANCE: Press to replay the current program for a set for details). x STOP: Press to your BRAVIA Theatre Sync audio system. The picture settings will be set period of time when playing back a recorded program. qg VOL +/- TV Press to play a program...Off appears. 22 wa m (fast reverse): Press to live TV cache. qd THEATER Press to remain on and off the TV. H PLAY: Press to display the BD/DVD disc menu. qh qj BD/DVD Press to pause playback. To cancel Sleep Timer, press SLEEP repeatedly until the TV...

Operating Instructions
Page 24
... while the list of External Inputs is selected when an icon to display a list of digital rating will appear if Digital Rating is displayed. • See page 44 on -screen cursor. Press to display the TV Home Menu/XMB™ to display the list of connected components. Press to select the function of External...
... while the list of External Inputs is selected when an icon to display a list of digital rating will appear if Digital Rating is displayed. • See page 44 on -screen cursor. Press to display the TV Home Menu/XMB™ to display the list of connected components. Press to select the function of External...

Operating Instructions
Page 28
...with Your Remote Control Make sure that case, operate by the remote control supplied with the equipment. Back to previous channel JUMP Display channel number DISPLAY Display SAT Guide OPTIONS Display SAT Menu HOME Move highlight (cursor) V v B b Select item VCR To Do This ... Press ... Stop Fast ... ... x M m X (press again to disc step backward Select a track directly 0-9, ENT Display the disc menu or top menu BD/DVD MENU or TOP MENU Operate the DVD menu V v B b, Display the system MENU HOME Return RETURN Blu-ray Disc Player (BD) To Do This ... Remote control...
...with Your Remote Control Make sure that case, operate by the remote control supplied with the equipment. Back to previous channel JUMP Display channel number DISPLAY Display SAT Guide OPTIONS Display SAT Menu HOME Move highlight (cursor) V v B b Select item VCR To Do This ... Press ... Stop Fast ... ... x M m X (press again to disc step backward Select a track directly 0-9, ENT Display the disc menu or top menu BD/DVD MENU or TOP MENU Operate the DVD menu V v B b, Display the system MENU HOME Return RETURN Blu-ray Disc Player (BD) To Do This ... Remote control...

Operating Instructions
Page 29
... MUTING Select other equipment connected to the DAV F1 Disk skip F2 Display the disc menu or top menu BD/DVD MENU or TOP MENU ... Specify the previous chapter/track Specify the next chapter/track . > Replay Advance Display the disc menu or top menu BD/DVD MENU or TOP MENU INPUT SELECT INPUT... on/off POWER Select the DVD F 1 Select the VCR F 2 Display the disc menu or top menu BD/DVD MENU or TOP MENU Play ...channels (VCR) CH +/- Activate the remote control to the previous display RETURN AV Receiver To Do This ... INPUT HOME HDD/DVD Combo Unit To Do This ......
... MUTING Select other equipment connected to the DAV F1 Disk skip F2 Display the disc menu or top menu BD/DVD MENU or TOP MENU ... Specify the previous chapter/track Specify the next chapter/track . > Replay Advance Display the disc menu or top menu BD/DVD MENU or TOP MENU INPUT SELECT INPUT... on/off POWER Select the DVD F 1 Select the VCR F 2 Display the disc menu or top menu BD/DVD MENU or TOP MENU Play ...channels (VCR) CH +/- Activate the remote control to the previous display RETURN AV Receiver To Do This ... INPUT HOME HDD/DVD Combo Unit To Do This ......

Operating Instructions
Page 30
Replay the current program for a set period of time Advance forward a set period of time when playing back a recorded program Specify the previous chapter mark Specify the next chapter mark . > Stop x Pause X Record z Open the Favorites List FAVORITES Open the Guide OPTIONS Open Main menu HOME Move highlight (cursor) V v B b Select item Close on-screen display RETURN Page +/- Press ... Open the RECORDINGS List TOP MENU 30 CH+/- To Do This ...
Replay the current program for a set period of time Advance forward a set period of time when playing back a recorded program Specify the previous chapter mark Specify the next chapter mark . > Stop x Pause X Record z Open the Favorites List FAVORITES Open the Guide OPTIONS Open Main menu HOME Move highlight (cursor) V v B b Select item Close on-screen display RETURN Page +/- Press ... Open the RECORDINGS List TOP MENU 30 CH+/- To Do This ...
Operating Instructions
Page 31
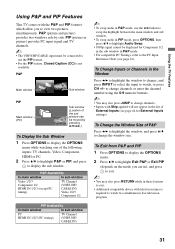
... channel number using the 0-9 numeric buttons. ~ • You may also press RETURN while in these features to exit. • Additional compatible device with television tuner is not available. P&P Availability In main window In sub window Video 1/2/3 Component 1/2 HDMI IN 1/2/3 (except PC timing) TV Channel (VHF/UHF/...PIP features which allow you are in), and press to exit. ~ • You may also press JUMP to display the sub window. To Exit from P&P and PIP 1 Press OPTIONS to display the OPTIONS menu. 2 Press V/v to highlight Exit P&P or Exit PIP (depends on the mode you to the...
... channel number using the 0-9 numeric buttons. ~ • You may also press RETURN while in these features to exit. • Additional compatible device with television tuner is not available. P&P Availability In main window In sub window Video 1/2/3 Component 1/2 HDMI IN 1/2/3 (except PC timing) TV Channel (VHF/UHF/...PIP features which allow you are in), and press to exit. ~ • You may also press JUMP to display the sub window. To Exit from P&P and PIP 1 Press OPTIONS to display the OPTIONS menu. 2 Press V/v to highlight Exit P&P or Exit PIP (depends on the mode you to the...

Operating Instructions
Page 32
... as a variety of TV features. Watching TV Select a channel. Inputs Assign a label using the number 0-9 or CH +/- Unavailable options are grayed out or not displayed. TV • You can also select a TV channel using the Label Inputs feature for your PC. Accessing the Equipment Connected to access the TV Home...play a game, record a program or work on your convenience, see remote control section pages 20 and 24). Product Support Clock/Timers Settings The XMB™ displays the Media Category icons (horizontally) and available features (vertically) within the highlighted icon.
... as a variety of TV features. Watching TV Select a channel. Inputs Assign a label using the number 0-9 or CH +/- Unavailable options are grayed out or not displayed. TV • You can also select a TV channel using the Label Inputs feature for your PC. Accessing the Equipment Connected to access the TV Home...play a game, record a program or work on your convenience, see remote control section pages 20 and 24). Product Support Clock/Timers Settings The XMB™ displays the Media Category icons (horizontally) and available features (vertically) within the highlighted icon.

