
Operating Instructions Setup Guide
Page 2
... set-up 15 Preparing a Wired Network 16 Viewing the Network Status 16 If You Cannot Connect to the Internet 16 Privacy Policy 16 Watching TV Select Your Content Source 17 Adjust Screen Shape and Aspect Ratio 17 Customize Sound and Picture Quality 17 Changing the Viewing Style 18 Changing the... Wide Mode 18 Setting Scene Select 18 Navigating through Home Menu All Apps 19 Photo Sharing Plus 19 Using the TV as a Photo Frame Mode 20 Favorites 20 Media 21 Playback Photo/Music/Video via USB 21 Home Network 22 Connecting to a Home Network . . . . . 22...
... set-up 15 Preparing a Wired Network 16 Viewing the Network Status 16 If You Cannot Connect to the Internet 16 Privacy Policy 16 Watching TV Select Your Content Source 17 Adjust Screen Shape and Aspect Ratio 17 Customize Sound and Picture Quality 17 Changing the Viewing Style 18 Changing the... Wide Mode 18 Setting Scene Select 18 Navigating through Home Menu All Apps 19 Photo Sharing Plus 19 Using the TV as a Photo Frame Mode 20 Favorites 20 Media 21 Playback Photo/Music/Video via USB 21 Home Network 22 Connecting to a Home Network . . . . . 22...

Operating Instructions Setup Guide
Page 3
Viewing Pictures from Connected Equipment Connection Diagram 33 Connecting the TV 34 Showing a Set Top Box with HDMI connection 34 Showing a Set Top Box with Component connection 35 Cable System or VHF/UHF Antenna System 35 ... 38 Using Audio and Video Equipment 39 Using Screen Mirroring 39 Additional Information Using a Wall-Mount Bracket 40 Detaching the Table-Top Stand from the TV 40 Installing the TV Against a Wall or Enclosed Area 41 Troubleshooting 41 Picture 41 Sound 42 Channels 42 Network 42 General 44 Specifications 45 3US
Viewing Pictures from Connected Equipment Connection Diagram 33 Connecting the TV 34 Showing a Set Top Box with HDMI connection 34 Showing a Set Top Box with Component connection 35 Cable System or VHF/UHF Antenna System 35 ... 38 Using Audio and Video Equipment 39 Using Screen Mirroring 39 Additional Information Using a Wall-Mount Bracket 40 Detaching the Table-Top Stand from the TV 40 Installing the TV Against a Wall or Enclosed Area 41 Troubleshooting 41 Picture 41 Sound 42 Channels 42 Network 42 General 44 Specifications 45 3US
Operating Instructions Setup Guide
Page 4
.... Location of the Setup Guide Setup Guide is placed on top of Conformity Trade Name: SONY Model: KDL-48W650D / 40W650D / 32W600D Responsible Party: Sony Electronics Inc. Labels for the TV Model No. Model Name Serial No. These limits are designed to them whenever you call upon your authority to FCC regulations, you for choosing this...
.... Location of the Setup Guide Setup Guide is placed on top of Conformity Trade Name: SONY Model: KDL-48W650D / 40W650D / 32W600D Responsible Party: Sony Electronics Inc. Labels for the TV Model No. Model Name Serial No. These limits are designed to them whenever you call upon your authority to FCC regulations, you for choosing this...
Operating Instructions Setup Guide
Page 5
... To reduce the risk of fire or electric shock, do not place objects filled with any interference, including interference that may cause a malfunction of the TV. Do not touch the AC adapter with wet hands. If you notice an abnormality in a confined space, such as a bookshelf or similar unit...
... To reduce the risk of fire or electric shock, do not place objects filled with any interference, including interference that may cause a malfunction of the TV. Do not touch the AC adapter with wet hands. If you notice an abnormality in a confined space, such as a bookshelf or similar unit...
Operating Instructions Setup Guide
Page 6
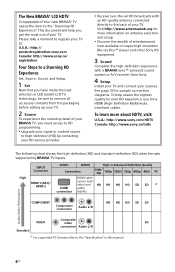
... SD connection Audio L/R Standard *1 For supported PC formats refer to remove all accessory contents from Sony. 4 Setup Install your TV and connect your HD experience, use Sony HDMI (High-Definition Multimedia Interface) cables. Visit http://www.antennaweb.org for your sources. The New... BRAVIA® LCD HDTV Congratulation! Please take a moment to register your TV at: U.S.A.: http:// productregistration.sony.com Canada: http://www.sony.ca/ registration Four Steps to a Stunning HD Experience Set, Source, Sound, and Setup. 1 Set Now that...
... SD connection Audio L/R Standard *1 For supported PC formats refer to remove all accessory contents from Sony. 4 Setup Install your TV and connect your HD experience, use Sony HDMI (High-Definition Multimedia Interface) cables. Visit http://www.antennaweb.org for your sources. The New... BRAVIA® LCD HDTV Congratulation! Please take a moment to register your TV at: U.S.A.: http:// productregistration.sony.com Canada: http://www.sony.ca/ registration Four Steps to a Stunning HD Experience Set, Source, Sound, and Setup. 1 Set Now that...
Operating Instructions Setup Guide
Page 7
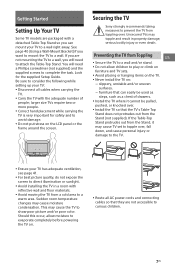
...of drawers. Install the TV where it may cause the TV to consider the following while setting up your TV: Disconnect all AC power cords and connecting cables so that they are not accessible to complete the task. Securing the TV Sony strongly recommends taking measures to a... wall right away. Sudden room temperature changes may topple and result in a room with reflective wall and floor materials. Avoid moving the TV from a cold area to avoid damage. ...
...of drawers. Install the TV where it may cause the TV to consider the following while setting up your TV: Disconnect all AC power cords and connecting cables so that they are not accessible to complete the task. Securing the TV Sony strongly recommends taking measures to a... wall right away. Sudden room temperature changes may topple and result in a room with reflective wall and floor materials. Avoid moving the TV from a cold area to avoid damage. ...

Operating Instructions Setup Guide
Page 8
... follow the three measures recommended. 8US For further protection, be sure to the Stand. Use two angle braces (not supplied) to below illustration for the TV. Make sure the Stand can adequately support the weight of the angle brace to the wall stud. Attach the other side to the Stand... or chain (not supplied) Wall-anchor VS (not supplied) Please see below illustration. 10 mm - 12 mm Screw M6 TV Rope or chain 3 Anchor the TV to : Attach one side of the TV. Make sure that there is no excess slack in the rope or chain. Please refer to secure the Stand.
... follow the three measures recommended. 8US For further protection, be sure to the Stand. Use two angle braces (not supplied) to below illustration for the TV. Make sure the Stand can adequately support the weight of the angle brace to the wall stud. Attach the other side to the Stand... or chain (not supplied) Wall-anchor VS (not supplied) Please see below illustration. 10 mm - 12 mm Screw M6 TV Rope or chain 3 Anchor the TV to : Attach one side of the TV. Make sure that there is no excess slack in the rope or chain. Please refer to secure the Stand.

Operating Instructions Setup Guide
Page 9
...moistened with a solution of the screen or exterior parts and enter the TV set, and may be placed on the TV set . Never use strong solvents such as a thinner, alcohol or benzine for your BRAVIA TV Safety is securely fastened. 9US It may drip to the bottom of...safety documentation (Safety Booklet) separately provided. If you US begin cleaning your TV. Wipe the LCD screen gently with a soft cloth. Stubborn stains may cause damage to the TV set . Unplug the TV and other connected equipment from the wall outlet before you have young children ...
...moistened with a solution of the screen or exterior parts and enter the TV set, and may be placed on the TV set . Never use strong solvents such as a thinner, alcohol or benzine for your BRAVIA TV Safety is securely fastened. 9US It may drip to the bottom of...safety documentation (Safety Booklet) separately provided. If you US begin cleaning your TV. Wipe the LCD screen gently with a soft cloth. Stubborn stains may cause damage to the TV set . Unplug the TV and other connected equipment from the wall outlet before you have young children ...
Operating Instructions Setup Guide
Page 10
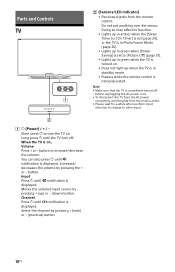
...sensor. Doing so may affect its function. • Lights up in amber when the [Sleep Timer] or [On Timer] is set (page 29), or the TV is in Photo Frame Mode (page 20). • Lights up in green when [Power Saving] is being operated. Increases/ decreases the volume by pressing + ... until CH notification is displayed. Long press until notification is displayed. When the TV is turned on. • Does not light up ) or - (down) button. You can also press until the TV turn the TV on , Volume Press + or - Moves the selected input source by pressing + (up when ...
...sensor. Doing so may affect its function. • Lights up in amber when the [Sleep Timer] or [On Timer] is set (page 29), or the TV is in Photo Frame Mode (page 20). • Lights up in green when [Power Saving] is being operated. Increases/ decreases the volume by pressing + ... until CH notification is displayed. Long press until notification is displayed. When the TV is turned on. • Does not light up ) or - (down) button. You can also press until the TV turn the TV on , Volume Press + or - Moves the selected input source by pressing + (up when ...

Operating Instructions Setup Guide
Page 11
...service. DISPLAY Displays information. Device Control: Use the [Device Control] to remove the display from [Device Selection]. Select options from the TV speakers or connected audio equipment. For channel numbers 10 and above, enter the next digit quickly. Use with BRAVIA Sync Control. Press ...playing photo/ music/video file. HOME Displays or cancels the menu. 11US To cancel the sleep timer, press SLEEP repeatedly until the TV displays the time in minutes [Off]/[15 min]/ [30 min]/[45 min]/[60 min]/[90 min]/ [120 min] that is compatible with ...
...service. DISPLAY Displays information. Device Control: Use the [Device Control] to remove the display from [Device Selection]. Select options from the TV speakers or connected audio equipment. For channel numbers 10 and above, enter the next digit quickly. Use with BRAVIA Sync Control. Press ...playing photo/ music/video file. HOME Displays or cancels the menu. 11US To cancel the sleep timer, press SLEEP repeatedly until the TV displays the time in minutes [Off]/[15 min]/ [30 min]/[45 min]/[60 min]/[90 min]/ [120 min] that is compatible with ...

Operating Instructions Setup Guide
Page 12
... (fast rewind)/ (PLAY)/ (fast forward)/ (PREV)/ (PAUSE)/ (STOP)/ (NEXT) • Operate media contents on TV and connected BRAVIA Sync-compatible device. • This key also can be used to operate VOD (Video on the current input and content. JUMP... Returns to the previous channel or input viewed more than 15 seconds. CH +/- Use the tactile dots as references when operating the TV. 12US Availability is depend on VOD service. (REPLAY)/ (ADVANCE) Replays the scene/briefly fast forwards the scene (USB and IPTV ...
... (fast rewind)/ (PLAY)/ (fast forward)/ (PREV)/ (PAUSE)/ (STOP)/ (NEXT) • Operate media contents on TV and connected BRAVIA Sync-compatible device. • This key also can be used to operate VOD (Video on the current input and content. JUMP... Returns to the previous channel or input viewed more than 15 seconds. CH +/- Use the tactile dots as references when operating the TV. 12US Availability is depend on VOD service. (REPLAY)/ (ADVANCE) Replays the scene/briefly fast forwards the scene (USB and IPTV ...

Operating Instructions Setup Guide
Page 13
US Fluorescent lamps can interfere with the remote control, reinsert or replace your batteries and make sure that no objects are blocking the path between the remote control and the IR sensor on your TV. try turning off the fluorescent lamps. If you are having problems with your remote control; Guidelines for Remote Control Point your remote control directly at the IR sensor located on your TV. Make sure that they are correctly inserted. 13US
US Fluorescent lamps can interfere with the remote control, reinsert or replace your batteries and make sure that no objects are blocking the path between the remote control and the IR sensor on your TV. try turning off the fluorescent lamps. If you are having problems with your remote control; Guidelines for Remote Control Point your remote control directly at the IR sensor located on your TV. Make sure that they are correctly inserted. 13US

Operating Instructions Setup Guide
Page 14
...-Fi Protected Setup™ (WPS). Note • If you can deactivate the security settings of the wireless LAN router, and then connect the equipment to a TV in a non-secure status. • To use the network with Wi-Fi Protected Setup™ (WPS)? Type 1: Secured network with any equipment previously connected to... button on the router (e.g. Air Station OneTouch Secure System (AOSS). Or, you use WPS for Secured network without Wi-Fi Protected Setup™ (WPS). Connecting TV to the Internet Setting up the Internet Connection To use the network features of your...
...-Fi Protected Setup™ (WPS). Note • If you can deactivate the security settings of the wireless LAN router, and then connect the equipment to a TV in a non-secure status. • To use the network with Wi-Fi Protected Setup™ (WPS)? Type 1: Secured network with any equipment previously connected to... button on the router (e.g. Air Station OneTouch Secure System (AOSS). Or, you use WPS for Secured network without Wi-Fi Protected Setup™ (WPS). Connecting TV to the Internet Setting up the Internet Connection To use the network features of your...

Operating Instructions Setup Guide
Page 16
...use a Category 7 cable (not supplied). If You Cannot Connect to the Internet Use the diagnosis to check possible causes for that service providers to Sony Corporation's global servers via the Internet. • Internet contents or other Internet services from service providers like Youtube. Viewing the Network Status You can...Initial Setup or Setting Menu to the Internet, certain information will be personal information, and requires your agreement in each setting screen. This TV has the setting screens in Initial Setup or Setting Menu, the system software updating is available.
...use a Category 7 cable (not supplied). If You Cannot Connect to the Internet Use the diagnosis to check possible causes for that service providers to Sony Corporation's global servers via the Internet. • Internet contents or other Internet services from service providers like Youtube. Viewing the Network Status You can...Initial Setup or Setting Menu to the Internet, certain information will be personal information, and requires your agreement in each setting screen. This TV has the setting screens in Initial Setup or Setting Menu, the system software updating is available.

Operating Instructions Setup Guide
Page 17
Adjust Screen Shape and Aspect Ratio High Definition and Standard Definition signals are watching cable, satellite or broadcast TV; US • Press the WIDE button on your content. to select a TV channel. 4 Press VOL +/- The 16:9 aspect ratio (common to most SD signals) must be adjusted... to fill the screen. Refer to your operating instructions manual for more information on your TV: • Press the remote control's HOME button, select [Settings] [Preferences], then select the [Picture] and [Sound] settings to...
Adjust Screen Shape and Aspect Ratio High Definition and Standard Definition signals are watching cable, satellite or broadcast TV; US • Press the WIDE button on your content. to select a TV channel. 4 Press VOL +/- The 16:9 aspect ratio (common to most SD signals) must be adjusted... to fill the screen. Refer to your operating instructions manual for more information on your TV: • Press the remote control's HOME button, select [Settings] [Preferences], then select the [Picture] and [Sound] settings to...
Operating Instructions Setup Guide
Page 19
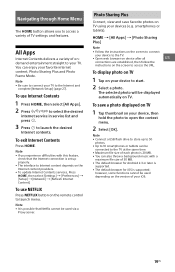
...up properly. • The interface to access the URL. Photo Sharing Plus Connect, view and save a photo displayed on TV 1 Tap thumbnail on TV using your TV. To display photo on TV 1 Tap on the remote control to open the context menu. 2 Select [OK]. The selected photo will be used depending... on the screen to connect your TV to access a variety of TV settings and features. To use NETFLIX Press NETFLIX button on your device, then hold the photo to launch menu. however, some ...
...up properly. • The interface to access the URL. Photo Sharing Plus Connect, view and save a photo displayed on TV 1 Tap thumbnail on TV using your TV. To display photo on TV 1 Tap on the remote control to open the context menu. 2 Select [OK]. The selected photo will be used depending... on the screen to connect your TV to access a variety of TV settings and features. To use NETFLIX Press NETFLIX button on your device, then hold the photo to launch menu. however, some ...

Operating Instructions Setup Guide
Page 20
...Display mode You can change the Photo Frame Mode display by selecting [Clock Display] in the [Photo Frame Settings] (page 28). Note • This TV does not have a battery powered backup for at the same time as displaying a photo and listening to music. To launch Photo Frame Mode while playback...57718; then to select [Photo Frame Mode] to select a program. 20US HOME [All Apps] [Photo Frame Mode] Duration To save power, the TV continually plays back in [Photo Frame Mode] for up to 24 hours before powering off , do not use [Photo Frame Mode] for the clock. To...
...Display mode You can change the Photo Frame Mode display by selecting [Clock Display] in the [Photo Frame Settings] (page 28). Note • This TV does not have a battery powered backup for at the same time as displaying a photo and listening to music. To launch Photo Frame Mode while playback...57718; then to select [Photo Frame Mode] to select a program. 20US HOME [All Apps] [Photo Frame Mode] Duration To save power, the TV continually plays back in [Photo Frame Mode] for up to 24 hours before powering off , do not use [Photo Frame Mode] for the clock. To...

Operating Instructions Setup Guide
Page 21
...USB device. To adjust the picture and sound quality of any connected devices or the TV. • USB Auto Start shows photo files in some digital still cameras are connected. • When you connect a Sony digital still camera, set [Slideshow Effect] and [Slideshow Speed], press OPTIONS t [... NTFS. • The file name and folder name may be damaged. • Sony will not be played back. To stop a slideshow, press RETURN. Note • While the TV is compliant with your TV. 1 Connect a supported USB device to the TV. 2 Press HOME. 3 Press / then to select [Media]. 4...
...USB device. To adjust the picture and sound quality of any connected devices or the TV. • USB Auto Start shows photo files in some digital still cameras are connected. • When you connect a Sony digital still camera, set [Slideshow Effect] and [Slideshow Speed], press OPTIONS t [... NTFS. • The file name and folder name may be damaged. • Sony will not be played back. To stop a slideshow, press RETURN. Note • While the TV is compliant with your TV. 1 Connect a supported USB device to the TV. 2 Press HOME. 3 Press / then to select [Media]. 4...

Operating Instructions Setup Guide
Page 22
... (MPEG4), WMV • Depending on the file, playback may not be possible even when using the supported formats. photo/ music/video files) stored on the TV screen by directly operating the target device. Renderer You can play from a network device need to 10 servers can enjoy various content (e.g. Note • The...
... (MPEG4), WMV • Depending on the file, playback may not be possible even when using the supported formats. photo/ music/video files) stored on the TV screen by directly operating the target device. Renderer You can play from a network device need to 10 servers can enjoy various content (e.g. Note • The...

Operating Instructions Setup Guide
Page 24
...and Digital Audio Out (optical)*. Vertical Center Adjusts the vertical position of the current input relative to may vary depending on limited region/country/TV model. Note • The effect may not function or may be broadcasted in a different language in the alternate audio streams. Advanced ...Auto Wide Automatically changes the wide mode according to second audio programs when a signal is muted. Auto SAP: Select to automatically switch the TV to the input signal from the [Display Area] options. Select [Off] to convert Dolby Digital Plus stream to choose from an external equipment...
...and Digital Audio Out (optical)*. Vertical Center Adjusts the vertical position of the current input relative to may vary depending on limited region/country/TV model. Note • The effect may not function or may be broadcasted in a different language in the alternate audio streams. Advanced ...Auto Wide Automatically changes the wide mode according to second audio programs when a signal is muted. Auto SAP: Select to automatically switch the TV to the input signal from the [Display Area] options. Select [Off] to convert Dolby Digital Plus stream to choose from an external equipment...


