Operating Instructions
Page 2
...DLNA CERTIFIED™ are trademarks, service marks, or certification marks of Sony Corporation and Sony Computer Entertainment Inc. ENERGY STAR is a trademark of the Digital Living Network Alliance. Changes to certain features, settings, and functionalities of these numbers in the "Home" mode. It...for the 46 and 52 inch BRAVIA KDL-XBR10 series models with an extension cord, receptacle or other related marks are trademarks of Sony Corporation. Media receiver Model Name Serial No. Your BRAVIA TV is used only in the TV Guide On Screen system. In Canada, TV Guide ...
...DLNA CERTIFIED™ are trademarks, service marks, or certification marks of Sony Corporation and Sony Computer Entertainment Inc. ENERGY STAR is a trademark of the Digital Living Network Alliance. Changes to certain features, settings, and functionalities of these numbers in the "Home" mode. It...for the 46 and 52 inch BRAVIA KDL-XBR10 series models with an extension cord, receptacle or other related marks are trademarks of Sony Corporation. Media receiver Model Name Serial No. Your BRAVIA TV is used only in the TV Guide On Screen system. In Canada, TV Guide ...
Operating Instructions
Page 3
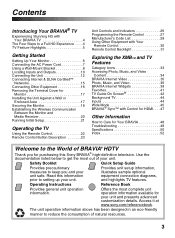
.../referencebook. Operating Instructions Reference Book Provides general unit operation information. Read this Sony BRAVIA® high-definition television. Contents Introducing Your BRAVIA® TV Experiencing Stunning HD with Your BRAVIA TV 4 The Four Steps to a Full HD Experience . . . .4 TV Feature Highlights 5 Getting Started Setting Up Your Monitor 6 Connecting the AC Power Cord 7 Using a Wall-Mount Bracket 8 Locating Inputs...
.../referencebook. Operating Instructions Reference Book Provides general unit operation information. Read this Sony BRAVIA® high-definition television. Contents Introducing Your BRAVIA® TV Experiencing Stunning HD with Your BRAVIA TV 4 The Four Steps to a Full HD Experience . . . .4 TV Feature Highlights 5 Getting Started Setting Up Your Monitor 6 Connecting the AC Power Cord 7 Using a Wall-Mount Bracket 8 Locating Inputs...
Operating Instructions
Page 4
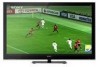
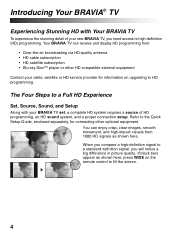
... detail of HD programming, an HD sound system, and a proper connection setup. Introducing Your BRAVIA® TV Experiencing Stunning HD with your BRAVIA TV set, a complete HD system requires a source of your new BRAVIA TV, you will notice a big difference in picture quality. Your BRAVIA TV can enjoy crisp, clear images, smooth movement, and high-impact visuals from : •...
... detail of HD programming, an HD sound system, and a proper connection setup. Introducing Your BRAVIA® TV Experiencing Stunning HD with your BRAVIA TV set, a complete HD system requires a source of your new BRAVIA TV, you will notice a big difference in picture quality. Your BRAVIA TV can enjoy crisp, clear images, smooth movement, and high-impact visuals from : •...

Operating Instructions
Page 5
... Sony USB equipment. BRAVIA Internet Widgets allow you to access local weather, news, and much more from the Internet to your favorite BRAVIA Internet Video and Widgets items, Photo, Music, Video content, TV channels, External Inputs, and Background TV themes for Your Favorite Items: The Favorites feature centralizes your unit (page 35). Product Support Preferences Settings...
... Sony USB equipment. BRAVIA Internet Widgets allow you to access local weather, news, and much more from the Internet to your favorite BRAVIA Internet Video and Widgets items, Photo, Music, Video content, TV channels, External Inputs, and Background TV themes for Your Favorite Items: The Favorites feature centralizes your unit (page 35). Product Support Preferences Settings...
Operating Instructions
Page 6
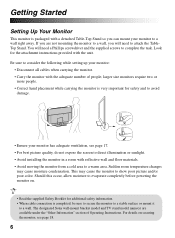
...monitor has adequate ventilation, see page 18. 6 If you are available under the "Other Information" section of people; The designated Sony wall-mount bracket model and TV stand model name(s) are not mounting the monitor to a wall right away. Be sure to a warm area. Should this occur,... monitor in a room with reflective wall and floor materials. • Avoid moving the monitor from a cold area to consider the following while setting up your monitor: • Disconnect all cables when carrying the monitor. • Carry the monitor with the unit. larger size monitors require two...
...monitor has adequate ventilation, see page 18. 6 If you are available under the "Other Information" section of people; The designated Sony wall-mount bracket model and TV stand model name(s) are not mounting the monitor to a wall right away. Be sure to a warm area. Should this occur,... monitor in a room with reflective wall and floor materials. • Avoid moving the monitor from a cold area to consider the following while setting up your monitor: • Disconnect all cables when carrying the monitor. • Carry the monitor with the unit. larger size monitors require two...
Operating Instructions
Page 7
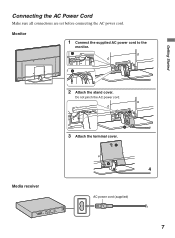
Do not pinch the AC power cord. 3 Attach the terminal cover. Monitor 1 Connect the supplied AC power cord to the monitor. Connecting the AC Power Cord Make sure all connections are set before connecting the AC power cord. Media receiver 4 AC power cord (supplied) 7 Getting Started 2 Attach the stand cover.
Do not pinch the AC power cord. 3 Attach the terminal cover. Monitor 1 Connect the supplied AC power cord to the monitor. Connecting the AC Power Cord Make sure all connections are set before connecting the AC power cord. Media receiver 4 AC power cord (supplied) 7 Getting Started 2 Attach the stand cover.
Operating Instructions
Page 11
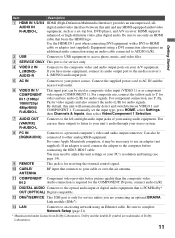
...PC's resolution and timing (see page 14). 9 REMOTE This jack is used as composite video input (VIDEO 1) or as a set the input type, press HOME, select Settings, then Channels & Inputs, then select Video/Component 1 Selection. 7 AUDIO OUT (VAR/FIX) R-AUDIO-L Connects to an existing ...and also connect the audio (L/R) for the COMPONENT IN ports, connect audio (L/R). Dolby and the double-D symbol are connecting an optional BRAVIA Link module (DMex). Equipment using a DVI connection also requires an additional audio connection using an Ethernet cable. IN 2 Audio connection is...
...PC's resolution and timing (see page 14). 9 REMOTE This jack is used as composite video input (VIDEO 1) or as a set the input type, press HOME, select Settings, then Channels & Inputs, then select Video/Component 1 Selection. 7 AUDIO OUT (VAR/FIX) R-AUDIO-L Connects to an existing ...and also connect the audio (L/R) for the COMPONENT IN ports, connect audio (L/R). Dolby and the double-D symbol are connecting an optional BRAVIA Link module (DMex). Equipment using a DVI connection also requires an additional audio connection using an Ethernet cable. IN 2 Audio connection is...

Operating Instructions
Page 12
...-ohm coaxial cable to a high-definition service or a highdefinition satellite service. Shown with HDMI Connection Rear of input signal you choose. Antenna B Set the Cable/Antenna setting found under the Settings on the rear of media receiver CABLE/ ANTENNA HD Cable Box/HD Satellite Box You can easily be affected by subscribing to...
...-ohm coaxial cable to a high-definition service or a highdefinition satellite service. Shown with HDMI Connection Rear of input signal you choose. Antenna B Set the Cable/Antenna setting found under the Settings on the rear of media receiver CABLE/ ANTENNA HD Cable Box/HD Satellite Box You can easily be affected by subscribing to...

Operating Instructions
Page 14
... IN LAN HD15-HD15 cable (analog RGB) Audio cable (stereo mini plugs) PC Input Signal Reference Chart After connecting the PC to the unit, set Scene Select to Graphics, Wide Mode to Full, and Display Area to Full Pixel. • Connect the PC IN jack to the PC using an... cable with PC connection Use this unit as a monitor for your PC according to the supported resolutions and timings indicated below . To view PC content set the output signal from the PC for details. 14 Supported resolutions Signal VGA Horizontal × (Pixel) 640 × SVGA 800 × XGA 1,024 ...
... IN LAN HD15-HD15 cable (analog RGB) Audio cable (stereo mini plugs) PC Input Signal Reference Chart After connecting the PC to the unit, set Scene Select to Graphics, Wide Mode to Full, and Display Area to Full Pixel. • Connect the PC IN jack to the PC using an... cable with PC connection Use this unit as a monitor for your PC according to the supported resolutions and timings indicated below . To view PC content set the output signal from the PC for details. 14 Supported resolutions Signal VGA Horizontal × (Pixel) 640 × SVGA 800 × XGA 1,024 ...
Operating Instructions
Page 17
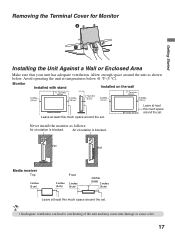
...inches (10 cm) 11 7/8 inches (30 cm) 4 inches (10 cm) Leave at least this much space around the set. 4 inches (10 cm) Leave at least this much space around the set . • Inadequate ventilation can lead to overheating of the unit and may cause unit damage or cause a fire. 17 ...Wall Wall Media receiver Top 2 inches (5 cm) Front 2 inches 2 inches (5 cm) (5 cm) 2 inches (5 cm) 2 inches (5 cm) Leave at least this much space around the set .
...inches (10 cm) 11 7/8 inches (30 cm) 4 inches (10 cm) Leave at least this much space around the set. 4 inches (10 cm) Leave at least this much space around the set . • Inadequate ventilation can lead to overheating of the unit and may cause unit damage or cause a fire. 17 ...Wall Wall Media receiver Top 2 inches (5 cm) Front 2 inches 2 inches (5 cm) (5 cm) 2 inches (5 cm) 2 inches (5 cm) Leave at least this much space around the set .
Operating Instructions
Page 20
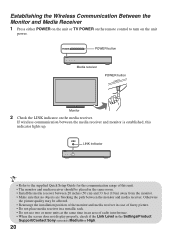
Otherwise the picture quality may be placed in the Settings/Product Support/Contact Sony screen is established, this unit. • The monitor and media receiver should be affected. • Rearrange the installation position of the monitor and media receiver ... in an area of this indicator lights up. Establishing the Wireless Communication Between the Monitor and Media Receiver 1 Press either POWER on the unit or TV POWER on the remote control to the supplied Quick Setup Guide for the communication range of radio interference. • When the screen does not display...
Otherwise the picture quality may be placed in the Settings/Product Support/Contact Sony screen is established, this unit. • The monitor and media receiver should be affected. • Rearrange the installation position of the monitor and media receiver ... in an area of this indicator lights up. Establishing the Wireless Communication Between the Monitor and Media Receiver 1 Press either POWER on the unit or TV POWER on the remote control to the supplied Quick Setup Guide for the communication range of radio interference. • When the screen does not display...
Operating Instructions
Page 21
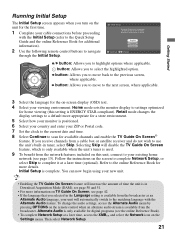
...Español Français Choose RETURN BRAVIA INTERNET V/v button: Allows you receive channels from the network features included on this setting is available from the broadcaster. see page 50 and 51. • For more information on TV Guide On Screen, see page 42. &#...B button: Allows you selected in Download Acquisition Mode (DAM); Home mode sets the monitor display to a default more details. Retail mode changes the display settings to settings optimized for available channels and enable the TV Guide On Screen® feature. Refer to the online Reference Book for ...
...Español Français Choose RETURN BRAVIA INTERNET V/v button: Allows you receive channels from the network features included on this setting is available from the broadcaster. see page 50 and 51. • For more information on TV Guide On Screen, see page 42. &#...B button: Allows you selected in Download Acquisition Mode (DAM); Home mode sets the monitor display to a default more details. Retail mode changes the display settings to settings optimized for available channels and enable the TV Guide On Screen® feature. Refer to the online Reference Book for ...
Operating Instructions
Page 23
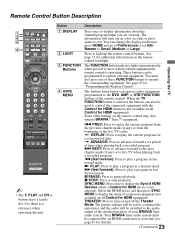
...Control". Remote Control Button Description Operating the TV 1 2 3 4 DISPLAY LIGHT POWER TV POWER DVD AMP STB TV FUNCTION PREV REPLAY ADVANCE NEXT PLAY SYNC MENU PAUSE STOP THEATER SCENE CC WIDE VIDEO WIDGETS BRAVIA INTERNET VOL MUTING CH JUMP REC RECPAUSE RECSTOP... BD/DVD TOP MENU MENU F1 F2 YELLOW BLUE RED GREEN ~ • The 5, PLAY and CH + buttons have a tactile dot. The picture settings...
...Control". Remote Control Button Description Operating the TV 1 2 3 4 DISPLAY LIGHT POWER TV POWER DVD AMP STB TV FUNCTION PREV REPLAY ADVANCE NEXT PLAY SYNC MENU PAUSE STOP THEATER SCENE CC WIDE VIDEO WIDGETS BRAVIA INTERNET VOL MUTING CH JUMP REC RECPAUSE RECSTOP... BD/DVD TOP MENU MENU F1 F2 YELLOW BLUE RED GREEN ~ • The 5, PLAY and CH + buttons have a tactile dot. The picture settings...

Operating Instructions
Page 24
... again to exit from the screen when displaying menu items and settings. 8 0 HOME Press to display TV Home Menu/XMB™ to turn on and off the unit. qa 0-9 ENT Press 0-9 to restore the sound. qs Use with Sony Blu-ray Disc player (BD), see page 32). Press again... are viewing. Button Description DISPLAY LIGHT POWER TV POWER DVD AMP STB TV FUNCTION PREV REPLAY ADVANCE NEXT PLAY SYNC MENU PAUSE STOP 5 SCENE ql w; 6 BRAVIA INTERNET VIDEO Press to adjust the volume. Press to select the best picture and sound settings for the particular type of the connected equipment...
... again to exit from the screen when displaying menu items and settings. 8 0 HOME Press to display TV Home Menu/XMB™ to turn on and off the unit. qa 0-9 ENT Press 0-9 to restore the sound. qs Use with Sony Blu-ray Disc player (BD), see page 32). Press again... are viewing. Button Description DISPLAY LIGHT POWER TV POWER DVD AMP STB TV FUNCTION PREV REPLAY ADVANCE NEXT PLAY SYNC MENU PAUSE STOP 5 SCENE ql w; 6 BRAVIA INTERNET VIDEO Press to adjust the volume. Press to select the best picture and sound settings for the particular type of the connected equipment...

Operating Instructions
Page 26
...not put anything near the sensor or the nearby general area (as shown above), as it may indicate that the unit needs servicing (see Sony Customer Support information on and off the unit. 0 Speaker Outputs audio signal. Press to toggle through channels. Unit Controls and Indicators Monitor 1 .... Press repeatedly to display the list of external inputs is set . CHANNEL + Press to confirm the selection or setting. Press to display TV Home Menu/XMB™ to adjust the volume. Press to access unit Settings and other media and network related content. Lights up converted...
...not put anything near the sensor or the nearby general area (as shown above), as it may indicate that the unit needs servicing (see Sony Customer Support information on and off the unit. 0 Speaker Outputs audio signal. Press to toggle through channels. Unit Controls and Indicators Monitor 1 .... Press repeatedly to display the list of external inputs is set . CHANNEL + Press to confirm the selection or setting. Press to display TV Home Menu/XMB™ to adjust the volume. Press to access unit Settings and other media and network related content. Lights up converted...

Operating Instructions
Page 31
... or Tuner Input Remote Control Backlight The remote control backlight can be set auto backlight: Press LIGHT and MUTING simultaneously until the four FUNCTION buttons blink. To change the backlight timeout: 1 Press LIGHT, VOL +, and CH + simultaneously until the TV FUNCTION button blinks. The four FUNCTION buttons blink when 31 MUTING Muting...
... or Tuner Input Remote Control Backlight The remote control backlight can be set auto backlight: Press LIGHT and MUTING simultaneously until the four FUNCTION buttons blink. To change the backlight timeout: 1 Press LIGHT, VOL +, and CH + simultaneously until the TV FUNCTION button blinks. The four FUNCTION buttons blink when 31 MUTING Muting...

Operating Instructions
Page 32
...™ displays help text that describes options available within an item. to suit personal preferences Shown with Preferences highlighted. 32 Product Support Preferences Settings Category Picture & Display Sound Channels & Inputs Network TV Item 1 Select a Category icon using the B/b buttons. 2 Highlight an Item using the V/v buttons. 3 Press item. Press HOME to access the...
...™ displays help text that describes options available within an item. to suit personal preferences Shown with Preferences highlighted. 32 Product Support Preferences Settings Category Picture & Display Sound Channels & Inputs Network TV Item 1 Select a Category icon using the B/b buttons. 2 Highlight an Item using the V/v buttons. 3 Press item. Press HOME to access the...
Operating Instructions
Page 33
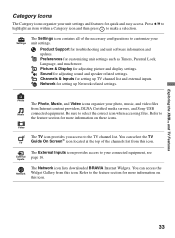
... content providers, DLNA Certified media servers, and Sony USB Music connected equipment. Preferences for customizing unit settings such as Timers, Parental Lock, Language, and much more information on this icon. Settings The Settings icon contains all of the channels list from this...icon. 33 Sound for adjusting picture and display settings. Network The Network icon lists downloaded BRAVIA Internet Widgets. Exploring the XMB™ and TV Features Category Icons The Category icons organize your unit settings and features for troubleshooting and unit software information ...
... content providers, DLNA Certified media servers, and Sony USB Music connected equipment. Preferences for customizing unit settings such as Timers, Parental Lock, Language, and much more information on this icon. Settings The Settings icon contains all of the channels list from this...icon. 33 Sound for adjusting picture and display settings. Network The Network icon lists downloaded BRAVIA Internet Widgets. Exploring the XMB™ and TV Features Category Icons The Category icons organize your unit settings and features for troubleshooting and unit software information ...

Operating Instructions
Page 34
Shown here is the XMB™ with Internet connectivity. Photo Internet content provider, page 35 DLNA Certified media server, page 36 Sony USB, page 36 Sample Images, page 36 • The items displayed may vary for each category icon, your connected equipment, and the availability of Internet .... 3 Press V/v to highlight an item and press to select an item. Accessing Photo, Music, and Video Content You can also be accessed once you have set up a DLNA Certified equipment or after plugging in Sony USB equipment directly to your unit.
Shown here is the XMB™ with Internet connectivity. Photo Internet content provider, page 35 DLNA Certified media server, page 36 Sony USB, page 36 Sample Images, page 36 • The items displayed may vary for each category icon, your connected equipment, and the availability of Internet .... 3 Press V/v to highlight an item and press to select an item. Accessing Photo, Music, and Video Content You can also be accessed once you have set up a DLNA Certified equipment or after plugging in Sony USB equipment directly to your unit.

Operating Instructions
Page 35
...Recommended connection speed: Standard Definition video - 2.5 Mbps, High Definition video - 10 Mbps. • To update the BRAVIA Internet Video content providers, select the Network icon from the Settings menu on -demand entertainment straight to seek forward or seek backward. Press B or m to Favorites" on page ... resume point speed of Internet content providers may vary. Press b or M to your BRAVIA TV. see more information on the highlighted video. • The Parental Lock function set on the unit blocks video content based on the XMB™. Seeking Forwards and Backwards ...
...Recommended connection speed: Standard Definition video - 2.5 Mbps, High Definition video - 10 Mbps. • To update the BRAVIA Internet Video content providers, select the Network icon from the Settings menu on -demand entertainment straight to seek forward or seek backward. Press B or m to Favorites" on page ... resume point speed of Internet content providers may vary. Press b or M to your BRAVIA TV. see more information on the highlighted video. • The Parental Lock function set on the unit blocks video content based on the XMB™. Seeking Forwards and Backwards ...


