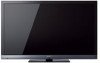
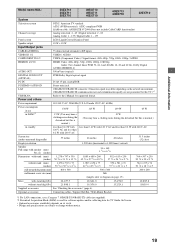
Child Safety: It Makes A Difference Where Your TV Stands
Page 1
... large enough to support the weight of your television (and other electronic components). 2 Use appropriate angle braces, straps and anchors to secure your furniture to the wall (but never screw anything directly into the TV). 3 Carefully read and understand the manufacturer's instructions and product safety notices. 4 Don't allow children to climb on or play with furniture and television sets. 5 Avoid placing...
Safety and Regulatory Booklet
Page 1
... place, the picture may expose you might bump your TV. ☐ Do not place the TV where the power cord can easily be found on the LCD screen. Volume Adjustment ☐ When using a chemically pretreated cloth, please follow the installation guide supplied with the Wall‑Mount Bracket when installing the TV. ☐ Be sure to attach the brackets with the specified parts supplied with the Wall‑Mount Bracket. ☐...
Additional Information for Using Sony® Wall-Mount Bracket (SU-WL500)
Page 1
... Using Sony Wall-Mount Bracket (SU-WL500) A-DLR-100-14(1) Compatible TV models for this Wall-Mount Bracket information: to refer to the various methods of installing the Wall-Mount Bracket for step 5 of "Secure the Mounting Hook to the rear of the TV" (page 5). KDL-55HX701/KDL-46HX701/KDL-40HX701/ KDL-46EX507/KDL-40EX507/KDL-32EX507/ KDL-60EX505/KDL-55EX505/ KDL-40EX407/KDL-32EX407/KDL-40EX406/ KDL-46EX405/KDL-40EX405/KDL-32EX405/ KDL-32EX308/KDL-32EX306/KDL-32EX305 KDL-40EX40B/KDL...
Additional Information for Using Sony® Wall-Mount Bracket (SU-WL500)
Page 3
Installing the Wall-Mount Bracket Install the Base Bracket and Mounting Hooks. 1 Open the Wall-Mount Bracket package and check for Using Sony Wall-Mount Bracket (SU-WL500) − − Dimension Table (except KDL-32EX*) (KDL-32EX* only) Screen center point Model Name XBR-60LX90* XBR-52HX909 XBR-46HX909 KDL-60NX80* KDL-55HX800 KDL-46HX800 KDL-40HX800 KDL-55HX701 KDL-46HX701 KDL-40HX701 Display dimensions 56 3/4 (1,440) 35 3/4 (906) 49 3/4 (1,263) 30 5/8 (775...
Additional Information for Using Sony® Wall-Mount Bracket (SU-WL500)
Page 5
... the Instructions for Using Sony Wall-Mount Bracket (SU-WL500) − − Figures in an inclined position. Determine the screw locations and secure the Mounting Hooks to your TV's operating instructions for its weight. 3 Install the Base Bracket on should be capable of supporting a weight of at least four times that the TV will be operated in BD player before installing the TV on a wall. Refer to the "Screw and Hook Locations Diagram/Table" shown below. KDL‑...
Additional Information for Using Sony® Wall-Mount Bracket (SU-WL500)
Page 7
... the TV on the Table-Top Stand, when securing the Mounting Hook. • When installing the TV on the rear of the TV (KDL-EX70*/XBR-60LX90*/KDL-60NX80*/KDL-55EX71* and KDL55HX800 only). * In the actual model names, the "" indicates numbers and/or characters specific to store the removed screws in the wall mounting holes from children. Be...
Additional Information for Using Sony® Wall-Mount Bracket (SU-WL500)
Page 9
... base X of the Mounting Hook. KDL-32EX6*, KDL‑32EX7*, KDL-40EX6*, KDL‑40EX7*, KDL‑40HX800 only * In the actual model names, the "" indicates numbers and/or characters specific to lift the TV by yourself. Do not attempt to each model. 8 Lift the TV off the stand. 6 Adjust the angle of the Mounting Hook. 7 Remove the screws...
Setup Guide (Operating Instructions)
Page 2
... Guide, Picture/Sound, Light Sensor, Power Savings) can be fully inserted. • Operate the TV only on 110-240 V AC (U.S.A./Canada 120 V AC) • Avoid operating the TV at : U.S.A.: http://productregistration.sony.com Canada: http://www.SonyStyle.ca/registration Four Steps to a Full HD Experience Set, Source, Sound, and Setup. 1 Set Now that you have made the best selection in a resolution of your HD service provider. • Receive...
Setup Guide (Operating Instructions)
Page 3
... AC power cord ...11 Running initial setup ...11 Detaching the Table-Top Stand from the TV 12 Using a Wall-Mount Bracket ...13 Installing the TV Against a Wall or Enclosed Area 13 To watch TV To watch programs...14 To use the TV features ...14 To use i-Manual" for operation (page 15). • Retain this manual for future reference. 3 Refer to "To use i-Manual...15 Additional Information Troubleshooting ...16 Specifications ...18 • Operating instructions...
Setup Guide (Operating Instructions)
Page 4
... between the remote control and the IR sensor on the remote control. Checking the accessories AC power cord (1) Table-Top Stand (1)*1 (except KDL-60EX700/60EX701/60EX703 models) Stand Rear Cover (1)*2 Fixing screws for Table-Top Stand (M5 × 16) (4) (except KDL-60EX700/ 60EX701/60EX703 models) Assembling Screws for Table-Top Stand (M5 × 16) (4) (for KDL-40EX713/ 40EX710/40EX700/40EX703/32EX710/ 32EX700 models) Remote control (1)*3 Size AAA batteries (2) USB Wireless LAN Adapter UWA-BR100 (1) (for 46, 52, 55 and 60 inch models. *3 Please refer...
Setup Guide (Operating Instructions)
Page 5
... the supplied Stand Rear Cover. ~ • You can mount your TV to a wall right away. Setting up your TV Some TV models are packaged with a detached Table-Top Stand so you can attach the TV to the Table-Top Stand with the Stand Rear Cover on the LCD panel or the frame around the screen. • Be careful to not pinch your hands or the AC power cord...
Setup Guide (Operating Instructions)
Page 11
... TV Guide. • Home mode sets the TV to display the settings optimized for home viewing (this setting is used. ~ • If you receive channels from a cable box or satellite receiver and do not wish to use the TV's built-in tuner, select Skip. Anchor bolts (not supplied) Wallmount holes Rope or chain (not supplied) Wall-anchor (not supplied) Running initial setup POWER 1 Complete your nearest power outlet. 2 Check the ENERGY SAVING SWITCH setting is...
Setup Guide (Operating Instructions)
Page 13
... TV" (page 12). Installed with the Wall-Mount Bracket for your TV and the installation should be mounted on a wall using a Wall-Mount Bracket (not supplied) out of the box as packaged. Installed on the Wall-mount bracket model. Never install the TV set . Wall Wall ~ • Inadequate ventilation can be performed by a Sony dealer or licensed contractor. • Follow the instruction guide provided with stand 4 inches (10 cm) 11 7/8 inches (30 cm) 4 inches (10 cm) 2 3/8 inches (6 cm) Leave at...
Setup Guide (Operating Instructions)
Page 14
... Settings Picture & Display Adjust the picture and screen settings Press for: Picture Adjustments Ambient Sensor Screen Pro Picture Setup TV Press OPTIONS to Favorites Speakers GUIDE OPTIONS HOME 0-9 ENT 1 Check the ENERGY SAVING SWITCH setting is on (z). 2 Press POWER on the TV or on the remote control to turn on the TV. (You may use the Guide Press GUIDE to display the TV Guide On Screen to view scheduled programs or to select a program to select digital channels. The Options menu items vary based...
Setup Guide (Operating Instructions)
Page 15
... i-Manual BRAVIA TV Features Watching TV Using the Home Menu Fun Features with Connected Equipment Parts Description Troubleshooting Index RETURN Back x Welcome to i-Manual x BRAVIA TV Features x Watching TV Introduces convenient features such as TV Guide, Favorites, etc. x Parts Description x Troubleshooting You can find solutions for your i-Manual anytime you are watching on -screen manual. x Fun Features with Connected Equipment Introduces how to customize your TV settings...
Setup Guide (Operating Instructions)
Page 16
... Sony service center of how the indicator flashes (number of this TV. Press SYNC MENU, select TV Control and then select Home (Menu) or Options to turn it off function may be set to On. The TV turns off is activated and TV receives no sound. • Connect the TV to "Troubleshooting" in the i-Manual.) 2 If the problem persists, contact Sony Customer Support (information provided on the remote control. The "Parental Lock" password...
Setup Guide (Operating Instructions)
Page 18
...Television system NTSC: American TV standard ATSC (8VSB terrestrial): ATSC compliant 8VSB QAM on cable: ANSI/SCTE 07 2000 (Does not include CableCARD functionality) Channel coverage Analog terrestrial: 2 - 69 / Digital terrestrial: 2 - 69 Analog Cable: 1 - 135 / Digital Cable: 1 - 135 Panel system LCD (Liquid Crystal Display) Panel Speaker output Input/Output jacks 10 W + 10 W CABLE/ANTENNA 75-ohm external terminal for RF inputs VIDEO IN 1/2 VIDEO / AUDIO COMPONENT IN 1/2 YPBPR (Component Video) / Signal format: 480i, 480p, 720p, 1080i, 1080p / AUDIO HDMI IN 1/2/3/4 HDMI: Video...
Setup Guide (Operating Instructions)
Page 19
...Television system NTSC: American TV standard ATSC (8VSB terrestrial): ATSC compliant 8VSB QAM on cable: ANSI/SCTE 07 2000 (Does not include CableCARD functionality) Channel coverage Analog terrestrial: 2 - 69 / Digital terrestrial: 2 - 69 Analog Cable: 1 - 135 / Digital Cable: 1 - 135 Panel system LCD (Liquid Crystal Display) Panel Speaker output Input/Output jacks 10 W + 10 W CABLE/ANTENNA 75-ohm external terminal for RF inputs VIDEO IN 1/2 VIDEO / AUDIO COMPONENT IN 1/2 YPBPR (Component Video) / Signal format: 480i, 480p, 720p, 1080i, 1080p / AUDIO HDMI IN 1/2/3/4 HDMI: Video...
Setup Guide (Operating Instructions)
Page 20
... to Part 15 of the following two conditions: (1) This device may cause undesired operation. SU-WL500 Use with other antenna or transmitter except Grant condition. Pursuant to FCC regulations, you to receive unscrambled digital cable television programming via subscription service to provide reasonable protection against harmful interference in this manual could result in accordance with the limits for TV installations. Telephone Number: 858...
Setup Guide (Operating Instructions)
Page 24
...://www.sony.ca/support NOTE: If your TV. Online Registration: Software Updates: For Your Convenience Be sure to the Internet, you can check for software updates by selecting Settings, Product Support and then Automatic Software Update. © 2010 Sony Corporation Printed in U.S.A. United States Canada http://productregistration.sony.com http://www.SonyStyle.ca/registration Your TV is connected to register your TV is capable of receiving software updates.