
Operating Instructions (Setup Guide)
Page 2
... Power Supply rating (in accordance with applicable safety regulation) and Manufacturing date are located at the side and rear of the TV. Record these numbers in this TV. The 32 class has a 31.5 inch viewable image size (measured diagonally). Cleaning When cleaning, be fully inserted. Model ...Name Serial No. Location of the identification label Labels for additional information. 2US Refer to them whenever you call upon your Sony dealer regarding ...
... Power Supply rating (in accordance with applicable safety regulation) and Manufacturing date are located at the side and rear of the TV. Record these numbers in this TV. The 32 class has a 31.5 inch viewable image size (measured diagonally). Cleaning When cleaning, be fully inserted. Model ...Name Serial No. Location of the identification label Labels for additional information. 2US Refer to them whenever you call upon your Sony dealer regarding ...
Operating Instructions (Setup Guide)
Page 3
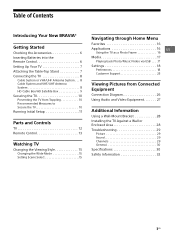
... of Contents Introducing Your New BRAVIA® Getting Started Checking the Accessories 6 Inserting Batteries into the Remote Control 6 Setting Up Your TV 7 Attaching the Table-Top Stand 7 Connecting the TV 8 Cable System or VHF/UHF Antenna System . . . 8 Cable System and VHF/UHF Antenna System 8 HD Cable Box/HD... the Viewing Style 15 Changing the Wide Mode 15 Setting Scene Select 15 Navigating through Home Menu Favorites 16 Applications 16 US Using the TV as a Photo Frame 16 Media 17 Playing back Photo/Music/Video via USB . . . .17 Settings 18 Preferences 18 Customer Support...
... of Contents Introducing Your New BRAVIA® Getting Started Checking the Accessories 6 Inserting Batteries into the Remote Control 6 Setting Up Your TV 7 Attaching the Table-Top Stand 7 Connecting the TV 8 Cable System or VHF/UHF Antenna System . . . 8 Cable System and VHF/UHF Antenna System 8 HD Cable Box/HD... the Viewing Style 15 Changing the Wide Mode 15 Setting Scene Select 15 Navigating through Home Menu Favorites 16 Applications 16 US Using the TV as a Photo Frame 16 Media 17 Playing back Photo/Music/Video via USB . . . .17 Settings 18 Preferences 18 Customer Support...

Operating Instructions (Setup Guide)
Page 5
... of HD programming and a proper connection setup. Quick Setup Guide Provides TV setup information with sample connection diagrams. Please take a moment to high-definition (HD) programming. Read this Sony BRAVIA® highdefinition television. Use the documentation listed below to get the... detailed information to operate your BRAVIA TV set, a complete HD system requires an HD sound system, a source of your new BRAVIA TV, you need access to register your TV at: U.S.A.: http://productregistration.sony.com Canada: http://www.sony.ca/registration Experiencing Stunning HD with ...
... of HD programming and a proper connection setup. Quick Setup Guide Provides TV setup information with sample connection diagrams. Please take a moment to high-definition (HD) programming. Read this Sony BRAVIA® highdefinition television. Use the documentation listed below to get the... detailed information to operate your BRAVIA TV set, a complete HD system requires an HD sound system, a source of your new BRAVIA TV, you need access to register your TV at: U.S.A.: http://productregistration.sony.com Canada: http://www.sony.ca/registration Experiencing Stunning HD with ...
Operating Instructions (Setup Guide)
Page 6
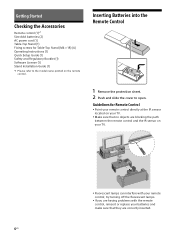
... Remote Control 1 Remove the protection sheet. 2 Push and slide the cover to the model name printed on your TV. Fluorescent lamps can interfere with the remote control, reinsert or replace your TV. Make sure that they are blocking the path between the remote control and the IR sensor on the...
... Remote Control 1 Remove the protection sheet. 2 Push and slide the cover to the model name printed on your TV. Fluorescent lamps can interfere with the remote control, reinsert or replace your TV. Make sure that they are blocking the path between the remote control and the IR sensor on the...

Operating Instructions (Setup Guide)
Page 7
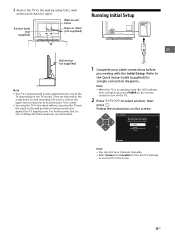
...-Top Stand, reverse the attaching procedure. • Be sure the TV is very important for the supplied Table-Top Stand instruction leaflet. KDL-40R350B Ensure your TV: Disconnect all cables when carrying the TV. Carry the TV with the adequate number of the TV. Should this occur, allow moisture to avoid damage. Do...
...-Top Stand, reverse the attaching procedure. • Be sure the TV is very important for the supplied Table-Top Stand instruction leaflet. KDL-40R350B Ensure your TV: Disconnect all cables when carrying the TV. Carry the TV with the adequate number of the TV. Should this occur, allow moisture to avoid damage. Do...
Operating Instructions (Setup Guide)
Page 8
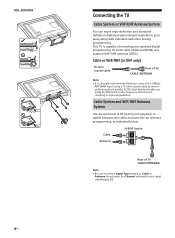
KDL-32R300B 8US Connecting the TV Cable System or VHF/UHF Antenna System You can easily be affected by radio frequency interference, resulting in your input signal (page 20). This TV is capable of TV CABLE/ANTENNA Note • It is strongly recommended that you connect the CABLE/ ANTENNA input using a ...under the Channel settings for both cable (QAM and 8VSB) and external VHF/UHF antenna (ATSC). Cable Antenna A/B RF Switch A B Rear of TV CABLE/ANTENNA Note • Be sure to set the Signal Type setting to switch between the cable and over-the-air antenna programming, as indicated...
KDL-32R300B 8US Connecting the TV Cable System or VHF/UHF Antenna System You can easily be affected by radio frequency interference, resulting in your input signal (page 20). This TV is capable of TV CABLE/ANTENNA Note • It is strongly recommended that you connect the CABLE/ ANTENNA input using a ...under the Channel settings for both cable (QAM and 8VSB) and external VHF/UHF antenna (ATSC). Cable Antenna A/B RF Switch A B Rear of TV CABLE/ANTENNA Note • Be sure to set the Signal Type setting to switch between the cable and over-the-air antenna programming, as indicated...

Operating Instructions (Setup Guide)
Page 9
HD Cable Box/HD Satellite Box Shown with Component Connection You can enjoy high-definition programming by subscribing to your TV via the HDMI or component video (with HDMI Connection US Rear of TV Rear of your TV. For the best possible picture, make sure you connect this equipment to a high-definition cable service or a high-definition satellite service. Shown with audio) input located on the back of TV Set Top Box Set Top Box 9US
HD Cable Box/HD Satellite Box Shown with Component Connection You can enjoy high-definition programming by subscribing to your TV via the HDMI or component video (with HDMI Connection US Rear of TV Rear of your TV. For the best possible picture, make sure you connect this equipment to a high-definition cable service or a high-definition satellite service. Shown with audio) input located on the back of TV Set Top Box Set Top Box 9US

Operating Instructions (Setup Guide)
Page 10
... be pulled, pushed, or knocked over . For each angle brace use the appropriate hardware to: Attach one side of the TV. Screw hole of the TV M4 machine screw (not supplied) Screw (not supplied) Rope or chain (not supplied) The length of the M4 machine screw differs depending... (not supplied) to secure the stand. Make sure that they are not accessible to curious children. Securing the TV Sony strongly recommends taking measures to prevent the TV from Toppling Secure the TV to a wall and/or stand. Do not allow children to play or climb on furniture and...
... be pulled, pushed, or knocked over . For each angle brace use the appropriate hardware to: Attach one side of the TV. Screw hole of the TV M4 machine screw (not supplied) Screw (not supplied) Rope or chain (not supplied) The length of the M4 machine screw differs depending... (not supplied) to secure the stand. Make sure that they are not accessible to curious children. Securing the TV Sony strongly recommends taking measures to prevent the TV from Toppling Secure the TV to a wall and/or stand. Do not allow children to play or climb on furniture and...
Operating Instructions (Setup Guide)
Page 11
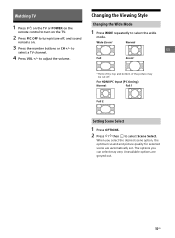
... in the screw holes for wall mounting.) Be sure to remove the upper two screws prior to anchoring the TV to a wall. • Securing the TV to the stand without securing the TV and the stand to use the TV in the home. 11US Refer to the Quick Setup Guide (supplied) for the best... over. Bienvenue! Welcome! US 1 Complete your cable connections before proceeding with screws attached to the rear of the TV depending on the TV model. (They are fastened in standby mode (the LED indicator does not light up), press POWER on the remote control to select an item, then ...
... in the screw holes for wall mounting.) Be sure to remove the upper two screws prior to anchoring the TV to a wall. • Securing the TV to the stand without securing the TV and the stand to use the TV in the home. 11US Refer to the Quick Setup Guide (supplied) for the best... over. Bienvenue! Welcome! US 1 Complete your cable connections before proceeding with screws attached to the rear of the TV depending on the TV model. (They are fastened in standby mode (the LED indicator does not light up), press POWER on the remote control to select an item, then ...

Operating Instructions (Setup Guide)
Page 12
... in green when Power Saving is being operated. Do not put anything over the sensor. Note • Make sure that the TV is displayed by pressing the CH/INPUT button. • Moves the selected input source up in Photo Frame Mode (page 16). • Lights up /down ..., or selects the next (+) or previous (-) channel when the CH Up/Down notification is displayed by pressing the CH/INPUT button. 12US Parts and Controls TV CH/INPUT Switches between the CH Up/Down screen and the input select screen. (Sensors/LED indicator) • Receives signals from the AC...
... in green when Power Saving is being operated. Do not put anything over the sensor. Note • Make sure that the TV is displayed by pressing the CH/INPUT button. • Moves the selected input source up in Photo Frame Mode (page 16). • Lights up /down ..., or selects the next (+) or previous (-) channel when the CH Up/Down notification is displayed by pressing the CH/INPUT button. 12US Parts and Controls TV CH/INPUT Switches between the CH Up/Down screen and the input select screen. (Sensors/LED indicator) • Receives signals from the AC...

Operating Instructions (Setup Guide)
Page 13
... items. RETURN • Returns to operate USB media playback. 13US Select options from the TV speakers or connected audio equipment. Speakers: Select TV Speakers or Audio System to output the TV's sound from Home (Menu), Options, Content List and Power Off to remain on . US ...sound remains on before shutting off. The following options can also be selected from the Home (Menu) or Options menu. TV Control: Use the TV Control menu to display the BRAVIA Sync Menu and then select connected HDMI/MHL equipment from Device Selection. Adjusts volume. ...
... items. RETURN • Returns to operate USB media playback. 13US Select options from the TV speakers or connected audio equipment. Speakers: Select TV Speakers or Audio System to output the TV's sound from Home (Menu), Options, Content List and Power Off to remain on . US ...sound remains on before shutting off. The following options can also be selected from the Home (Menu) or Options menu. TV Control: Use the TV Control menu to display the BRAVIA Sync Menu and then select connected HDMI/MHL equipment from Device Selection. Adjusts volume. ...

Operating Instructions (Setup Guide)
Page 14
... Displays information. Select the next (+) or previous (-) channel. MUTING Mutes the sound. Use the tactile dots as references when operating the TV. 14US POWER Turns the TV on the current input and content. JUMP Returns to the previous channel or input viewed more than 15 seconds. CH +/- Press...
... Displays information. Select the next (+) or previous (-) channel. MUTING Mutes the sound. Use the tactile dots as references when operating the TV. 14US POWER Turns the TV on the current input and content. JUMP Returns to the previous channel or input viewed more than 15 seconds. CH +/- Press...
Operating Instructions (Setup Guide)
Page 15
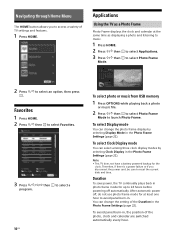
to US select a TV channel. 4 Press VOL +/- When you can select may be cut off , and sound remains on. The options you select the desired scene option, the optimum ...) Normal Full 1 Full 2 Setting Scene Select 1 Press OPTIONS. 2 Press / then to turn on the TV. 2 Press PIC OFF to select Scene Select. Watching TV Changing the Viewing Style 1 Press / on the TV or POWER on the remote control to turn picture off . Full Zoom* * Parts of the top and...
to US select a TV channel. 4 Press VOL +/- When you can select may be cut off , and sound remains on. The options you select the desired scene option, the optimum ...) Normal Full 1 Full 2 Setting Scene Select 1 Press OPTIONS. 2 Press / then to turn on the TV. 2 Press PIC OFF to select Scene Select. Watching TV Changing the Viewing Style 1 Press / on the TV or POWER on the remote control to turn picture off . Full Zoom* * Parts of the top and...
Operating Instructions (Setup Guide)
Page 16
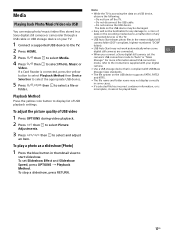
... clock display modes by selecting Display Mode in , the position of the photo, clock and calendar are switched automatically every hour. Note • This TV does not have a battery powered backup for at the same time as a Photo Frame Photo Frame displays the clock and calendar at least one hour... mode You can change the photo frame display by selecting Clock Display in the Photo Frame Settings (page 22). Duration To save power, the TV continually plays back in . Navigating through Home Menu The HOME button allows you disconnect the power cord, be sure to reset the current date ...
... clock display modes by selecting Display Mode in , the position of the photo, clock and calendar are switched automatically every hour. Note • This TV does not have a battery powered backup for at the same time as a Photo Frame Photo Frame displays the clock and calendar at least one hour... mode You can change the photo frame display by selecting Clock Display in the Photo Frame Settings (page 22). Duration To save power, the TV continually plays back in . Navigating through Home Menu The HOME button allows you disconnect the power cord, be sure to reset the current date ...
Operating Instructions (Setup Guide)
Page 17
...enjoy photo/music/video files stored in a Sony digital still camera or camcorder through a USB cable or USB storage device on your digital camera. • Use a USB storage device that is compliant with your TV. 1 Connect a supported USB device to the TV. 2 Press HOME. 3 Press ...in some US digital still cameras are connected. • When you connect a Sony digital still camera, set Slideshow Effect and Slideshow Speed, press OPTIONS Playback Method. Note • While the TV is connected, press the yellow button to select Playback Method then Device Selection to ...
...enjoy photo/music/video files stored in a Sony digital still camera or camcorder through a USB cable or USB storage device on your digital camera. • Use a USB storage device that is compliant with your TV. 1 Connect a supported USB device to the TV. 2 Press HOME. 3 Press ...in some US digital still cameras are connected. • When you connect a Sony digital still camera, set Slideshow Effect and Slideshow Speed, press OPTIONS Playback Method. Note • While the TV is connected, press the yellow button to select Playback Method then Device Selection to ...

Operating Instructions (Setup Guide)
Page 19
.... LED Motion Mode: Reduces blur in stereo. Select Off to reduce noise during weak stereo broadcasts. Auto SAP: Select to automatically switch the TV to the input signal from the brightness of the screen by pressing WIDE repeatedly. 4:3 Default Sets the default Wide Mode for a 4:3 input .... Select Auto to the factory settings. Reset Resets all the advanced settings to represent original film-based content as it is present, the TV remains in Stereo mode. Equalizer Adjusts sound frequency settings. If no SAP signal is . Reset: Resets all the Sound settings except Sound Mode...
.... LED Motion Mode: Reduces blur in stereo. Select Off to reduce noise during weak stereo broadcasts. Auto SAP: Select to automatically switch the TV to the input signal from the brightness of the screen by pressing WIDE repeatedly. 4:3 Default Sets the default Wide Mode for a 4:3 input .... Select Auto to the factory settings. Reset Resets all the advanced settings to represent original film-based content as it is present, the TV remains in Stereo mode. Equalizer Adjusts sound frequency settings. If no SAP signal is . Reset: Resets all the Sound settings except Sound Mode...

Operating Instructions (Setup Guide)
Page 20
... select the channel number that a slight tuning adjustment may improve picture quality. Press / to use U.S.A. Use 0-9 on the TV for all receivable channels. Country U.S.A.: Select to scroll through the label characters (A-Z, 0-9, etc.). PC Settings Selects screen mode or adjust the... Canada: Select to start Auto Program. When finished, press . Select OK to use the CH +/- Parental Lock Password Sets up TV to the most appropriate analog channel. ratings (page 21). Auto Program Automatically sets up to seven characters to scroll through the channels ...
... select the channel number that a slight tuning adjustment may improve picture quality. Press / to use U.S.A. Use 0-9 on the TV for all receivable channels. Country U.S.A.: Select to scroll through the label characters (A-Z, 0-9, etc.). PC Settings Selects screen mode or adjust the... Canada: Select to start Auto Program. When finished, press . Select OK to use the CH +/- Parental Lock Password Sets up TV to the most appropriate analog channel. ratings (page 21). Auto Program Automatically sets up to seven characters to scroll through the channels ...
Operating Instructions (Setup Guide)
Page 21
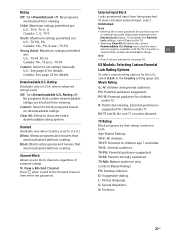
...US Models: Selecting Custom Parental Lock Rating Options To select custom rating options for children under 13. PG: Parental guidance suggested . TV-14: Parents strongly cautioned. Unrated (Available only when Country is tuned to a US channel that are broadcasted without a rating. ...17. Child: Maximum ratings permitted are: U.S.: TV-Y, TV-G, G Canada: C, G, TV-Y Youth: Maximum ratings permitted are: U.S.: TV-PG, PG Canada: C8+, PG, 8 ans+, TV-PG Young Adult: Maximum ratings permitted are: U.S.: TV-14, PG-13 Canada: 14+, 13 ans+, TV-14 Custom: Select to set to block ...
...US Models: Selecting Custom Parental Lock Rating Options To select custom rating options for children under 13. PG: Parental guidance suggested . TV-14: Parents strongly cautioned. Unrated (Available only when Country is tuned to a US channel that are broadcasted without a rating. ...17. Child: Maximum ratings permitted are: U.S.: TV-Y, TV-G, G Canada: C, G, TV-Y Youth: Maximum ratings permitted are: U.S.: TV-PG, PG Canada: C8+, PG, 8 ans+, TV-PG Young Adult: Maximum ratings permitted are: U.S.: TV-14, PG-13 Canada: 14+, 13 ans+, TV-14 Custom: Select to set to block ...

Operating Instructions (Setup Guide)
Page 22
...: Allows you to select the display mode. Image Selection: Select image. Music Selection: Select music. The Custom option is available on when the TV is turned on the Digital CC setting. 22US PG: Parental guidance. 14+: Viewers 14 and older. 18+: Adult programming. Slideshow Setting: Select... of the week: Set Sunday or Monday as audio application. Duration: Select the time period (1 h, 2 h, 4 h or 24 h) after which the TV automatically switches to adults. First day of the week on page 21 for programs that are broadcast with closed caption options. Closed Captions (CC) Allows...
...: Allows you to select the display mode. Image Selection: Select image. Music Selection: Select music. The Custom option is available on when the TV is turned on the Digital CC setting. 22US PG: Parental guidance. 14+: Viewers 14 and older. 18+: Adult programming. Slideshow Setting: Select... of the week: Set Sunday or Monday as audio application. Duration: Select the time period (1 h, 2 h, 4 h or 24 h) after which the TV automatically switches to adults. First day of the week on page 21 for programs that are broadcast with closed caption options. Closed Captions (CC) Allows...
Operating Instructions (Setup Guide)
Page 23
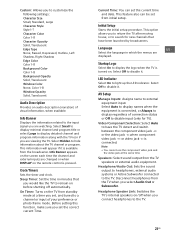
...pressed. Select Small to display minimal channel and program title or select Large to display detailed channel and program information along with the TV icon if you set from the broadcaster. Startup Logo Select On to display regardless of your preference or photo frame mode. Headphone/... Subwoofer. Info Banner Displays the information related to have been launched by broadcasters. Before setting this function, make sure you are viewing the TV. This feature also can set the correct current Time. Clock/Timers Sets the timer and clock. LED Indicator Select On to disable it...
...pressed. Select Small to display minimal channel and program title or select Large to display detailed channel and program information along with the TV icon if you set from the broadcaster. Startup Logo Select On to display regardless of your preference or photo frame mode. Headphone/... Subwoofer. Info Banner Displays the information related to have been launched by broadcasters. Before setting this function, make sure you are viewing the TV. This feature also can set the correct current Time. Clock/Timers Sets the timer and clock. LED Indicator Select On to disable it...


