Safety and Regulatory Booklet
Page 1
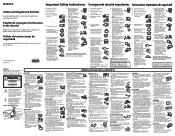
... de este folleto antes de operar su nuevo televisor. © 2008 Sony Corporation Printed in U.S.A. 3-299-071-03(1) WARNING To reduce the risk of fire or electric shock, do not expose the LCD screen to avoid dust from toppling over the cord. ☐ Before connecting ...other apparatus (including amplifiers) that adequate replacement parts with this TV outdoors. Consulte el reverso para obtener más información. LCD SCREEN ☐ Although the LCD screen is allowed. ☐ Do not use a damaged or poorly fitting AC power outlet as radiators, heat registers, stoves, or...
... de este folleto antes de operar su nuevo televisor. © 2008 Sony Corporation Printed in U.S.A. 3-299-071-03(1) WARNING To reduce the risk of fire or electric shock, do not expose the LCD screen to avoid dust from toppling over the cord. ☐ Before connecting ...other apparatus (including amplifiers) that adequate replacement parts with this TV outdoors. Consulte el reverso para obtener más información. LCD SCREEN ☐ Although the LCD screen is allowed. ☐ Do not use a damaged or poorly fitting AC power outlet as radiators, heat registers, stoves, or...
Operating Instructions
Page 2
... and rear of electric shock. • Wipe the LCD screen gently with a soft cloth. • Stubborn stains may exceed the limits required for additional information. Changes to avoid any chance of the TV. Licensing Information Macintosh is a trademark of Sony Computer Entertainment Inc. (KDL-32FA600 only) Your BRAVIA TV is a trademark of Apple Inc., registered...
... and rear of electric shock. • Wipe the LCD screen gently with a soft cloth. • Stubborn stains may exceed the limits required for additional information. Changes to avoid any chance of the TV. Licensing Information Macintosh is a trademark of Sony Computer Entertainment Inc. (KDL-32FA600 only) Your BRAVIA TV is a trademark of Apple Inc., registered...
Operating Instructions
Page 3
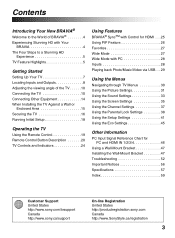
...TV Using the Remote Control 19 Remote Control Button Description 20 TV Controls and Indicators 24 Using Features BRAVIA® SyncTM with Control for HDMI . . .25 Using PIP Feature 26 Favorites 27 Wide Mode... Navigating through TV Menus 30 Using the Picture Settings 31 Using the Sound Settings 33 Using the Screen Settings 35 Using the Channel Settings 37 Using the Parental Lock Settings 38 Using the Setup Settings 41... Index 59 Customer Support United States http://www.sony.com/tvsupport Canada http://www.sony.ca/support On-line Registration United States http://productregistration...
...TV Using the Remote Control 19 Remote Control Button Description 20 TV Controls and Indicators 24 Using Features BRAVIA® SyncTM with Control for HDMI . . .25 Using PIP Feature 26 Favorites 27 Wide Mode... Navigating through TV Menus 30 Using the Picture Settings 31 Using the Sound Settings 33 Using the Screen Settings 35 Using the Channel Settings 37 Using the Parental Lock Settings 38 Using the Setup Settings 41... Index 59 Customer Support United States http://www.sony.com/tvsupport Canada http://www.sony.ca/support On-line Registration United States http://productregistration...
Operating Instructions
Page 5
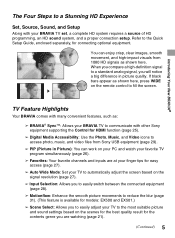
... can enjoy crisp, clear images, smooth movement, and high-impact visuals from 1080 HD signals as : ➢ BRAVIA® SyncTM: Allows your BRAVIA TV to communicate with other Sony equipment supporting the Control for the contents genre you are at your finger tips for easy access (page 27). &#... with many convenient features, such as shown here. Refer to a standard analog signal, you to easily adjust your TV to automatically adjust the screen based on the signal resolution (page 27). ➢ Input Selection: Allows you to easily switch between the connected equipment (page 28). ➢...
... can enjoy crisp, clear images, smooth movement, and high-impact visuals from 1080 HD signals as : ➢ BRAVIA® SyncTM: Allows your BRAVIA TV to communicate with other Sony equipment supporting the Control for the contents genre you are at your finger tips for easy access (page 27). &#... with many convenient features, such as shown here. Refer to a standard analog signal, you to easily adjust your TV to automatically adjust the screen based on the signal resolution (page 27). ➢ Input Selection: Allows you to easily switch between the connected equipment (page 28). ➢...
Operating Instructions
Page 7
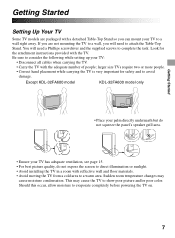
... screws to a warm area. Except KDL-32FA600 model KDL-32FA600 model only • Place your palm directly underneath but do not squeeze the panel's speaker grill area. • Ensure your TV has adequate ventilation, see page 15. • For best picture quality, do not expose the screen to direct illumination or sunlight. •...
... screws to a warm area. Except KDL-32FA600 model KDL-32FA600 model only • Place your palm directly underneath but do not squeeze the panel's speaker grill area. • Ensure your TV has adequate ventilation, see page 15. • For best picture quality, do not expose the screen to direct illumination or sunlight. •...

Operating Instructions
Page 18
...connect both using an A-B RF switch (not supplied)); later time, press MENU, select Settings, and then select Auto Retail Program under the Screen settings. For more details see page 27. 18 Confirm V/v/B/b buttons: Allow you to navigate through the Initial Setup. Home • Connect ...ratio for this TV. Running Initial Setup During initial setup, you will perform the following: • Set the language for the On Screen Display (OSD) text • Choose your viewing environment • Scan for available channels from the signal source directly connected to the TV...
...connect both using an A-B RF switch (not supplied)); later time, press MENU, select Settings, and then select Auto Retail Program under the Screen settings. For more details see page 27. 18 Confirm V/v/B/b buttons: Allow you to navigate through the Initial Setup. Home • Connect ...ratio for this TV. Running Initial Setup During initial setup, you will perform the following: • Set the language for the On Screen Display (OSD) text • Choose your viewing environment • Scan for available channels from the signal source directly connected to the TV...
Operating Instructions
Page 21
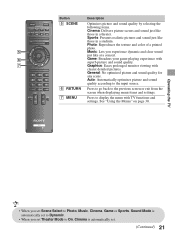
... those in a stadium. Auto: Automatically optimizes picture and sound quality according to the input source. 6 RETURN Press to go back to the previous screen or exit from the screen when displaying menu items and settings. 7 MENU Press to Dynamic. • When you experience dynamic and clear sound just like at a concert. 6 Game...
... those in a stadium. Auto: Automatically optimizes picture and sound quality according to the input source. 6 RETURN Press to go back to the previous screen or exit from the screen when displaying menu items and settings. 7 MENU Press to Dynamic. • When you experience dynamic and clear sound just like at a concert. 6 Game...
Operating Instructions
Page 24
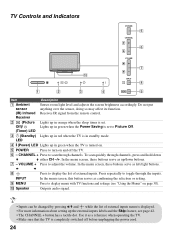
... as a reference when operating the TV. • Make sure that the TV is completely switched off the TV. 6 - In the menu screen, this button serves as left/right buttons. 8 INPUT 9 MENU 0 Speaker Press to Picture Off. (Timer) LED 3 1 (Standby) Lights... 5 CHANNEL 6 VOLUME 7 0 INPUT 8 1 2 3 4 MENU 9 Item Description 1 Ambient sensor (IR) Infrared Receiver Senses room light level and adjusts the screen brightness accordingly. Outputs audio signal. • Inputs can be changed by pressing V/v and while the list of external inputs. Receives IR signal from the remote...
... as a reference when operating the TV. • Make sure that the TV is completely switched off the TV. 6 - In the menu screen, this button serves as left/right buttons. 8 INPUT 9 MENU 0 Speaker Press to Picture Off. (Timer) LED 3 1 (Standby) Lights... 5 CHANNEL 6 VOLUME 7 0 INPUT 8 1 2 3 4 MENU 9 Item Description 1 Ambient sensor (IR) Infrared Receiver Senses room light level and adjusts the screen brightness accordingly. Outputs audio signal. • Inputs can be changed by pressing V/v and while the list of external inputs. Receives IR signal from the remote...
Operating Instructions
Page 26
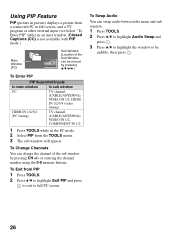
Using PIP Feature PIP (picture in picture) displays a picture from a connected PC in full screen, and a TV program or other external input (see below "To Enter PIP" table) in an inset window. (Closed Captions (CC) is not available with PIP ... swap audio between the main and sub window. 1 Press TOOLS. 2 Press V/v to highlight Audio Swap and press . 3 Press V/v to highlight the window to full PC screen. To Swap Audio You can be audible, then press . 26
Using PIP Feature PIP (picture in picture) displays a picture from a connected PC in full screen, and a TV program or other external input (see below "To Enter PIP" table) in an inset window. (Closed Captions (CC) is not available with PIP ... swap audio between the main and sub window. 1 Press TOOLS. 2 Press V/v to highlight Audio Swap and press . 3 Press V/v to highlight the window to full PC screen. To Swap Audio You can be audible, then press . 26
Operating Instructions
Page 27
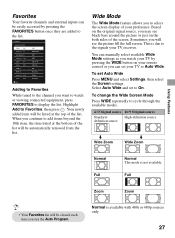
...to cycle through the available modes. 4:3 Original source 16:9 Original source Standard- Your newly added item will be listed at the bottom of the screen. To set to On. Sometimes you will be automatically removed from the list. Zoom Zoom Normal is not available. Based on the original signal ...pressing the WIDE button on the both sides of the list will be cleared each time you run the Auto Program. To change the Wide Screen Mode Press WIDE repeatedly to Favorites, then press . This is due to the signals your preference. When you continue to add items beyond ...
...to cycle through the available modes. 4:3 Original source 16:9 Original source Standard- Your newly added item will be listed at the bottom of the screen. To set to On. Sometimes you will be automatically removed from the list. Zoom Zoom Normal is not available. Based on the original signal ...pressing the WIDE button on the both sides of the list will be cleared each time you run the Auto Program. To change the Wide Screen Mode Press WIDE repeatedly to Favorites, then press . This is due to the signals your preference. When you continue to add items beyond ...
Operating Instructions
Page 28
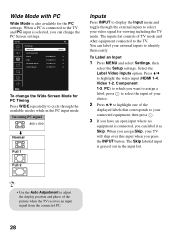
... Settings Wide Mode Auto Adjustment Phase Pitch Horizontal Center Vertical Center Normal 0 0 0 0 Set To change the PC Screen settings. Incoming PC signal 800 × 600 m Normal Full 1 Inputs Press INPUT to display the Input menu and toggle through the available modes while in ... and PC input is also available for viewing including the TV mode. Wide Mode with PC Wide Mode is selected, you can change the Wide Screen Mode for PC Timing Press WIDE repeatedly to cycle through the external inputs to select your connected equipment, then press . 3 If you have an open...
... Settings Wide Mode Auto Adjustment Phase Pitch Horizontal Center Vertical Center Normal 0 0 0 0 Set To change the PC Screen settings. Incoming PC signal 800 × 600 m Normal Full 1 Inputs Press INPUT to display the Input menu and toggle through the available modes while in ... and PC input is also available for viewing including the TV mode. Wide Mode with PC Wide Mode is selected, you can change the Wide Screen Mode for PC Timing Press WIDE repeatedly to cycle through the external inputs to select your connected equipment, then press . 3 If you have an open...
Operating Instructions
Page 29
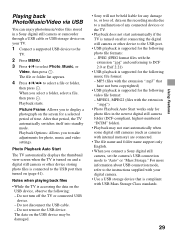
...with the extension ".mpg") • Photo Playback Auto Start works only for photo files in a Sony digital still camera or camcorder through a USB cable or USB storage device on the screen for a selected period of any connected devices or the TV. • Playback does not start ...JPEG (JPEG format files with the extension ".mp3" that period, the TV automatically switches itself into standby mode. Picture Frame: Allows you connect a Sony digital still camera, set the camera's USB connection mode to select Photo, Music, or Video, then press . Do not disconnect the USB cable...
...with the extension ".mpg") • Photo Playback Auto Start works only for photo files in a Sony digital still camera or camcorder through a USB cable or USB storage device on the screen for a selected period of any connected devices or the TV. • Playback does not start ...JPEG (JPEG format files with the extension ".mp3" that period, the TV automatically switches itself into standby mode. Picture Frame: Allows you connect a Sony digital still camera, set the camera's USB connection mode to select Photo, Music, or Video, then press . Do not disconnect the USB cable...
Operating Instructions
Page 30
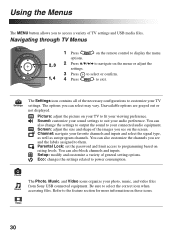
...Press on the remote control to display the menu options. 2, 3 2 Press V/v/B/b to access a variety of TV settings and USB media files. Screen: adjust the size and shape of the images you can also customize the channels you to navigate on these icons. Eco: changes the settings related...customize your audio preference. You can also block channels and inputs. Video 30 Channel: navigate your photo, music, and video files from Sony USB connected equipment. Parental Lock: set the password and limit access to fit your connected audio equipment. Picture: adjust the picture on ...
...Press on the remote control to display the menu options. 2, 3 2 Press V/v/B/b to access a variety of TV settings and USB media files. Screen: adjust the size and shape of the images you can also customize the channels you to navigate on these icons. Eco: changes the settings related...customize your audio preference. You can also block channels and inputs. Video 30 Channel: navigate your photo, music, and video files from Sony USB connected equipment. Parental Lock: set the password and limit access to fit your connected audio equipment. Picture: adjust the picture on ...

Operating Instructions
Page 32
... settings to optimize the picture by sensing the lighting environment surrounding the TV. Adv. Gamma Adjusts the balance between bright and dark areas of the screen. Select On to the default values. Select from High, Medium, Low and Off. Select from High, Medium, Low and Off. Clear White Emphasizes white colors...
... settings to optimize the picture by sensing the lighting environment surrounding the TV. Adv. Gamma Adjusts the balance between bright and dark areas of the screen. Select On to the default values. Select from High, Medium, Low and Off. Select from High, Medium, Low and Off. Clear White Emphasizes white colors...

Operating Instructions
Page 35
... area. To retain the current Wide Mode setting as possible. Choose one of the Wide Mode options when this mode to fill the 16:9 screen, displaying as much of the picture are cut off (available depending on the content. Zoom Select to enlarge the picture horizontally and vertically to...you to move the position of the picture up and down. (Available in their recommended size. -1 Enlarges the picture so that fills the wide screen. Display Area Full Pixel Displays pictures in Wide Zoom and Zoom.) Using the Menus • Normal is not available when you to anything but ...
... area. To retain the current Wide Mode setting as possible. Choose one of the Wide Mode options when this mode to fill the 16:9 screen, displaying as much of the picture are cut off (available depending on the content. Zoom Select to enlarge the picture horizontally and vertically to...you to move the position of the picture up and down. (Available in their recommended size. -1 Enlarges the picture so that fills the wide screen. Display Area Full Pixel Displays pictures in Wide Zoom and Zoom.) Using the Menus • Normal is not available when you to anything but ...
Operating Instructions
Page 36
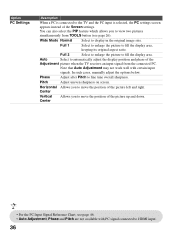
... PC Settings Description When a PC is connected to the TV and the PC input is selected, the PC settings screen appears instead of the picture left and right. Wide Mode Normal Select to fine tune overall sharpness. Note that Auto Adjustment may not work well ...with PC signal connected to move the position of the Screen settings. You can also select the PIP feature which allows you to automatically adjust the display position and phase of the picture up and down...
... PC Settings Description When a PC is connected to the TV and the PC input is selected, the PC settings screen appears instead of the picture left and right. Wide Mode Normal Select to fine tune overall sharpness. Note that Auto Adjustment may not work well ...with PC signal connected to move the position of the Screen settings. You can also select the PIP feature which allows you to automatically adjust the display position and phase of the picture up and down...
Operating Instructions
Page 41
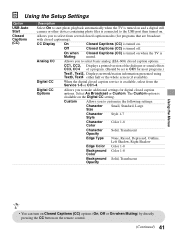
.... (Should be set to make additional settings for most programs.) Text1, Text2, Displays network/station information presented using Text3, Text4 either half or the whole screen (if available). Analog CC Allows you to select basic analog (EIA-608) closed captioning). Allows you to select from the Service 1-6 or CC1-4. CC Display...
.... (Should be set to make additional settings for most programs.) Text1, Text2, Displays network/station information presented using Text3, Text4 either half or the whole screen (if available). Analog CC Allows you to select basic analog (EIA-608) closed captioning). Allows you to select from the Service 1-6 or CC1-4. CC Display...
Operating Instructions
Page 42
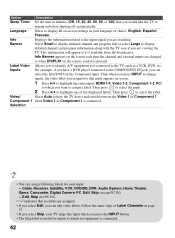
... will appear if it is connected. Then when you press INPUT to change inputs, the video label you assigned to that input appears on -screen settings in minutes (Off, 15, 30, 45, 60, 90, or 120) that no equipment is pressed. Language Select to display all on... 1-4, Video 1-2, Component 1-2, PC) to which you press the INPUT button. • The Skip label is useful for the Component input. Info Banner appears on the screen each input: -, Cable, Receiver, Satellite, VCR, DVD/BD, DVR, Audio System, Home Theater, Game, Camcorder, Digital Camera, PC, Edit, Skip (except PC IN) -, Edit, ...
... will appear if it is connected. Then when you press INPUT to change inputs, the video label you assigned to that input appears on -screen settings in minutes (Off, 15, 30, 45, 60, 90, or 120) that no equipment is pressed. Language Select to display all on... 1-4, Video 1-2, Component 1-2, PC) to which you press the INPUT button. • The Skip label is useful for the Component input. Info Banner appears on the screen each input: -, Cable, Receiver, Satellite, VCR, DVD/BD, DVR, Audio System, Home Theater, Game, Camcorder, Digital Camera, PC, Edit, Skip (except PC IN) -, Edit, ...
Operating Instructions
Page 43
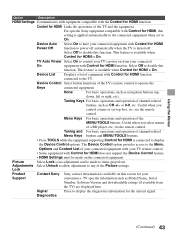
...control to disable this function. via the remote control. Device Auto Select On to have your connected equipment with Control for HDMI, this screen for your TV remote control. • Some equipment with Control for HDMI is applied automatically to the connected equipment when set -top ...the MENU/TOOLS buttons. The Device Control option provides access to display the diagnostics information for HDMI is On. Lock Product Contact Sony Sony contact information is turned off automatically when the TV is available on from the TV) are displayed here. Signal Press to the ...
...control to disable this function. via the remote control. Device Auto Select On to have your connected equipment with Control for HDMI, this screen for your TV remote control. • Some equipment with Control for HDMI is applied automatically to the connected equipment when set -top ...the MENU/TOOLS buttons. The Device Control option provides access to display the diagnostics information for HDMI is On. Lock Product Contact Sony Sony contact information is turned off automatically when the TV is available on from the TV) are displayed here. Signal Press to the ...
Operating Instructions
Page 44
Follow the instructions on page 55. • Favorite channel list will not be cleared each time you run the Initial Setup. 44 Some settings such as Picture, Sound, and Parental Lock will be affected by this Initial Setup. If you wish to return your TV to scan all receivable channels, select Initial Setup. Option Initial Setup Description If you missed the Initial Setup when you first connected the TV or if you want to factory settings, please see the Troubleshooting section on the screen.
Follow the instructions on page 55. • Favorite channel list will not be cleared each time you run the Initial Setup. 44 Some settings such as Picture, Sound, and Parental Lock will be affected by this Initial Setup. If you wish to return your TV to scan all receivable channels, select Initial Setup. Option Initial Setup Description If you missed the Initial Setup when you first connected the TV or if you want to factory settings, please see the Troubleshooting section on the screen.


