
Child Safety: It Makes A Difference Where Your TV Stands
Page 1
..., in your family and friends. As a result, TV sets may cause unnecessary injury. The Consumer Electronics Association formed... Share our safety message on this hidden hazard of the home with furniture and television sets. 5 Avoid placing any items on top of TVs such as VCRs and remotes that may pique the children's curiosity. 6 Remember that ... angle braces, straps and anchors to secure your furniture to the wall (but never screw anything directly into the TV). 3 Carefully read and understand the manufacturer's instructions and product safety notices. 4 Don't allow children to climb on...
..., in your family and friends. As a result, TV sets may cause unnecessary injury. The Consumer Electronics Association formed... Share our safety message on this hidden hazard of the home with furniture and television sets. 5 Avoid placing any items on top of TVs such as VCRs and remotes that may pique the children's curiosity. 6 Remember that ... angle braces, straps and anchors to secure your furniture to the wall (but never screw anything directly into the TV). 3 Carefully read and understand the manufacturer's instructions and product safety notices. 4 Don't allow children to climb on...
Operating Instructions
Page 6
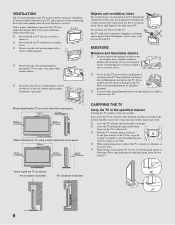
... slots as illustrated. VENTILATION The slots and openings in the specified manner Carrying the TV requires at least two people. Unless proper ventilation is provided. MOISTURE Moisture and flammable objects s Do not use power-line operated sets near a swimming pool, etc. If any kind on a wall, allow this ...much as a bookcase or built-in a wet basement, or near water - For proper ventilation, observe the following: s Do not install the TV face up or down . Never spill ...
... slots as illustrated. VENTILATION The slots and openings in the specified manner Carrying the TV requires at least two people. Unless proper ventilation is provided. MOISTURE Moisture and flammable objects s Do not use power-line operated sets near a swimming pool, etc. If any kind on a wall, allow this ...much as a bookcase or built-in a wet basement, or near water - For proper ventilation, observe the following: s Do not install the TV face up or down . Never spill ...
Operating Instructions
Page 9
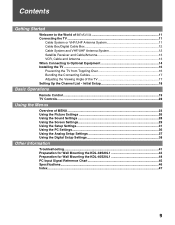
... ...23 Using the Picture Settings 26 Using the Sound Settings 28 Using the Screen Settings 29 Using the Setup Settings 31 Using the PC Settings...36 Using the Analog Setup Settings 37 Using the Digital Setup Settings 38 Other Information Troubleshooting...41 Preparation for Wall Mounting the KDL-32S20L1 43 Preparation for Wall Mounting the KDL-40S20L1 44 PC Input Signal...
... ...23 Using the Picture Settings 26 Using the Sound Settings 28 Using the Screen Settings 29 Using the Setup Settings 31 Using the PC Settings...36 Using the Analog Setup Settings 37 Using the Digital Setup Settings 38 Other Information Troubleshooting...41 Preparation for Wall Mounting the KDL-32S20L1 43 Preparation for Wall Mounting the KDL-40S20L1 44 PC Input Signal...
Operating Instructions
Page 11
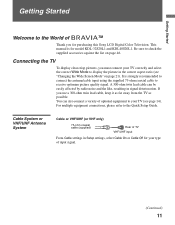
..."Changing the Wide Screen Mode" on page 46. If you must connect your TV correctly and select the correct Wide Mode to check the supplied accesories against the list on page 21). It is for model KDL-32S20L1 and KDL40S20L1. You can be easily affected by radio noise and the like, ...TM Thank you for your type of input signal. (Continued) 11 Be sure to display the picture in Setup settings, select Cable On or Cable Off for purchasing this Sony LCD Digital Color Television. Connecting the TV To display clear crisp pictures, you use a 300-ohm twin lead cable, keep it as far away from...
..."Changing the Wide Screen Mode" on page 46. If you must connect your TV correctly and select the correct Wide Mode to check the supplied accesories against the list on page 21). It is for model KDL-32S20L1 and KDL40S20L1. You can be easily affected by radio noise and the like, ...TM Thank you for your type of input signal. (Continued) 11 Be sure to display the picture in Setup settings, select Cable On or Cable Off for purchasing this Sony LCD Digital Color Television. Connecting the TV To display clear crisp pictures, you use a 300-ohm twin lead cable, keep it as far away from...
Operating Instructions
Page 12
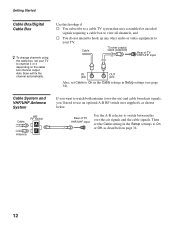
... use an optional A-B RF switch (not supplied), as described on the cable box channel output. Rear of TV VHF/UHF input IN OUT jack jack Also, set Cable to switch between the over -the-air) and cable broadcast signals, you'll need to channel 3 or 4 ...settings (see page 34). Cable System and VHF/UHF Antenna System Cable A/B RF Switch A B Antenna If you want to watch both antenna (over -the-air signals and the cable signals. Auto Scan will fix the channel automatically. Getting Started Cable Box/Digital Cable Box z To change channels using the cable box, set your TV...
... use an optional A-B RF switch (not supplied), as described on the cable box channel output. Rear of TV VHF/UHF input IN OUT jack jack Also, set Cable to switch between the over -the-air) and cable broadcast signals, you'll need to channel 3 or 4 ...settings (see page 34). Cable System and VHF/UHF Antenna System Cable A/B RF Switch A B Antenna If you want to watch both antenna (over -the-air signals and the cable signals. Auto Scan will fix the channel automatically. Getting Started Cable Box/Digital Cable Box z To change channels using the cable box, set your TV...
Operating Instructions
Page 13
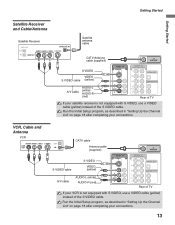
...is not equipped with S VIDEO, use a VIDEO cable (yellow) instead of the S VIDEO cable. Run the Initial Setup program, as described in "Setting Up the Channel List" on page 18 after completing your connections. 13 CATV cable Antenna cable (supplied) VHF/UHF S VIDEO cable S VIDEO VIDEO (... 4 5 Y OPTICAL OUT PB VIDEO L (MONO) AUDIO R PR L AUDIO R AUDIO OUT(VAR/FIX) Rear of TV If your connections. Run the Initial Setup program, as described in "Setting Up the Channel List" on page 18 after completing your VCR is not equipped with S VIDEO, use a VIDEO cable (yellow...
...is not equipped with S VIDEO, use a VIDEO cable (yellow) instead of the S VIDEO cable. Run the Initial Setup program, as described in "Setting Up the Channel List" on page 18 after completing your connections. 13 CATV cable Antenna cable (supplied) VHF/UHF S VIDEO cable S VIDEO VIDEO (... 4 5 Y OPTICAL OUT PB VIDEO L (MONO) AUDIO R PR L AUDIO R AUDIO OUT(VAR/FIX) Rear of TV If your connections. Run the Initial Setup program, as described in "Setting Up the Channel List" on page 18 after completing your VCR is not equipped with S VIDEO, use a VIDEO cable (yellow...
Operating Instructions
Page 14
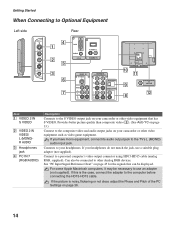
... Chart" on your camcorder or other Analog RGB devices. If this is noisy, flickering or not clear, adjust the Phase and Pitch of the PC Settings on your camcorder or other video equipment such as video game equipment. If you have mono equipment, connect its audio output jack to your headphones... 7 (RGB/AUDIO) Description Connects to the S VIDEO output jack on page 36. 14 For some Apple Macintosh computers, it may be displayed. Connects to the TV's L (MONO) audio input jack.
... Chart" on your camcorder or other Analog RGB devices. If this is noisy, flickering or not clear, adjust the Phase and Pitch of the PC Settings on your camcorder or other video equipment such as video game equipment. If you have mono equipment, connect its audio output jack to your headphones... 7 (RGB/AUDIO) Description Connects to the S VIDEO output jack on page 36. 14 For some Apple Macintosh computers, it may be displayed. Connects to the TV's L (MONO) audio input jack.
Operating Instructions
Page 15
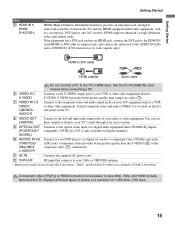
...that this TV and any HDMI-equipped audio/video equipment, such as a VCR or other video equipment that is PCM/Dolby digital (PCM/DOLBY* compatible. (OPTICAL OUT is for digital channels.) DIGITAL) 0 HD/DVD IN 4/5 (1080i/720p/ 480p/480i)/ L-AUDIO-R Connect to your DVD player's or digital set -top... box, DVD player, and A/V receiver. Component video (YPBPR) or HDMI connection is located on your Cable or VHF/UHF antenna. * Manufactured under license from Dolby Laboratories. You can use these outputs to listen to your TV's audio through your stereo ...
...that this TV and any HDMI-equipped audio/video equipment, such as a VCR or other video equipment that is PCM/Dolby digital (PCM/DOLBY* compatible. (OPTICAL OUT is for digital channels.) DIGITAL) 0 HD/DVD IN 4/5 (1080i/720p/ 480p/480i)/ L-AUDIO-R Connect to your DVD player's or digital set -top... box, DVD player, and A/V receiver. Component video (YPBPR) or HDMI connection is located on your Cable or VHF/UHF antenna. * Manufactured under license from Dolby Laboratories. You can use these outputs to listen to your TV's audio through your stereo ...

Operating Instructions
Page 18
... Initial Setup screen appears when you turn on the TV. If you do it later by selecting the Auto Program option in the Analog and Digital Setup settings (see pages 37 and 38). appears. To run Initial Setup, which automatically sets up the channels at a later time ❑ Use... the Auto Program feature as described on your TV, you complete the Auto Program. To add individual digital channels ❑ Use the Digital Channels feature as a reminder until you need to run...
... Initial Setup screen appears when you turn on the TV. If you do it later by selecting the Auto Program option in the Analog and Digital Setup settings (see pages 37 and 38). appears. To run Initial Setup, which automatically sets up the channels at a later time ❑ Use... the Auto Program feature as described on your TV, you complete the Auto Program. To add individual digital channels ❑ Use the Digital Channels feature as a reminder until you need to run...
Operating Instructions
Page 19
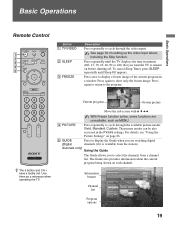
... program being shown on a unique mission. Series follows the aquatic misadventures of the current program in a window. Audio 19 Time remaining: 1:26 TV-G CC 1 ABC 10 DISC 23.1 FAM 36 TLC Alternate Audio Audio 1 Englsih Audio 2 English 65 HIST 68 SHOW C23.1 FAM Alt. .... 4 PICTURE Press repeatedly to display the Guide when you are watching digital (Digital channels (if it is available from a channel list. See page 32 on before shutting off. Press again to return to remain on setting up the video input labels, including the Skip function. Press again to...
... program being shown on a unique mission. Series follows the aquatic misadventures of the current program in a window. Audio 19 Time remaining: 1:26 TV-G CC 1 ABC 10 DISC 23.1 FAM 36 TLC Alternate Audio Audio 1 Englsih Audio 2 English 65 HIST 68 SHOW C23.1 FAM Alt. .... 4 PICTURE Press repeatedly to display the Guide when you are watching digital (Digital channels (if it is available from a channel list. See page 32 on before shutting off. Press again to return to remain on setting up the video input labels, including the Skip function. Press again to...
Operating Instructions
Page 20
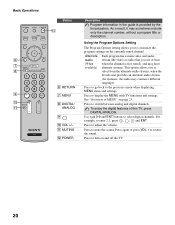
... to turn on page 23. Press to restore the sound. Press again or press VOL + to mute the sound. Use with TV functions and settings. Basic Operations 6 7 8 9 0 qa Button qs 6 RETURN 7 MENU 8 DIGITAL/ ANALOG 9 0 VOL +/- As a result, it may contain a different language). Press to display the MENU with 0-9 and ENT buttons to select...
... to turn on page 23. Press to restore the sound. Press again or press VOL + to mute the sound. Use with TV functions and settings. Basic Operations 6 7 8 9 0 qa Button qs 6 RETURN 7 MENU 8 DIGITAL/ ANALOG 9 0 VOL +/- As a result, it may contain a different language). Press to display the MENU with 0-9 and ENT buttons to select...

Operating Instructions
Page 21
...Original source Standard definition source High definition source m Wide Zoom Normal Full m Wide Zoom Normal This mode is associated with your current input: Analog TV, Digital TV, or External Inputs (with the exception of PC input). (See page 26, 28, 31, 36 and 37.) Press to jump back and ...Press V/v/B/b to move the on the batteries to scan through channels, press and hold down either +/-. Press ENT to step through the Wide Mode settings: Wide Zoom, Normal, Full, Zoom. Press to the diagram inside the remote control's battery compartment. 21 To scan quickly through channels. Insert ...
...Original source Standard definition source High definition source m Wide Zoom Normal Full m Wide Zoom Normal This mode is associated with your current input: Analog TV, Digital TV, or External Inputs (with the exception of PC input). (See page 26, 28, 31, 36 and 37.) Press to jump back and ...Press V/v/B/b to move the on the batteries to scan through channels, press and hold down either +/-. Press ENT to step through the Wide Mode settings: Wide Zoom, Normal, Full, Zoom. Press to the diagram inside the remote control's battery compartment. 21 To scan quickly through channels. Insert ...
Operating Instructions
Page 22
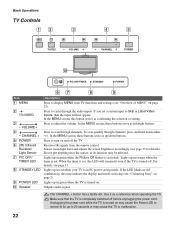
... LED blinks in green when the TV is completely switched off the TV. If you set , this LED will not appear. Press to display MENU with TV functions and settings (see "Contacting Sony" on page 2). Use it as its function may cause the TV to malfunction. 22 Make sure that the TV is turned on and off before...
... LED blinks in green when the TV is completely switched off the TV. If you set , this LED will not appear. Press to display MENU with TV functions and settings (see "Contacting Sony" on page 2). Use it as its function may cause the TV to malfunction. 22 Make sure that the TV is turned on and off before...

Operating Instructions
Page 23
... than a variety of MENU MENU provides one button access for controlling your TV settings. 1 Press MENU on the remote. When you press the MENU button, you to exit. 1 MENU External Inputs Analog Favorites Digital Favorites Analog Digital Settings Select from connected equipment Select: Set: Exit: MENU 23 Using the Menus Using the Menus Overview of remote...
... than a variety of MENU MENU provides one button access for controlling your TV settings. 1 Press MENU on the remote. When you press the MENU button, you to exit. 1 MENU External Inputs Analog Favorites Digital Favorites Analog Digital Settings Select from connected equipment Select: Set: Exit: MENU 23 Using the Menus Using the Menus Overview of remote...
Operating Instructions
Page 24
... press . To create your list using Favorite Channels in the Analog Setup (see page 32) 1 Highlight External Inputs on the MENU control panel and press . 2 Highlight Add...Exit When the Favorite Channels list is full, remove a channel from your TV. Analog Favorites Return Add to the most recently viewed analog channel. Highlight Analog...settings. (see page 37) settings and try again. Analog The Digital feature takes you to Favorites 1 28 : ----2 60 : ----3 28 : ----4 65 : ----5 68 : ----6 28 : ----7 -- : ----8 -- : ----Edit Favorites Select: Set: Exit: MENU The Digital ...
... press . To create your list using Favorite Channels in the Analog Setup (see page 32) 1 Highlight External Inputs on the MENU control panel and press . 2 Highlight Add...Exit When the Favorite Channels list is full, remove a channel from your TV. Analog Favorites Return Add to the most recently viewed analog channel. Highlight Analog...settings. (see page 37) settings and try again. Analog The Digital feature takes you to Favorites 1 28 : ----2 60 : ----3 28 : ----4 65 : ----5 68 : ----6 28 : ----7 -- : ----8 -- : ----Edit Favorites Select: Set: Exit: MENU The Digital ...

Operating Instructions
Page 25
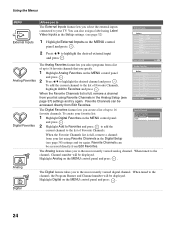
... the settings screen. Settings and adjustments can adjust vary depending on various settings starts from the Settings menu. To exit Settings, press MENU. Unavailable options are grayed out. Using the Menus 25 Navigating Through Settings The Settings screen provides access to the features: 1 Press MENU. 2 Select . 3 Highlight the item: Picture, Sound, Screen, Setup, PC Settings, Analog Setup, Digital Setup...
... the settings screen. Settings and adjustments can adjust vary depending on various settings starts from the Settings menu. To exit Settings, press MENU. Unavailable options are grayed out. Using the Menus 25 Navigating Through Settings The Settings screen provides access to the features: 1 Press MENU. 2 Select . 3 Highlight the item: Picture, Sound, Screen, Setup, PC Settings, Analog Setup, Digital Setup...
Operating Instructions
Page 26
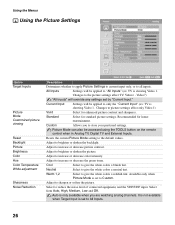
...Analog TV, Digital TV and External Inputs. Picture Mode can also be applied to only the "Current Input" (ex: TV is showing Video 1. Select to sharpen or soften the picture. Neutral Select to picture settings affect only Video 1) Vivid Select for standard picture settings. ...increase or decrease picture contrast. Changes to give the white colors a bluish tint. Adjust to the picture settings affect TV, Video1 - Auto is showing Video 1. All Inputs Settings will be applied to give the white colors a neutral tint. Custom Allows you are watching analog channels....
...Analog TV, Digital TV and External Inputs. Picture Mode can also be applied to only the "Current Input" (ex: TV is showing Video 1. Select to sharpen or soften the picture. Neutral Select to picture settings affect only Video 1) Vivid Select for standard picture settings. ...increase or decrease picture contrast. Changes to give the white colors a bluish tint. Adjust to the picture settings affect TV, Video1 - Auto is showing Video 1. All Inputs Settings will be applied to give the white colors a neutral tint. Custom Allows you are watching analog channels....
Operating Instructions
Page 27
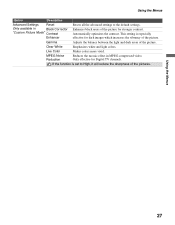
...contrast. If the function is especially effective for dark images which increases the vibrancy of the picture for Digital TV channels. Live Color Makes colors more vivid. Using the Menus 27 Enhances black areas of the picture. MPEG Noise Reduction Reduces the ...Mode" Contrast Enhancer Resets all the advanced settings to High, it will reduce the sharpness of the picture. This setting is set to the default settings. Automatically optimizes the contrast. Using the Menus Option Description Advanced Settings Reset Only available in MPEG-compressed video....
...contrast. If the function is especially effective for dark images which increases the vibrancy of the picture for Digital TV channels. Live Color Makes colors more vivid. Using the Menus 27 Enhances black areas of the picture. MPEG Noise Reduction Reduces the ...Mode" Contrast Enhancer Resets all the advanced settings to High, it will reduce the sharpness of the picture. This setting is set to the default settings. Automatically optimizes the contrast. Using the Menus Option Description Advanced Settings Reset Only available in MPEG-compressed video....

Operating Instructions
Page 28
... Sound. Off Select to increase or decrease lower-pitched sounds. If no SAP signal is present, the TV remains in Analog TV, Digital TV and External Inputs. Use to the default values, except MTS. Select from High, Low, and Off.... Mono Select for spoken dialog. Custom Flat setting. Resets the current Sound Mode setting to reduce noise during weak stereo broadcasts. Auto SAP Select to automatically switch the TV to "All Inputs" (ex: TV...
... Sound. Off Select to increase or decrease lower-pitched sounds. If no SAP signal is present, the TV remains in Analog TV, Digital TV and External Inputs. Use to the default values, except MTS. Select from High, Low, and Off.... Mono Select for spoken dialog. Custom Flat setting. Resets the current Sound Mode setting to reduce noise during weak stereo broadcasts. Auto SAP Select to automatically switch the TV to "All Inputs" (ex: TV...

Operating Instructions
Page 29
... in original size when the original source is showing Video 1. Zoom Select to fill screen with minimum distortion. Changes to picture settings affect only Video 1) Wide Zoom Select to enlarge the original picture without distorting the aspect ratio. When the original source is not...Off Select to all inputs. On Select to have the screen automatically change to "All Inputs" (ex: TV is best for the current program. Using the Screen Settings Using the Menus Using the Menus Option Target Inputs Wide Mode Auto Wide Description Determines whether to apply Screen...
... in original size when the original source is showing Video 1. Zoom Select to fill screen with minimum distortion. Changes to picture settings affect only Video 1) Wide Zoom Select to enlarge the original picture without distorting the aspect ratio. When the original source is not...Off Select to all inputs. On Select to have the screen automatically change to "All Inputs" (ex: TV is best for the current program. Using the Screen Settings Using the Menus Using the Menus Option Target Inputs Wide Mode Auto Wide Description Determines whether to apply Screen...


