
Child Safety: It Makes A Difference Where Your TV Stands
Page 1
...read and understand the manufacturer's instructions and product safety notices. 4 Don't allow children to climb on or play with furniture and television sets. 5 Avoid placing any items on top of TVs such as VCRs and remotes that may pique the children's curiosity. 6 Remember... size does NOT fit all. As a result, TV sets may cause unnecessary injury. Thank you have more than one television. The Consumer Electronics Association formed the Home Entertainment Support Safety Committee comprised of television and consumer electronics furniture manufacturers to making home entertainment enjoyable...
...read and understand the manufacturer's instructions and product safety notices. 4 Don't allow children to climb on or play with furniture and television sets. 5 Avoid placing any items on top of TVs such as VCRs and remotes that may pique the children's curiosity. 6 Remember... size does NOT fit all. As a result, TV sets may cause unnecessary injury. Thank you have more than one television. The Consumer Electronics Association formed the Home Entertainment Support Safety Committee comprised of television and consumer electronics furniture manufacturers to making home entertainment enjoyable...
Limited Warranty (US Only)
Page 1
... (i) acts of God, (ii) misuse, (iii) customer instruction, installation, set forth below. This Limited Warranty does not cover SONY products sold AS IS or WITH ALL FAULTS or consumables (such as set up adjustments or signal reception issues; (iv) limitations of technology, or (v) ... Warranty covers only the hardware components packaged with respect to the software. 4-103-056-02(1) x S® LCD Television LIMITED WARRANTY(US ONLY) SONY ELECTRONICS INC. ("SONY") warrants this product against defects in material or workmanship for the time periods and as fuses or batteries). Pursuant...
... (i) acts of God, (ii) misuse, (iii) customer instruction, installation, set forth below. This Limited Warranty does not cover SONY products sold AS IS or WITH ALL FAULTS or consumables (such as set up adjustments or signal reception issues; (iv) limitations of technology, or (v) ... Warranty covers only the hardware components packaged with respect to the software. 4-103-056-02(1) x S® LCD Television LIMITED WARRANTY(US ONLY) SONY ELECTRONICS INC. ("SONY") warrants this product against defects in material or workmanship for the time periods and as fuses or batteries). Pursuant...
Safety and Regulatory Booklet
Page 1
... to persons. Folleto de instrucciones de seguridad Lea y entienda el contenido de este folleto antes de operar su nuevo televisor. © 2008 Sony Corporation Printed in U.S.A. 3-299-071-01(1) WARNING CAUTION RISK OF ELECTRIC SHOCK DO NOT OPEN ATTENTION RISQUE DE CHOC ELECTRIQUE, NE PAS OUVRIR... dos contactos y una tercera clavija de conexión a tierra. This is a structural property of the LCD panel and is not a malfunction. ☐ The LCD screen is made with furniture and TV sets. ☐ Do not install the TV on furniture that the TV is damaged, liquid has been spilled or...
... to persons. Folleto de instrucciones de seguridad Lea y entienda el contenido de este folleto antes de operar su nuevo televisor. © 2008 Sony Corporation Printed in U.S.A. 3-299-071-01(1) WARNING CAUTION RISK OF ELECTRIC SHOCK DO NOT OPEN ATTENTION RISQUE DE CHOC ELECTRIQUE, NE PAS OUVRIR... dos contactos y una tercera clavija de conexión a tierra. This is a structural property of the LCD panel and is not a malfunction. ☐ The LCD screen is made with furniture and TV sets. ☐ Do not install the TV on furniture that the TV is damaged, liquid has been spilled or...
Operating Instructions
Page 3
... connection diagrams. Customer Support http://www.sony.com/tvsupport On-line Registration United States http://productregistration.sony.com Canada http://www.sonystyle.ca/registration 3 Setting Up the Channel List Initial Setup 19 Exploring Fun Features Using BRAVIA Theatre Sync™ with Control for ...Using the Setup Menu 37 Other Information Troubleshooting 39 Specifications 42 Index 43 Quick Setup Guide (separate volume) Provides a variety of BRAVIA® The Four Steps to Attach the Table-Top Stand 5 Securing the TV 6 Bundling the Connecting Cables 7 Preparation for Wall...
... connection diagrams. Customer Support http://www.sony.com/tvsupport On-line Registration United States http://productregistration.sony.com Canada http://www.sonystyle.ca/registration 3 Setting Up the Channel List Initial Setup 19 Exploring Fun Features Using BRAVIA Theatre Sync™ with Control for ...Using the Setup Menu 37 Other Information Troubleshooting 39 Specifications 42 Index 43 Quick Setup Guide (separate volume) Provides a variety of BRAVIA® The Four Steps to Attach the Table-Top Stand 5 Securing the TV 6 Bundling the Connecting Cables 7 Preparation for Wall...
Operating Instructions
Page 4
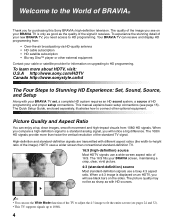
.... The 1080i HD signals provide more about HDTV, visit: U.S.A http://www.sony.com/HDTV Canada http://www.sonystyle.ca/hd The Four Steps to HD programming. The 16:9 fills your BRAVIA TV set, a complete HD system requires an HD sound system, a source of the...definition signal to -height ratio of your cable or satellite provider for purchasing this Sony BRAVIA® high-definition television. When you need access to Stunning HD Experience: Set, Sound, Source, and Setup Along with your BRAVIA screen, maintaining a crisp, clear, vivid picture. 4:3 (standard-definition) source Most...
.... The 1080i HD signals provide more about HDTV, visit: U.S.A http://www.sony.com/HDTV Canada http://www.sonystyle.ca/hd The Four Steps to HD programming. The 16:9 fills your BRAVIA TV set, a complete HD system requires an HD sound system, a source of the...definition signal to -height ratio of your cable or satellite provider for purchasing this Sony BRAVIA® high-definition television. When you need access to Stunning HD Experience: Set, Sound, Source, and Setup Along with your BRAVIA screen, maintaining a crisp, clear, vivid picture. 4:3 (standard-definition) source Most...
Operating Instructions
Page 6
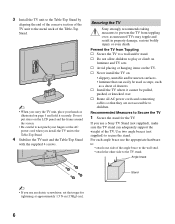
...s Install the TV where it securely. Recommended Measures to children. Do not put stress on the LCD panel and the frame around the screen. • Be careful to not pinch your fingers or the... support the weight of the TV. Angle brace Stand ~ • If you use an electric screwdriver, set the torque for the TV. as a chest of the angle brace to the wall stud. • attach...side to secure the stand. s Do not allow children to a wall and/or stand. Securing the TV Sony strongly recommends taking measures to prevent the TV from Toppling s Secure the TV to play or climb on :...
...s Install the TV where it securely. Recommended Measures to children. Do not put stress on the LCD panel and the frame around the screen. • Be careful to not pinch your fingers or the... support the weight of the TV. Angle brace Stand ~ • If you use an electric screwdriver, set the torque for the TV. as a chest of the angle brace to the wall stud. • attach...side to secure the stand. s Do not allow children to a wall and/or stand. Securing the TV Sony strongly recommends taking measures to prevent the TV from Toppling s Secure the TV to play or climb on :...

Operating Instructions
Page 8
...surface covered with the following WALL-MOUNT BRACKET. Use your TV with a thick and soft cloth. Sony Wall-Mount Bracket Model No. Sony TV Model No. Make sure the Table-Top Stand is used, set the torque to remove the TableTop Stand: 1 Disconnect all the cables from behind the TV as... KDL-32NL140 KDL-37NL140 SU-WL100 SU-WL500 • For bracket installation, refer to the rear of your TV should be removed from the TV. ~ • Do not remove the Table-Top Stand for any other than to wall-mount the TV. • For product protection and safety reasons, Sony strongly ...
...surface covered with the following WALL-MOUNT BRACKET. Use your TV with a thick and soft cloth. Sony Wall-Mount Bracket Model No. Sony TV Model No. Make sure the Table-Top Stand is used, set the torque to remove the TableTop Stand: 1 Disconnect all the cables from behind the TV as... KDL-32NL140 KDL-37NL140 SU-WL100 SU-WL500 • For bracket installation, refer to the rear of your TV should be removed from the TV. ~ • Do not remove the Table-Top Stand for any other than to wall-mount the TV. • For product protection and safety reasons, Sony strongly ...
Operating Instructions
Page 11
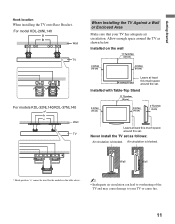
... least this much space around the TV as follows: Air circulation is blocked. Allow enough space around the set as shown below. For model KDL-26NL140 Wall TV For models KDL-32NL140/KDL-37NL140 Wall TV When Installing the TV Against a Wall or Enclosed Area Make sure that your TV or cause... fire. 11 Never install the TV set . Wall Wall * Hook position "a" cannot be used for the models in the table above. ...
... least this much space around the TV as follows: Air circulation is blocked. Allow enough space around the set as shown below. For model KDL-26NL140 Wall TV For models KDL-32NL140/KDL-37NL140 Wall TV When Installing the TV Against a Wall or Enclosed Area Make sure that your TV or cause... fire. 11 Never install the TV set . Wall Wall * Hook position "a" cannot be used for the models in the table above. ...

Operating Instructions
Page 13
... signals. PC generated signals may not be rendered as PC. Note that this TV and any HDMI-equipped audio/video equipment, such as DVD player, a set-top box, A/V receiver and Blu-ray Disc player as well as expected due to scaling factors. Getting Started Rear Panel 3 4 CABLE/ ANTENNA 2 1 SERVICE ONLY 1 2 S VIDEO...
... signals. PC generated signals may not be rendered as PC. Note that this TV and any HDMI-equipped audio/video equipment, such as DVD player, a set-top box, A/V receiver and Blu-ray Disc player as well as expected due to scaling factors. Getting Started Rear Panel 3 4 CABLE/ ANTENNA 2 1 SERVICE ONLY 1 2 S VIDEO...

Operating Instructions
Page 14
Connects to your DVD player's or digital set-top box's component video (YPBPR) and audio (L/R) jacks. Connects to the composite video and audio output jacks on your A/V equipment such as a DVD or other ...
Connects to your DVD player's or digital set-top box's component video (YPBPR) and audio (L/R) jacks. Connects to the composite video and audio output jacks on your A/V equipment such as a DVD or other ...

Operating Instructions
Page 15
... and over-the-air antenna programming, as shown. Shown with audio) input on the back of TV B CABLE/ANTENNA input • Be sure to set Cable setting to On or Off in signal degradation. Connecting the TV Cable System and/or VHF/UHF Cable or VHF/UHF (or VHF only) 75-ohm...
... and over-the-air antenna programming, as shown. Shown with audio) input on the back of TV B CABLE/ANTENNA input • Be sure to set Cable setting to On or Off in signal degradation. Connecting the TV Cable System and/or VHF/UHF Cable or VHF/UHF (or VHF only) 75-ohm...

Operating Instructions
Page 17
Getting Started PC Use the TV as a monitor for your PC. Shown below with a 60 Hz vertical frequency from the PC according to the TV, set the output signal from a personal computer. PC Input Signal Reference Chart After connecting the PC to the chart below. Signals VGA SVGA XGA WXGA Resolution ...
Getting Started PC Use the TV as a monitor for your PC. Shown below with a 60 Hz vertical frequency from the PC according to the TV, set the output signal from a personal computer. PC Input Signal Reference Chart After connecting the PC to the chart below. Signals VGA SVGA XGA WXGA Resolution ...

Operating Instructions
Page 19
... Program at a later time ❑ Use the Auto Program feature at this time, you need to run Initial Setup, which automatically sets up the channels at Channel menu as described on the screen to run Auto Program. Please select your preferred aspect ratio ❑ Select... the desired language, then press . 3 Please connect cable or antenna, then select Yes to run Auto Program. ~ • If you want to set up available channels. The Initial Setup screen appears when you have both cable and antenna available, please connect cable first. • IMPORTANT: You must perform...
... Program at a later time ❑ Use the Auto Program feature at this time, you need to run Initial Setup, which automatically sets up the channels at Channel menu as described on the screen to run Auto Program. Please select your preferred aspect ratio ❑ Select... the desired language, then press . 3 Please connect cable or antenna, then select Yes to run Auto Program. ~ • If you want to set up available channels. The Initial Setup screen appears when you have both cable and antenna available, please connect cable first. • IMPORTANT: You must perform...

Operating Instructions
Page 20
... with Control for connection. Setting the Control for HDMI In order for the function of Control for HDMI to operate, the TV and other Sony equipment with Control for HDMI capability is supported. Using DIGITAL MEDIA PORT adapter Connecting a DIGITAL MEDIA PORT adapter, lets you...20 When you can be output. In this case, the system outputs only a composite video signal. • Check compatibility between Sony TV's and Sony equipment. When the BRAVIA Theatre Sync audio system is possible: • By pressing THEATER on the remote control, it via the TV's remote control. The...
... with Control for connection. Setting the Control for HDMI In order for the function of Control for HDMI to operate, the TV and other Sony equipment with Control for HDMI capability is supported. Using DIGITAL MEDIA PORT adapter Connecting a DIGITAL MEDIA PORT adapter, lets you...20 When you can be output. In this case, the system outputs only a composite video signal. • Check compatibility between Sony TV's and Sony equipment. When the BRAVIA Theatre Sync audio system is possible: • By pressing THEATER on the remote control, it via the TV's remote control. The...

Operating Instructions
Page 22
...the TV displays the time in the Picture menu. The OSD (On Screen Display) will be set for details). 4 SOUND Press repeatedly to step through the available picture modes: Vivid, Standard, Cinema. Your BRAVIA Theatre Sync audio system must be accessed in minutes (Off, 15, 30, 60 or 120 minutes...) that you want the TV to immediately turn on before shutting off. These Sound Mode settings can also be connected by an HDMI connection to your BRAVIA Theatre Sync audio system. For details, see pages 31). 5 PICTURE Press repeatedly to the audio output of the ...
...the TV displays the time in the Picture menu. The OSD (On Screen Display) will be set for details). 4 SOUND Press repeatedly to step through the available picture modes: Vivid, Standard, Cinema. Your BRAVIA Theatre Sync audio system must be accessed in minutes (Off, 15, 30, 60 or 120 minutes...) that you want the TV to immediately turn on before shutting off. These Sound Mode settings can also be connected by an HDMI connection to your BRAVIA Theatre Sync audio system. For details, see pages 31). 5 PICTURE Press repeatedly to the audio output of the ...

Operating Instructions
Page 23
...exit from the station). the channel changes after few seconds. Info Banner Channel list Make Way for Ducks! (0:29 Remaining) KPBS-HD 15.1 Series follows the aquatic misadventures of Henry and Riley, two wayward ducks on page 27. Press to mute the sound. qa Use with TV functions ...and settings. Remote Control and TV Controls/Indicators 6 7 8 9 q; qf POWER Press to display the menu with - See "Using the TV Menus" on a unique mission. ...
...exit from the station). the channel changes after few seconds. Info Banner Channel list Make Way for Ducks! (0:29 Remaining) KPBS-HD 15.1 Series follows the aquatic misadventures of Henry and Riley, two wayward ducks on page 27. Press to mute the sound. qa Use with TV functions ...and settings. Remote Control and TV Controls/Indicators 6 7 8 9 q; qf POWER Press to display the menu with - See "Using the TV Menus" on a unique mission. ...

Operating Instructions
Page 24
The Wide Mode settings can be selected. 24 Changing the Wide Screen Mode 4:3 Original source 16:9 Original source Standard-definition source High-definition source m Wide Zoom Normal Full Zoom m Wide Zoom Normal This mode is not available Full Zoom ~ • When the TV receives a 720p or 1080i signal, Normal cannot be also accessed in the Screen menu (see page 32). SOUND GUIDE Button qg WIDE qg TOOLS MENU Description Press repeatedly to step through the Wide Mode settings: Wide Zoom, Normal, Full, Zoom.
The Wide Mode settings can be selected. 24 Changing the Wide Screen Mode 4:3 Original source 16:9 Original source Standard-definition source High-definition source m Wide Zoom Normal Full Zoom m Wide Zoom Normal This mode is not available Full Zoom ~ • When the TV receives a 720p or 1080i signal, Normal cannot be also accessed in the Screen menu (see page 32). SOUND GUIDE Button qg WIDE qg TOOLS MENU Description Press repeatedly to step through the Wide Mode settings: Wide Zoom, Normal, Full, Zoom.

Operating Instructions
Page 25
... to scan through the inputs. Press V/v/B/b to alternate between the current channel and the last channel tuned with the buttons - Press to move the on setting up to view a channel at the same time as a PIP (picture in picture) screen (see pages 33). qj V/v/B/b qk TOOLS ql JUMP w; The TV will...
... to scan through the inputs. Press V/v/B/b to alternate between the current channel and the last channel tuned with the buttons - Press to move the on setting up to view a channel at the same time as a PIP (picture in picture) screen (see pages 33). qj V/v/B/b qk TOOLS ql JUMP w; The TV will...

Operating Instructions
Page 26
TV Controls/Indicators Item Description 1 MENU Press to display the menu with TV functions and settings (see contacting Sony information on the back cover). Lights up in red when your TV is turned on page 27). 2 INPUT 3 - Unplugging the power cord while the TV .... Press to malfunction. 26 For details, see page 30 for up to 20 seconds or may be affected. • Make sure that the TV is set , this button serves as left/right buttons. 4 Press to remain lit for details). When the timer is turned on and off the TV. 6 TIMER/PIC...
TV Controls/Indicators Item Description 1 MENU Press to display the menu with TV functions and settings (see contacting Sony information on the back cover). Lights up in red when your TV is turned on page 27). 2 INPUT 3 - Unplugging the power cord while the TV .... Press to malfunction. 26 For details, see page 30 for up to 20 seconds or may be affected. • Make sure that the TV is set , this button serves as left/right buttons. 4 Press to remain lit for details). When the timer is turned on and off the TV. 6 TIMER/PIC...
Operating Instructions
Page 27
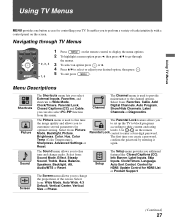
... to their content and rating levels. Select from : Picture Mode, Backlight, Picture, Brightness, Color, Hue, Color Temp (Color Temperature), Sharpness, Advanced Settings or Reset. The Screen menu allows you to set up the TV to block programs according to enter a four-digit password. Select from : Sound Mode, Effect, Steady Sound, Treble, Bass...
... to their content and rating levels. Select from : Picture Mode, Backlight, Picture, Brightness, Color, Hue, Color Temp (Color Temperature), Sharpness, Advanced Settings or Reset. The Screen menu allows you to set up the TV to block programs according to enter a four-digit password. Select from : Sound Mode, Effect, Steady Sound, Treble, Bass...


