Operating Instructions
Page 3
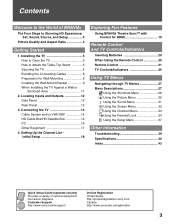
... Control for Wall-Mounting 8 Installing the Wall-Mount Bracket 9 When Installing the TV Against a Wall or Enclosed Area 11 2. Installing the TV 5 How to Carry the TV 5 How to Stunning HD Experience: Set, Sound, Source, and Setup 4 Picture Quality and Aspect Ratio 4 Getting Started...31 Using the Screen Menu 32 Using the Channel Menu 33 Using the Parental Lock 34 Using the Setup Menu 37 Other Information Troubleshooting 39 Specifications 42 Index 43 Quick Setup Guide (separate volume) Provides a variety of optional equipment connection diagrams. Customer Support http://www.sony...
... Control for Wall-Mounting 8 Installing the Wall-Mount Bracket 9 When Installing the TV Against a Wall or Enclosed Area 11 2. Installing the TV 5 How to Carry the TV 5 How to Stunning HD Experience: Set, Sound, Source, and Setup 4 Picture Quality and Aspect Ratio 4 Getting Started...31 Using the Screen Menu 32 Using the Channel Menu 33 Using the Parental Lock 34 Using the Setup Menu 37 Other Information Troubleshooting 39 Specifications 42 Index 43 Quick Setup Guide (separate volume) Provides a variety of optional equipment connection diagrams. Customer Support http://www.sony...
Operating Instructions
Page 4
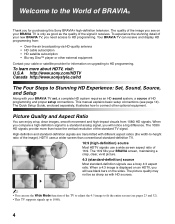
...® high-definition television. The 1080i HD signals provide more about HDTV, visit: U.S.A http://www.sony.com/HDTV Canada http://www.sonystyle.ca/hd The Four Steps to Stunning HD Experience: Set, Sound, Source, and Setup Along with different aspect ratios (the width-to-height ratio of the image). When a 4:3 image... it receives. Welcome to the World of BRAVIA® Thank you need access to HD programming. To experience the stunning detail of your BRAVIA TV set, a complete HD system requires an HD sound system, a source of the image you will see pages 23 and 32). • This...
...® high-definition television. The 1080i HD signals provide more about HDTV, visit: U.S.A http://www.sony.com/HDTV Canada http://www.sonystyle.ca/hd The Four Steps to Stunning HD Experience: Set, Sound, Source, and Setup Along with different aspect ratios (the width-to-height ratio of the image). When a 4:3 image... it receives. Welcome to the World of BRAVIA® Thank you need access to HD programming. To experience the stunning detail of your BRAVIA TV set, a complete HD system requires an HD sound system, a source of the image you will see pages 23 and 32). • This...
Operating Instructions
Page 6
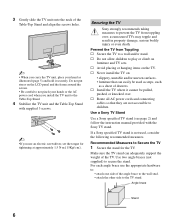
s Never install the TV on the LCD panel and the frame around the screen. • Be careful to not pinch your hand as illustrated (page 5) and hold it cannot be used , consider the following recommended measures. Make sure the TV stand can easily be pulled, pushed, or knocked ...with the Sony TV stand. Securing the TV Sony strongly recommends taking measures to prevent the TV from Toppling s Secure the TV to a wall and/or stand. s Avoid placing or hanging items on furniture and TV sets. If a Sony specified TV stand is not used as steps, such as unsecured TVs may topple...
s Never install the TV on the LCD panel and the frame around the screen. • Be careful to not pinch your hand as illustrated (page 5) and hold it cannot be used , consider the following recommended measures. Make sure the TV stand can easily be pulled, pushed, or knocked ...with the Sony TV stand. Securing the TV Sony strongly recommends taking measures to prevent the TV from Toppling s Secure the TV to a wall and/or stand. s Avoid placing or hanging items on furniture and TV sets. If a Sony specified TV stand is not used as steps, such as unsecured TVs may topple...
Operating Instructions
Page 9
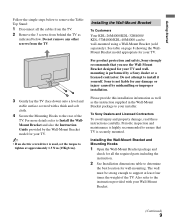
...to remove the TableTop Stand: 1 Disconnect all the cables from the TV. 2 Remove the 3 screws from the TV. Sony is securely mounted. Please provide this installation information as well as ...Mount Bracket designed for your TV. Periodic inspection and maintenance is used, set the torque to tighten at least four times the weight of the TV. Getting Started Follow the simple... Gently lay the TV (face down) onto a level and stable surface covered with your installer. Installing the Wall-Mount Bracket To Customers Your KDL-26M4000/KDL-32M4000/ KDL-37M4000/KDL-40M4000 can be strong...
...to remove the TableTop Stand: 1 Disconnect all the cables from the TV. 2 Remove the 3 screws from the TV. Sony is securely mounted. Please provide this installation information as well as ...Mount Bracket designed for your TV. Periodic inspection and maintenance is used, set the torque to tighten at least four times the weight of the TV. Getting Started Follow the simple... Gently lay the TV (face down) onto a level and stable surface covered with your installer. Installing the Wall-Mount Bracket To Customers Your KDL-26M4000/KDL-32M4000/ KDL-37M4000/KDL-40M4000 can be strong...
Operating Instructions
Page 11
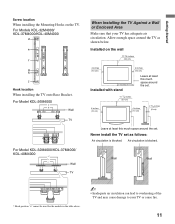
... this much space around the set. 11 7/8 inches (30 cm) 4 inches (10 cm) 4 inches (10 cm) 2 3/8 inches (6 cm) Leave at least this much space around the TV as follows: Air circulation is blocked. Installed on the TV. For Model KDL-26M4000 Wall TV For Model KDL-32M4000/KDL-37M4000/ KDL-40M4000 Wall TV When Installing the TV Against a Wall or Enclosed...
... this much space around the set. 11 7/8 inches (30 cm) 4 inches (10 cm) 4 inches (10 cm) 2 3/8 inches (6 cm) Leave at least this much space around the TV as follows: Air circulation is blocked. Installed on the TV. For Model KDL-26M4000 Wall TV For Model KDL-32M4000/KDL-37M4000/ KDL-40M4000 Wall TV When Installing the TV Against a Wall or Enclosed...
Operating Instructions
Page 13
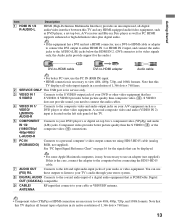
...7 AUDIO OUT (FIX) R/L Connects to your DVD player's or digital set -top box, A/V receiver and Blu-ray Disc player as well as a DVD player or other video equipment that this TV displays all video input signals in its native resolution of your DVD or other... R-AUDIO-L Description HDMI (High-Definition Multimedia Interface) provides an uncompressed, all-digital audio/video interface between this TV and any HDMI-equipped audio/video equipment, such as DVD player, a set -top box's component video (YPBPR) and audio (L/R) jacks. HDMI supports enhanced or high-definition video plus digital...
...7 AUDIO OUT (FIX) R/L Connects to your DVD player's or digital set -top box, A/V receiver and Blu-ray Disc player as well as a DVD player or other video equipment that this TV displays all video input signals in its native resolution of your DVD or other... R-AUDIO-L Description HDMI (High-Definition Multimedia Interface) provides an uncompressed, all-digital audio/video interface between this TV and any HDMI-equipped audio/video equipment, such as DVD player, a set -top box's component video (YPBPR) and audio (L/R) jacks. HDMI supports enhanced or high-definition video plus digital...

Operating Instructions
Page 14
... you connect the antenna/cable input using a 75-ohm coaxial cable (not supplied) to high-definition cable service or highdefinition satellite service. Connecting the TV Cable System and/or VHF/UHF Cable or VHF/UHF (or VHF only) 75-ohm coaxial cable (not supplied) Rear of input signal you choose... to watch both cable and antenna (over -the-air antenna programming, as shown. A-B RF Switch Cable Antenna A Rear of TV B CABLE/ANTENNA input • Be sure to set Cable setting to On or Off in signal degradation. HD Cable Box/HD Satellite Box You can be easily affected by subscribing to...
... you connect the antenna/cable input using a 75-ohm coaxial cable (not supplied) to high-definition cable service or highdefinition satellite service. Connecting the TV Cable System and/or VHF/UHF Cable or VHF/UHF (or VHF only) 75-ohm coaxial cable (not supplied) Rear of input signal you choose... to watch both cable and antenna (over -the-air antenna programming, as shown. A-B RF Switch Cable Antenna A Rear of TV B CABLE/ANTENNA input • Be sure to set Cable setting to On or Off in signal degradation. HD Cable Box/HD Satellite Box You can be easily affected by subscribing to...
Operating Instructions
Page 16
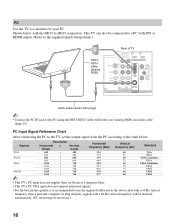
...PC Input Signal Reference Chart After connecting the PC to the TV, set the output signal from the PC according to use the signals...215; 768 1,024 × 768 1,024 × 768 1,280 × 768 1,360 × 768 Horizontal frequency (kHz) 31.5 37.5 37.9 46.9 48.4 56.5 60.0 47.8 47.7 Vertical frequency (Hz) 60 75 60 75 60 70 75 60 ... . In plug and play, signals with DVI or HDMI output. (Refer to the supplied Quick Setup Guide.) HD15HD15 cable (analog RGB) Rear of TV SERVICE ONLY Y 1 2 IN S VIDEO VIDEO L (MONO) AUDIO R 1 VIDEO IN PB PR L AUDIO R R RGB AUDIO L DIGITAL ...
...PC Input Signal Reference Chart After connecting the PC to the TV, set the output signal from the PC according to use the signals...215; 768 1,024 × 768 1,024 × 768 1,280 × 768 1,360 × 768 Horizontal frequency (kHz) 31.5 37.5 37.9 46.9 48.4 56.5 60.0 47.8 47.7 Vertical frequency (Hz) 60 75 60 75 60 70 75 60 ... . In plug and play, signals with DVI or HDMI output. (Refer to the supplied Quick Setup Guide.) HD15HD15 cable (analog RGB) Rear of TV SERVICE ONLY Y 1 2 IN S VIDEO VIDEO L (MONO) AUDIO R 1 VIDEO IN PB PR L AUDIO R R RGB AUDIO L DIGITAL ...

Operating Instructions
Page 18
... ~ • You may not be available. 4 Follow the help text provided on the TV. The Initial Setup screen appears when you want to set up convenient features such as described on your TV, you cancel Auto Program some channels may want to run Auto Program. Initial Setup Press to... the TV's CABLE/ANTENNA input. 5 When Auto Program is completed. 4. If you need to set up available channels. Auto Program will scan for the first time. Setting Up the Channel List Initial Setup After you finish connecting your...
... ~ • You may not be available. 4 Follow the help text provided on the TV. The Initial Setup screen appears when you want to set up convenient features such as described on your TV, you cancel Auto Program some channels may want to run Auto Program. Initial Setup Press to... the TV's CABLE/ANTENNA input. 5 When Auto Program is completed. 4. If you need to set up available channels. Auto Program will scan for the first time. Setting Up the Channel List Initial Setup After you finish connecting your...
Operating Instructions
Page 19
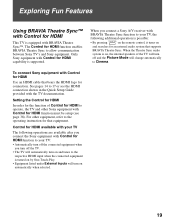
... HDMI to the operating instruction for that bears the HDMI logo for connection. For other equipment, refer to operate, the TV and other Sony equipment with Control for HDMI function must be setup (see the HDMI connection shown in the Quick Setup Guide provided with the... equipment is equipped with Control for HDMI capability is supported. Setting the Control for HDMI In order for HDMI function enables BRAVIA Theatre Sync to 17 or see page 38). See pages 14 to allow communication between Sony TV's and Sony equipment. Only Sony equipment with BRAVIA Theatre Sync™.
... HDMI to the operating instruction for that bears the HDMI logo for connection. For other equipment, refer to operate, the TV and other Sony equipment with Control for HDMI function must be setup (see the HDMI connection shown in the Quick Setup Guide provided with the... equipment is equipped with Control for HDMI capability is supported. Setting the Control for HDMI In order for HDMI function enables BRAVIA Theatre Sync to 17 or see page 38). See pages 14 to allow communication between Sony TV's and Sony equipment. Only Sony equipment with BRAVIA Theatre Sync™.
Operating Instructions
Page 21
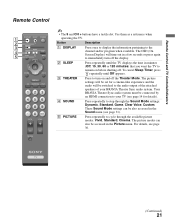
...to display the information pertaining to step through the available picture modes: Vivid, Standard, Cinema. For details, see page 31). 5 PICTURE Press repeatedly to turn off the Theater Mode. Remote Control and TV Controls/Indicators Remote Control 1 2 3 4 5 SOUND GUIDE TOOLS MENU • The 5 and CH + buttons have... (Off, 15, 30, 60 or 120 minutes) that you want the TV to your BRAVIA Theatre Sync audio system. Use them as a reference when operating the TV. The picture modes can be set for details). 4 SOUND Press repeatedly to the channel and/or program when available...
...to display the information pertaining to step through the available picture modes: Vivid, Standard, Cinema. For details, see page 31). 5 PICTURE Press repeatedly to turn off the Theater Mode. Remote Control and TV Controls/Indicators Remote Control 1 2 3 4 5 SOUND GUIDE TOOLS MENU • The 5 and CH + buttons have... (Off, 15, 30, 60 or 120 minutes) that you want the TV to your BRAVIA Theatre Sync audio system. Use them as a reference when operating the TV. The picture modes can be set for details). 4 SOUND Press repeatedly to the channel and/or program when available...
Operating Instructions
Page 22
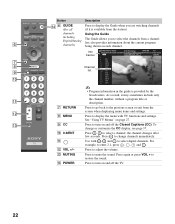
... digital channels. and to turn on and off the Closed Captions (CC). For example, to select the channels from a channel list; See "Using TV Menus" on a unique mission. the channel changes after few seconds. qs VOL +/- SOUND GUIDE TOOLS MENU Button Description qf 6 GUIDE (For all ... by the broadcasters. qs 8 MENU Press to the previous screen or exit from the station). Press to mute the sound. qa Use with TV functions and settings. qd MUTING Press to change or customize the CC display, see page 37. 0 0-9/ENT Press - Info banner Channel list Make Way for...
... digital channels. and to turn on and off the Closed Captions (CC). For example, to select the channels from a channel list; See "Using TV Menus" on a unique mission. the channel changes after few seconds. qs VOL +/- SOUND GUIDE TOOLS MENU Button Description qf 6 GUIDE (For all ... by the broadcasters. qs 8 MENU Press to the previous screen or exit from the station). Press to mute the sound. qa Use with TV functions and settings. qd MUTING Press to change or customize the CC display, see page 37. 0 0-9/ENT Press - Info banner Channel list Make Way for...
Operating Instructions
Page 23
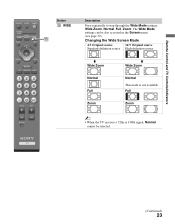
The Wide Mode settings can be selected. (Continued) 23 Remote Control and TV Controls/Indicators SOUND GUIDE Button qg WIDE qg TOOLS MENU Description Press repeatedly to step through the Wide Mode settings: Wide Zoom, Normal, Full, Zoom. Changing the Wide Screen Mode 4:3 Original source 16:9 Original source Standard-definition source High-definition source m Wide Zoom Normal Full Zoom m Wide Zoom Normal This mode is not available Full Zoom ~ • When the TV receives a 720p or 1080i signal, Normal cannot be also accessed in the Screen menu (see page 32).
The Wide Mode settings can be selected. (Continued) 23 Remote Control and TV Controls/Indicators SOUND GUIDE Button qg WIDE qg TOOLS MENU Description Press repeatedly to step through the Wide Mode settings: Wide Zoom, Normal, Full, Zoom. Changing the Wide Screen Mode 4:3 Original source 16:9 Original source Standard-definition source High-definition source m Wide Zoom Normal Full Zoom m Wide Zoom Normal This mode is not available Full Zoom ~ • When the TV receives a 720p or 1080i signal, Normal cannot be also accessed in the Screen menu (see page 32).
Operating Instructions
Page 24
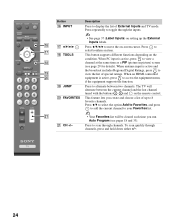
... (Label Inputs) on -screen cursor. When PC input is active, press to access the equipment menu, if the equipment supports the function. The TV will be cleared each time you create and choose a list of up the External Inputs labels. wa CH +/- • Your Favorites list will... controlled equipment is active and the broadcast includes Regional Digital Ratings, press to display the list of special ratings. Press to move the on setting up to 8 favorite channels. This button supports different functions depending on the remote control. SOUND GUIDE qh qj TOOLS qk MENU ql w;...
... (Label Inputs) on -screen cursor. When PC input is active, press to access the equipment menu, if the equipment supports the function. The TV will be cleared each time you create and choose a list of up the External Inputs labels. wa CH +/- • Your Favorites list will... controlled equipment is active and the broadcast includes Regional Digital Ratings, press to display the list of special ratings. Press to move the on setting up to 8 favorite channels. This button supports different functions depending on the remote control. SOUND GUIDE qh qj TOOLS qk MENU ql w;...
Operating Instructions
Page 25
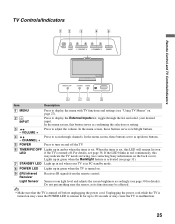
...desired input. Lights up in red continuously, this button serves as left/right buttons. Unplugging the power cord while the TV is activated (see page 31). 7 STANDBY LED Light up in green when the Backlight feature is turned on may cause the POWER LED to remain... CHANNEL + 5 POWER Press to malfunction. 25 In the menu screen, these buttons serve as its function may cause the TV to display the menu with TV functions and settings (see contacting Sony information on . 9 (IR) Infrared Receiver Light Sensor Receives IR signals from the remote control. For details, see page 30...
...desired input. Lights up in red continuously, this button serves as left/right buttons. Unplugging the power cord while the TV is activated (see page 31). 7 STANDBY LED Light up in green when the Backlight feature is turned on may cause the POWER LED to remain... CHANNEL + 5 POWER Press to malfunction. 25 In the menu screen, these buttons serve as its function may cause the TV to display the menu with TV functions and settings (see contacting Sony information on . 9 (IR) Infrared Receiver Light Sensor Receives IR signals from the remote control. For details, see page 30...

Operating Instructions
Page 27
... The Picture menu is used to fine tune The Parental Lock feature allows you the image quality and allows you to change audio. Sharpness, Advanced Settings or Reset. Select from : Favorites, Cable, Add Clock/Timers, Parental Lock, Closed Captions (CC) and Cable; The first Brightness, Color,... Program, Show/Hide Channels, Label Channels or Diagnostics. Update Control for HDMI, Reset. The Screen menu allows you to to set up the TV to block programs customize several parameters for according to the channel options. The Sound menu allows you to fine The Setup menu ...
... The Picture menu is used to fine tune The Parental Lock feature allows you the image quality and allows you to change audio. Sharpness, Advanced Settings or Reset. Select from : Favorites, Cable, Add Clock/Timers, Parental Lock, Closed Captions (CC) and Cable; The first Brightness, Color,... Program, Show/Hide Channels, Label Channels or Diagnostics. Update Control for HDMI, Reset. The Screen menu allows you to to set up the TV to block programs customize several parameters for according to the channel options. The Sound menu allows you to fine The Setup menu ...
Operating Instructions
Page 28
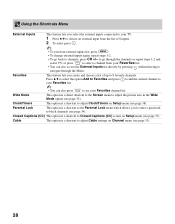
... FAVORITES to adjust the picture size in the Wide Mode option (see page 37). to navigate through the channels or repeat steps 1-2 and select TV; Press V/v to select the option Add to Favorites and press to add the current channel to your Favorites list. • You can also ...access the External Inputs list directly by pressing INPUT without having to go back to adjust Cable settings on Channel menu (see page 38). Cable This option is a shortcut to channels, press CH +/- or press FAVORITES to select a channel from ...
... FAVORITES to adjust the picture size in the Wide Mode option (see page 37). to navigate through the channels or repeat steps 1-2 and select TV; Press V/v to select the option Add to Favorites and press to add the current channel to your Favorites list. • You can also ...access the External Inputs list directly by pressing INPUT without having to go back to adjust Cable settings on Channel menu (see page 38). Cable This option is a shortcut to channels, press CH +/- or press FAVORITES to select a channel from ...

Operating Instructions
Page 30
...set . Using the Picture Menu Picture Mode Customized picture viewing Backlight Picture Brightness Color Hue Color Temp (Color Temperature) Sharpness Advanced Settings... picture, then press to set . Gamma Adjusts the balance...then press to set . Press B/b to brighten or darken the picture, then press to set . Warm 1,...or decrease picture contrast, then press to set to put anything around the sensor, as... Light Sensor is set . Resets the current Picture Mode setting to enable the automatic...the backlight brightness based on the picture settings and the ambient room light conditions....
...set . Using the Picture Menu Picture Mode Customized picture viewing Backlight Picture Brightness Color Hue Color Temp (Color Temperature) Sharpness Advanced Settings... picture, then press to set . Gamma Adjusts the balance...then press to set . Press B/b to brighten or darken the picture, then press to set . Warm 1,...or decrease picture contrast, then press to set to put anything around the sensor, as... Light Sensor is set . Resets the current Picture Mode setting to enable the automatic...the backlight brightness based on the picture settings and the ambient room light conditions....

Operating Instructions
Page 31
...second audio programs when a signal is present, the TV remains in stereo. Press B/b to increase or decrease lower-pitched sounds, then press to turn on Sound Mode. (Continued) 31 Use to customize Treble and Bass sound settings. recommended for television news and documentary programs. Custom... when viewing a program broadcast in Stereo mode. This Audio feature for mono reception. Resets the current Sound settings to emphasize left on. Using TV Menus Using the Sound Menu Sound Mode Steady Sound Treble Bass Balance Speakers Backlight Alt. Turns off Steady Sound...
...second audio programs when a signal is present, the TV remains in stereo. Press B/b to increase or decrease lower-pitched sounds, then press to turn on Sound Mode. (Continued) 31 Use to customize Treble and Bass sound settings. recommended for television news and documentary programs. Custom... when viewing a program broadcast in Stereo mode. This Audio feature for mono reception. Resets the current Sound settings to emphasize left on. Using TV Menus Using the Sound Menu Sound Mode Steady Sound Treble Bass Balance Speakers Backlight Alt. Turns off Steady Sound...
Operating Instructions
Page 33
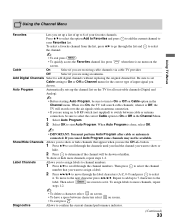
...scroll through the label characters (A-Z, 0-9) and press to select it is On, the TV will search cable channels; Then press to select the channel number that appear when you use the CH +/- Auto Program Automatically sets up the channel list on screen. • To exit press . To show ...8226; To quickly access the Favorites channel list, press FAVORITES when there is no menu on screen to set it is connected. Cable On Select if you are receiving cable channels via cable TV provider. To select a favorite channel from the list, press V/v to go through the channel numbers....
...scroll through the label characters (A-Z, 0-9) and press to select it is On, the TV will search cable channels; Then press to select the channel number that appear when you use the CH +/- Auto Program Automatically sets up the channel list on screen. • To exit press . To show ...8226; To quickly access the Favorites channel list, press FAVORITES when there is no menu on screen to set it is connected. Cable On Select if you are receiving cable channels via cable TV provider. To select a favorite channel from the list, press V/v to go through the channel numbers....


