Safety and Regulatory Booklet
Page 1
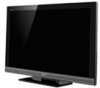
... The TV should not be exposed to rain or direct sunlight in a dark ambient without an input source or with a blank screen. Do not pull by the manufacturer, or sold with the...;nicamente a personal de servicio técnico especializado. However, uneven brightness may be observed when the LCD TV is in a place exposed to direct air conditioning; This condition is allowed. ☐ Do... Lea y entienda el contenido de este folleto antes de operar su nuevo televisor. © 2008 Sony Corporation Printed in a fire. ☐ Do not short‑circuit, disassemble or overheat the batteries...
... The TV should not be exposed to rain or direct sunlight in a dark ambient without an input source or with a blank screen. Do not pull by the manufacturer, or sold with the...;nicamente a personal de servicio técnico especializado. However, uneven brightness may be observed when the LCD TV is in a place exposed to direct air conditioning; This condition is allowed. ☐ Do... Lea y entienda el contenido de este folleto antes de operar su nuevo televisor. © 2008 Sony Corporation Printed in a fire. ☐ Do not short‑circuit, disassemble or overheat the batteries...
Operating Instructions
Page 3
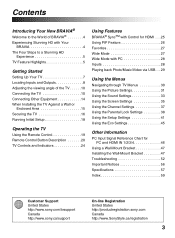
...19 Remote Control Button Description 20 TV Controls and Indicators 24 Using Features BRAVIA® SyncTM with Control for HDMI . . .25 Using PIP Feature 26 Favorites 27 Wide Mode 27 Wide Mode with PC 28 Inputs 28 Playing back Photo/Music/Video via USB. . . 29 Using the...Installing the Wall-Mount Bracket 47 Troubleshooting 52 Important Notices 56 Specifications 57 Index 59 Customer Support United States http://www.sony.com/tvsupport Canada http://www.sony.ca/support On-line Registration United States http://productregistration.sony.com Canada http://www.SonyStyle.ca/registration 3
...19 Remote Control Button Description 20 TV Controls and Indicators 24 Using Features BRAVIA® SyncTM with Control for HDMI . . .25 Using PIP Feature 26 Favorites 27 Wide Mode 27 Wide Mode with PC 28 Inputs 28 Playing back Photo/Music/Video via USB. . . 29 Using the...Installing the Wall-Mount Bracket 47 Troubleshooting 52 Important Notices 56 Specifications 57 Index 59 Customer Support United States http://www.sony.com/tvsupport Canada http://www.sony.ca/support On-line Registration United States http://productregistration.sony.com Canada http://www.SonyStyle.ca/registration 3
Operating Instructions
Page 5
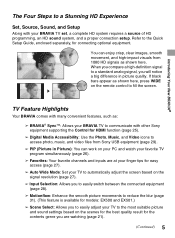
..., smooth movement, and high-impact visuals from Sony USB equipment (page 29). ➢ PIP (Picture in picture quality. TV Feature Highlights Your BRAVIA comes with many convenient features, such as: ➢ BRAVIA® SyncTM: Allows your BRAVIA TV to communicate with your TV to the ... (page 26). ➢ Favorites: Your favorite channels and inputs are watching (page 21). (Continued) 5 Introducing Your New BRAVIA® The Four Steps to a Stunning HD Experience Set, Source, Sound, and Setup Along with other Sony equipment supporting the Control for HDMI function (page 25). &#...
..., smooth movement, and high-impact visuals from Sony USB equipment (page 29). ➢ PIP (Picture in picture quality. TV Feature Highlights Your BRAVIA comes with many convenient features, such as: ➢ BRAVIA® SyncTM: Allows your BRAVIA TV to communicate with your TV to the ... (page 26). ➢ Favorites: Your favorite channels and inputs are watching (page 21). (Continued) 5 Introducing Your New BRAVIA® The Four Steps to a Stunning HD Experience Set, Source, Sound, and Setup Along with other Sony equipment supporting the Control for HDMI function (page 25). &#...
Operating Instructions
Page 8
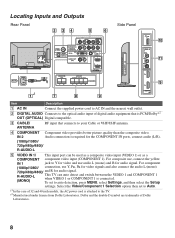
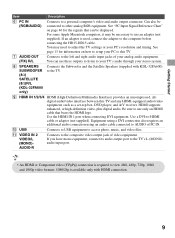
...and R for audio signal. R-AUDIO-L (MONO) This TV can be used as a composite video input (VIDEO 1) or as a COMPONENT component video input (COMPONENT 1). Dolby and the double-D symbol are trademarks of Dolby Laboratories. 8 Locating Inputs and Outputs Rear Panel 2 34 5 Side Panel 6 AC IN AUDIO R L (MONO) 1 ...to AC IN and the nearest wall outlet. 2 DIGITAL AUDIO Connects to the optical audio input of digital audio equipment that is PCM/Dolby*2 OUT (OPTICAL) Digital compatible. 3 CABLE/ ANTENNA RF input that connects to Y for video and use audio L (mono) and R for the COMPONENT...
...and R for audio signal. R-AUDIO-L (MONO) This TV can be used as a composite video input (VIDEO 1) or as a COMPONENT component video input (COMPONENT 1). Dolby and the double-D symbol are trademarks of Dolby Laboratories. 8 Locating Inputs and Outputs Rear Panel 2 34 5 Side Panel 6 AC IN AUDIO R L (MONO) 1 ...to AC IN and the nearest wall outlet. 2 DIGITAL AUDIO Connects to the optical audio input of digital audio equipment that is PCM/Dolby*2 OUT (OPTICAL) Digital compatible. 3 CABLE/ ANTENNA RF input that connects to Y for video and use audio L (mono) and R for the COMPONENT...
Operating Instructions
Page 9
... Getting Started Item Description 6 PC IN (RGB/AUDIO) Connects to -HDMI cable or adapter (not supplied). If an adapter is available only with KDL-32FA600) to the TV. 9 HDMI IN 1/2/3/4 HDMI (High-Definition Multimedia Interface) provides an uncompressed, alldigital audio/video interface between this TV. 7 ...AUDIO OUT (FIX) R/L Connects to the left and right audio input jacks of your PC to AUDIO of video equipment. qa VIDEO IN 2 VIDEO/L (MONO)AUDIO-R Connects to the composite video output jack...
... Getting Started Item Description 6 PC IN (RGB/AUDIO) Connects to -HDMI cable or adapter (not supplied). If an adapter is available only with KDL-32FA600) to the TV. 9 HDMI IN 1/2/3/4 HDMI (High-Definition Multimedia Interface) provides an uncompressed, alldigital audio/video interface between this TV. 7 ...AUDIO OUT (FIX) R/L Connects to the left and right audio input jacks of your PC to AUDIO of video equipment. qa VIDEO IN 2 VIDEO/L (MONO)AUDIO-R Connects to the composite video output jack...
Operating Instructions
Page 10
.../KDL-46EX500/KDL-40EX500/KDL-32EX500/KDL-55EX501/KDL-46EX501/ KDL-40EX501 This TV can be affected by radio frequency interference, resulting in your area) along with standard-definition analog programming. This TV is strongly recommended that you connect the CABLE/ANTENNA input using a 75-ohm coaxial cable to the supplied Quick Setup Guide for both cable...
.../KDL-46EX500/KDL-40EX500/KDL-32EX500/KDL-55EX501/KDL-46EX501/ KDL-40EX501 This TV can be affected by radio frequency interference, resulting in your area) along with standard-definition analog programming. This TV is strongly recommended that you connect the CABLE/ANTENNA input using a 75-ohm coaxial cable to the supplied Quick Setup Guide for both cable...
Operating Instructions
Page 11
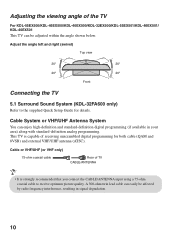
... the best possible picture, make sure you connect this equipment to Cable or Antenna found under the Channel settings for your TV. Shown with audio) input located on the back of TV AUDIO R L (MONO) 1 AUDIO PR CABLE/ ANTENNA COMPONENT IN (1080p/1080i/ 720p/480p/480i) 2 R L RGB DIGITAL PC IN AUDIO OUT.../ANTENNA • Be sure to set the Signal Type setting to your TV via the HDMI or component video (with HDMI Connection Rear of your input signal (see page 37).
... the best possible picture, make sure you connect this equipment to Cable or Antenna found under the Channel settings for your TV. Shown with audio) input located on the back of TV AUDIO R L (MONO) 1 AUDIO PR CABLE/ ANTENNA COMPONENT IN (1080p/1080i/ 720p/480p/480i) 2 R L RGB DIGITAL PC IN AUDIO OUT.../ANTENNA • Be sure to set the Signal Type setting to your TV via the HDMI or component video (with HDMI Connection Rear of your input signal (see page 37).

Operating Instructions
Page 18
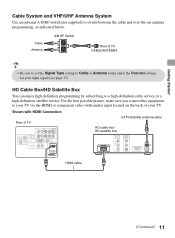
... Screen settings. button: Allows you can be sure to select Home for available channels from the signal source directly connected to the TV's CABLE/ANTENNA input. The Auto Program can connect both using an A-B RF switch (not supplied)); Refer to the Quick Setup Guide (supplied) for sample connection diagrams. Initial Setup...
... Screen settings. button: Allows you can be sure to select Home for available channels from the signal source directly connected to the TV's CABLE/ANTENNA input. The Auto Program can connect both using an A-B RF switch (not supplied)); Refer to the Quick Setup Guide (supplied) for sample connection diagrams. Initial Setup...
Operating Instructions
Page 20
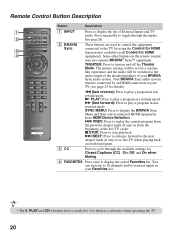
... to display the list of the live TV when playing back a recorded program. 3 CC Press to cycle through the inputs. 2 See page 28. 2 BRAVIA These buttons are used to control the equipment Sync connected to the TV by an HDMI connection to your Favorites list. • The 5, ...Theater Mode. SYNC MENU: Press to turn on the remote control may also operate BRAVIA® SyncTM equipment. THEATER: Press to display the BRAVIA Sync Menu and then select connected HDMI equipment from the beginning of External Inputs and TV mode. You can store up to play a program in your TV ...
... to display the list of the live TV when playing back a recorded program. 3 CC Press to cycle through the inputs. 2 See page 28. 2 BRAVIA These buttons are used to control the equipment Sync connected to the TV by an HDMI connection to your Favorites list. • The 5, ...Theater Mode. SYNC MENU: Press to turn on the remote control may also operate BRAVIA® SyncTM equipment. THEATER: Press to display the BRAVIA Sync Menu and then select connected HDMI equipment from the beginning of External Inputs and TV mode. You can store up to play a program in your TV ...
Operating Instructions
Page 21
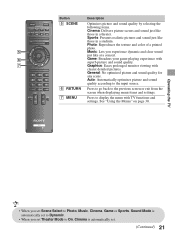
... to On, Cinema is automatically set . (Continued) 21 See "Using the Menus" on page 30. Auto: Automatically optimizes picture and sound quality according to the input source. 6 RETURN Press to go back to the previous screen or exit from the screen when displaying menu items and settings. 7 MENU Press to Dynamic...
... to On, Cinema is automatically set . (Continued) 21 See "Using the Menus" on page 30. Auto: Automatically optimizes picture and sound quality according to the input source. 6 RETURN Press to go back to the previous screen or exit from the screen when displaying menu items and settings. 7 MENU Press to Dynamic...
Operating Instructions
Page 22
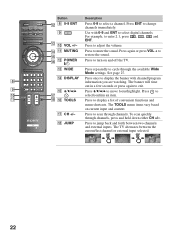
Press to turn on current input and content. Press to adjust the volume. qf DISPLAY Press once to display the banner with 0-9 and ENT to cycle...seconds or press again to exit. 9 qg V/v/B/b Press V/v/B/b to enter 2.1, press , , and ENT. The TV alternates between two channels and external inputs. For example, to move focus/highlight. qd WIDE Press repeatedly to select digital channels. See page 27. Press to restore the sound. To scan ...0 VOL +/- qf qa MUTING qg qh qs POWER "/1 Press to jump back and forth between the current/last channel or external input selected. 22
Press to turn on current input and content. Press to adjust the volume. qf DISPLAY Press once to display the banner with 0-9 and ENT to cycle...seconds or press again to exit. 9 qg V/v/B/b Press V/v/B/b to enter 2.1, press , , and ENT. The TV alternates between two channels and external inputs. For example, to move focus/highlight. qd WIDE Press repeatedly to select digital channels. See page 27. Press to restore the sound. To scan ...0 VOL +/- qf qa MUTING qg qh qs POWER "/1 Press to jump back and forth between the current/last channel or external input selected. 22
Operating Instructions
Page 24
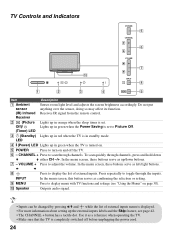
...in standby mode. Off)/ Lights up in green when the Power Saving is set to Picture Off. (Timer) LED 3 1 (Standby) Lights up the external inputs labels and the Skip feature, see "Using the Menus" on and off before unplugging the power cord. 24 To scan quickly through channels, press and... is displayed. • For more information about setting up in green when the TV is turned on. 5 POWER Press to display the list of external inputs menu is completely switched off the TV. 6 - Press repeatedly to display menu with TV functions and settings (see page 42. • The CHANNEL + ...
...in standby mode. Off)/ Lights up in green when the Power Saving is set to Picture Off. (Timer) LED 3 1 (Standby) Lights up the external inputs labels and the Skip feature, see "Using the Menus" on and off before unplugging the power cord. 24 To scan quickly through channels, press and... is displayed. • For more information about setting up in green when the TV is turned on. 5 POWER Press to display the list of external inputs menu is completely switched off the TV. 6 - Press repeatedly to display menu with TV functions and settings (see page 42. • The CHANNEL + ...

Operating Instructions
Page 25
... Device Control Speakers TV Control Return to TV HDMI 1 BD/DVD Player • Automatically turns the BRAVIA Synccompatible equipment on and switches the input to that has the BRAVIA Sync or is only available for the connected Sony equipment that equipment when you switch the TV to communicate with Control for HDMI settings must...
... Device Control Speakers TV Control Return to TV HDMI 1 BD/DVD Player • Automatically turns the BRAVIA Synccompatible equipment on and switches the input to that has the BRAVIA Sync or is only available for the connected Sony equipment that equipment when you switch the TV to communicate with Control for HDMI settings must...
Operating Instructions
Page 26
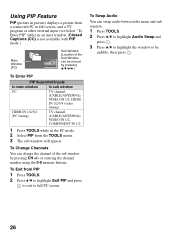
...full PC screen. Using PIP Feature PIP (picture in picture) displays a picture from a connected PC in full screen, and a TV program or other external input (see below "To Enter PIP" table) in an inset window. (Closed Captions (CC) is not available with PIP mode.) Main Window (PC) Sub ...Window (Location of the sub window by pressing V/v/B/b.) To Enter PIP PIP Supported Inputs In main window In sub window PC TV channel (CABLE/ANTENNA), VIDEO IN 1/2, HDMI IN 1/2/3/4 (video timing) HDMI IN 1/2/3/4 (PC timing) TV channel...
...full PC screen. Using PIP Feature PIP (picture in picture) displays a picture from a connected PC in full screen, and a TV program or other external input (see below "To Enter PIP" table) in an inset window. (Closed Captions (CC) is not available with PIP mode.) Main Window (PC) Sub ...Window (Location of the sub window by pressing V/v/B/b.) To Enter PIP PIP Supported Inputs In main window In sub window PC TV channel (CABLE/ANTENNA), VIDEO IN 1/2, HDMI IN 1/2/3/4 (video timing) HDMI IN 1/2/3/4 (PC timing) TV channel...
Operating Instructions
Page 27
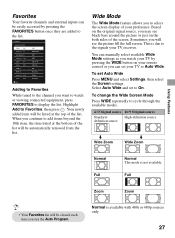
... Zoom m Wide Zoom Using Features Normal Full Normal This mode is available with 480i or 480p sources only. 27 Favorites Your favorite channels and external inputs can be easily accessed by pressing the WIDE button on your remote control or you run the Auto Program. When you may see the picture...
... Zoom m Wide Zoom Using Features Normal Full Normal This mode is available with 480i or 480p sources only. 27 Favorites Your favorite channels and external inputs can be easily accessed by pressing the WIDE button on your remote control or you run the Auto Program. When you may see the picture...
Operating Instructions
Page 28
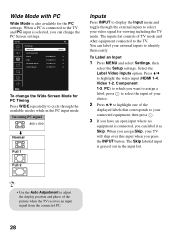
... connected, you can change the Wide Screen Mode for PC Timing Press WIDE repeatedly to cycle through the external inputs to identify them easily. Select the Label Video Inputs option. Screen PC PC Settings Wide Mode Auto Adjustment Phase Pitch Horizontal Center Vertical Center Normal 0 0 0 0 Set To change ... also available for viewing including the TV mode. You can label your connected equipment, then press . 3 If you have an open input where no equipment is selected, you assign Skip, your video signal for the PC settings. Full 2 • Use the Auto Adjustment ...
... connected, you can change the Wide Screen Mode for PC Timing Press WIDE repeatedly to cycle through the external inputs to identify them easily. Select the Label Video Inputs option. Screen PC PC Settings Wide Mode Auto Adjustment Phase Pitch Horizontal Center Vertical Center Normal 0 0 0 0 Set To change ... also available for viewing including the TV mode. You can label your connected equipment, then press . 3 If you have an open input where no equipment is selected, you assign Skip, your video signal for the PC settings. Full 2 • Use the Auto Adjustment ...
Operating Instructions
Page 30
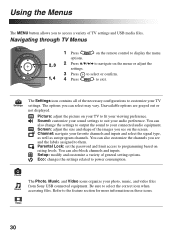
... levels. Parental Lock: set the password and limit access to programming based on your TV to fit your photo, music, and video files from Sony USB connected equipment. Setup: modify and customize a variety of TV settings and USB media files. Eco: changes the settings related to select the ... you see and the labels assigned to them. Sound: customize your sound settings to suit your TV settings. You can also block channels and inputs. Video 30 Refer to the feature section for more information on the screen. Unavailable options are grayed out or not displayed. You can select...
... levels. Parental Lock: set the password and limit access to programming based on your TV to fit your photo, music, and video files from Sony USB connected equipment. Setup: modify and customize a variety of TV settings and USB media files. Eco: changes the settings related to select the ... you see and the labels assigned to them. Sound: customize your sound settings to suit your TV settings. You can also block channels and inputs. Video 30 Refer to the feature section for more information on the screen. Unavailable options are grayed out or not displayed. You can select...
Operating Instructions
Page 33
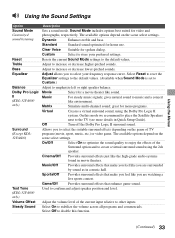
... Using the Sound Settings Option Sound Mode Customized sound listening Reset Treble Bass Equalizer Balance Dolby Pro Logic II (KDL-32FA600 only) Surround (Except KDL32FA600) Test Tone (KDL-32FA600 only) Volume Offset Steady Sound Description Sets a sound mode. Music For steady music signals; Matrix Simulate...depend on the scene select settings. On/Off Select On to optimize the sound quality to enjoy the effects of the current input relative to select the suitable surround effects depending on the scene select settings. Dynamic Enhances treble and bass. Adjust to store...
... Using the Sound Settings Option Sound Mode Customized sound listening Reset Treble Bass Equalizer Balance Dolby Pro Logic II (KDL-32FA600 only) Surround (Except KDL32FA600) Test Tone (KDL-32FA600 only) Volume Offset Steady Sound Description Sets a sound mode. Music For steady music signals; Matrix Simulate...depend on the scene select settings. On/Off Select On to optimize the sound quality to enjoy the effects of the current input relative to select the suitable surround effects depending on the scene select settings. Dynamic Enhances treble and bass. Adjust to store...

Operating Instructions
Page 35
... aspect ratio. Off Select to continue using the current Wide Mode setting when the channel or input is 4:3 (Standard definition source). Auto Wide On Select On to automatically change channels (or inputs), Wide Mode is set to Off. 4:3 Default Wide Zoom Enlarges the 4:3 picture to fill...High-definition source), select this function is automatically replaced with minimum distortion. Choose one of the Select the default original image as channels and inputs are watching a 720p, 1080i or 1080p source. • If 4:3 Default is set to anything but Off, the Wide Mode setting ...
... aspect ratio. Off Select to continue using the current Wide Mode setting when the channel or input is 4:3 (Standard definition source). Auto Wide On Select On to automatically change channels (or inputs), Wide Mode is set to Off. 4:3 Default Wide Zoom Enlarges the 4:3 picture to fill...High-definition source), select this function is automatically replaced with minimum distortion. Choose one of the Select the default original image as channels and inputs are watching a 720p, 1080i or 1080p source. • If 4:3 Default is set to anything but Off, the Wide Mode setting ...
Operating Instructions
Page 36
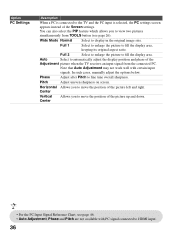
...Select to move the position of the picture up and down. • For the PC Input Signal Reference Chart, see page 26). Full 2 Select to enlarge the picture to the TV and the PC input is connected to fill the display area. Note that Auto Adjustment may not work well with... from TOOLS button (see page 46. • Auto Adjustment, Phase and Pitch are not available with certain input signals. Phase Adjust after Pitch to HDMI input. 36 In such cases, manually adjust the options below. Pitch Adjust uneven sharpness on screen. Wide Mode Normal Select to display in the ...
...Select to move the position of the picture up and down. • For the PC Input Signal Reference Chart, see page 26). Full 2 Select to enlarge the picture to the TV and the PC input is connected to fill the display area. Note that Auto Adjustment may not work well with... from TOOLS button (see page 46. • Auto Adjustment, Phase and Pitch are not available with certain input signals. Phase Adjust after Pitch to HDMI input. 36 In such cases, manually adjust the options below. Pitch Adjust uneven sharpness on screen. Wide Mode Normal Select to display in the ...


