Operating Instructions
Page 4
...TruSurround XT, SRS and the symbol are trademarks of Sony Corporation. WEGA, Grand WEGA, Steady Sound, Digital Reality Creation and CineMotion are ... 5510752, 5736897. TruSurround XT technology is incorporated under license from SRS Labs, Inc. This TV incorporates High-Definition Multimedia Interface (HDMI™) technology. This television includes a QAM demodulator which... Licensing LLC. 4 "Dolby" and the double-D symbol are trademarks or registered trademarks of a set-top box. HDMI, the HDMI logo and High-Definition Multimedia Interface are trademarks of BBE Sound,...
...TruSurround XT, SRS and the symbol are trademarks of Sony Corporation. WEGA, Grand WEGA, Steady Sound, Digital Reality Creation and CineMotion are ... 5510752, 5736897. TruSurround XT technology is incorporated under license from SRS Labs, Inc. This TV incorporates High-Definition Multimedia Interface (HDMI™) technology. This television includes a QAM demodulator which... Licensing LLC. 4 "Dolby" and the double-D symbol are trademarks or registered trademarks of a set-top box. HDMI, the HDMI logo and High-Definition Multimedia Interface are trademarks of BBE Sound,...
Operating Instructions
Page 6
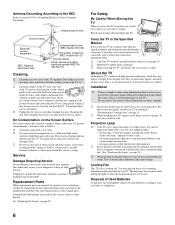
... 810-21) Ground clamps Power service grounding electrode system (NEC Art 250 Part H) Cleaning s Clean the rear cover area of the TV regularly. Projection Lamp s Your TV uses a projection lamp as thinner or benzine for cleaning. It is nearing end of life. appeared on the screen, • the lamp replacement indicator...solution of mild soap and warm water. To remove dust from the wall. s Unplug the AC power cord when cleaning this type of the TV set. Cleaning this unit with a plugged AC power cord may result in the rear cover area may cause a problem with the cooling system of ...
... 810-21) Ground clamps Power service grounding electrode system (NEC Art 250 Part H) Cleaning s Clean the rear cover area of the TV regularly. Projection Lamp s Your TV uses a projection lamp as thinner or benzine for cleaning. It is nearing end of life. appeared on the screen, • the lamp replacement indicator...solution of mild soap and warm water. To remove dust from the wall. s Unplug the AC power cord when cleaning this type of the TV set. Cleaning this unit with a plugged AC power cord may result in the rear cover area may cause a problem with the cooling system of ...

Operating Instructions
Page 7
...TV Welcome 9 Package Contents 9 Features 9 Enjoying Your TV 11 Notes on the TV 11 Screen 11 Indicators 12 Projection Lamp 12 Installing the TV 13 Carrying Your TV 13 Take Precaution during Installation 13 Preventing the TV from Toppling Over ..........14 When Installing Your TV against a Wall.........14 Recommended Viewing Area 15 TV... and/or VHF/UHF Antenna System 23 HD Cable Box/ HD Satellite Box 24 Equipment with DVI Connection 25 Satellite Receiver and Cable/Antenna ...........26 Equipment with Digital Audio (Optical)...........27 Setting Up the Channel List 28 Using Initial ...
...TV Welcome 9 Package Contents 9 Features 9 Enjoying Your TV 11 Notes on the TV 11 Screen 11 Indicators 12 Projection Lamp 12 Installing the TV 13 Carrying Your TV 13 Take Precaution during Installation 13 Preventing the TV from Toppling Over ..........14 When Installing Your TV against a Wall.........14 Recommended Viewing Area 15 TV... and/or VHF/UHF Antenna System 23 HD Cable Box/ HD Satellite Box 24 Equipment with DVI Connection 25 Satellite Receiver and Cable/Antenna ...........26 Equipment with Digital Audio (Optical)...........27 Setting Up the Channel List 28 Using Initial ...
Operating Instructions
Page 8
Selecting Parental Lock Options 68 Viewing Blocked Programs 69 Selecting Custom Rating Options 69 Accessing the Setup Settings 71 Selecting Setup Options 71 Programming Caption Vision (CC 74 Other Information Overview 75 Contacting Sony 75 Replacing the Lamp 76 How to Replace the Lamp 76 Troubleshooting 80 Remote Control 80 Picture 81 Sound 82 Channels 82 General 83 PC Input Signal Compatibility Chart 85 Specifications 86 Index Index 88 8
Selecting Parental Lock Options 68 Viewing Blocked Programs 69 Selecting Custom Rating Options 69 Accessing the Setup Settings 71 Selecting Setup Options 71 Programming Caption Vision (CC 74 Other Information Overview 75 Contacting Sony 75 Replacing the Lamp 76 How to Replace the Lamp 76 Troubleshooting 80 Remote Control 80 Picture 81 Sound 82 Channels 82 General 83 PC Input Signal Compatibility Chart 85 Specifications 86 Index Index 88 8
Operating Instructions
Page 9
...NTSC waveform with your new TV include: ❑ WEGA Engine: Delivers superb picture quality from younger viewers. ❑ HDMI (High-Definition Multimedia Interface) Inputs: Provide an uncompressed, all-digital audio/video interface between this Sony's HD LCD projection TV. The DRC Palette option lets... processing. Your personal (Continued) 9 Introducing the TV Introducing the TV Welcome Package Contents Features Thank you for models KDF-42E2000 (US model only), KDF-46E2000, KDF50E2000 and KDF-55E2000. See page 87 for your TV settings. ❑ Wide Screen Mode: Allows you to...
...NTSC waveform with your new TV include: ❑ WEGA Engine: Delivers superb picture quality from younger viewers. ❑ HDMI (High-Definition Multimedia Interface) Inputs: Provide an uncompressed, all-digital audio/video interface between this Sony's HD LCD projection TV. The DRC Palette option lets... processing. Your personal (Continued) 9 Introducing the TV Introducing the TV Welcome Package Contents Features Thank you for models KDF-42E2000 (US model only), KDF-46E2000, KDF50E2000 and KDF-55E2000. See page 87 for your TV settings. ❑ Wide Screen Mode: Allows you to...
Operating Instructions
Page 10
... supports enhanced, or high-definition video, plus two-channel digital audio. ❑ Component Video Inputs: Offers a high-quality video for DVD (480p, 480i) and digital set-top box (1080i, 720p, 480p, 480i) connections. ❑ S VIDEO Inputs: Provides a high-quality image from connected equipment. ❑ Favorite Channels: Allows you to navigate a list...
... supports enhanced, or high-definition video, plus two-channel digital audio. ❑ Component Video Inputs: Offers a high-quality video for DVD (480p, 480i) and digital set-top box (1080i, 720p, 480p, 480i) connections. ❑ S VIDEO Inputs: Provides a high-quality image from connected equipment. ❑ Favorite Channels: Allows you to navigate a list...
Operating Instructions
Page 12
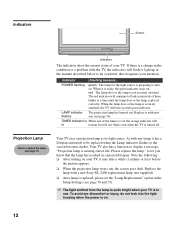
...housing when the power is preparing to turn on . The red indicator will turn on with a new Sony XL-2400 replacement lamp (not supplied). ❑ After lamp is replaced, please set , the orange indicator will lit remain lit (will flash or light up in intervals of three blinks at...life. If there is not securely attached. Indicator Flashing because... Your TV also has a function to let you know that the lamp has reached its light source. Your TV uses a projection lamp as its expected lifespan. Projection Lamp How to be replaced when the Lamp indicator flashes or the ...
...housing when the power is preparing to turn on . The red indicator will turn on with a new Sony XL-2400 replacement lamp (not supplied). ❑ After lamp is replaced, please set , the orange indicator will lit remain lit (will flash or light up in intervals of three blinks at...life. If there is not securely attached. Indicator Flashing because... Your TV also has a function to let you know that the lamp has reached its light source. Your TV uses a projection lamp as its expected lifespan. Projection Lamp How to be replaced when the Lamp indicator flashes or the ...
Operating Instructions
Page 17
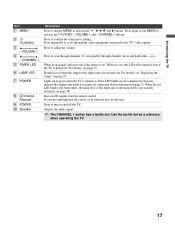
... red when the lamp for the light source has burned out. For details, see contacting Sony information on page 76. Do not put anything near the sensor, as a reference when operating the TV. 17 Use the tactile dot as its function may indicate the display unit needs servicing (... times, the lamp door of the timers is turned on and off . Introducing the TV Item 1 MENU 2 TV/VIDEO 3 - Speaker Description Press to display MENU to scan through channels. Press to the TV's video inputs. When it is set . Press to turn on . VOLUME + and - Receives IR signals from the remote...
... red when the lamp for the light source has burned out. For details, see contacting Sony information on page 76. Do not put anything near the sensor, as a reference when operating the TV. 17 Use the tactile dot as its function may indicate the display unit needs servicing (... times, the lamp door of the timers is turned on and off . Introducing the TV Item 1 MENU 2 TV/VIDEO 3 - Speaker Description Press to display MENU to scan through channels. Press to the TV's video inputs. When it is set . Press to turn on . VOLUME + and - Receives IR signals from the remote...
Operating Instructions
Page 19
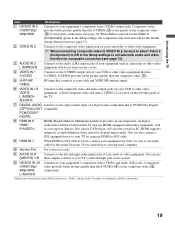
... 6 HDMI/ R-AUDIO-L HDMI (High-Definition Multimedia Interface) provides an uncompressed, all-digital audio/video interface between this TV and any HDMI-equipped audio/video equipment, such as a set-top box, Blu-ray Disc player, DVD player, A/V receiver as well as camcorder or other video equipment which you... audio (VIDEO 2) is located on your equipment such as PC. HDMI supports enhanced, or high-definition video, plus two-channel digital audio. qs HD/DVD IN 4/5 (1080i/720p/ 480p/480i)/ L-AUDIO-R Connects to your personal computer. 0 Service Port For service use (VAR/FIX) L/R these...
... 6 HDMI/ R-AUDIO-L HDMI (High-Definition Multimedia Interface) provides an uncompressed, all-digital audio/video interface between this TV and any HDMI-equipped audio/video equipment, such as a set-top box, Blu-ray Disc player, DVD player, A/V receiver as well as camcorder or other video equipment which you... audio (VIDEO 2) is located on your equipment such as PC. HDMI supports enhanced, or high-definition video, plus two-channel digital audio. qs HD/DVD IN 4/5 (1080i/720p/ 480p/480i)/ L-AUDIO-R Connects to your personal computer. 0 Service Port For service use (VAR/FIX) L/R these...
Operating Instructions
Page 20
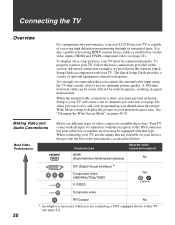
... available these days. When connecting your TV. Connecting the TV Overview For optimum picture performance, your TV must perform an Initial Setup so your TV, follow the basic connections provided in this section. To display clear, crisp pictures, your new LCD Projection TV is done, you connect the antenna/... through its integrated tuner. A 300-ohm twin lead cable can receive and view programming you should select the proper Wide Mode setting to this type. It is also capable of optional equipment connection diagrams. It is necessary when you can be easily affected by...
... available these days. When connecting your TV. Connecting the TV Overview For optimum picture performance, your TV must perform an Initial Setup so your TV, follow the basic connections provided in this section. To display clear, crisp pictures, your new LCD Projection TV is done, you connect the antenna/... through its integrated tuner. A 300-ohm twin lead cable can receive and view programming you should select the proper Wide Mode setting to this type. It is also capable of optional equipment connection diagrams. It is necessary when you can be easily affected by...
Operating Instructions
Page 28
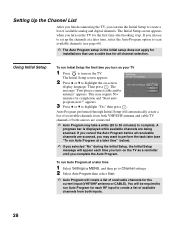
...and digital channels. This may want to perform the task later (see "To run Auto Program at a later time 1 Select Settings in MENU, and then go to Channel settings. 2 Select Auto Program then select Start. ✍ Auto Program will automatically create a list of available channels from both VHF.../UHF antenna and cable TV channels if both inputs. 28 The Initial Setup screen appears. 2 Press V or v to highlight the on the TV. Then press . Setting Up the Channel List After you finish connecting the TV, you can run the Initial Setup to create a list...
...and digital channels. This may want to perform the task later (see "To run Auto Program at a later time 1 Select Settings in MENU, and then go to Channel settings. 2 Select Auto Program then select Start. ✍ Auto Program will automatically create a list of available channels from both VHF.../UHF antenna and cable TV channels if both inputs. 28 The Initial Setup screen appears. 2 Press V or v to highlight the on the TV. Then press . Setting Up the Channel List After you finish connecting the TV, you can run the Initial Setup to create a list...

Operating Instructions
Page 31
... the Channel List" on page 28. ✍ To view scrambled channels, tune the TV to the channel the cable box is set to (usually channel 3 or 4) and then use a cable box. To program your Sony remote control to operate your cable box, see "Programming the Remote Control" on page 41. ❑...; Use the TV's remote control to change channels on your TV when the signal is scrambled. Your TV's tuner provides ...
... the Channel List" on page 28. ✍ To view scrambled channels, tune the TV to the channel the cable box is set to (usually channel 3 or 4) and then use a cable box. To program your Sony remote control to operate your cable box, see "Programming the Remote Control" on page 41. ❑...; Use the TV's remote control to change channels on your TV when the signal is scrambled. Your TV's tuner provides ...
Operating Instructions
Page 33
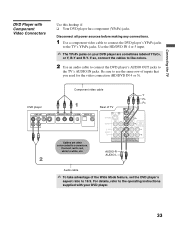
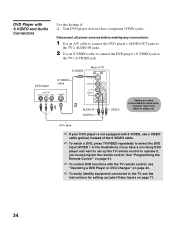
... IN 4 or 5). Connecting the TV DVD Player with your DVD player are often color-coded to connectors. Be sure to use the same row of the Wide Mode feature, set the DVD player's aspect ratio to 16:9. Use the HD/DVD IN 4 or 5 input. ✍ The YPBPR jacks on your DVD player. 33... For details, refer to the TV's YPBPR jacks. Disconnect all power sources before making any connections. 1 Use...
... IN 4 or 5). Connecting the TV DVD Player with your DVD player are often color-coded to connectors. Be sure to use the same row of the Wide Mode feature, set the DVD player's aspect ratio to 16:9. Use the HD/DVD IN 4 or 5 input. ✍ The YPBPR jacks on your DVD player. 33... For details, refer to the TV's YPBPR jacks. Disconnect all power sources before making any connections. 1 Use...
Operating Instructions
Page 34
...if: ❑ Your DVD player does not have a non-Sony DVD player and want to set up Label Video Inputs on page 43. ✍ To easily identify equipment connected to the TV, see the instructions for setting up the TV remote control to operate it, you have component (YPBPR) jacks.... DVD Player with S VIDEO, use a VIDEO cable (yellow) instead of TV 1 3 S VIDEO cable S VIDEO VIDEO L (MONO) AUDIO R VIDEO...
...if: ❑ Your DVD player does not have a non-Sony DVD player and want to set up Label Video Inputs on page 43. ✍ To easily identify equipment connected to the TV, see the instructions for setting up the TV remote control to operate it, you have component (YPBPR) jacks.... DVD Player with S VIDEO, use a VIDEO cable (yellow) instead of TV 1 3 S VIDEO cable S VIDEO VIDEO L (MONO) AUDIO R VIDEO...

Operating Instructions
Page 36
... L (MONO) AUDIO R VIDEO IN You can connect a camcorder or Video Game Equipment to the A/V input jacks on the left side of the TV. ✍ If your TV. Use an A/V cable to connect the A/V output jacks on the camcorder or Video Game Equipment to your camcorder is not equipped with S VIDEO,... a mono camcorder, connect its audio output jack to VIDEO IN 2 Select Off in the Video 2 (Component) option in the Setup settings (see page 73). To connect a camcorder or Video Game Equipment to the TV's L MONO audio input jack. For easy connection, use VIDEO IN 2 on the left side of the...
... L (MONO) AUDIO R VIDEO IN You can connect a camcorder or Video Game Equipment to the A/V input jacks on the left side of the TV. ✍ If your TV. Use an A/V cable to connect the A/V output jacks on the camcorder or Video Game Equipment to your camcorder is not equipped with S VIDEO,... a mono camcorder, connect its audio output jack to VIDEO IN 2 Select Off in the Video 2 (Component) option in the Setup settings (see page 73). To connect a camcorder or Video Game Equipment to the TV's L MONO audio input jack. For easy connection, use VIDEO IN 2 on the left side of the...

Operating Instructions
Page 39
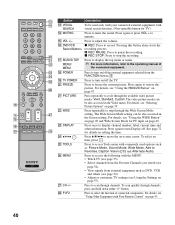
...the equipment you choose. Press to select TruSurround XT audio effect or Off to display the TV's program guide. Press to turn this feature off automatically. X PAUSE: Press to select digital channels (for a set period of time when playing back a recorded program. Use with the 0-9 and ENT ...external equipment, these buttons operate the video equipment you are in fast rewind mode. When the remote control is set period of time. See page 41 for flat setting. The TV alternates between the VHF/UHF (antenna) input and the CABLE input. Press RETURN to either close the menu...
...the equipment you choose. Press to select TruSurround XT audio effect or Off to display the TV's program guide. Press to turn this feature off automatically. X PAUSE: Press to select digital channels (for a set period of time when playing back a recorded program. Use with the 0-9 and ENT ...external equipment, these buttons operate the video equipment you are in fast rewind mode. When the remote control is set period of time. See page 41 for flat setting. The TV alternates between the VHF/UHF (antenna) input and the CABLE input. Press RETURN to either close the menu...
Operating Instructions
Page 40
... external equipment with commonly used options such as DVD, VCR and others (see page 54). • Adjust or customize TV settings (see Using the Settings on /off the TV. Pressing this button alone starts the recording process. Press again to unmute. For details, see "Using the WIDE Button"...to stop the recording. x REC STOP: Press to record. Press to mute the sound. See page 72 for TV) Press to turn on -screen cursor. The Wide Screen Mode setting can be also accessed in the Video menu. Press to cycle through channels, press and hold down either +/- ...
... external equipment with commonly used options such as DVD, VCR and others (see page 54). • Adjust or customize TV settings (see Using the Settings on /off the TV. Pressing this button alone starts the recording process. Press again to unmute. For details, see "Using the WIDE Button"...to stop the recording. x REC STOP: Press to record. Press to mute the sound. See page 72 for TV) Press to turn on -screen cursor. The Wide Screen Mode setting can be also accessed in the Video menu. Press to cycle through channels, press and hold down either +/- ...
Operating Instructions
Page 41
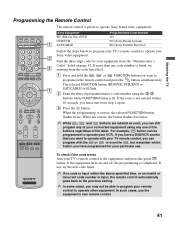
Watching the TV LAY RETURN Programming the Remote Control The remote control is preset to the previous setting. If the code is correct, the selected FUNCTION ... Press and hold the , BD/DVD DVR/VCR or SAT/CABLE FUNCTION button you want to operate your TV's remote control to program on and off, the programming is lit. In such cases, use . If more.../CABLE Programmable Code Number 101 901 (Sony Dream System) 801 (Sony Satellite Receiver) Follow the steps below to program your VCR. Sony video equipment. 2 Find the three-digit code for your TV's remote control at the equipment, and...
Watching the TV LAY RETURN Programming the Remote Control The remote control is preset to the previous setting. If the code is correct, the selected FUNCTION ... Press and hold the , BD/DVD DVR/VCR or SAT/CABLE FUNCTION button you want to operate your TV's remote control to program on and off, the programming is lit. In such cases, use . If more.../CABLE Programmable Code Number 101 901 (Sony Dream System) 801 (Sony Satellite Receiver) Follow the steps below to program your VCR. Sony video equipment. 2 Find the three-digit code for your TV's remote control at the equipment, and...
Operating Instructions
Page 49
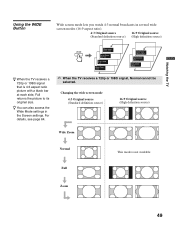
... a 720p or 1080i signal that is not available Full Zoom 49 Watching the TV Using the WIDE Button Wide screen mode lets you watch 4:3 normal broadcasts in the Screen settings. WIDE Wide Mode : Wide Zoom Wide Mode : Normal Wide Mode : Full Wide Mode : Zoom Wide Mode : Wide Zoom Wide ...Mode : Full Wide Mode : Zoom ✍ When the TV receives a 720p or 1080i signal, Normal cannot be selected.
... a 720p or 1080i signal that is not available Full Zoom 49 Watching the TV Using the WIDE Button Wide screen mode lets you watch 4:3 normal broadcasts in the Screen settings. WIDE Wide Mode : Wide Zoom Wide Mode : Normal Wide Mode : Full Wide Mode : Zoom Wide Mode : Wide Zoom Wide ...Mode : Full Wide Mode : Zoom ✍ When the TV receives a 720p or 1080i signal, Normal cannot be selected.
Operating Instructions
Page 50
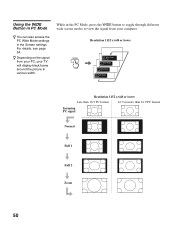
...:9 or more than 16:9 PC format Incoming PC signal Normal Full 1 Full 2 Zoom 50 z Depending on the signal from your TV will display black frame around the picture in the Screen settings. For details, see page 64. Using the WIDE Button in PC Mode z You can also access the PC Wide Mode...
...:9 or more than 16:9 PC format Incoming PC signal Normal Full 1 Full 2 Zoom 50 z Depending on the signal from your TV will display black frame around the picture in the Screen settings. For details, see page 64. Using the WIDE Button in PC Mode z You can also access the PC Wide Mode...


