
Child Safety: It Makes A Difference Where Your TV Stands
Page 1
... components). 2 Use appropriate angle braces, straps and anchors to secure your furniture to the wall (but never screw anything directly into the TV). 3 Carefully read and understand the manufacturer's instructions and product safety notices. 4 Don't allow children to climb on or play with furniture...furniture that children can become excited while watching a program and can potentially push or pull a TV over and may fall over . 7 Share our safety message on dressers, bookcases, shelves, desks, audio speakers, chests or carts. Tune Into Safety 1 One size does NOT fit all. The ...
... components). 2 Use appropriate angle braces, straps and anchors to secure your furniture to the wall (but never screw anything directly into the TV). 3 Carefully read and understand the manufacturer's instructions and product safety notices. 4 Don't allow children to climb on or play with furniture...furniture that children can become excited while watching a program and can potentially push or pull a TV over and may fall over . 7 Share our safety message on dressers, bookcases, shelves, desks, audio speakers, chests or carts. Tune Into Safety 1 One size does NOT fit all. The ...

Operating Instructions
Page 9
... 11 Package Contents 11 Features 12 Overview 15 TV Controls and Connectors 16 Front panel 16 Side panel 17 Rear panel 18 Connecting the Power Cord 20 Preventing the TV from Toppling Over 21 Bundling the Connecting Cables 22 Basic Connections: Connecting a Cable or Antenna 23 Cable or Antenna ...Editing 34 Satellite Receiver 36 Satellite Receiver and VCR 38 DVD Player with Component Video Connectors 41 DVD Player with S VIDEO and Audio Connectors 43 Digital Satellite Receiver with HDMI Connector 44 DVD Player or Digital Satellite Receiver via AV Receiver with CENTER SPEAKER IN ...
... 11 Package Contents 11 Features 12 Overview 15 TV Controls and Connectors 16 Front panel 16 Side panel 17 Rear panel 18 Connecting the Power Cord 20 Preventing the TV from Toppling Over 21 Bundling the Connecting Cables 22 Basic Connections: Connecting a Cable or Antenna 23 Cable or Antenna ...Editing 34 Satellite Receiver 36 Satellite Receiver and VCR 38 DVD Player with Component Video Connectors 41 DVD Player with S VIDEO and Audio Connectors 43 Digital Satellite Receiver with HDMI Connector 44 DVD Player or Digital Satellite Receiver via AV Receiver with CENTER SPEAKER IN ...

Operating Instructions
Page 11
... Memory Stick Precautions 90 Using the Menus Overview 91 Navigating Through Menus 91 Using the Video Menu 92 Selecting Video Options 92 Using the Audio Menu 95 Selecting Audio Options 95 Using the Screen Menu 97 Selecting Screen Options 97 Using the Channel Menu 99 Selecting Channel Options 99 Using the Parental...
... Memory Stick Precautions 90 Using the Menus Overview 91 Navigating Through Menus 91 Using the Video Menu 92 Selecting Video Options 92 Using the Audio Menu 95 Selecting Audio Options 95 Using the Screen Menu 97 Selecting Screen Options 97 Using the Channel Menu 99 Selecting Channel Options 99 Using the Parental...
Operating Instructions
Page 12
Other Information Overview 109 Glossary 110 Contacting Sony 111 Troubleshooting 111 Twin View 111 Remote Control 112 CableCARD 112 Channels 113 Memory Stick 114 Audio 115 Video 116 General 117 Specifications 118 Optional Accessories 120 Index 121 10
Other Information Overview 109 Glossary 110 Contacting Sony 111 Troubleshooting 111 Twin View 111 Remote Control 112 CableCARD 112 Channels 113 Memory Stick 114 Audio 115 Video 116 General 117 Specifications 118 Optional Accessories 120 Index 121 10

Operating Instructions
Page 14
... Provides cable subscribers with your new TV include: s Integrated HDTV: You can watch digital television programs and enjoy the improved audio/video quality offered by improving the color space of the original signal and color gradation. The CableCARD™, which ...Sony's proprietary algorithm to provide a crisp and clear picture; • IFP (Image Format Processor): The Digital Texture Enhancer function of this manual, see pages 18 and 51.) s WEGA Engine™: Delivers superb picture quality from any sound fragmentation or jitter noise. that is inserted into the TV's rear panel...
... Provides cable subscribers with your new TV include: s Integrated HDTV: You can watch digital television programs and enjoy the improved audio/video quality offered by improving the color space of the original signal and color gradation. The CableCARD™, which ...Sony's proprietary algorithm to provide a crisp and clear picture; • IFP (Image Format Processor): The Digital Texture Enhancer function of this manual, see pages 18 and 51.) s WEGA Engine™: Delivers superb picture quality from any sound fragmentation or jitter noise. that is inserted into the TV's rear panel...
Operating Instructions
Page 15
...view on your favorite channels. HDMI supports enhanced, or highdefinition video, plus two-channel digital audio. 13 s Steady Sound®: Equalizes volume levels so there is consistent output between this TV and any HDMI-equipped audio/video component, such as a set -top box (1080i, 720p, 480p and 480i)... connections. s Favorite Channels: Allows you to block unsuitable programming from 16 of your TV screen digital images (JPEG) and movies (...
...view on your favorite channels. HDMI supports enhanced, or highdefinition video, plus two-channel digital audio. 13 s Steady Sound®: Equalizes volume levels so there is consistent output between this TV and any HDMI-equipped audio/video component, such as a set -top box (1080i, 720p, 480p and 480i)... connections. s Favorite Channels: Allows you to block unsuitable programming from 16 of your TV screen digital images (JPEG) and movies (...

Operating Instructions
Page 17
... Device with an Optical (Digital Audio) Connector Using the CONTROL S Feature Using CableCARD™ Setting Up the Channel List Page(s) 16-19 20-22 23-27 28 29 30 32 34 36 38 41 43 44 46 48 49 49 50 50 51 53 15 Topic TV Controls and Connectors Connecting the...
... Device with an Optical (Digital Audio) Connector Using the CONTROL S Feature Using CableCARD™ Setting Up the Channel List Page(s) 16-19 20-22 23-27 28 29 30 32 34 36 38 41 43 44 46 48 49 49 50 50 51 53 15 Topic TV Controls and Connectors Connecting the...
Operating Instructions
Page 18
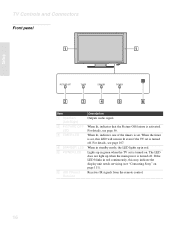
... unit needs servicing (see "Contacting Sony" on . If the LED blinks in red. For details, see page 107. The LED does not light up in green when the TV set is turned off . When ...mode, the LED lights up in red continuously, this LED will remain lit even if the TV set . Receives IR signals from the remote control. 16 When lit, indicates one of ...the timers is set is turned on page 111). Lights up when the main power is activated. TV Controls and Connectors Front panel Setup PICTURE OFF TIMER STANDBY POWER Item 1 Speakers (Left/Right) 2 PICTURE OFF LED 3 TIMER LED...
... unit needs servicing (see "Contacting Sony" on . If the LED blinks in red. For details, see page 107. The LED does not light up in green when the TV set is turned off . When ...mode, the LED lights up in red continuously, this LED will remain lit even if the TV set . Receives IR signals from the remote control. 16 When lit, indicates one of ...the timers is set is turned on page 111). Lights up when the main power is activated. TV Controls and Connectors Front panel Setup PICTURE OFF TIMER STANDBY POWER Item 1 Speakers (Left/Right) 2 PICTURE OFF LED 3 TIMER LED...
Operating Instructions
Page 19
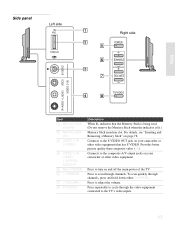
Press to the composite A/V output jacks on and off the main power of the TV. Provides better picture quality than composite video (4). Press repeatedly to the TV's video inputs. 17 For details, see "Inserting and Removing a Memory Stick" on your camcorder or other video equipment... page 78. Connects to adjust the volume. To scan quickly through channels, press and hold down either CHANNEL. Setup Side panel Left side PRO STD/DUO Right side POWER CHANNEL VOLUME TV/VIDEO R AUDIO L(MONO) VIDEO S VIDEO VIDEO 2 IN Item 1 Memory Stick indicator 2 Memory Stick slot 3 VIDEO 2 IN S ...
Press to the composite A/V output jacks on and off the main power of the TV. Provides better picture quality than composite video (4). Press repeatedly to the TV's video inputs. 17 For details, see "Inserting and Removing a Memory Stick" on your camcorder or other video equipment... page 78. Connects to adjust the volume. To scan quickly through channels, press and hold down either CHANNEL. Setup Side panel Left side PRO STD/DUO Right side POWER CHANNEL VOLUME TV/VIDEO R AUDIO L(MONO) VIDEO S VIDEO VIDEO 2 IN Item 1 Memory Stick indicator 2 Memory Stick slot 3 VIDEO 2 IN S ...
Operating Instructions
Page 20
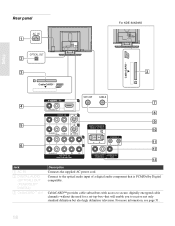
.... For more information, see page 51. 18 Rear panel AC IN OPTICAL OUT For KDE-50XS955 Setup CableCARD CableCARD R-AUDIO -L VIDEO IN VHF/UHF 6 CABLE 1 3 R-AUDIO -L (MONO) VIDEO S VIDEO 4 CENTER SPEAKER IN 180W (6 ) MAX CONTROL S IN OUT 5 R-AUDIO -L Y PB PR HD/DVD IN (1080i/720p/480p/480i) R-AUDIO -L AUDIO OUT (VAR/FIX) SUBWOOFER OUT (VAR) Jack 1 AC...
.... For more information, see page 51. 18 Rear panel AC IN OPTICAL OUT For KDE-50XS955 Setup CableCARD CableCARD R-AUDIO -L VIDEO IN VHF/UHF 6 CABLE 1 3 R-AUDIO -L (MONO) VIDEO S VIDEO 4 CENTER SPEAKER IN 180W (6 ) MAX CONTROL S IN OUT 5 R-AUDIO -L Y PB PR HD/DVD IN (1080i/720p/480p/480i) R-AUDIO -L AUDIO OUT (VAR/FIX) SUBWOOFER OUT (VAR) Jack 1 AC...
Operating Instructions
Page 21
You can use the TV speakers as a set -top box's component video (Y, PB, PR) and audio (L/R) jacks. definition video, plus two-channel digital audio. 5 VIDEO 1/3 IN Connect to other Sony infrared-controlled audio or video equipment that has S VIDEO. S VIDEO provides better picture quality than the S VIDEO (9) ... TV. qs SUBWOOFER OUT Connects to the input jack of your woofer. (VAR) qd AUDIO OUT (VAR/FIX/R/L) Connects to your audio or video equipment. HDMI supports enhanced, or high- R-AUDIO-L (MONO) 6 HD/DVD 4/5 IN (1080i/720p/480p/ 480i) Connect to the left side panel...
You can use the TV speakers as a set -top box's component video (Y, PB, PR) and audio (L/R) jacks. definition video, plus two-channel digital audio. 5 VIDEO 1/3 IN Connect to other Sony infrared-controlled audio or video equipment that has S VIDEO. S VIDEO provides better picture quality than the S VIDEO (9) ... TV. qs SUBWOOFER OUT Connects to the input jack of your woofer. (VAR) qd AUDIO OUT (VAR/FIX/R/L) Connects to your audio or video equipment. HDMI supports enhanced, or high- R-AUDIO-L (MONO) 6 HD/DVD 4/5 IN (1080i/720p/480p/ 480i) Connect to the left side panel...
Operating Instructions
Page 30
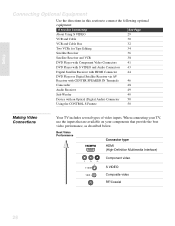
... or Digital Satellite Receiver via AV Receiver with CENTER SPEAKER IN Terminals 46 Camcorder 48 Audio Receiver 49 Sub Woofer 49 Device with an Optical (Digital Audio) Connector 50 Using the CONTROL S Feature 50 Making Video Connections Your TV includes several types of video inputs. Best Video Performance Connector type HDMI (High-Definition...
... or Digital Satellite Receiver via AV Receiver with CENTER SPEAKER IN Terminals 46 Camcorder 48 Audio Receiver 49 Sub Woofer 49 Device with an Optical (Digital Audio) Connector 50 Using the CONTROL S Feature 50 Making Video Connections Your TV includes several types of video inputs. Best Video Performance Connector type HDMI (High-Definition...
Operating Instructions
Page 31
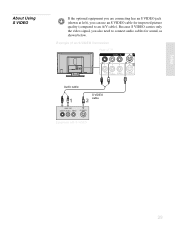
Example of an S VIDEO Connection Rear of TV VIDEO IN 1 3 R-AUDIO -L (MONO) VIDEO S VIDEO Audio cable S VIDEO cable Equipment with S VIDEO 29 Setup About Using S VIDEO If the optional equipment you are connecting has an S VIDEO jack (shown at left), you also need to connect audio cables for improved picture quality (compared to an A/V cable). Because S VIDEO carries only the video signal, you can use an S VIDEO cable for sound, as shown below.
Example of an S VIDEO Connection Rear of TV VIDEO IN 1 3 R-AUDIO -L (MONO) VIDEO S VIDEO Audio cable S VIDEO cable Equipment with S VIDEO 29 Setup About Using S VIDEO If the optional equipment you are connecting has an S VIDEO jack (shown at left), you also need to connect audio cables for improved picture quality (compared to an A/V cable). Because S VIDEO carries only the video signal, you can use an S VIDEO cable for sound, as shown below.
Operating Instructions
Page 32
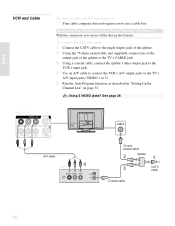
...to the single (input) jack of the splitter. 2 Using the 75-ohm coaxial cable (not supplied), connect one of the output jack of TV VIDEO IN 1 3 R-AUDIO -L (MONO) VIDEO S VIDEO A/V cable VCR CABLE 75-ohm coaxial cable Splitter Coaxial cable CATV cable 30 Rear of the splitter to the... TV's CABLE jack. 3 Using a coaxial cable, connect the splitter's other output jack to the VCR's input jack. 4 Use an A/V cable to connect the VCR's ...
...to the single (input) jack of the splitter. 2 Using the 75-ohm coaxial cable (not supplied), connect one of the output jack of TV VIDEO IN 1 3 R-AUDIO -L (MONO) VIDEO S VIDEO A/V cable VCR CABLE 75-ohm coaxial cable Splitter Coaxial cable CATV cable 30 Rear of the splitter to the... TV's CABLE jack. 3 Using a coaxial cable, connect the splitter's other output jack to the VCR's input jack. 4 Use an A/V cable to connect the VCR's ...
Operating Instructions
Page 34
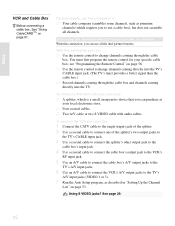
...the splitter. 2 Use a coaxial cable to connect one of the splitter's two output jacks to the TV's CABLE input jack. 3 Use a coaxial cable to connect the splitter's other output jack to the ... A/V cable to connect the cable box's A/V output jacks to the TV's A/V input jacks. 6 Use an A/V cable to connect the VCR's A/V output jacks to the TV's A/V input jacks (VIDEO 1 or 3). 7 Run the Auto Setup...to change channels coming directly into the TV's CABLE input jack. (The TV's tuner provides a better signal than the cable box.) s Record channels coming directly into the TV. See page 29. 32 For best...
...the splitter. 2 Use a coaxial cable to connect one of the splitter's two output jacks to the TV's CABLE input jack. 3 Use a coaxial cable to connect the splitter's other output jack to the ... A/V cable to connect the cable box's A/V output jacks to the TV's A/V input jacks. 6 Use an A/V cable to connect the VCR's A/V output jacks to the TV's A/V input jacks (VIDEO 1 or 3). 7 Run the Auto Setup...to change channels coming directly into the TV's CABLE input jack. (The TV's tuner provides a better signal than the cable box.) s Record channels coming directly into the TV. See page 29. 32 For best...

Operating Instructions
Page 35
If you have a non-Sony VCR, you must program the remote control. See the instructions for ...control Label video inputs to easily identify equipment connected to change channels. Do not leave the display indication of TV CABLE Setup VIDEO IN 1 3 R-AUDIO -L (MONO) VIDEO S VIDEO VCR Coaxial cable Cable Box Coaxial cable A/V cable Coaxial cable A/V cable ...VCR" on Using This Connection To Do This ... Rear of the cable box and VCR turned on page 105. Press TV/VIDEO repeatedly to (usually channel 3 or 4). See "Programming the Remote Control" on the VCR and tune it to ...
If you have a non-Sony VCR, you must program the remote control. See the instructions for ...control Label video inputs to easily identify equipment connected to change channels. Do not leave the display indication of TV CABLE Setup VIDEO IN 1 3 R-AUDIO -L (MONO) VIDEO S VIDEO VCR Coaxial cable Cable Box Coaxial cable A/V cable Coaxial cable A/V cable ...VCR" on Using This Connection To Do This ... Rear of the cable box and VCR turned on page 105. Press TV/VIDEO repeatedly to (usually channel 3 or 4). See "Programming the Remote Control" on the VCR and tune it to ...
Operating Instructions
Page 36
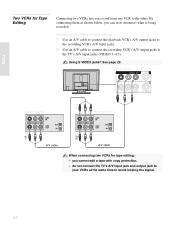
Rear of TV VIDEO IN 1 3 R-AUDIO -L (MONO) VIDEO S VIDEO Playback VCR Recording VCR A/V cable A/V cable When connecting two VCRs for tape editing ... A/V output jacks to the other. Setup Two VCRs for Tape Editing Connecting two VCRs lets you record from one VCR to the TV's A/V input jacks (VIDEO 1 or 3). To connect two VCRs for tape editing; - See page 29. you can view (monitor... them as shown below, you cannot edit a tape with copy protection. - do not connect the TV's A/V input jack and output jack to your VCRs at the same time to avoid looping the signal. 34
Rear of TV VIDEO IN 1 3 R-AUDIO -L (MONO) VIDEO S VIDEO Playback VCR Recording VCR A/V cable A/V cable When connecting two VCRs for tape editing ... A/V output jacks to the other. Setup Two VCRs for Tape Editing Connecting two VCRs lets you record from one VCR to the TV's A/V input jacks (VIDEO 1 or 3). To connect two VCRs for tape editing; - See page 29. you can view (monitor... them as shown below, you cannot edit a tape with copy protection. - do not connect the TV's A/V input jack and output jack to your VCRs at the same time to avoid looping the signal. 34
Operating Instructions
Page 38
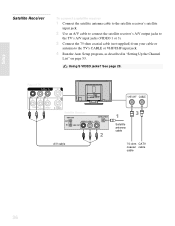
Rear of TV VIDEO IN 1 3 R-AUDIO -L (MONO) VIDEO S VIDEO Satellite Receiver A/V cable VHF/UHF CABLE Satellite antenna cable 75-ohm CATV coaxial cable cable 36 Using S VIDEO jacks? Setup Satellite Receiver ... receiver 1 Connect the satellite antenna cable to the satellite receiver's satellite input jack. 2 Use an A/V cable to connect the satellite receiver's A/V output jacks to the TV's A/V input jacks (VIDEO 1 or 3). 3 Connect the 75-ohm coaxial cable (not supplied) from your cable or antenna to the...
Rear of TV VIDEO IN 1 3 R-AUDIO -L (MONO) VIDEO S VIDEO Satellite Receiver A/V cable VHF/UHF CABLE Satellite antenna cable 75-ohm CATV coaxial cable cable 36 Using S VIDEO jacks? Setup Satellite Receiver ... receiver 1 Connect the satellite antenna cable to the satellite receiver's satellite input jack. 2 Use an A/V cable to connect the satellite receiver's A/V output jacks to the TV's A/V input jacks (VIDEO 1 or 3). 3 Connect the 75-ohm coaxial cable (not supplied) from your cable or antenna to the...

Operating Instructions
Page 43
... Y, B-Y and R-Y. If so, connect the cables to their matching color jacks. 2 Use an audio cable to connect the DVD player's audio output jacks to the Y, PB and PR input jacks (VIDEO 4 or 5) on your DVD player has component video (Y, PB, PR) jacks. Rear of TV 4 5 R-AUDIO -L Y PB PR HD/DVD IN (1080i/720p/480p/480i...
... Y, B-Y and R-Y. If so, connect the cables to their matching color jacks. 2 Use an audio cable to connect the DVD player's audio output jacks to the Y, PB and PR input jacks (VIDEO 4 or 5) on your DVD player has component video (Y, PB, PR) jacks. Rear of TV 4 5 R-AUDIO -L Y PB PR HD/DVD IN (1080i/720p/480p/480i...
Operating Instructions
Page 45
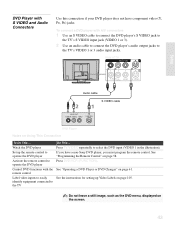
... illustration). Setup DVD Player with S VIDEO and Audio Connectors Use this connection if your DVD player does not have a non-Sony DVD player, you have component video (Y, PB, PR) jacks. Press TV/VIDEO repeatedly to the TV Do This ... Rear of TV VIDEO IN 1 3 R-AUDIO -L (MONO) VIDEO S VIDEO Audio cable S VIDEO cable DVD Player Notes on the...
... illustration). Setup DVD Player with S VIDEO and Audio Connectors Use this connection if your DVD player does not have a non-Sony DVD player, you have component video (Y, PB, PR) jacks. Press TV/VIDEO repeatedly to the TV Do This ... Rear of TV VIDEO IN 1 3 R-AUDIO -L (MONO) VIDEO S VIDEO Audio cable S VIDEO cable DVD Player Notes on the...
