Instruction Manual
Page 1
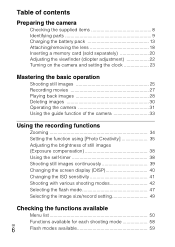
4-469-858-12(1) Interchangeable Lens Digital Camera Instruction Manual E-mount Preparing the camera Mastering the basic operation Using the recording functions Checking the functions available Viewing images on a computer Others ILCE-3000
4-469-858-12(1) Interchangeable Lens Digital Camera Instruction Manual E-mount Preparing the camera Mastering the basic operation Using the recording functions Checking the functions available Viewing images on a computer Others ILCE-3000
Instruction Manual
Page 6
... 13 Attaching/removing the lens 18 Inserting a memory card (sold separately 20 Adjusting the viewfinder (diopter adjustment 22 Turning on the camera and setting the clock 23 Mastering the basic operation Shooting still images 25 Recording movies 27 Playing back images 28 Deleting images 30 ...Operating the camera 31 Using the guide function of the camera 33 Using the recording functions Zooming 34 Setting the function using [Photo Creativity 35 Adjusting the brightness of ...
... 13 Attaching/removing the lens 18 Inserting a memory card (sold separately 20 Adjusting the viewfinder (diopter adjustment 22 Turning on the camera and setting the clock 23 Mastering the basic operation Shooting still images 25 Recording movies 27 Playing back images 28 Deleting images 30 ...Operating the camera 31 Using the guide function of the camera 33 Using the recording functions Zooming 34 Setting the function using [Photo Creativity 35 Adjusting the brightness of ...

Instruction Manual
Page 7
Model name Lens GB ILCE-3000K DT18 - 55 mm 7 Viewing images on a computer What you can do with software 60 Installing the software 62 Others Checking the number of recordable images 65 List of icons on the LCD screen 69 Learning more about the camera (α Handbook 72 Troubleshooting 73 Precautions 78 Specifications 83 Index 87 Model name In this manual, the model name "ILCE-3000K" is described as "ILCE-3000".
Model name Lens GB ILCE-3000K DT18 - 55 mm 7 Viewing images on a computer What you can do with software 60 Installing the software 62 Others Checking the number of recordable images 65 List of icons on the LCD screen 69 Learning more about the camera (α Handbook 72 Troubleshooting 73 Precautions 78 Specifications 83 Index 87 Model name In this manual, the model name "ILCE-3000K" is described as "ILCE-3000".

Instruction Manual
Page 8
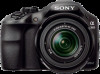
GB 8 Preparing the camera Preparing the camera Checking the supplied items The number in parentheses indicates the quantity. • Camera (1) • Rechargeable battery pack NP-FW50 (1) • Micro USB cable (1) • E18 - 55 mm zoom lens (1) (attached to the camera) • Front lens cap (1) (attached to the lens) • Lens hood (1) • Shoulder strap (1) • Instruction Manual (This manual) (1) * An AC adaptor is not supplied with this camera.
GB 8 Preparing the camera Preparing the camera Checking the supplied items The number in parentheses indicates the quantity. • Camera (1) • Rechargeable battery pack NP-FW50 (1) • Micro USB cable (1) • E18 - 55 mm zoom lens (1) (attached to the camera) • Front lens cap (1) (attached to the lens) • Lens hood (1) • Shoulder strap (1) • Instruction Manual (This manual) (1) * An AC adaptor is not supplied with this camera.
Instruction Manual
Page 9
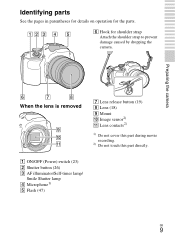
Identifying parts See the pages in parentheses for details on operation for shoulder strap Attach the shoulder strap to prevent damage caused by dropping the camera. Preparing the camera When the lens is removed G Lens release button (19) H Lens (18) I Mount J Image sensor2) K Lens contacts2) 1) Do not cover this part during movie recording. 2) Do not touch this part directly. A ON/OFF (Power) switch (23) B Shutter button (26) C AF illuminator/Self-timer lamp/ Smile Shutter lamp D Microphone1) E Flash (47) GB 9 F Hook for the parts.
Identifying parts See the pages in parentheses for details on operation for shoulder strap Attach the shoulder strap to prevent damage caused by dropping the camera. Preparing the camera When the lens is removed G Lens release button (19) H Lens (18) I Mount J Image sensor2) K Lens contacts2) 1) Do not cover this part during movie recording. 2) Do not touch this part directly. A ON/OFF (Power) switch (23) B Shutter button (26) C AF illuminator/Self-timer lamp/ Smile Shutter lamp D Microphone1) E Flash (47) GB 9 F Hook for the parts.

Instruction Manual
Page 10
...other manufactures' accessories are not guaranteed. 2) Accessories for the Accessory Shoe can also be attached using the Shoe Adaptor (sold separately). Preparing the camera A Multi Interface Shoe1)2) B FINDER/LCD button (22) • You can switch between the LCD screen and the viewfinder display. (In... C (32) J Control wheel (31) 1) For details on compatible accessories of the Multi Interface Shoe, visit the Sony web site in your area, or consult your Sony dealer or local authorized Sony service facility. GB 10 A (Flash pop-up) button B Diopter-adjustment dial C LCD screen D Mode dial E ...
...other manufactures' accessories are not guaranteed. 2) Accessories for the Accessory Shoe can also be attached using the Shoe Adaptor (sold separately). Preparing the camera A Multi Interface Shoe1)2) B FINDER/LCD button (22) • You can switch between the LCD screen and the viewfinder display. (In... C (32) J Control wheel (31) 1) For details on compatible accessories of the Multi Interface Shoe, visit the Sony web site in your area, or consult your Sony dealer or local authorized Sony service facility. GB 10 A (Flash pop-up) button B Diopter-adjustment dial C LCD screen D Mode dial E ...

Instruction Manual
Page 11
... D Battery cover (13) E Battery compartment (13) F Lock lever (13, 17) A Connection plate cover Use this when using screws longer than 5.5 mm (7/32 inch). Preparing the camera B Tripod socket hole • Use a tripod with a screw length of less than 5.5 mm (7/32 inch), and may damage the... camera. Insert the connection plate into the battery compartment, and then pass the cord through the connection plate cover as shown below. • Make sure that ...
... D Battery cover (13) E Battery compartment (13) F Lock lever (13, 17) A Connection plate cover Use this when using screws longer than 5.5 mm (7/32 inch). Preparing the camera B Tripod socket hole • Use a tripod with a screw length of less than 5.5 mm (7/32 inch), and may damage the... camera. Insert the connection plate into the battery compartment, and then pass the cord through the connection plate cover as shown below. • Make sure that ...

Instruction Manual
Page 12
E 18 - 55 mm F3.5-5.6 OSS A Hood index B Focusing ring C Zooming ring D Focal-length scale E Focal-length index F Lens contacts1) G Mounting index 1) Do not touch this part directly. Preparing the camera GB 12 x Lens See page 85 on the specifications of the lens.
E 18 - 55 mm F3.5-5.6 OSS A Hood index B Focusing ring C Zooming ring D Focal-length scale E Focal-length index F Lens contacts1) G Mounting index 1) Do not touch this part directly. Preparing the camera GB 12 x Lens See page 85 on the specifications of the lens.
Instruction Manual
Page 13
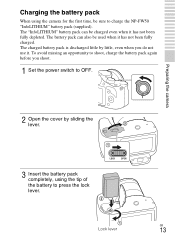
... charged battery pack is discharged little by sliding the lever. 3 Insert the battery pack completely, using the camera for the first time, be charged even when it has not been fully depleted. Preparing the camera Charging the battery pack When using the tip of the battery to charge the NP-FW50 "InfoLITHIUM...
... charged battery pack is discharged little by sliding the lever. 3 Insert the battery pack completely, using the camera for the first time, be charged even when it has not been fully depleted. Preparing the camera Charging the battery pack When using the tip of the battery to charge the NP-FW50 "InfoLITHIUM...

Instruction Manual
Page 14
Preparing the camera The charge lamp lights orange, and charging starts. • Set the power switch to ON, the camera cannot charge the battery. • When the charge lamp flashes, remove and re-insert the battery pack. If the power switch is outside the recommended range. 4 Close the cover. 5 Connect the camera to a computer, using the micro USB cable (supplied). GB 14 Charge lamp Lit: Charging Off: Charging finished Flashing: Charging error or charging temporarily stopped because the temperature is set to OFF while charging the battery.
Preparing the camera The charge lamp lights orange, and charging starts. • Set the power switch to ON, the camera cannot charge the battery. • When the charge lamp flashes, remove and re-insert the battery pack. If the power switch is outside the recommended range. 4 Close the cover. 5 Connect the camera to a computer, using the micro USB cable (supplied). GB 14 Charge lamp Lit: Charging Off: Charging finished Flashing: Charging error or charging temporarily stopped because the temperature is set to OFF while charging the battery.
Instruction Manual
Page 15
... restart the computer, or wake the computer to a computer for charging using at the same time. • The charge lamp may cause the camera to use only genuine Sony brand battery packs, micro USB cable (supplied) and AC Adaptor (sold separately). No guarantees are using a custom-built computer, a modified computer, or charging...
... restart the computer, or wake the computer to a computer for charging using at the same time. • The charge lamp may cause the camera to use only genuine Sony brand battery packs, micro USB cable (supplied) and AC Adaptor (sold separately). No guarantees are using a custom-built computer, a modified computer, or charging...

Instruction Manual
Page 16
... according to operating conditions with the following indicators and percent figures displayed on conditions of 25 °C (77 °F). Preparing the camera x Charging time The charging time is approximately 290 minutes. • You can charge the battery pack more image. x Checking the... remaining battery level Check the level with your camera. Notes • The above charging time applies when charging a fully depleted battery pack (supplied) at a temperature of use and circumstances....
... according to operating conditions with the following indicators and percent figures displayed on conditions of 25 °C (77 °F). Preparing the camera x Charging time The charging time is approximately 290 minutes. • You can charge the battery pack more image. x Checking the... remaining battery level Check the level with your camera. Notes • The above charging time applies when charging a fully depleted battery pack (supplied) at a temperature of use and circumstances....
Instruction Manual
Page 17
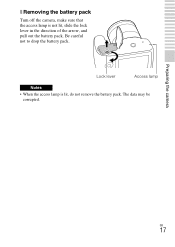
x Removing the battery pack Turn off the camera, make sure that the access lamp is lit, do not remove the battery pack. Preparing the camera GB 17 The data may be corrupted. Lock lever Access lamp Notes • When the access lamp is not lit, slide the lock lever in the direction of the arrow, and pull out the battery pack. Be careful not to drop the battery pack.
x Removing the battery pack Turn off the camera, make sure that the access lamp is lit, do not remove the battery pack. Preparing the camera GB 17 The data may be corrupted. Lock lever Access lamp Notes • When the access lamp is not lit, slide the lock lever in the direction of the arrow, and pull out the battery pack. Be careful not to drop the battery pack.
Instruction Manual
Page 18
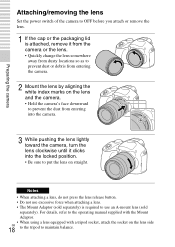
...the lens release button. • Do not use excessive force when attaching a lens. • The Mount Adaptor (sold separately) is attached, remove it from the camera or the lens. • Quickly change the lens somewhere away from dusty locations so as to prevent dust or debris from entering the... with the Mount Adaptor. • When using a lens equipped with a tripod socket, attach the socket on straight. Preparing the camera Attaching/removing the lens Set the power switch of the camera to OFF before you attach or remove the lens. 1 If the cap or the packaging lid is required to use...
...the lens release button. • Do not use excessive force when attaching a lens. • The Mount Adaptor (sold separately) is attached, remove it from the camera or the lens. • Quickly change the lens somewhere away from dusty locations so as to prevent dust or debris from entering the... with the Mount Adaptor. • When using a lens equipped with a tripod socket, attach the socket on straight. Preparing the camera Attaching/removing the lens Set the power switch of the camera to OFF before you attach or remove the lens. 1 If the cap or the packaging lid is required to use...

Instruction Manual
Page 19
...-B1EM (Body cap) or ALC-R1EM (Rear lens cap) (sold separately). • When you are changing the lens and adheres to the surface of the camera to OFF and confirm that converts the light source to a digital signal), it stops. If the lens has not retracted, do not press the lens... to touch the zooming/focusing ring. The image sensor has an anti-dust coating to prevent dust from dusty locations. • Do not leave the camera with the lens removed. • When you want to use a lens with a power zoom, set the power switch of the image sensor (the part that...
...-B1EM (Body cap) or ALC-R1EM (Rear lens cap) (sold separately). • When you are changing the lens and adheres to the surface of the camera to OFF and confirm that converts the light source to a digital signal), it stops. If the lens has not retracted, do not press the lens... to touch the zooming/focusing ring. The image sensor has an anti-dust coating to prevent dust from dusty locations. • Do not leave the camera with the lens removed. • When you want to use a lens with a power zoom, set the power switch of the image sensor (the part that...

Instruction Manual
Page 20
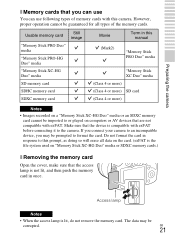
Check on the direction of the notched corner. GB 20 Preparing the camera Inserting a memory card (sold separately) 1 Open the cover. 2 Insert a memory card. • Insert the memory card until it clicks as illustrated. 3 Close the cover.
Check on the direction of the notched corner. GB 20 Preparing the camera Inserting a memory card (sold separately) 1 Open the cover. 2 Insert a memory card. • Insert the memory card until it clicks as illustrated. 3 Close the cover.
Instruction Manual
Page 21
... use following types of the memory cards. The data may be prompted to format the card. Make sure that the device is compatible with this camera. Access lamp Notes • When the access lamp is not lit, and then push the memory card in this prompt, as doing so will erase... all types of memory cards with exFAT before connecting it to the camera. GB 21 Usable memory card Still image Movie Term in once. Preparing the camera x Memory cards that you may be guaranteed for all data on the card. (exFAT is the file system...
... use following types of the memory cards. The data may be prompted to format the card. Make sure that the device is compatible with this camera. Access lamp Notes • When the access lamp is not lit, and then push the memory card in this prompt, as doing so will erase... all types of memory cards with exFAT before connecting it to the camera. GB 21 Usable memory card Still image Movie Term in once. Preparing the camera x Memory cards that you may be guaranteed for all data on the card. (exFAT is the file system...
Instruction Manual
Page 22
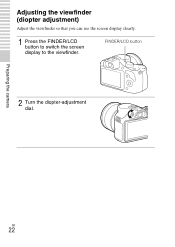
FINDER/LCD button 2 Turn the diopter-adjustment dial. Preparing the camera GB 22 Adjusting the viewfinder (diopter adjustment) Adjust the viewfinder so that you can see the screen display clearly. 1 Press the FINDER/LCD button to switch the screen display to the viewfinder.
FINDER/LCD button 2 Turn the diopter-adjustment dial. Preparing the camera GB 22 Adjusting the viewfinder (diopter adjustment) Adjust the viewfinder so that you can see the screen display clearly. 1 Press the FINDER/LCD button to switch the screen display to the viewfinder.

Instruction Manual
Page 23
The screen to set date and time appears. • To turn off the camera, set the power switch to turn on the camera. GB 23 Preparing the camera Turning on the camera and setting the clock When you turn on the camera for the first time, the screen to set date and time appears. 1 Set the power switch to ON to OFF. 2 Press the center of the control wheel. 3 Select your area by pressing the left or right of the control wheel and press the center.
The screen to set date and time appears. • To turn off the camera, set the power switch to turn on the camera. GB 23 Preparing the camera Turning on the camera and setting the clock When you turn on the camera for the first time, the screen to set date and time appears. 1 Set the power switch to ON to OFF. 2 Press the center of the control wheel. 3 Select your area by pressing the left or right of the control wheel and press the center.

Instruction Manual
Page 24
... and other items, and then press the center of the control wheel. Using "PlayMemories Home," you can save or print images with date. Preparing the camera 4 Press the left or right of the control wheel to select each item, and press the top or bottom, or turn it to "PlayMemories Home... Help Guide" for more details (page 63). After that, set other settings regardless of whether the power is on this camera. Daylight Svg.: Turns on or off , or the battery is turned on for date and time setup is displayed only when the power is installed...
... and other items, and then press the center of the control wheel. Using "PlayMemories Home," you can save or print images with date. Preparing the camera 4 Press the left or right of the control wheel to select each item, and press the top or bottom, or turn it to "PlayMemories Home... Help Guide" for more details (page 63). After that, set other settings regardless of whether the power is on this camera. Daylight Svg.: Turns on or off , or the battery is turned on for date and time setup is displayed only when the power is installed...


