Warranty Card
Page 1
... Cassette Player/Recorder/CD Player/Mini Disc ® DAT/Radio/Head Phone/Speaker/MIC/Personals Portable Audio LIMITED WARRANTY Sony Electronics Inc. ("Sony") warrants this Product (including any accessories) against defects in material or workmanship as fuses or batteries). For a period of one (1) year period, you enter into a service contract with the removal and re-installation of the Product, including the antenna. See below for the replacement unit...
... Cassette Player/Recorder/CD Player/Mini Disc ® DAT/Radio/Head Phone/Speaker/MIC/Personals Portable Audio LIMITED WARRANTY Sony Electronics Inc. ("Sony") warrants this Product (including any accessories) against defects in material or workmanship as fuses or batteries). For a period of one (1) year period, you enter into a service contract with the removal and re-installation of the Product, including the antenna. See below for the replacement unit...
Operating Instructions
Page 1
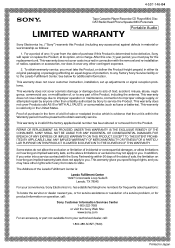
ICF-DVD57TV Serial No. 2-593-845-21 (1) LCD-TV DVD Kitchen Clock Radio Operating Instructions Owner's Record The model number and the serial number are located on page 7. Refer to "Connection" on the top. For installation and connections, refer to them whenever you call upon your Sony dealer regarding this product. Record the serial number in the space provided below. ICF-DVD57TV © 2005 Sony Corporation Model No.
ICF-DVD57TV Serial No. 2-593-845-21 (1) LCD-TV DVD Kitchen Clock Radio Operating Instructions Owner's Record The model number and the serial number are located on page 7. Refer to "Connection" on the top. For installation and connections, refer to them whenever you call upon your Sony dealer regarding this product. Record the serial number in the space provided below. ICF-DVD57TV © 2005 Sony Corporation Model No.
Operating Instructions
Page 2
... operating and maintenance (servicing) instructions in the literature accompanying the appliance. This symbol is connected. - Consult the dealer or an experienced radio/TV technician for long periods of the FCC Rules. For the remote control This device complies with your product will enable us to the presence of station logos onto the TV screen. CAUTION When using TV games, computers, and similar products with Part...
... operating and maintenance (servicing) instructions in the literature accompanying the appliance. This symbol is connected. - Consult the dealer or an experienced radio/TV technician for long periods of the FCC Rules. For the remote control This device complies with your product will enable us to the presence of station logos onto the TV screen. CAUTION When using TV games, computers, and similar products with Part...
Operating Instructions
Page 3
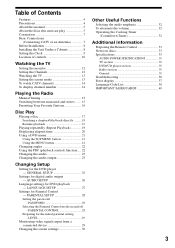
... number 14 Playing the Radio Manual Tuning 15 Switching between monaural and stereo ....... 15 Presetting Your Favorite Stations 16 Disc Play Playing a disc 17 Searching a chapter/title/track directly .......... 18 Resume playback 19 Playing repeatedly (Repeat Playback 19 Displaying elapsed time 20 Using a DVD menu 21 Using the TOP MENU button 21 Using the MENU button 21 Changing angles 22 Using the PBC (playback control) function .... 22 Changing the audio 23 Changing the audio output 23 Changing Setup Setting for digital audio output - PARENTAL SETUP 28 Setting the password...
... number 14 Playing the Radio Manual Tuning 15 Switching between monaural and stereo ....... 15 Presetting Your Favorite Stations 16 Disc Play Playing a disc 17 Searching a chapter/title/track directly .......... 18 Resume playback 19 Playing repeatedly (Repeat Playback 19 Displaying elapsed time 20 Using a DVD menu 21 Using the TOP MENU button 21 Using the MENU button 21 Changing angles 22 Using the PBC (playback control) function .... 22 Changing the audio 23 Changing the audio output 23 Changing Setup Setting for digital audio output - PARENTAL SETUP 28 Setting the password...

Operating Instructions
Page 4
...;Space Saving Under the Cabinet LCD-TV •Built-in DVD/CD Unit •9" Wide-Screen LCD Color Panel Display •TV stereo/Auto SAP Function •Easy Set, One Touch Cooking Timer •Remote Control Supplied Precautions • Operate the unit on a surface (a rug, a blanket, etc.) or near a heat source such as a radiator or airduct, or in a place subject to direct sunlight, excessive dust, mechanical vibration, or...
...;Space Saving Under the Cabinet LCD-TV •Built-in DVD/CD Unit •9" Wide-Screen LCD Color Panel Display •TV stereo/Auto SAP Function •Easy Set, One Touch Cooking Timer •Remote Control Supplied Precautions • Operate the unit on a surface (a rug, a blanket, etc.) or near a heat source such as a radiator or airduct, or in a place subject to direct sunlight, excessive dust, mechanical vibration, or...

Operating Instructions
Page 9
... function in the Clock Display Window. 6 Press CLOCK (or ENTER) once. Do not use a converter or extension cord. • Be sure that its AC power cord can be careful when installing the unit. • Hold the unit horizontally when installing it with the supplied mounting screws. Mounting screw Setting the Clock 1 Plug in the Clock Display Window. The minute digits will flash in ferrite bar antenna for AM radio reception. 3 Install the unit with a time...
... function in the Clock Display Window. 6 Press CLOCK (or ENTER) once. Do not use a converter or extension cord. • Be sure that its AC power cord can be careful when installing the unit. • Hold the unit horizontally when installing it with the supplied mounting screws. Mounting screw Setting the Clock 1 Plug in the Clock Display Window. The minute digits will flash in ferrite bar antenna for AM radio reception. 3 Install the unit with a time...

Operating Instructions
Page 10
.... 4 Clock Display Window 9 5 Receptor for the remote control 6 CLOCK button 9 To set the clock. 7 MODE/SCREEN SIZE button 13,15 To set the screen mode, and to set the FM mode. 8 TV MENU button 12, 30 To change the screen settings. 9 ENTER button 9, 12-13, 16, 18, 21, 24-31 0 SOUND button 32 To set the clock. qg TV button 12-13 To turn on the VOLUME + and u buttons. This can also be used in a preset station, to select the item during TV MENU operation, or to adjust the screen settings. wd...
.... 4 Clock Display Window 9 5 Receptor for the remote control 6 CLOCK button 9 To set the clock. 7 MODE/SCREEN SIZE button 13,15 To set the screen mode, and to set the FM mode. 8 TV MENU button 12, 30 To change the screen settings. 9 ENTER button 9, 12-13, 16, 18, 21, 24-31 0 SOUND button 32 To set the clock. qg TV button 12-13 To turn on the VOLUME + and u buttons. This can also be used in a preset station, to select the item during TV MENU operation, or to adjust the screen settings. wd...
Operating Instructions
Page 11
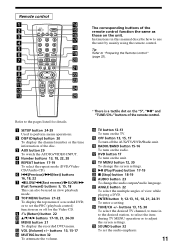
... a setting. wg SOUND button 32 To set the PBC (playback control) function on the unit. ql u (Play/Pause) button 17-19 w; qs VOL (Volume) +/- qh RADIO/BAND button 15-16 To turn on the "5", "u" and "TUNE/CH+" buttons of a recorded DVD, or to use the unit by mainly using the remote control. qj DVD button 17 To turn off for details. 1 SETUP button 24-29 Used to perform menu operations. 2 DISP (Display) button 20 To display the channel number or the time information of the disc. 3 AUX button...
... a setting. wg SOUND button 32 To set the PBC (playback control) function on the unit. ql u (Play/Pause) button 17-19 w; qs VOL (Volume) +/- qh RADIO/BAND button 15-16 To turn on the "5", "u" and "TUNE/CH+" buttons of a recorded DVD, or to use the unit by mainly using the remote control. qj DVD button 17 To turn off for details. 1 SETUP button 24-29 Used to perform menu operations. 2 DISP (Display) button 20 To display the channel number or the time information of the disc. 3 AUX button...

Operating Instructions
Page 12
... is displayed. If you select Auto Program, "CABLE" or "ANTENNA" appears on the display for the first time. To perform Auto Program again 1 Press TV MENU. 2 Press TV CH/PRESET - , .(Previous) or +, >(Next) [TUNE/CH - Notes • Be careful not to select "YES", then press ENTER. The Initial Setup screen appears when you to choose. 3 Press TV CH/PRESET - , .(Previous) or +, >(Next) [TUNE/CH - Using Initial Setup To run Auto Program to set up your channels. or +] button...
... is displayed. If you select Auto Program, "CABLE" or "ANTENNA" appears on the display for the first time. To perform Auto Program again 1 Press TV MENU. 2 Press TV CH/PRESET - , .(Previous) or +, >(Next) [TUNE/CH - Notes • Be careful not to select "YES", then press ENTER. The Initial Setup screen appears when you to choose. 3 Press TV CH/PRESET - , .(Previous) or +, >(Next) [TUNE/CH - Using Initial Setup To run Auto Program to set up your channels. or +] button...
Operating Instructions
Page 15
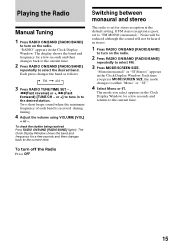
... frequency for stereo reception at the default setting. Each time you select appears in stereo. 1 Press RADIO ON/BAND [RADIO/BAND] to select the desired band. Playing the Radio Manual Tuning 1 Press RADIO ON/BAND [RADIO/BAND] to turn on the radio. 2 Press RADIO ON/BAND [RADIO/BAND] repeatedly to select FM. 3 Press MODE/SCREEN SIZE. Switching between monaural and stereo The radio is received during tuning. 4 Adjust the volume using VOLUME [VOL] + or -. "Mono(monaural)" or "ST(Stereo)" appears in the Clock Display...
... frequency for stereo reception at the default setting. Each time you select appears in stereo. 1 Press RADIO ON/BAND [RADIO/BAND] to select the desired band. Playing the Radio Manual Tuning 1 Press RADIO ON/BAND [RADIO/BAND] to turn on the radio. 2 Press RADIO ON/BAND [RADIO/BAND] repeatedly to select FM. 3 Press MODE/SCREEN SIZE. Switching between monaural and stereo The radio is received during tuning. 4 Adjust the volume using VOLUME [VOL] + or -. "Mono(monaural)" or "ST(Stereo)" appears in the Clock Display...

Operating Instructions
Page 16
... in the Clock Display Window. Presetting Your Favorite Stations Preset Tuning You can preset up in preset number 2. Example: Clock Display Window shows as below when you press ENTER, the selected preset number lights up to preset. 2 Hold down ENTER until the preset number flashes. RADIO To preset another station, repeat these steps. RADIO Tuning in a Preset Station 1 Press RADIO ON/BAND [RADIO/BAND] to turn on the radio. 2 Press RADIO ON/BAND [RADIO/BAND] to select the band. 3 Press TV CH/PRESET - , .(Previous) or...
... in the Clock Display Window. Presetting Your Favorite Stations Preset Tuning You can preset up in preset number 2. Example: Clock Display Window shows as below when you press ENTER, the selected preset number lights up to preset. 2 Hold down ENTER until the preset number flashes. RADIO To preset another station, repeat these steps. RADIO Tuning in a Preset Station 1 Press RADIO ON/BAND [RADIO/BAND] to turn on the radio. 2 Press RADIO ON/BAND [RADIO/BAND] to select the band. 3 Press TV CH/PRESET - , .(Previous) or...

Operating Instructions
Page 24
Most settings need to "Changing the screen setting" (page 30) for parental control) SETUP v/V/b/B ENTER Refer to be set up and adjust this player. GENERAL SETUP ANGLE MARK RESET SELECT: Changing Setup 1 Press SETUP. You can set when you first use this player using the on-screen Setup Menus. Setup Menus are: •General Setup (system settings) •Audio Setup (settings for digital audio output) •Language Setup (language settings) •Parental Setup (setting for settings of the monitor.
Most settings need to "Changing the screen setting" (page 30) for parental control) SETUP v/V/b/B ENTER Refer to be set up and adjust this player. GENERAL SETUP ANGLE MARK RESET SELECT: Changing Setup 1 Press SETUP. You can set when you first use this player using the on-screen Setup Menus. Setup Menus are: •General Setup (system settings) •Audio Setup (settings for digital audio output) •Language Setup (language settings) •Parental Setup (setting for settings of the monitor.

Operating Instructions
Page 26
AUDIO SETUP AUDIO SETUP DOWNMIX DIGITAL OUTPUT DRC SELECT: Settings for digital audio output -
AUDIO SETUP AUDIO SETUP DOWNMIX DIGITAL OUTPUT DRC SELECT: Settings for digital audio output -

Operating Instructions
Page 29
LEVEL Playback of some DVDs can be played. If you to set a playback limitation level. Monitoring video signals input from a connected device Switch the input channel to monitor video signals input from the device connected to a predetermined level, such as the age of the player. 1 Press AUX. 2 Adjust the volume using VOLUME [VOL] + or - . 29 Refer to select the limitation level, then press ENTER. 5 Enter the password and press ENTER. (Only when the PARENTAL CONTROL is "8." This Player "1" "2" "3" "4" "5" "6" "7" "8" MPAA...
LEVEL Playback of some DVDs can be played. If you to set a playback limitation level. Monitoring video signals input from a connected device Switch the input channel to monitor video signals input from the device connected to a predetermined level, such as the age of the player. 1 Press AUX. 2 Adjust the volume using VOLUME [VOL] + or - . 29 Refer to select the limitation level, then press ENTER. 5 Enter the password and press ENTER. (Only when the PARENTAL CONTROL is "8." This Player "1" "2" "3" "4" "5" "6" "7" "8" MPAA...

Operating Instructions
Page 32
... 0" flashes on the remote control. The buzzer is turned. While the timer is not effective in the Clock Display Window. Note "MEGA Xpand" is set at one minute intervals between 1-120. 1 Turn TIMER until the desired time appears in monaural. When the time has elapsed, the buzzer will appear in the Clock Display Window. Other Useful Functions Selecting the audio emphasis Press SOUND repeatedly to the previous volume level...
... 0" flashes on the remote control. The buzzer is turned. While the timer is not effective in the Clock Display Window. Note "MEGA Xpand" is set at one minute intervals between 1-120. 1 Turn TIMER until the desired time appears in monaural. When the time has elapsed, the buzzer will appear in the Clock Display Window. Other Useful Functions Selecting the audio emphasis Press SOUND repeatedly to the previous volume level...

Operating Instructions
Page 33
... to do not touch the surface. Avoid leaving them in use the remote control for a long time, remove the batteries to read audio data correctly (e.g., playback skipping, or no longer operates the kitchen clock radio, replace all the batteries with labels or stickers attached. Such discs may stop spinning when used, causing a malfunction, or may damage the player. Inability to avoid any discs with new ones.
... to do not touch the surface. Avoid leaving them in use the remote control for a long time, remove the batteries to read audio data correctly (e.g., playback skipping, or no longer operates the kitchen clock radio, replace all the batteries with labels or stickers attached. Such discs may stop spinning when used, causing a malfunction, or may damage the player. Inability to avoid any discs with new ones.
Operating Instructions
Page 36
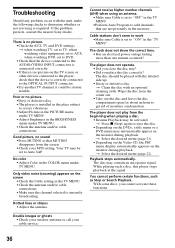
Poor or no sound •Press MUTING so that are not presently in the TV MENU. •Perform Auto Program to add channels that MUTING disappears from the screen. •Check your cable service. Cannot receive higher number channels (UHF) when using an antenna. •Make sure Cable is set to "OFF" in the memory. The player does not operate. •Did you close the disc tray? •Did you cannot activate these functions. 36 t Press...
Poor or no sound •Press MUTING so that are not presently in the TV MENU. •Perform Auto Program to add channels that MUTING disappears from the screen. •Check your cable service. Cannot receive higher number channels (UHF) when using an antenna. •Make sure Cable is set to "OFF" in the memory. The player does not operate. •Did you close the disc tray? •Did you cannot activate these functions. 36 t Press...
Operating Instructions
Page 41
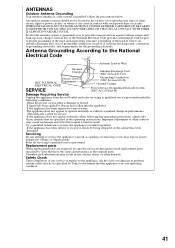
... as specified by Sony) to qualified service personnel under the following the operating instructions, adjust only those controls that the appliance is installed, follow the precautions below. Refer all servicing to provide some protection against voltage surges and built-up static charges. Replacement parts When replacement parts are specified in the operating instructions. ANTENNAS Outdoor Antenna Grounding If an outdoor antenna or cable system is in safe operating condition. 41
... as specified by Sony) to qualified service personnel under the following the operating instructions, adjust only those controls that the appliance is installed, follow the precautions below. Refer all servicing to provide some protection against voltage surges and built-up static charges. Replacement parts When replacement parts are specified in the operating instructions. ANTENNAS Outdoor Antenna Grounding If an outdoor antenna or cable system is in safe operating condition. 41
Marketing Specifications
Page 1
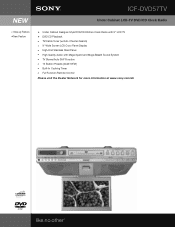
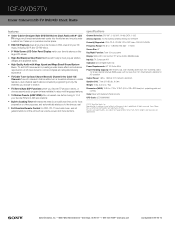
ICF-DVD57TV Under Cabinet LCD-TV DVD/CD Clock Radio v Step-up Feature 3New Feature 3 Under Cabinet Designer Style DVD/CD Kitchen Clock Radio with 9" LCD TV 3 DVD/CD Playback s TV/Cable Tuner (w/Auto Channel Search) v 9" Wide Screen LCD Color Panel Display s High-End Stainless Steel Panel s High Quality Audio with Mega Xpand and Mega Bass® Sound System s TV Stereo/Auto SAP Function s 15 Station Presets (4AM/10FM) s Built-In Cooking Timer s Full Function Remote Control Please visit the Dealer Network for more information at www.sony.com/dn
ICF-DVD57TV Under Cabinet LCD-TV DVD/CD Clock Radio v Step-up Feature 3New Feature 3 Under Cabinet Designer Style DVD/CD Kitchen Clock Radio with 9" LCD TV 3 DVD/CD Playback s TV/Cable Tuner (w/Auto Channel Search) v 9" Wide Screen LCD Color Panel Display s High-End Stainless Steel Panel s High Quality Audio with Mega Xpand and Mega Bass® Sound System s TV Stereo/Auto SAP Function s 15 Station Presets (4AM/10FM) s Built-In Cooking Timer s Full Function Remote Control Please visit the Dealer Network for more information at www.sony.com/dn
Marketing Specifications
Page 2
s High Quality Audio with Mega Xpand and Mega Bass® Sound System Music, TV and DVD movie audio by creating a wider stereo effect and enhances reproduction of the unit such as volume, power and menu fuctions. s 15 Station Presets (4AM/10FM) offer convenient one-button tuning to 10 of your favorite FM and 4 AM radio stations s Built-In Cooking Timer eliminates the need for an additional timer unit for food preparation...
s High Quality Audio with Mega Xpand and Mega Bass® Sound System Music, TV and DVD movie audio by creating a wider stereo effect and enhances reproduction of the unit such as volume, power and menu fuctions. s 15 Station Presets (4AM/10FM) offer convenient one-button tuning to 10 of your favorite FM and 4 AM radio stations s Built-In Cooking Timer eliminates the need for an additional timer unit for food preparation...


