Operating Instructions
Page 4
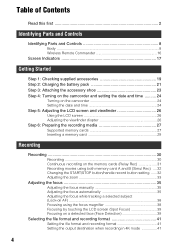
... 24 Turning on the camcorder 24 Setting the date and time 24 Step 5: Adjusting the LCD screen and viewfinder 26 Using the LCD screen 26 Adjusting the viewfinder diopter 26 Step 6: Preparing the recording media 27 Supported memory cards 27 Inserting a memory card 29 Recording Recording 30 Recording 30 Continuous recording on the memory cards (Relay Rec 31 Recording movies using both memory card A and B (Simul Rec) .... 32 Changing the START/STOP button/handle record button setting ...... 32 Adjusting the zoom 33 Adjusting the focus 35 Adjusting the focus manually 35 Adjusting the...
... 24 Turning on the camcorder 24 Setting the date and time 24 Step 5: Adjusting the LCD screen and viewfinder 26 Using the LCD screen 26 Adjusting the viewfinder diopter 26 Step 6: Preparing the recording media 27 Supported memory cards 27 Inserting a memory card 29 Recording Recording 30 Recording 30 Continuous recording on the memory cards (Relay Rec 31 Recording movies using both memory card A and B (Simul Rec) .... 32 Changing the START/STOP button/handle record button setting ...... 32 Adjusting the zoom 33 Adjusting the focus 35 Adjusting the focus manually 35 Adjusting the...
Operating Instructions
Page 5
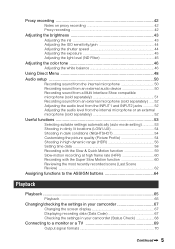
... range (HDR 56 Setting time data 58 Recording with the Slow & Quick Motion function 59 Slow-motion recording at high frame rate (HFR 60 Recording with the Super Slow Motion function 60 Reviewing the most recently recorded scene (Last Scene Review 62 Assigning functions to the ASSIGN buttons 64 Playback Playback 65 Playback 65 Changing/checking the settings in your camcorder 67 Changing the screen display 67 Displaying recording data (Data Code 67 Checking the settings in your camcorder (Status Check 68 Connecting to a monitor or a TV 69 Output signal formats 70 Continued...
... range (HDR 56 Setting time data 58 Recording with the Slow & Quick Motion function 59 Slow-motion recording at high frame rate (HFR 60 Recording with the Super Slow Motion function 60 Reviewing the most recently recorded scene (Last Scene Review 62 Assigning functions to the ASSIGN buttons 64 Playback Playback 65 Playback 65 Changing/checking the settings in your camcorder 67 Changing the screen display 67 Displaying recording data (Data Code 67 Checking the settings in your camcorder (Status Check 68 Connecting to a monitor or a TV 69 Output signal formats 70 Continued...
Operating Instructions
Page 7
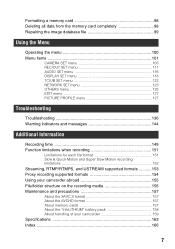
Formatting a memory card 98 Deleting all data from the memory card completely 98 Repairing the image database file 99 Using the Menu Operating the menu 100 Menu items 101 CAMERA SET menu 103 REC/OUT SET menu 111 AUDIO SET menu 116 DISPLAY SET menu 118 TC/UB SET menu 122 NETWORK SET menu 123 OTHERS menu 125 EDIT menu 127 PICTURE PROFILE menu 127 Troubleshooting Troubleshooting 136 Warning indicators and messages 144 Additional Information Recording time 149 Function limitations when recording 151 Limitations for each file format 151 Slow & Quick Motion and Super Slow Motion ...
Formatting a memory card 98 Deleting all data from the memory card completely 98 Repairing the image database file 99 Using the Menu Operating the menu 100 Menu items 101 CAMERA SET menu 103 REC/OUT SET menu 111 AUDIO SET menu 116 DISPLAY SET menu 118 TC/UB SET menu 122 NETWORK SET menu 123 OTHERS menu 125 EDIT menu 127 PICTURE PROFILE menu 127 Troubleshooting Troubleshooting 136 Warning indicators and messages 144 Additional Information Recording time 149 Function limitations when recording 151 Limitations for each file format 151 Slow & Quick Motion and Super Slow Motion ...
Operating Instructions
Page 19
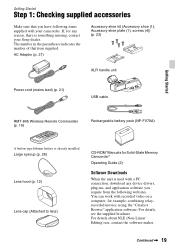
... Power cord (mains lead) (p. 21) USB cable Getting Started RMT-845 Wireless Remote Commander (p. 16) Rechargeable battery pack (NP-FV70A) A button-type lithium battery is something missing, contact your camcorder. Large eyecup (p. 26) Lens hood (p. 12) Lens cap (Attached to lens) CD-ROM "Manuals for Solid-State Memory Camcorder" Operating Guide (2) Software Downloads When the unit is used with recorded video on a computer, for any device drivers, plug-ins, and application software you have following websites. You can work...
... Power cord (mains lead) (p. 21) USB cable Getting Started RMT-845 Wireless Remote Commander (p. 16) Rechargeable battery pack (NP-FV70A) A button-type lithium battery is something missing, contact your camcorder. Large eyecup (p. 26) Lens hood (p. 12) Lens cap (Attached to lens) CD-ROM "Manuals for Solid-State Memory Camcorder" Operating Guide (2) Software Downloads When the unit is used with recorded video on a computer, for any device drivers, plug-ins, and application software you have following websites. You can work...
Operating Instructions
Page 29
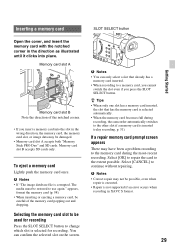
...; When the memory card becomes full during the most-recent recording. The media must be restored to continue without repairing. Select [CANCEL] to use again." b Notes • If "The image database file is not supported if an error occurs when recording in the wrong direction, the memory card, the memory card slot, or image data may be damaged. • Memory card slot A accepts both "Memory Stick PRO Duo" and SD cards. Inserting a memory card Open the cover...
...; When the memory card becomes full during the most-recent recording. The media must be restored to continue without repairing. Select [CANCEL] to use again." b Notes • If "The image database file is not supported if an error occurs when recording in the wrong direction, the memory card, the memory card slot, or image data may be damaged. • Memory card slot A accepts both "Memory Stick PRO Duo" and SD cards. Inserting a memory card Open the cover...

Operating Instructions
Page 30
... a microphone attached to your camcorder is recorded. To stop recording, press the START/STOP button (handle record button) again. The image data may be set to [NORMAL] while streaming. • When the access lamp is lit or flashing in the [MIC SELECT] menu and the XLR handle unit is connected to the camcorder without closing the LCD screen, interrupting the power, the settings will not be saved. Check that the memory cards are saved when you remove the battery...
... a microphone attached to your camcorder is recorded. To stop recording, press the START/STOP button (handle record button) again. The image data may be set to [NORMAL] while streaming. • When the access lamp is lit or flashing in the [MIC SELECT] menu and the XLR handle unit is connected to the camcorder without closing the LCD screen, interrupting the power, the settings will not be saved. Check that the memory cards are saved when you remove the battery...

Operating Instructions
Page 39
... focuses on the LCD screen. 1 Press the MENU button D. 2 Select (CAMERA SET) t [SPOT FOCUS]. 2 Select (CAMERA SET) t [FACE DETECTION] t [ON]. To cancel the priority face Move the selection cursor to the priority face frame, then press the v/V/b/B/SET button to a double frame. When using Digital Zoom - When a face is detected, a gray face detection frame is displayed. b Notes • Faces may not be focused on the LCD screen, the recorded image is disabled...
... focuses on the LCD screen. 1 Press the MENU button D. 2 Select (CAMERA SET) t [SPOT FOCUS]. 2 Select (CAMERA SET) t [FACE DETECTION] t [ON]. To cancel the priority face Move the selection cursor to the priority face frame, then press the v/V/b/B/SET button to a double frame. When using Digital Zoom - When a face is detected, a gray face detection frame is displayed. b Notes • Faces may not be focused on the LCD screen, the recorded image is disabled...
Operating Instructions
Page 55
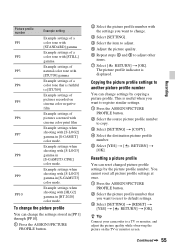
... picture profile number. 5 Select [YES] t [ RETURN] t [OK]. Resetting a picture profile You can reset changed picture profile settings by copying a picture profile. Continued , 55 Recording The picture profile indicator is displayed. You cannot reset all picture profile settings at once. 1 Press the ASSIGN3/PICTURE PROFILE button. 2 Select the picture profile number that is faithful to [ITU709] Example settings of pictures recorded on the TV or monitor screen. z Tip Connect your camcorder to a TV or monitor, and adjust the picture...
... picture profile number. 5 Select [YES] t [ RETURN] t [OK]. Resetting a picture profile You can reset changed picture profile settings by copying a picture profile. Continued , 55 Recording The picture profile indicator is displayed. You cannot reset all picture profile settings at once. 1 Press the ASSIGN3/PICTURE PROFILE button. 2 Select the picture profile number that is faithful to [ITU709] Example settings of pictures recorded on the TV or monitor screen. z Tip Connect your camcorder to a TV or monitor, and adjust the picture...
Operating Instructions
Page 56
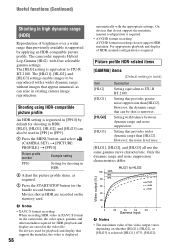
Shooting using HDR-compatible picture profile An HDR setting is registered in [PP10] by applying an HDR-compatible picture profile. Setting with a wider dynamic range without images that support the metadata, the video is displayed 56 automatically with four selectable gamma settings. Movies shot in HDR are stored in the video file. On devices used for shooting in HDR. [HLG], [HLG1], [HLG2], and [HLG3] can also be used in [PP1] to [PP9]. 1 Press the MENU button, and select...
Shooting using HDR-compatible picture profile An HDR setting is registered in [PP10] by applying an HDR-compatible picture profile. Setting with a wider dynamic range without images that support the metadata, the video is displayed 56 automatically with four selectable gamma settings. Movies shot in HDR are stored in the video file. On devices used for shooting in HDR. [HLG], [HLG1], [HLG2], and [HLG3] can also be used in [PP1] to [PP9]. 1 Press the MENU button, and select...
Operating Instructions
Page 58
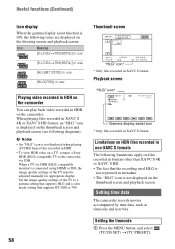
Setting time data The camcorder records movies accompanied by time data, such as timecode and user bits. Icon Meaning [S-LOG2t709(800%)] in use [S-LOG3t709(800%)] in use [HLG(BT.2020)] in use [HLG(709)] in use Playing video recorded in HDR on the camcorder You can play back video recorded in HDR. • To view HDR video on the thumbnail screen and playback screen (see following diagrams). When a TV (or HDR (HLG) compatible monitor) is displayed on a TV, connect a Sony HDR (HLG) compatible TV to a gamma...
Setting time data The camcorder records movies accompanied by time data, such as timecode and user bits. Icon Meaning [S-LOG2t709(800%)] in use [S-LOG3t709(800%)] in use [HLG(BT.2020)] in use [HLG(709)] in use Playing video recorded in HDR on the camcorder You can play back video recorded in HDR. • To view HDR video on the thumbnail screen and playback screen (see following diagrams). When a TV (or HDR (HLG) compatible monitor) is displayed on a TV, connect a Sony HDR (HLG) compatible TV to a gamma...
Operating Instructions
Page 59
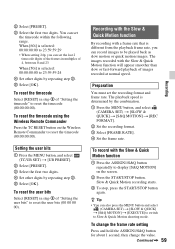
... [RESET] in step 2 of images recorded at normal speed. The playback speed is selected: 00:00:00:00 to Slow & Quick Motion shooting mode. You can also press the MENU button and select (CAMERA SET) t [SLOW & QUICK] t [S&Q MOTION] t [EXECUTE] to switch to 23:59:59:24 4 Set other digits by repeating step 3. 5 Select [OK]. To reset the timecode using the Wireless Remote Commander Press the TC RESET button on the screen. 2 Press the START/STOP button. To record with the Slow & Quick Motion function...
... [RESET] in step 2 of images recorded at normal speed. The playback speed is selected: 00:00:00:00 to Slow & Quick Motion shooting mode. You can also press the MENU button and select (CAMERA SET) t [SLOW & QUICK] t [S&Q MOTION] t [EXECUTE] to switch to 23:59:59:24 4 Set other digits by repeating step 3. 5 Select [OK]. To reset the timecode using the Wireless Remote Commander Press the TC RESET button on the screen. 2 Press the START/STOP button. To record with the Slow & Quick Motion function...

Operating Instructions
Page 61
... TRIGGER END TRIGGER HALF Time axis To record with the Super Slow Motion function will appear smoother than slow playback of recording time for about 1 second, change the setting using the v/V/b/B/SET button, and then press the v/V/b/B/SET button to Super Slow Motion shooting mode. To determine the recording time manually When [REC TIMING] is not saved. Recording stops and the captured content is set the record timing. 1 Press the MENU button, and select (CAMERA SET) t [SLOW & QUICK] t [SUPER SLOW MOTION]. 2 Select [REC FORMAT], and select the recording format. 3 Select [FRAME RATE...
... TRIGGER END TRIGGER HALF Time axis To record with the Super Slow Motion function will appear smoother than slow playback of recording time for about 1 second, change the setting using the v/V/b/B/SET button, and then press the v/V/b/B/SET button to Super Slow Motion shooting mode. To determine the recording time manually When [REC TIMING] is not saved. Recording stops and the captured content is set the record timing. 1 Press the MENU button, and select (CAMERA SET) t [SLOW & QUICK] t [SUPER SLOW MOTION]. 2 Select [REC FORMAT], and select the recording format. 3 Select [FRAME RATE...
Operating Instructions
Page 73
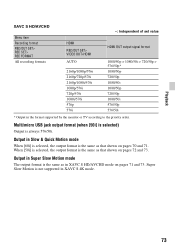
Output in Super Slow Motion mode The output format is the same as that shown on pages 72 and 73. Output in XAVC S 4K mode. 73 Super Slow Motion is always 576/50i. Playback XAVC S HD/AVCHD Menu item Recording format REC/OUT SET> REC SET> REC FORMAT All recording formats HDMI REC/OUT SET> VIDEO OUT>HDMI AUTO 2160p/1080p/576i...50i 576/50p 576/50i * Output in XAVC S HD/AVCHD mode on pages 71 and 73. Multi/micro USB jack output format (when [50i] is selected) Output is not supported in Slow & Quick Motion mode When [60i] is selected, the output format is the same as that shown...
Output in Super Slow Motion mode The output format is the same as that shown on pages 72 and 73. Output in XAVC S 4K mode. 73 Super Slow Motion is always 576/50i. Playback XAVC S HD/AVCHD Menu item Recording format REC/OUT SET> REC SET> REC FORMAT All recording formats HDMI REC/OUT SET> VIDEO OUT>HDMI AUTO 2160p/1080p/576i...50i 576/50p 576/50i * Output in XAVC S HD/AVCHD mode on pages 71 and 73. Multi/micro USB jack output format (when [50i] is selected) Output is not supported in Slow & Quick Motion mode When [60i] is selected, the output format is the same as that shown...

Operating Instructions
Page 104
... Description Turns the AE shift function on AF are disabled when using clear image zoom and digital zoom. OFF ( ): Does not use image stabilization function. • This setting is not active while you adjust the iris, shutter speed, ISO sensitivity/gain all manually. Adjusts the brightness. • This function is recommended when you set this function to the original. Selects the type of the zoom may also be recorded in the movie. Image quality deteriorates...
... Description Turns the AE shift function on AF are disabled when using clear image zoom and digital zoom. OFF ( ): Does not use image stabilization function. • This setting is not active while you adjust the iris, shutter speed, ISO sensitivity/gain all manually. Adjusts the brightness. • This function is recommended when you set this function to the original. Selects the type of the zoom may also be recorded in the movie. Image quality deteriorates...

Operating Instructions
Page 117
.... Using the Menu Continued , 117 AUTO: The microphone used for recording audio. MI SHOE MIC: Records audio using the HDMI jack to record to an external device. AUDIO SET Menu item MIC SELECT AUDIO OUTPUT TIMING Sub-items/Settings AUTO, INT MIC, MI SHOE MIC, STEREO MINI MIC LIVE, LIP SYNC Description Selects the microphone to the XLR handle unit or a Multi Interface Shoe compatible microphone. Selects the timing of priority: External microphone connected to MIC jack (PLUG IN POWER) > Microphone connected to the INPUT1 and INPUT2 jacks, the internal microphone...
.... Using the Menu Continued , 117 AUTO: The microphone used for recording audio. MI SHOE MIC: Records audio using the HDMI jack to record to an external device. AUDIO SET Menu item MIC SELECT AUDIO OUTPUT TIMING Sub-items/Settings AUTO, INT MIC, MI SHOE MIC, STEREO MINI MIC LIVE, LIP SYNC Description Selects the microphone to the XLR handle unit or a Multi Interface Shoe compatible microphone. Selects the timing of priority: External microphone connected to MIC jack (PLUG IN POWER) > Microphone connected to the INPUT1 and INPUT2 jacks, the internal microphone...
Operating Instructions
Page 139
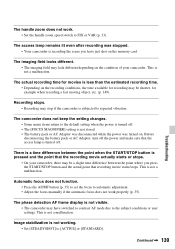
... adjustment. • Adjust the focus manually if the automatic focus does not work . • Set the handle zoom speed switch to the subject conditions or user settings. This is turned off. Before disconnecting the battery pack or AC Adaptor, turn off . • The [FOCUS MAGNIFIER] setting is not stored. • The battery pack or AC Adaptor was disconnected while the power was stopped. • Your camcorder is not a malfunction. There is a time...
... adjustment. • Adjust the focus manually if the automatic focus does not work . • Set the handle zoom speed switch to the subject conditions or user settings. This is turned off. Before disconnecting the battery pack or AC Adaptor, turn off . • The [FOCUS MAGNIFIER] setting is not stored. • The battery pack or AC Adaptor was disconnected while the power was stopped. • Your camcorder is not a malfunction. There is a time...
Operating Instructions
Page 146
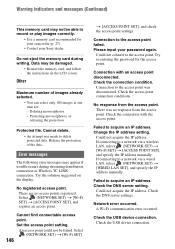
... record or play images correctly. • Use a memory card recommended for your camcorder (p. 27). • Contact your password again. An access point could not be able to a network via a wireless LAN, select (NETWORK SET) t [Wi-Fi SET] t [ACCESS POINT SET], and specify the IP address manually. No registered access point. Cannot find connectable access point. Data may not be found. Check the connection condition. Protecting movies/photos, or releasing the protection Protected file. Connection...
... record or play images correctly. • Use a memory card recommended for your camcorder (p. 27). • Contact your password again. An access point could not be able to a network via a wireless LAN, select (NETWORK SET) t [Wi-Fi SET] t [ACCESS POINT SET], and specify the IP address manually. No registered access point. Cannot find connectable access point. Data may not be found. Check the connection condition. Protecting movies/photos, or releasing the protection Protected file. Connection...
Operating Instructions
Page 147
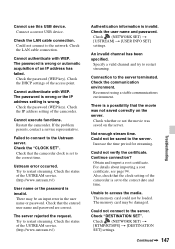
... a service representative. Check that the camcorder clock is set to the correct date and time. Specify a valid channel and try to the server. Reconnect using a stable communications environment. Could not verify the certificate. For details about importing a root certificate, see page 94. The memory card may be damaged. Check the LAN cable connection. Check the password (WEP key). Check the password (WEP key). Restart the camcorder. Ustream error occurred. Check...
... a service representative. Check that the camcorder clock is set to the correct date and time. Specify a valid channel and try to the server. Reconnect using a stable communications environment. Could not verify the certificate. For details about importing a root certificate, see page 94. The memory card may be damaged. Check the LAN cable connection. Check the password (WEP key). Check the password (WEP key). Restart the camcorder. Ustream error occurred. Check...
Operating Instructions
Page 157
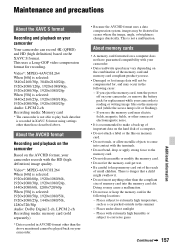
This uses a Long-GOP video compression format for replacement while your camcorder is reading or writing image files on the memory card (while the access lamp is lit or flashing). - If you eject the memory card, turn the power off on your camcorder. • Because the AVCHD format uses a data compression system, images may cause a malfunction. • Do not use or keep the memory card in XAVC S format using settings other than the compliant size of memory card into contact with...
This uses a Long-GOP video compression format for replacement while your camcorder is reading or writing image files on the memory card (while the access lamp is lit or flashing). - If you eject the memory card, turn the power off on your camcorder. • Because the AVCHD format uses a data compression system, images may cause a malfunction. • Do not use or keep the memory card in XAVC S format using settings other than the compliant size of memory card into contact with...
Operating Instructions
Page 167
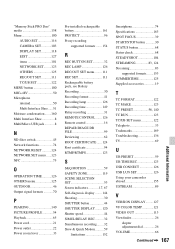
...75 O OPERATION TIME...........126 OTHERS menu 125 OUTDOOR 46 Output signal formats ...........70 P PEAKING 140 PICTURE PROFILE 54 Playback 65 Power cord 21 Power outlet 22 Power zoom lever 33 Pre-installed rechargeable battery 161 PROTECT 96 Proxy recording supported formats ....... 154 R REC BUTTON SET 32 REC LAMP 126 REC/OUT SET menu......... 111 REC SET 111 Rechargeable battery pack, see Battery Recording 30 Recording format 41 Recording lamp 126 Recording time 149 Relay recording 31 REMOTE CONTROL ....... 126 Remote control 16 REPAIR IMAGE DB FILE 99 Reviewing 62 ROOT...
...75 O OPERATION TIME...........126 OTHERS menu 125 OUTDOOR 46 Output signal formats ...........70 P PEAKING 140 PICTURE PROFILE 54 Playback 65 Power cord 21 Power outlet 22 Power zoom lever 33 Pre-installed rechargeable battery 161 PROTECT 96 Proxy recording supported formats ....... 154 R REC BUTTON SET 32 REC LAMP 126 REC/OUT SET menu......... 111 REC SET 111 Rechargeable battery pack, see Battery Recording 30 Recording format 41 Recording lamp 126 Recording time 149 Relay recording 31 REMOTE CONTROL ....... 126 Remote control 16 REPAIR IMAGE DB FILE 99 Reviewing 62 ROOT...

