User Manual
Page 1
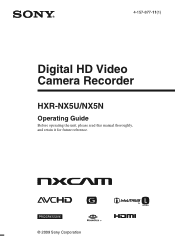
4-157-877-11(1) Digital HD Video Camera Recorder HXR-NX5U/NX5N Operating Guide Before operating the unit, please read this manual thoroughly, and retain it for future reference. © 2009 Sony Corporation
4-157-877-11(1) Digital HD Video Camera Recorder HXR-NX5U/NX5N Operating Guide Before operating the unit, please read this manual thoroughly, and retain it for future reference. © 2009 Sony Corporation

User Manual
Page 2
... for the recordable time of memory cards. • Up to 32 GB of memory cards are both called "Memory Stick PRO Duo" media in this manual thoroughly, and retain it in your camcorder.) b Notes • "Memory Stick PRO Duo" media can be used only with "Memory Stick PRO" media compatible equipment... : - PRO Duo" media)* ("Memory Stick - ("Memory Stick PRO-HG Duo" media) * Marked with your camcorder. Read this first Before operating this unit, please read this manual. • See page 101 for future reference.
... for the recordable time of memory cards. • Up to 32 GB of memory cards are both called "Memory Stick PRO Duo" media in this manual thoroughly, and retain it in your camcorder.) b Notes • "Memory Stick PRO Duo" media can be used only with "Memory Stick PRO" media compatible equipment... : - PRO Duo" media)* ("Memory Stick - ("Memory Stick PRO-HG Duo" media) * Marked with your camcorder. Read this first Before operating this unit, please read this manual. • See page 101 for future reference.
User Manual
Page 5
...therefore may appear different. • The on-screen displays in this manual show the NP-F770 unless otherwise specified. 5 About this manual • Memory cards and a flash memory unit are both referred to as recording media in this manual. • The images of battery packs in each local language are...). • Design and specifications of recording media and other accessories are subject to change without notice. • Illustrations of camcorders in this manual show the HXR-NX5U unless otherwise specified. • Illustrations of the LCD screen and the viewfinder used in this...
...therefore may appear different. • The on-screen displays in this manual show the NP-F770 unless otherwise specified. 5 About this manual • Memory cards and a flash memory unit are both referred to as recording media in this manual. • The images of battery packs in each local language are...). • Design and specifications of recording media and other accessories are subject to change without notice. • Illustrations of camcorders in this manual show the HXR-NX5U unless otherwise specified. • Illustrations of the LCD screen and the viewfinder used in this...

User Manual
Page 6
... definition image quality (SD 24 Selecting the recording format 25 Changing the settings of your camcorder recordings 27 Adjusting the zoom 27 Adjusting the focus manually 28 Adjusting the image brightness 29 Adjusting to natural color (White balance 31 Customizing the picture quality (Picture profile 33 Audio setup 40 Acquiring location...
... definition image quality (SD 24 Selecting the recording format 25 Changing the settings of your camcorder recordings 27 Adjusting the zoom 27 Adjusting the focus manually 28 Adjusting the image brightness 29 Adjusting to natural color (White balance 31 Customizing the picture quality (Picture profile 33 Audio setup 40 Acquiring location...
User Manual
Page 10
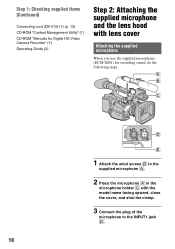
Step 1: Checking supplied items (Continued) Connecting cord (DK-415) (1) (p. 13) CD-ROM "Content Management Utility" (1) CD-ROM "Manuals for Digital HD Video Camera Recorder" (1) Operating Guide (2) Step 2: Attaching the supplied microphone and the lens hood with lens cover Attaching the supplied microphone When ...
Step 1: Checking supplied items (Continued) Connecting cord (DK-415) (1) (p. 13) CD-ROM "Content Management Utility" (1) CD-ROM "Manuals for Digital HD Video Camera Recorder" (1) Operating Guide (2) Step 2: Attaching the supplied microphone and the lens hood with lens cover Attaching the supplied microphone When ...

User Manual
Page 21
..., the camcorder divides the file and create a new file automatically. • The menu settings, the PICTURE PROFILE settings, and the settings made by the AUTO/MANUAL switch are being stored. Continued , 21 Recording/Playback Recording/Playback Recording Handle record button Recording lamp Recording lamp Lens hood POWER switch Record button Your...
..., the camcorder divides the file and create a new file automatically. • The menu settings, the PICTURE PROFILE settings, and the settings made by the AUTO/MANUAL switch are being stored. Continued , 21 Recording/Playback Recording/Playback Recording Handle record button Recording lamp Recording lamp Lens hood POWER switch Record button Your...

User Manual
Page 28
... adjustment is easier to focus on the subject when you release the button, the setting returns to manual focusing. The scenes will not be adjusted any closer. z Tips For focusing manually • It is restored. Move the power zoom lever towards T (telephoto) to adjust the focus... To record a stationary subject using a conversion lens (sold separately)). - Changing the settings of your camcorder recordings (Continued) Adjusting the focus manually 9 changes to when the focus cannot be adjusted any farther. 9 changes to when the focus cannot be displayed correctly if you want to...
... adjustment is easier to focus on the subject when you release the button, the setting returns to manual focusing. The scenes will not be adjusted any closer. z Tips For focusing manually • It is restored. Move the power zoom lever towards T (telephoto) to adjust the focus... To record a stationary subject using a conversion lens (sold separately)). - Changing the settings of your camcorder recordings (Continued) Adjusting the focus manually 9 changes to when the focus cannot be adjusted any farther. 9 changes to when the focus cannot be displayed correctly if you want to...

User Manual
Page 29
...expressed as an F value between F1.6 and F11. It will be easier to the ASSIGN 7 button (p. 47). To return to MANUAL. Adjusting the image brightness You can change or close subject. Continued , 29 Recording/Playback Focusing on the screen. The volume of the... screen is only available during manual focusing. Using the expanded focus (Expanded focus) [EXPANDED FOCUS] is not expanded. Press the ASSIGN 7 button. [EXPANDED FOCUS] appears ...
...expressed as an F value between F1.6 and F11. It will be easier to the ASSIGN 7 button (p. 47). To return to MANUAL. Adjusting the image brightness You can change or close subject. Continued , 29 Recording/Playback Focusing on the screen. The volume of the... screen is only available during manual focusing. Using the expanded focus (Expanded focus) [EXPANDED FOCUS] is not expanded. Press the ASSIGN 7 button. [EXPANDED FOCUS] appears ...

User Manual
Page 30
... Press the IRIS button E, or set for the selected gain switch position appears on the screen. The gain value set the AUTO/ MANUAL switch H to AUTO, other manually adjusted items (gain, shutter speed, white balance) also become automatic. z Tips • When you open the aperture by adjusting the... of focus, an important effect of field. For example, To adjust the gain automatically Press the GAIN button C, or set the AUTO/MANUAL switch H to MANUAL. 2 Press the SHUTTER SPEED button D until the shutter speed value is automatically adjusted, press the GAIN button C. 30 next to the...
... Press the IRIS button E, or set for the selected gain switch position appears on the screen. The gain value set the AUTO/ MANUAL switch H to AUTO, other manually adjusted items (gain, shutter speed, white balance) also become automatic. z Tips • When you open the aperture by adjusting the... of focus, an important effect of field. For example, To adjust the gain automatically Press the GAIN button C, or set the AUTO/MANUAL switch H to MANUAL. 2 Press the SHUTTER SPEED button D until the shutter speed value is automatically adjusted, press the GAIN button C. 30 next to the...

User Manual
Page 31
.... The shutter speed value disappears, or appears next to focus automatically at a lower shutter speed. b Notes • When you set the AUTO/MANUAL switch H to natural color (White balance) Continued , 31 Recording/Playback b Notes • If you change colors, or may be adjusted with ...the setting of light to 1. Adjusting to AUTO, other manually adjusted items (iris, gain, white balance) also become automatic. You may have horizontal bands of light (ND filter) You can set the shutter...
.... The shutter speed value disappears, or appears next to focus automatically at a lower shutter speed. b Notes • When you set the AUTO/MANUAL switch H to natural color (White balance) Continued , 31 Recording/Playback b Notes • If you change colors, or may be adjusted with ...the setting of light to 1. Adjusting to AUTO, other manually adjusted items (iris, gain, white balance) also become automatic. You may have horizontal bands of light (ND filter) You can set the shutter...

User Manual
Page 32
... of PRESET/A/B. Turn the SEL/PUSH EXEC dial E until the desired temperature appears on the screen, then press the dial to set the AUTO/MANUAL switch D to MANUAL. 2 Press the WHT BAL button A. 3 Set the white balance memory switch B to which the subject is selected and turn the SEL/PUSH EXEC dial...
... of PRESET/A/B. Turn the SEL/PUSH EXEC dial E until the desired temperature appears on the screen, then press the dial to set the AUTO/MANUAL switch D to MANUAL. 2 Press the WHT BAL button A. 3 Set the white balance memory switch B to which the subject is selected and turn the SEL/PUSH EXEC dial...

User Manual
Page 33
...the shutter speed to auto or around 1/60, then try adjusting the white balance again. • It may take a long time to AUTO, other manual adjusted items (iris, gain, and shutter speed) also become automatic. b Notes • When you want to perform a different operation before completing the adjustment... white balance automatically Press the WHT BAL button A or set [x.v.Color] in A or B. It will be disabled. If you set the AUTO/MANUAL switch D to slow flashing. b Notes • When a white balance adjustment value has not been obtained successfully, A or B turns from rapid flashing to...
...the shutter speed to auto or around 1/60, then try adjusting the white balance again. • It may take a long time to AUTO, other manual adjusted items (iris, gain, and shutter speed) also become automatic. b Notes • When you want to perform a different operation before completing the adjustment... white balance automatically Press the WHT BAL button A or set [x.v.Color] in A or B. It will be disabled. If you set the AUTO/MANUAL switch D to slow flashing. b Notes • When a white balance adjustment value has not been obtained successfully, A or B turns from rapid flashing to...

User Manual
Page 36
...To set the color phase. Item [MODE] [AUTO SET] [MANUAL SET] Description and settings Selects a mode either automatic or manual. [AUTO] : to set the knee point and slope automatically. [MANUAL] : to +5(steep) COLOR MODE To set the knee point and slope manually. Item Description and settings -7 (greenish) to 100% [SENSITIVITY] ...: Sets the sensitivity. HIGH/MIDDLE/LOW Sets the knee point and slope manually. [POINT] : Sets the knee point. 75% to 105% [SLOPE] : Sets the knee slope. -5(gentle) to set type and level of ...
...To set the color phase. Item [MODE] [AUTO SET] [MANUAL SET] Description and settings Selects a mode either automatic or manual. [AUTO] : to set the knee point and slope automatically. [MANUAL] : to +5(steep) COLOR MODE To set the knee point and slope manually. Item Description and settings -7 (greenish) to 100% [SENSITIVITY] ...: Sets the sensitivity. HIGH/MIDDLE/LOW Sets the knee point and slope manually. [POINT] : Sets the knee point. 75% to 105% [SLOPE] : Sets the knee slope. -5(gentle) to set type and level of ...

User Manual
Page 38
... level: likely to be limited) to 7 (High limit level: not likely to be performed). [OFF] : Disables the manual detail adjustment. [V/H BALANCE] : Sets the vertical (V) and horizontal (H) balance of DETAIL. -2 (off to the vertical (V) side) to +2 (off the... manual detail adjustment. [ON] : Enables the manual detail adjustment (automatic optimization will not be limited) [CRISPENING] : Sets the crispening level. 0 (shallow crispening level) to 7 (deep crispening...
... level: likely to be limited) to 7 (High limit level: not likely to be performed). [OFF] : Disables the manual detail adjustment. [V/H BALANCE] : Sets the vertical (V) and horizontal (H) balance of DETAIL. -2 (off to the vertical (V) side) to +2 (off the... manual detail adjustment. [ON] : Enables the manual detail adjustment (automatic optimization will not be limited) [CRISPENING] : Sets the crispening level. 0 (shallow crispening level) to 7 (deep crispening...

User Manual
Page 42
See [HEADPHONE OUT] on the sound at the time movies were recorded. b Notes • The indicator changes according to the strength of the manually adjusted channel to AUTO. Triangulating status GPS indicators GPS reception status Function off No The GPS switch is set the GPS switch to OFF. Triangulating ...
See [HEADPHONE OUT] on the sound at the time movies were recorded. b Notes • The indicator changes according to the strength of the manually adjusted channel to AUTO. Triangulating status GPS indicators GPS reception status Function off No The GPS switch is set the GPS switch to OFF. Triangulating ...
User Manual
Page 53
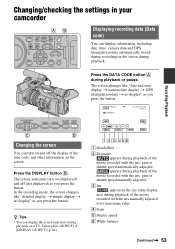
.... Recording/Playback Changing the screen You can turn on (displayed) and off the display of the movie recorded with the iris, gain or shutter speed manually adjusted. A SteadyShot B Exposure appears during playback of the time code, and other information on a TV. z Tips • You can display information, including date, time, camera...
.... Recording/Playback Changing the screen You can turn on (displayed) and off the display of the movie recorded with the iris, gain or shutter speed manually adjusted. A SteadyShot B Exposure appears during playback of the time code, and other information on a TV. z Tips • You can display information, including date, time, camera...
User Manual
Page 71
... to another . The default setting is [OFF]. z Tips • It is displayed as required. Especially in parentheses appear when the items are marked with manual focus. • You can increase the gain to an ASSIGN button (p. 47). GAIN SET You can set for the Auto Gain Control (AGC) from [.... • This function returns to the default setting when you switch the format, perform the function by 3 dB. b Notes • If you adjust the gain manually, you set this function to [ON] ( ), you switch the GAIN switch from [FAST], [MIDDLE] and [SLOW] or set to [ON] and play it ...
... to another . The default setting is [OFF]. z Tips • It is displayed as required. Especially in parentheses appear when the items are marked with manual focus. • You can increase the gain to an ASSIGN button (p. 47). GAIN SET You can set for the Auto Gain Control (AGC) from [.... • This function returns to the default setting when you switch the format, perform the function by 3 dB. b Notes • If you adjust the gain manually, you set this function to [ON] ( ), you switch the GAIN switch from [FAST], [MIDDLE] and [SLOW] or set to [ON] and play it ...

User Manual
Page 72
.... WB OUTDOOR LEVEL You can set an offset value to adjust the outdoor white balance when you adjust the iris, shutter speed and gain all manually. OFF Disables minus gain control during automatic gain control. MIDDLE LOW Automatically adjusts the white balance while increasing redness or blueness. When [ON] is [0]. ATW...
.... WB OUTDOOR LEVEL You can set an offset value to adjust the outdoor white balance when you adjust the iris, shutter speed and gain all manually. OFF Disables minus gain control during automatic gain control. MIDDLE LOW Automatically adjusts the white balance while increasing redness or blueness. When [ON] is [0]. ATW...
User Manual
Page 73
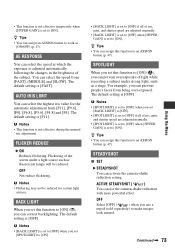
... you use the camera-shake reduction with more powerful effect. AUTO IRIS LIMIT You can prevent overexposure of iris, gain, and shutter speed are adjusted manually. • [BACK LIGHT] is set to [OFF] when [HYPER GAIN] is set to make images look natural. ACTIVE STEADYSHOT ( ) You...for certain light sources. . The default setting is [FAST]. b Notes • This function is [OFF]. The default setting is not effective during the manual iris adjustment. The default setting is set to [ON]. b Notes • [BACK LIGHT] is set to [OFF] when you set [BACK LIGHT] ...
... you use the camera-shake reduction with more powerful effect. AUTO IRIS LIMIT You can prevent overexposure of iris, gain, and shutter speed are adjusted manually. • [BACK LIGHT] is set to [OFF] when [HYPER GAIN] is set to make images look natural. ACTIVE STEADYSHOT ( ) You...for certain light sources. . The default setting is [FAST]. b Notes • This function is [OFF]. The default setting is not effective during the manual iris adjustment. The default setting is set to [ON]. b Notes • [BACK LIGHT] is set to [OFF] when you set [BACK LIGHT] ...

User Manual
Page 74
... recording when you are walking or moving around. B STANDARD Standard camera-shake reduction. x ACTIVE STEADYSHOT TYPE You can temporarily focus manually using techniques like panning or tilting. FOCUS MACRO When you set this function to [ON], you can select a type of camera... on a subject within 80 cm. SOFT Reduces camera shakes moderately. Slight unsteadiness remains in [ACTIVE STEADYSHOT] mode, and especially effective for Sony wide conversion lens. b Notes • When you will deteriorate slightly, as [SET] (p. 47). HARD Reduces camera shake considerably. AF...
... recording when you are walking or moving around. B STANDARD Standard camera-shake reduction. x ACTIVE STEADYSHOT TYPE You can temporarily focus manually using techniques like panning or tilting. FOCUS MACRO When you set this function to [ON], you can select a type of camera... on a subject within 80 cm. SOFT Reduces camera shakes moderately. Slight unsteadiness remains in [ACTIVE STEADYSHOT] mode, and especially effective for Sony wide conversion lens. b Notes • When you will deteriorate slightly, as [SET] (p. 47). HARD Reduces camera shake considerably. AF...


