Operating Instructions
Page 3
...user is adopted in BS (broadcast satellite) digital and terrestrial digital HDTV broadcastings and in this manual could void your Sony dealer regarding this product. The HDV standards • Digital high-definition (HD) video signals are recorded and played back on a DV format cassette. •...green in color) that into which utilizes 1080 effective scanning lines, within the HDV standards, and records pictures at the image bit rate of recording in HDV/DV format, it is recommended to use Your camcorder is adopted as the digital interface enabling a digital connection with TVs and ...
...user is adopted in BS (broadcast satellite) digital and terrestrial digital HDTV broadcastings and in this manual could void your Sony dealer regarding this product. The HDV standards • Digital high-definition (HD) video signals are recorded and played back on a DV format cassette. •...green in color) that into which utilizes 1080 effective scanning lines, within the HDV standards, and records pictures at the image bit rate of recording in HDV/DV format, it is recommended to use Your camcorder is adopted as the digital interface enabling a digital connection with TVs and ...
Operating Instructions
Page 4
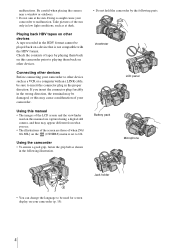
...other devices A tape recorded in the HDV format cannot be sure to malfunction. Playing back HDV tapes on other device such as a VCR or a computer with the HDV format. Check the contents of tapes by the following parts. Connecting other devices. Take pictures of your camcorder (p. 19). 4 If you see....screen display on the (OTHERS) menu is not compatible with an i.LINK cable, be played back on other devices Before connecting your camcorder to insert the connector plug in low light conditions, such as shown in the wrong direction, the terminal may appear different from ...
...other devices A tape recorded in the HDV format cannot be sure to malfunction. Playing back HDV tapes on other device such as a VCR or a computer with the HDV format. Check the contents of tapes by the following parts. Connecting other devices. Take pictures of your camcorder (p. 19). 4 If you see....screen display on the (OTHERS) menu is not compatible with an i.LINK cable, be played back on other devices Before connecting your camcorder to insert the connector plug in low light conditions, such as shown in the wrong direction, the terminal may appear different from ...
Operating Instructions
Page 7
... a computer 96 Dubbing sound to a recorded tape 98 Setting time values 101 Connecting an analog VCR to the computer via your camcorder - TC MAKE, etc 76 Using the (OTHERS) menu - CLOCK SET/WORLD TIME, etc 78 Customizing Personal Menu 83 Assigning ...the functions 86 Troubleshooting Troubleshooting 106 Warning indicators and messages ...111 Additional Information Using your camcorder abroad ..........113 HDV format and recording/playback 114 Compatibility of the menu is set to [60i]. 7 Advanced operations Using the Menu Selecting...
... a computer 96 Dubbing sound to a recorded tape 98 Setting time values 101 Connecting an analog VCR to the computer via your camcorder - TC MAKE, etc 76 Using the (OTHERS) menu - CLOCK SET/WORLD TIME, etc 78 Customizing Personal Menu 83 Assigning ...the functions 86 Troubleshooting Troubleshooting 106 Warning indicators and messages ...111 Additional Information Using your camcorder abroad ..........113 HDV format and recording/playback 114 Compatibility of the menu is set to [60i]. 7 Advanced operations Using the Menu Selecting...
Operating Instructions
Page 12
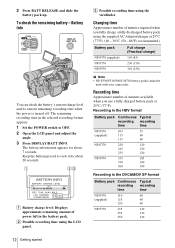
... To check the remaining battery - The battery information appears for about 7 seconds. B Possible recording time using the viewfinder. Recording in the HDV format Battery pack Continuous Typical recording recording time time NP-F570 105 55 (supplied) 115 60 115 60 NP-F770 220 120 245 120 ...Practical charge) 145 (85) 230 (170) 310 (250) b Note • NP-F330/F530/500/510/710 battery packs cannot be used with your camcorder. 2 Press BATT RELEASE and slide the battery pack up. Keep the button pressed to OFF. 2 Open the LCD panel and adjust the angle. 3 Press...
... To check the remaining battery - The battery information appears for about 7 seconds. B Possible recording time using the viewfinder. Recording in the HDV format Battery pack Continuous Typical recording recording time time NP-F570 105 55 (supplied) 115 60 115 60 NP-F770 220 120 245 120 ...Practical charge) 145 (85) 230 (170) 310 (250) b Note • NP-F330/F530/500/510/710 battery packs cannot be used with your camcorder. 2 Press BATT RELEASE and slide the battery pack up. Keep the button pressed to OFF. 2 Open the LCD panel and adjust the angle. 3 Press...
Operating Instructions
Page 13
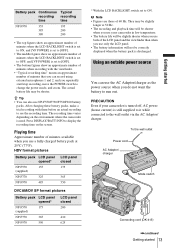
... external microphones 1 and 2, and you use only the LCD panel. • The battery information will be correctly displayed when the battery pack is discharged. HDV format pictures Battery pack LCD panel opened* NP-F570 155 (supplied) NP-F770 325 NP-F970 485 LCD panel closed 175 365 550 DVCAM/DV... switch is set to OFF, and [VF POWER] is set to ON. b Note • Figures are those of 60 Hz. PRECAUTION Even if your camcorder in low temperature. • The battery life will not be slightly shorter when you use NP-F550/F730/F750/F960 battery packs. They may be...
... external microphones 1 and 2, and you use only the LCD panel. • The battery information will be correctly displayed when the battery pack is discharged. HDV format pictures Battery pack LCD panel opened* NP-F570 155 (supplied) NP-F770 325 NP-F970 485 LCD panel closed 175 365 550 DVCAM/DV... switch is set to OFF, and [VF POWER] is set to ON. b Note • Figures are those of 60 Hz. PRECAUTION Even if your camcorder in low temperature. • The battery life will not be slightly shorter when you use NP-F550/F730/F750/F960 battery packs. They may be...
Operating Instructions
Page 20
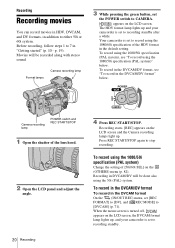
...recording lamp 3 While pressing the green button, set [REC FORMAT] to [DV], and [ REC MODE] to [DVCAM] (p. 71). The HDV format lamp lights up , and your camcorder is turned off, appears on the (OTHERS) menu (p. 82). Press REC START/STOP again to either 50i or 60i system. To record using... (PAL system) Change the setting of [50i/60i SEL] on the LCD screen, the DVCAM format lamp lights up and your camcorder is set to recording standby. Your camcorder is set to recording standby after a while. To record in the default setting. Before recording, follow steps 1 to 7 in ...
...recording lamp 3 While pressing the green button, set [REC FORMAT] to [DV], and [ REC MODE] to [DVCAM] (p. 71). The HDV format lamp lights up , and your camcorder is turned off, appears on the (OTHERS) menu (p. 82). Press REC START/STOP again to either 50i or 60i system. To record using... (PAL system) Change the setting of [50i/60i SEL] on the LCD screen, the DVCAM format lamp lights up and your camcorder is set to recording standby. Your camcorder is set to recording standby after a while. To record in the default setting. Before recording, follow steps 1 to 7 in ...
Operating Instructions
Page 21
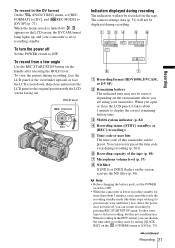
... indicators will not be recorded on the (OTHERS) menu to the original position with the LCD screen facing out. When recording in the HDV format, you are using your camcorder exits the recording standby mode (the drum stops rotating) to OFF. C 50i/60i system indicator (p. 82) D Recording status ([STBY] (...on the handle after releasing the HOLD lever. b Note • Before changing the battery pack, set the POWER switch to OFF. • When the camcorder is set [REC FORMAT] to [DV], and [ REC MODE] to recording standby. When the menu screen is turned off , you open or close ...
... indicators will not be recorded on the (OTHERS) menu to the original position with the LCD screen facing out. When recording in the HDV format, you are using your camcorder exits the recording standby mode (the drum stops rotating) to OFF. C 50i/60i system indicator (p. 82) D Recording status ([STBY] (...on the handle after releasing the HOLD lever. b Note • Before changing the battery pack, set the POWER switch to OFF. • When the camcorder is set [REC FORMAT] to [DV], and [ REC MODE] to recording standby. When the menu screen is turned off , you open or close ...
Operating Instructions
Page 22
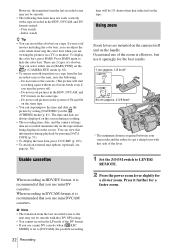
... correctly with that side of color bar. There are mounted on the camera itself and on the same tape. - Usable cassettes When recording in the HDV, DVCAM, and DV formats mixed: - You can select either one in DVCAM format, it further for the best results. 1 cm (approx. 1/2... inch)* 80 cm (approx. 2 5/8 feet)* * The minimum distance required between your camcorder and the subject to get a sharp focus with a tape recorded in HDV/DV format, it sparingly for a faster zoom. When recording in [BARS TYPE] on the (CAMERA SET) menu (p. 62). •...
... correctly with that side of color bar. There are mounted on the camera itself and on the same tape. - Usable cassettes When recording in the HDV, DVCAM, and DV formats mixed: - You can select either one in DVCAM format, it further for the best results. 1 cm (approx. 1/2... inch)* 80 cm (approx. 2 5/8 feet)* * The minimum distance required between your camcorder and the subject to get a sharp focus with a tape recorded in HDV/DV format, it sparingly for a faster zoom. When recording in [BARS TYPE] on the (CAMERA SET) menu (p. 62). •...
Operating Instructions
Page 34
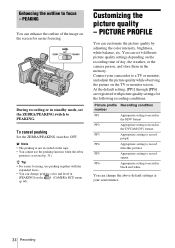
... Appropriate setting to record sunset PP6 Appropriate setting to OFF. Picture profile Recording condition number PP1 Appropriate setting to record in the HDV format PP2 Appropriate setting to record in the memory. During recording or in black and white You can change the above default... settings at your camcorder to focus - Customizing the picture quality - To cancel peaking Set the ZEBRA/PEAKING switch to record in standby mode, set 6 ...
... Appropriate setting to record sunset PP6 Appropriate setting to OFF. Picture profile Recording condition number PP1 Appropriate setting to record in the HDV format PP2 Appropriate setting to record in the memory. During recording or in black and white You can change the above default... settings at your camcorder to focus - Customizing the picture quality - To cancel peaking Set the ZEBRA/PEAKING switch to record in standby mode, set 6 ...
Operating Instructions
Page 45
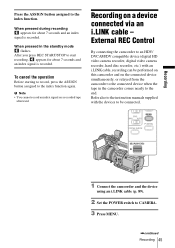
.... After you press REC START/STOP to the connected device when the tape in the standby mode flashes. External REC Control By connecting the camcorder to an HDV/ DVCAM/DV compatible device (digital HD video camera recorder, digital video camera recorder, hard disc recorder, etc.) with the devices to CAMERA. 3 Press MENU...
.... After you press REC START/STOP to the connected device when the tape in the standby mode flashes. External REC Control By connecting the camcorder to an HDV/ DVCAM/DV compatible device (digital HD video camera recorder, digital video camera recorder, hard disc recorder, etc.) with the devices to CAMERA. 3 Press MENU...

Operating Instructions
Page 48
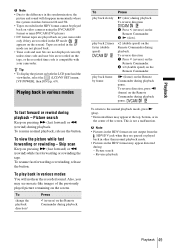
...Press N (play) to start playback. To fast forward or rewind Press M (fast forward) or m (rewind) in stop ). To review movies on your camcorder. To pause Press X (pause) during tape playback 1 Open the LCD panel and adjust the angle. 2 While pressing the green button, set the POWER switch ... the operations are possible using the Remote Commander. Indicators displayed during playback. When playing back the tape, select the (IN/OUT REC) menu, [VCR HDV/DV], then [AUTO] (the default setting). To adjust the volume Adjust the volume by pressing VOLUME - (decrease) / + (increase). Playback stops...
...Press N (play) to start playback. To fast forward or rewind Press M (fast forward) or m (rewind) in stop ). To review movies on your camcorder. To pause Press X (pause) during tape playback 1 Open the LCD panel and adjust the angle. 2 While pressing the green button, set the POWER switch ... the operations are possible using the Remote Commander. Indicators displayed during playback. When playing back the tape, select the (IN/OUT REC) menu, [VCR HDV/DV], then [AUTO] (the default setting). To adjust the volume Adjust the volume by pressing VOLUME - (decrease) / + (increase). Playback stops...
Operating Instructions
Page 49
...search - To play back in various modes You will disappear momentarily where the system switches between 60i and 50i. • Tapes recorded in the HDV format cannot be played back on video cameras using the DVCAM/DV format or mini-DVCAM (DV) players. • DV format tapes are played... back on your camcorder. play ). * Horizontal lines may appear distorted during playback pause. This is compatible with your camcorder only if they are recorded in the SP mode ( appears on both the LCD panel and the ...
...search - To play back in various modes You will disappear momentarily where the system switches between 60i and 50i. • Tapes recorded in the HDV format cannot be played back on video cameras using the DVCAM/DV format or mini-DVCAM (DV) players. • DV format tapes are played... back on your camcorder. play ). * Horizontal lines may appear distorted during playback pause. This is compatible with your camcorder only if they are recorded in the SP mode ( appears on both the LCD panel and the ...
Operating Instructions
Page 51
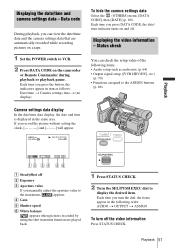
...Gain E Shutter speed F White balance appears when pictures recorded by using the shot transition function are automatically recorded while recording pictures on the camcorder or Remote Commander during playback or playback pause. Each time you press the button, the indicators appear in the following items. • ...can check the setup value of the following order: AUIDO t OUTPUT t ASSIGN To turn as audio mix (p. 64) • Output signal setup ([VCR HDV/DV], etc.) (p. 70) • Functions assigned to VCR. 2 Press DATA CODE on a tape. 1 Set the POWER switch to the ASSIGN buttons ...
...Gain E Shutter speed F White balance appears when pictures recorded by using the shot transition function are automatically recorded while recording pictures on the camcorder or Remote Commander during playback or playback pause. Each time you press the button, the indicators appear in the following items. • ...can check the setup value of the following order: AUIDO t OUTPUT t ASSIGN To turn as audio mix (p. 64) • Output signal setup ([VCR HDV/DV], etc.) (p. 70) • Functions assigned to VCR. 2 Press DATA CODE on a tape. 1 Set the POWER switch to the ASSIGN buttons ...
Operating Instructions
Page 52
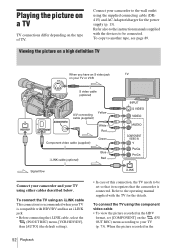
... component video cable • To view the picture recorded in the 52 Playback When the picture recorded in the HDV format, set so that it recognizes that the camcorder is connected. Connect your TV using the supplied connecting cable (DK415) and AC Adaptor/charger for the details.... Refer also to the instruction manuals supplied with the devices to the operating manual supplied with HDV/DV and has an i.LINK jack....
... component video cable • To view the picture recorded in the 52 Playback When the picture recorded in the HDV format, set so that it recognizes that the camcorder is connected. Connect your TV using the supplied connecting cable (DK415) and AC Adaptor/charger for the details.... Refer also to the instruction manuals supplied with the devices to the operating manual supplied with HDV/DV and has an i.LINK jack....
Operating Instructions
Page 53
The audio will not be output when you set [VCR HDV/DV] before connecting the i.LINK cable. b Note • Be sure that you connect with the S video cable alone. Otherwise, the TV might not be connected, ... jack, if copyright protection signals are not output from the COMPONENT OUTPUT jack. Playback 53 Playback When your TV is connected to a VCR Connect your camcorder by the S video jacks using the A/V connecting cable. To output audio signals, connect the white and red plugs of the A/V connecting cable to the audio...
The audio will not be output when you set [VCR HDV/DV] before connecting the i.LINK cable. b Note • Be sure that you connect with the S video cable alone. Otherwise, the TV might not be connected, ... jack, if copyright protection signals are not output from the COMPONENT OUTPUT jack. Playback 53 Playback When your TV is connected to a VCR Connect your camcorder by the S video jacks using the A/V connecting cable. To output audio signals, connect the white and red plugs of the A/V connecting cable to the audio...
Operating Instructions
Page 54
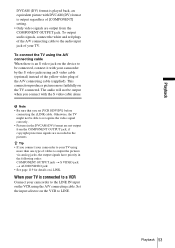
...Yellow cable (supplied) Component video cable (supplied) White Red Green Signal flow Blue Red Connect your camcorder and your TV or VCR using the component video cable This connection is output regardless of your TV...To view the picture on a 4:3 TV • To view the picture recorded in the HDV format, select the (IN/OUT REC) menu, [DOWN CONVERT], then a desired mode (p. 74). •... To view the picture recorded in the HDV format, set [COMPONENT] on the (IN/ OUT REC) menu according to produce high resolution pictures. ...
...Yellow cable (supplied) Component video cable (supplied) White Red Green Signal flow Blue Red Connect your camcorder and your TV or VCR using the component video cable This connection is output regardless of your TV...To view the picture on a 4:3 TV • To view the picture recorded in the HDV format, select the (IN/OUT REC) menu, [DOWN CONVERT], then a desired mode (p. 74). •... To view the picture recorded in the HDV format, set [COMPONENT] on the (IN/ OUT REC) menu according to produce high resolution pictures. ...
Operating Instructions
Page 70
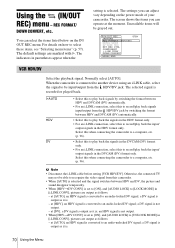
... select these items, see "Selecting menu items" (p. 57). a DV signal is . 70 Using the Menu When the camcorder is recorded or played back. The indicators in the HDV format only. at [HDV], an HDV signal is ; GAUTO HDV DV • Select this to play back signals by switching the format between...LOCK MODE] in [i.LINK CONV], pictures are marked with G. b Note • Disconnect the i.LINK cable before setting [VCR HDV/DV]. For details on the power mode of your camcorder. an HDV signal is not output. • When [HDVtDV CONV] is set to [ON], and [AUDIO LOCK] to an audio-locked...
... select these items, see "Selecting menu items" (p. 57). a DV signal is . 70 Using the Menu When the camcorder is recorded or played back. The indicators in the HDV format only. at [HDV], an HDV signal is ; GAUTO HDV DV • Select this to play back signals by switching the format between...LOCK MODE] in [i.LINK CONV], pictures are marked with G. b Note • Disconnect the i.LINK cable before setting [VCR HDV/DV]. For details on the power mode of your camcorder. an HDV signal is not output. • When [HDVtDV CONV] is set to [ON], and [AUDIO LOCK] to an audio-locked...
Operating Instructions
Page 71
a DV signal is not output. • An HDV signal cannot be interrupted when you play back the tape on other camcorders or VCRs. • When you mix recordings in the DVCAM mode and in the DVCAM/DV format. REC FORMAT Selects a recording format when the POWER ... the Menu ,continued Using the Menu 71 GHDV1080i ( ) DV ( Select to a connected device using the HDV1080i specification. at [HDV], an HDV signal is set at [DV], a DV signal is output as it is; an HDV signal is not output. - In addition, you want to record for a long time on one tape, the playback...
a DV signal is not output. • An HDV signal cannot be interrupted when you play back the tape on other camcorders or VCRs. • When you mix recordings in the DVCAM mode and in the DVCAM/DV format. REC FORMAT Selects a recording format when the POWER ... the Menu ,continued Using the Menu 71 GHDV1080i ( ) DV ( Select to a connected device using the HDV1080i specification. at [HDV], an HDV signal is set at [DV], a DV signal is output as it is; an HDV signal is not output. - In addition, you want to record for a long time on one tape, the playback...

Operating Instructions
Page 73
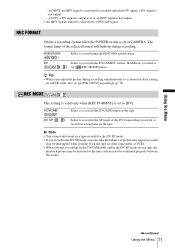
...output the signals in accordance with 576p. i.LINK CONV When the POWER switch is compatible with 1080i. Select when connecting your camcorder to a TV that for audio is separate from the HDV/DV jack. Using the Menu HDVtDV CONV GOFF ON Select to CAMERA, this setting is ...HDV1080i] is compatible with 1080i. Signals which sampling clock for information about an input signal via an i.LINK connection. ,continued Using the Menu 73 Select when connecting your camcorder to a TV that of video are output from that is selected in [VCR HDV/DV]. When the POWER...
...output the signals in accordance with 576p. i.LINK CONV When the POWER switch is compatible with 1080i. Select when connecting your camcorder to a TV that for audio is separate from the HDV/DV jack. Using the Menu HDVtDV CONV GOFF ON Select to CAMERA, this setting is ...HDV1080i] is compatible with 1080i. Signals which sampling clock for information about an input signal via an i.LINK connection. ,continued Using the Menu 73 Select when connecting your camcorder to a TV that of video are output from that is selected in [VCR HDV/DV]. When the POWER...
Operating Instructions
Page 74
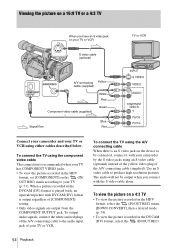
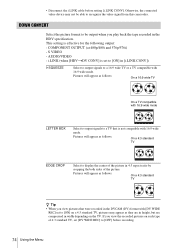
... a 4:3 standard TV z Tip • When you play back the tape recorded in 4:3 aspect ratio by cropping the both sides of the picture in the HDV specification. S VIDEO - Pictures will appear as follows: On a 4:3 standard TV EDGE CROP Select to a TV that were recorded in [i.LINK CONV]) GSQUEEZE ...signals to a 16:9 wide TV or a TV compatible with [DV WIDE REC] set [DV WIDE REC] to recognize the video signal from this camcorder. DOWN CONVERT Select the picture format to [ON] on a 4:3 standard TV, pictures may not be output when you view pictures that is not compatible...
... a 4:3 standard TV z Tip • When you play back the tape recorded in 4:3 aspect ratio by cropping the both sides of the picture in the HDV specification. S VIDEO - Pictures will appear as follows: On a 4:3 standard TV EDGE CROP Select to a TV that were recorded in [i.LINK CONV]) GSQUEEZE ...signals to a 16:9 wide TV or a TV compatible with [DV WIDE REC] set [DV WIDE REC] to recognize the video signal from this camcorder. DOWN CONVERT Select the picture format to [ON] on a 4:3 standard TV, pictures may not be output when you view pictures that is not compatible...


