Operating Instructions
Page 3
...order to comply with the instructions, may cause harmful interference to a malfunction of recording in DVCAM format, it is recommended to use Your camcorder is recommended to correct the interference by turning the equipment off and on the bottom. Increase the separation between the equipment and receiver. -... the manufacturing process and do not affect the recording in any changes or modifications not expressly approved in this manual could void your Sony dealer regarding this product. However, there may be determined by one or more of FCC Rules. Model No.HVRSerial No. The ...
...order to comply with the instructions, may cause harmful interference to a malfunction of recording in DVCAM format, it is recommended to use Your camcorder is recommended to correct the interference by turning the equipment off and on the bottom. Increase the separation between the equipment and receiver. -... the manufacturing process and do not affect the recording in any changes or modifications not expressly approved in this manual could void your Sony dealer regarding this product. However, there may be determined by one or more of FCC Rules. Model No.HVRSerial No. The ...
Operating Instructions
Page 4
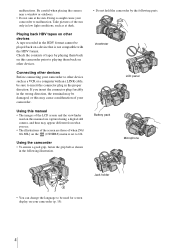
... 60i SEL] on a device that is set to insert the connector plug in the wrong direction, the terminal may cause a malfunction of your camcorder (p. 19). 4 Connecting other device such as at the sun. Viewfinder LCD panel Battery pack Microphone Jack holder • You can change the... to malfunction. malfunctions. Check the contents of the sun only in the following illustration. • Do not hold the camcorder by playing them back on your camcorder. Take pictures of tapes by the following parts. Be careful when placing the camera near a window or outdoors. •...
... 60i SEL] on a device that is set to insert the connector plug in the wrong direction, the terminal may cause a malfunction of your camcorder (p. 19). 4 Connecting other device such as at the sun. Viewfinder LCD panel Battery pack Microphone Jack holder • You can change the... to malfunction. malfunctions. Check the contents of the sun only in the following illustration. • Do not hold the camcorder by playing them back on your camcorder. Take pictures of tapes by the following parts. Be careful when placing the camera near a window or outdoors. •...
Operating Instructions
Page 7
... SET/WORLD TIME, etc 78 Customizing Personal Menu 83 Assigning the functions 86 Troubleshooting Troubleshooting 106 Warning indicators and messages ...111 Additional Information Using your camcorder - Features available for the DVCAM format only. TC MAKE, etc 76 Using the (OTHERS) menu - LCD COLOR, etc 68 Using the (IN/OUT ... Connecting to a computer 96 Dubbing sound to a recorded tape 98 Setting time values 101 Connecting an analog VCR to the computer via your camcorder abroad ..........113 HDV format and recording/playback 114 Compatibility of the menu is set to [50i].
... SET/WORLD TIME, etc 78 Customizing Personal Menu 83 Assigning the functions 86 Troubleshooting Troubleshooting 106 Warning indicators and messages ...111 Additional Information Using your camcorder - Features available for the DVCAM format only. TC MAKE, etc 76 Using the (OTHERS) menu - LCD COLOR, etc 68 Using the (IN/OUT ... Connecting to a computer 96 Dubbing sound to a recorded tape 98 Setting time values 101 Connecting an analog VCR to the computer via your camcorder abroad ..........113 HDV format and recording/playback 114 Compatibility of the menu is set to [50i].
Operating Instructions
Page 8
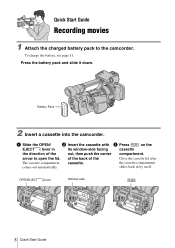
... battery, see page 11. a Slide the OPEN/ b Insert the cassette with c Press on the EJECT lever in by itself. Battery Pack 2 Insert a cassette into the camcorder. OPEN/EJECT lever Window-side 8 Quick Start Guide Quick Start Guide Recording movies 1 Attach the charged battery pack to open the lid. Press the battery...
... battery, see page 11. a Slide the OPEN/ b Insert the cassette with c Press on the EJECT lever in by itself. Battery Pack 2 Insert a cassette into the camcorder. OPEN/EJECT lever Window-side 8 Quick Start Guide Quick Start Guide Recording movies 1 Attach the charged battery pack to open the lid. Press the battery...

Operating Instructions
Page 10
... (DK-415) (1) Shoe adaptor (1) To attach it to your camcorder. Cleaning cassette (1) Shoulder strap (1) To attach it to your camcorder, see page 126. AC Adaptor/charger (1) Large eyecup (1) To attach it to your camcorder, see page 131. b Note • If you have following ...items supplied with your camcorder. Operating Instructions (This manual) (1) 10 Getting started Step 1: Checking supplied items Make sure you attach...
... (DK-415) (1) Shoe adaptor (1) To attach it to your camcorder. Cleaning cassette (1) Shoulder strap (1) To attach it to your camcorder, see page 126. AC Adaptor/charger (1) Large eyecup (1) To attach it to your camcorder, see page 131. b Note • If you have following ...items supplied with your camcorder. Operating Instructions (This manual) (1) 10 Getting started Step 1: Checking supplied items Make sure you attach...

Operating Instructions
Page 11
... Charge lamp Mode switch 1 Set the mode switch to CHARGE. 2 Connect the power cord to the AC Adaptor/charger. 3 Connect the power cord to the camcorder Press the battery pack and slide it down , slide it in the shape of a full battery ( ) that indicates that the battery has been sufficiently charged...
... Charge lamp Mode switch 1 Set the mode switch to CHARGE. 2 Connect the power cord to the AC Adaptor/charger. 3 Connect the power cord to the camcorder Press the battery pack and slide it down , slide it in the shape of a full battery ( ) that indicates that the battery has been sufficiently charged...
Operating Instructions
Page 12
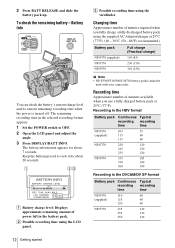
... Full charge (Practical charge) 145 (85) 230 (170) 310 (250) b Note • NP-F330/F530/500/510/710 battery packs cannot be used with your camcorder.
... Full charge (Practical charge) 145 (85) 230 (170) 310 (250) b Note • NP-F330/F530/500/510/710 battery packs cannot be used with your camcorder.
Operating Instructions
Page 13
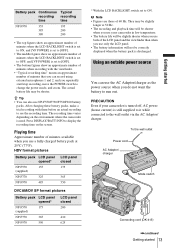
... battery packs, make a trial recording with the viewfinder. • "Typical recording time" means an approximate number of minutes that you use your camcorder is turned off, AC power (house current) is discharged. HDV format pictures Battery pack LCD panel opened* NP-F570 155 (supplied) NP-F770... source You can record using external microphones 1 and 2, and you do not want the battery to run out. PRECAUTION Even if your camcorder in low temperature. • The battery life will not be slightly longer at 25°C (77°F). Battery pack Continuous Typical recording...
... battery packs, make a trial recording with the viewfinder. • "Typical recording time" means an approximate number of minutes that you use your camcorder is turned off, AC power (house current) is discharged. HDV format pictures Battery pack LCD panel opened* NP-F570 155 (supplied) NP-F770... source You can record using external microphones 1 and 2, and you do not want the battery to run out. PRECAUTION Even if your camcorder in low temperature. • The battery life will not be slightly longer at 25°C (77°F). Battery pack Continuous Typical recording...
Operating Instructions
Page 14
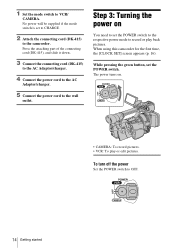
Step 3: Turning the power on . • CAMERA: To record pictures. • VCR: To play back pictures. When using this camcorder for the first time, the [CLOCK SET] screen appears (p. 16). Press the attaching part of the connecting cord (DK-415), and slide it down. 3 Connect ... switch to the wall outlet. No power will be supplied if the mode switch is set the POWER switch. 1 Set the mode switch to the camcorder. While pressing the green button, set to CHARGE. 2 Attach the connecting cord (DK-415) to VCR/ CAMERA.
Step 3: Turning the power on . • CAMERA: To record pictures. • VCR: To play back pictures. When using this camcorder for the first time, the [CLOCK SET] screen appears (p. 16). Press the attaching part of the connecting cord (DK-415), and slide it down. 3 Connect ... switch to the wall outlet. No power will be supplied if the mode switch is set the POWER switch. 1 Set the mode switch to the camcorder. While pressing the green button, set to CHARGE. 2 Attach the connecting cord (DK-415) to VCR/ CAMERA.
Operating Instructions
Page 15
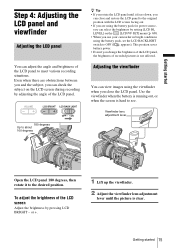
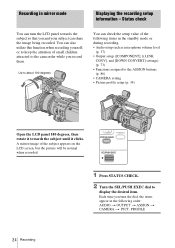
Adjusting the viewfinder You can view images using the battery pack for power source, you use your camcorder in bright conditions using the battery pack, set the LCD BACKLIGHT switch to OFF ( appears). Use the viewfinder when the battery is running out, or ...
Adjusting the viewfinder You can view images using the battery pack for power source, you use your camcorder in bright conditions using the battery pack, set the LCD BACKLIGHT switch to OFF ( appears). Use the viewfinder when the battery is running out, or ...
Operating Instructions
Page 16
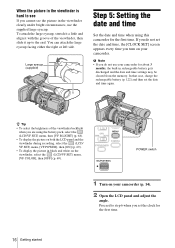
...you do not set the date and time, the [CLOCK SET] screen appears every time you turn on your camcorder (p. 14). 2 Open the LCD panel and adjust the angle. To attach the large eyecup, stretch it a... little and align it with the groove of the viewfinder backlight when you are using this camcorder for the first time. 16 Getting started You can attach the large eyecup facing either the ...right or left side. POWER switch 1 Turn on your camcorder for about 3 months, the built-in rechargeable battery gets discharged and the date and time settings ...
...you do not set the date and time, the [CLOCK SET] screen appears every time you turn on your camcorder (p. 14). 2 Open the LCD panel and adjust the angle. To attach the large eyecup, stretch it a... little and align it with the groove of the viewfinder backlight when you are using this camcorder for the first time. 16 Getting started You can attach the large eyecup facing either the ...right or left side. POWER switch 1 Turn on your camcorder for about 3 months, the built-in rechargeable battery gets discharged and the date and time settings ...
Operating Instructions
Page 18
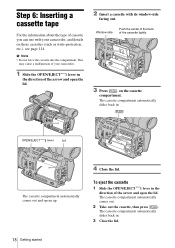
... into the compartment. The cassette compartment automatically slides back in the direction of the arrow and open the lid. 2 Insert a cassette with your camcorder. 1 Slide the OPEN/EJECT lever in . 3 Close the lid. 18 Getting started The cassette compartment automatically comes out. 2 Take out the... The cassette compartment automatically slides back in the direction of the arrow and open the lid. This may cause a malfunction of your camcorder, and details on the cassette compartment. Window-side Push the center of the back of the cassette lightly. 3 Press on these cassettes...
... into the compartment. The cassette compartment automatically slides back in the direction of the arrow and open the lid. 2 Insert a cassette with your camcorder. 1 Slide the OPEN/EJECT lever in . 3 Close the lid. 18 Getting started The cassette compartment automatically comes out. 2 Take out the... The cassette compartment automatically slides back in the direction of the arrow and open the lid. This may cause a malfunction of your camcorder, and details on the cassette compartment. Window-side Push the center of the back of the cassette lightly. 3 Press on these cassettes...
Operating Instructions
Page 19
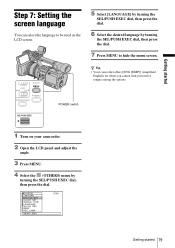
... [ENG [SIMP]] (simplified English) for when you cannot find your camcorder. 2 Open the LCD panel and adjust the angle. 3 Press MENU. 4 Select the (OTHERS) menu by turning the SEL/PUSH EXEC dial, then press the dial. 7 ...
... [ENG [SIMP]] (simplified English) for when you cannot find your camcorder. 2 Open the LCD panel and adjust the angle. 3 Press MENU. 4 Select the (OTHERS) menu by turning the SEL/PUSH EXEC dial, then press the dial. 7 ...
Operating Instructions
Page 20
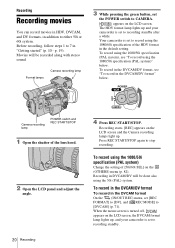
p. 19). The HDV format lamp lights up and your camcorder is set [REC FORMAT] to [DV], and [ REC MODE] to recording standby after a while....) Change the setting of [50i/60i SEL] on the LCD screen and the Camera recording lamps light up , and your camcorder is set to 7 in "Getting started" (p. 10 - Recording in DVCAM/DV will be done also using the 50i (PAL... 20 Recording 4 Press REC START/STOP. When the menu screen is set the POWER switch to stop recording. Your camcorder is turned off, appears on the LCD screen. appears on the LCD screen, the DVCAM format lamp lights up ....
p. 19). The HDV format lamp lights up and your camcorder is set [REC FORMAT] to [DV], and [ REC MODE] to recording standby after a while....) Change the setting of [50i/60i SEL] on the LCD screen and the Camera recording lamps light up , and your camcorder is set to 7 in "Getting started" (p. 10 - Recording in DVCAM/DV will be done also using the 50i (PAL... 20 Recording 4 Press REC START/STOP. When the menu screen is set the POWER switch to stop recording. Your camcorder is turned off, appears on the LCD screen. appears on the LCD screen, the DVCAM format lamp lights up ....
Operating Instructions
Page 21
... from a low-angle Use the REC START/STOP button on the tape. When you are using your camcorder. b Note • Before changing the battery pack, set the POWER switch to OFF. • When the camcorder is turned off, appears on the (OTHERS) menu to [ON] (p. 78). ,continued Recording 21 ... recording, face the LCD panel or the viewfinder upward, or face the LCD screen down, then close the LCD panel, it takes about 3 minutes, your camcorder is set [REC FORMAT] to [DV], and [ REC MODE] to [DV SP] (p. 71). F Recording capacity of this not a malfunction. To record in the...
... from a low-angle Use the REC START/STOP button on the tape. When you are using your camcorder. b Note • Before changing the battery pack, set the POWER switch to OFF. • When the camcorder is turned off, appears on the (OTHERS) menu to [ON] (p. 78). ,continued Recording 21 ... recording, face the LCD panel or the viewfinder upward, or face the LCD screen down, then close the LCD panel, it takes about 3 minutes, your camcorder is set [REC FORMAT] to [DV], and [ REC MODE] to [DV SP] (p. 71). F Recording capacity of this not a malfunction. To record in the...
Operating Instructions
Page 22
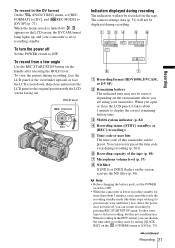
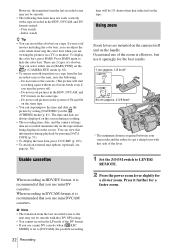
... with a tape recorded in DVCAM format, it sparingly for the best results. 1 cm (approx. 1/2 inch)* 80 cm (approx. 2 5/8 feet)* * The minimum distance required between your camcorder and the subject to LEVER/ REMOTE. 2 Press the power zoom lever slightly for a faster zoom. You can superimpose the time and date on the picture...
... with a tape recorded in DVCAM format, it sparingly for the best results. 1 cm (approx. 1/2 inch)* 80 cm (approx. 2 5/8 feet)* * The minimum distance required between your camcorder and the subject to LEVER/ REMOTE. 2 Press the power zoom lever slightly for a faster zoom. You can superimpose the time and date on the picture...
Operating Instructions
Page 24
A mirror-image of small children attracted to the camcorder while you turn the LCD panel towards the subject so that you and your subject can turn the dial, the items appear in the following ...
A mirror-image of small children attracted to the camcorder while you turn the LCD panel towards the subject so that you and your subject can turn the dial, the items appear in the following ...
Operating Instructions
Page 27
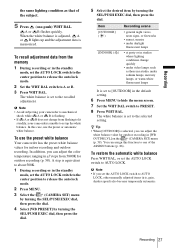
...The white balance is memorized. In this function to the recalled adjustment. You can assign this case, use the preset white balance Your camcorder has the preset white balance values for indoor recording and outdoor recording. When the white balance is adjusted, A or B lights up the...adjusted items (iris, gain, shutter speed) also become temporarily automatic. Recording 27 A or B flashes quickly. b Note • Avoid subjecting your camcorder is set to one -push) WHT BAL. Recording the same lighting condition as those in a studio, under sodium lamps, mercury lamps, or warm...
...The white balance is memorized. In this function to the recalled adjustment. You can assign this case, use the preset white balance Your camcorder has the preset white balance values for indoor recording and outdoor recording. When the white balance is adjusted, A or B lights up the...adjusted items (iris, gain, shutter speed) also become temporarily automatic. Recording 27 A or B flashes quickly. b Note • Avoid subjecting your camcorder is set to one -push) WHT BAL. Recording the same lighting condition as those in a studio, under sodium lamps, mercury lamps, or warm...
Operating Instructions
Page 30
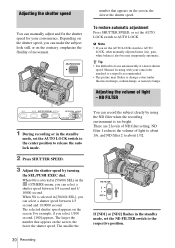
... recording environment is too bright. Manual focusing with your convenience. Adjusting the shutter speed You can manually adjust and fix the shutter speed for your camcorder attached to a tripod is recommended. • The picture may flicker or change colors under fluorescent lamps, sodium lamps, or mercury lamps. For example, if you...
... recording environment is too bright. Manual focusing with your convenience. Adjusting the shutter speed You can manually adjust and fix the shutter speed for your camcorder attached to a tripod is recommended. • The picture may flicker or change colors under fluorescent lamps, sodium lamps, or mercury lamps. For example, if you...
Operating Instructions
Page 34
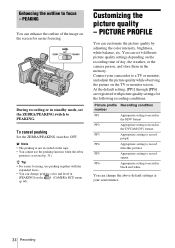
... peaking function when the zebra pattern is activated (p. 31). Connect your convenience. 34 Recording PICTURE PROFILE You can change the above default settings at your camcorder to OFF. You can change peaking color and level in the memory. During recording or in black and white You can set the ZEBRA/PEAKING...
... peaking function when the zebra pattern is activated (p. 31). Connect your convenience. 34 Recording PICTURE PROFILE You can change the above default settings at your camcorder to OFF. You can change peaking color and level in the memory. During recording or in black and white You can set the ZEBRA/PEAKING...


