
Operation Guide
Page 2
...HVR-HD1000U/HD1000N Serial No. This symbol is intended to alert the user to the presence of important operating and maintenance (servicing) instructions in . For those sets designed to operate from the type of power...the literature accompanying the appliance. IMPORTANT SAFEGUARDS For your Sony dealer regarding this product. This plug will fit into the power outlet only one described in a fire or electric...Owner's Record The model and serial numbers are not sure of the type of electrical power supplied to your home, consult your electrician to have a suitable outlet installed. Model No...
...HVR-HD1000U/HD1000N Serial No. This symbol is intended to alert the user to the presence of important operating and maintenance (servicing) instructions in . For those sets designed to operate from the type of power...the literature accompanying the appliance. IMPORTANT SAFEGUARDS For your Sony dealer regarding this product. This plug will fit into the power outlet only one described in a fire or electric...Owner's Record The model and serial numbers are not sure of the type of electrical power supplied to your home, consult your electrician to have a suitable outlet installed. Model No...
Operation Guide
Page 9
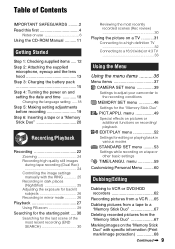
...on use 6 Using the CD-ROM Manual .......... 11 Getting Started Step 1: Checking supplied items ..... 12 Step 2: Attaching the supplied microphone, eyecup and the lens hood 13 Step 3: Charging the battery pack 15 Step 4: Turning the power on and setting the date and time 18 Changing the language setting ......18 Step ... (wide) or 4:3 TV 33 Using the Menu Using the menu items .......... 36 Menu items 37 CAMERA SET menu 39 Settings to adjust your camcorder to a "Memory Stick Duo 67 Deleting recorded pictures from the "Memory Stick Duo 67 Marking images on the "Memory Stick Duo" with the ...
...on use 6 Using the CD-ROM Manual .......... 11 Getting Started Step 1: Checking supplied items ..... 12 Step 2: Attaching the supplied microphone, eyecup and the lens hood 13 Step 3: Charging the battery pack 15 Step 4: Turning the power on and setting the date and time 18 Changing the language setting ......18 Step ... (wide) or 4:3 TV 33 Using the Menu Using the menu items .......... 36 Menu items 37 CAMERA SET menu 39 Settings to adjust your camcorder to a "Memory Stick Duo 67 Deleting recorded pictures from the "Memory Stick Duo 67 Marking images on the "Memory Stick Duo" with the ...

Operation Guide
Page 12
...) Lens cap (1) Wind screen (1) (p. 13) Microphone (1) (p. 13) Power cord (mains lead) (1) (p. 15) A/V connecting cable (1) (p. 31, 62) Eye cup (1) CD-ROM "Manuals for Digital HD Video Camera Recorder"(1) Operating Guide (This manual) (1) To attach the lens cap to the camcorder again. Rechargeable battery pack NP-F570 (1) (p. 15, 92) Lens hood ...lens cap by leading the grip belt through the attachment on the lens cap string. Getting Started Step 1: Checking supplied items Make sure that item supplied. The number in the parentheses indicates the number of that you have following items...
...) Lens cap (1) Wind screen (1) (p. 13) Microphone (1) (p. 13) Power cord (mains lead) (1) (p. 15) A/V connecting cable (1) (p. 31, 62) Eye cup (1) CD-ROM "Manuals for Digital HD Video Camera Recorder"(1) Operating Guide (This manual) (1) To attach the lens cap to the camcorder again. Rechargeable battery pack NP-F570 (1) (p. 15, 92) Lens hood ...lens cap by leading the grip belt through the attachment on the lens cap string. Getting Started Step 1: Checking supplied items Make sure that item supplied. The number in the parentheses indicates the number of that you have following items...
Operation Guide
Page 16
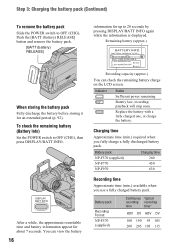
...16 information for up to 20 seconds by pressing DISPLAY/BATT INFO again while the information is displayed. Battery pack Recording Format NP-F570 (supplied) Continuous Typical recording recording time time* HDV DV HDV DV 180 190 95 105 200 205 105 115 Step 3: Charging the battery pack... (Continued) To remove the battery pack Slide the POWER switch to OFF (CHG), then press DISPLAY/BATT INFO. Battery pack Charging time NP-F570 (supplied) 260 NP-F770 450 NP-F970 630 Recording time Approximate time (min.) available when you fully...
...16 information for up to 20 seconds by pressing DISPLAY/BATT INFO again while the information is displayed. Battery pack Recording Format NP-F570 (supplied) Continuous Typical recording recording time time* HDV DV HDV DV 180 190 95 105 200 205 105 115 Step 3: Charging the battery pack... (Continued) To remove the battery pack Slide the POWER switch to OFF (CHG), then press DISPLAY/BATT INFO. Battery pack Charging time NP-F570 (supplied) 260 NP-F770 450 NP-F970 630 Recording time Approximate time (min.) available when you fully...
Operation Guide
Page 17
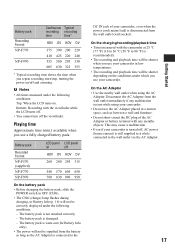
...; All times measured under which you use your camcorder, even when the power cord (mains lead) is damaged. - Playing time Approximate time (min.) available when you use your camcorder is turned off the viewfinder. Battery pack Recorded Format NP-F570 (supplied) NP-F770 NP-F970 LCD panel LCD panel ...on . The battery pack is worn-out (for Battery Info only). • The power will be supplied from the wall outlet immediately if...
...; All times measured under which you use your camcorder, even when the power cord (mains lead) is damaged. - Playing time Approximate time (min.) available when you use your camcorder is turned off the viewfinder. Battery pack Recorded Format NP-F570 (supplied) NP-F770 NP-F970 LCD panel LCD panel ...on . The battery pack is worn-out (for Battery Info only). • The power will be supplied from the wall outlet immediately if...

Operation Guide
Page 31
The TV may need to the instruction manuals supplied with an i.LINK cable. • Pictures recorded in the DV format are played back as the power source (p. 15). Recording/Playback Lift up the bottom of the jack cover, then rotate in the direction of the connection. • When recording, ...is connected and connectors used. Continued , 31 b Notes • Make all menu settings on your camcorder Open the jack cover in the direction of TV is changed after the TV and your camcorder were connected with the device to play back on an x.v.Color-compliant TV (p. 45). Jacks on ...
The TV may need to the instruction manuals supplied with an i.LINK cable. • Pictures recorded in the DV format are played back as the power source (p. 15). Recording/Playback Lift up the bottom of the jack cover, then rotate in the direction of the connection. • When recording, ...is connected and connectors used. Continued , 31 b Notes • Make all menu settings on your camcorder Open the jack cover in the direction of TV is changed after the TV and your camcorder were connected with the device to play back on an x.v.Color-compliant TV (p. 45). Jacks on ...

Operation Guide
Page 64
...as video input1 and video input2). 3 Connect your recording device (VCR or DVD/HDD recorder) to your camcorder. b Notes • When connecting with an i.LINK cable: - Slide the POWER switch to PLAY/ EDIT. 2 When dubbing to the VCR, insert a cassette for details. 5 When... dubbing is connected, the format of your camcorder. Refer to the operating instructions supplied with [PICT.EFFECT] (p. 51) or [D.EFFECT] (p. 50) ...
...as video input1 and video input2). 3 Connect your recording device (VCR or DVD/HDD recorder) to your camcorder. b Notes • When connecting with an i.LINK cable: - Slide the POWER switch to PLAY/ EDIT. 2 When dubbing to the VCR, insert a cassette for details. 5 When... dubbing is connected, the format of your camcorder. Refer to the operating instructions supplied with [PICT.EFFECT] (p. 51) or [D.EFFECT] (p. 50) ...
Operation Guide
Page 65
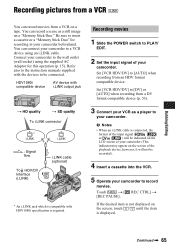
You can connect your camcorder to PLAY/ EDIT. 2 Set the input signal of the playback device, however, it will not be connected. Recording movies 1 Slide the POWER switch to a VCR device using the supplied AC Adaptor for recording in your camcorder beforehand. Set [VCR HDV/DV] to the ...wall outlet (wall socket) using an i.LINK cable. Connect your camcorder to [AUTO] when recording from an HDV format...
You can connect your camcorder to PLAY/ EDIT. 2 Set the input signal of the playback device, however, it will not be connected. Recording movies 1 Slide the POWER switch to a VCR device using the supplied AC Adaptor for recording in your camcorder beforehand. Set [VCR HDV/DV] to the ...wall outlet (wall socket) using an i.LINK cable. Connect your camcorder to [AUTO] when recording from an HDV format...

Operation Guide
Page 72
Use the supplied AC Adaptor to the computer at this point. • The computer may not recognize the camcorder if you connect them with the USB cable before turning on your camcorder. • See page 105 for the recommended connection. 1 Turn on your camcorder and your computer.... down all applications running on as an Administrator. 2 Insert a "Memory Stick Duo" into your camcorder. 3 Prepare the power source for the first time. • Do not connect your camcorder to obtain AC power (p. 15). 72 Step:2 Copying the pictures For Windows users Double-click the [Removable Disk] icon...
Use the supplied AC Adaptor to the computer at this point. • The computer may not recognize the camcorder if you connect them with the USB cable before turning on your camcorder. • See page 105 for the recommended connection. 1 Turn on your camcorder and your computer.... down all applications running on as an Administrator. 2 Insert a "Memory Stick Duo" into your camcorder. 3 Prepare the power source for the first time. • Do not connect your camcorder to obtain AC power (p. 15). 72 Step:2 Copying the pictures For Windows users Double-click the [Removable Disk] icon...

Operation Guide
Page 75
...to create DVD video in the following situations. - Step:2 Copying the movies Use the supplied AC Adaptor to obtain AC power (p. 15). 1 Prepare editing software (not provided). 2 Turn on the LCD screen of your camcorder. • The computer may freeze or may not recognize the signal from your...editing software may cause static electricity to a computer in HDV format but not recognized, your camcorder display (HDV or DV). - Connecting in the opposite order may not support HDV format. Changing the POWER switch position while connected with an i.LINK cable. - z Tips • To copy...
...to create DVD video in the following situations. - Step:2 Copying the movies Use the supplied AC Adaptor to obtain AC power (p. 15). 1 Prepare editing software (not provided). 2 Turn on the LCD screen of your camcorder. • The computer may freeze or may not recognize the signal from your...editing software may cause static electricity to a computer in HDV format but not recognized, your camcorder display (HDV or DV). - Connecting in the opposite order may not support HDV format. Changing the POWER switch position while connected with an i.LINK cable. - z Tips • To copy...

Operation Guide
Page 82
...TV. • This happens when viewing a picture recorded in the 16:9 (wide) mode on a 4:3 TV. For details, refer to the instruction manuals supplied with an A/V connecting cable (p. 58). This is not a malfunction. When connected using the component video cable, make sure the red and white plugs of ... specification, you record on a tape in both HDV and DV formats. Disconnect and connect the HDMI cable, or slide the POWER switch to turn on your camcorder (p. 29). Dubbing/Editing/Connecting to DV format and dub in SD (standard definition) image quality (p. 62). 82 Time code...
...TV. • This happens when viewing a picture recorded in the 16:9 (wide) mode on a 4:3 TV. For details, refer to the instruction manuals supplied with an A/V connecting cable (p. 58). This is not a malfunction. When connected using the component video cable, make sure the red and white plugs of ... specification, you record on a tape in both HDV and DV formats. Disconnect and connect the HDMI cable, or slide the POWER switch to turn on your camcorder (p. 29). Dubbing/Editing/Connecting to DV format and dub in SD (standard definition) image quality (p. 62). 82 Time code...

Operation Guide
Page 88
...picture can only be viewed on the design of the clock by time difference You can use your camcorder in any country/region using the AC Adaptor supplied with your camcorder abroad Power supply You can easily set the time difference (p. 59). 88 Viewing DV format pictures recorded in Bahama ...commercially available AC plug adaptor [a], if necessary, depending on an NTSC system TV with an AUDIO/VIDEO input jack. Additional Information Using your camcorder within the AC 100 V to the local time abroad by entering the time difference between where you live and where you are also ...
...picture can only be viewed on the design of the clock by time difference You can use your camcorder in any country/region using the AC Adaptor supplied with your camcorder abroad Power supply You can easily set the time difference (p. 59). 88 Viewing DV format pictures recorded in Bahama ...commercially available AC plug adaptor [a], if necessary, depending on an NTSC system TV with an AUDIO/VIDEO input jack. Additional Information Using your camcorder within the AC 100 V to the local time abroad by entering the time difference between where you live and where you are also ...
Operation Guide
Page 96
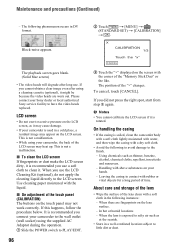
... residual image may appear on the touch panel may not work correctly. This is not a malfunction. • While using the supplied AC Adaptor during the operation. 1 Slide the POWER switch to the finish. - When you did not press the right spot, start from step 3 again. Use cleaning paper moistened... a clear image even after long use a soft cloth to clean it is recommended you connect your camcorder to the wall outlet (wall socket) using your Sony dealer or local authorized Sony service facility to little dirt or dust. When there are worn out. In hot or humid locations ...
... residual image may appear on the touch panel may not work correctly. This is not a malfunction. • While using the supplied AC Adaptor during the operation. 1 Slide the POWER switch to the finish. - When you did not press the right spot, start from step 3 again. Use cleaning paper moistened... a clear image even after long use a soft cloth to clean it is recommended you connect your camcorder to the wall outlet (wall socket) using your Sony dealer or local authorized Sony service facility to little dirt or dust. When there are worn out. In hot or humid locations ...

Operation Guide
Page 97
... a pre-installed rechargeable battery to retain the date, time, and other settings even when the POWER switch is connected to OFF (CHG). It is recommended that you operate your camcorder about 3 months if you are aligned 2, then remove the viewfinder upward 3. 3 2 1 2 ...POWER switch set to the wall outlet (wall socket) via the AC Adaptor or while the battery pack is clicked. 97 Then turn the viewfinder counterclockwise until it with a blower. Removing dust from inside the viewfinder 1 Remove the viewfinder. Use your camcorder to a wall outlet (wall socket) using the supplied...
... a pre-installed rechargeable battery to retain the date, time, and other settings even when the POWER switch is connected to OFF (CHG). It is recommended that you operate your camcorder about 3 months if you are aligned 2, then remove the viewfinder upward 3. 3 2 1 2 ...POWER switch set to the wall outlet (wall socket) via the AC Adaptor or while the battery pack is clicked. 97 Then turn the viewfinder counterclockwise until it with a blower. Removing dust from inside the viewfinder 1 Remove the viewfinder. Use your camcorder to a wall outlet (wall socket) using the supplied...

Operation Guide
Page 99
*2The unique pixel array of Sony's ClearVid CMOS sensor and image processing system (new Enhanced ... × 231 × 460 mm (10 4/8 × 9 1/8 × 18 1/8 in.) (w/h/d) including the projecting parts with the supplied battery pack NP-F570 attached Mass (approx.) 2.7 kg (6 lb 0 oz) main unit only 3.0 kg (6 lb 10 oz) including the NPF570...with lens cover , microphone. AC Adaptor AC-L100 Power requirements AC 100 V - 240 V, 50/60 Hz Current consumption 0.35 - 0.18 A Power consumption 18 W Continued , 99 Additional Information Supplied accessories See page 12. Input/Output connectors VIDEO ...
*2The unique pixel array of Sony's ClearVid CMOS sensor and image processing system (new Enhanced ... × 231 × 460 mm (10 4/8 × 9 1/8 × 18 1/8 in.) (w/h/d) including the projecting parts with the supplied battery pack NP-F570 attached Mass (approx.) 2.7 kg (6 lb 0 oz) main unit only 3.0 kg (6 lb 10 oz) including the NPF570...with lens cover , microphone. AC Adaptor AC-L100 Power requirements AC 100 V - 240 V, 50/60 Hz Current consumption 0.35 - 0.18 A Power consumption 18 W Continued , 99 Additional Information Supplied accessories See page 12. Input/Output connectors VIDEO ...


