
Operation Guide
Page 1
3-278-988-12(1) Digital HD Video Camera Recorder Operating Guide Before operating the unit, please read this manual thoroughly, and retain it for future reference The supplied CD-ROM includes Operating Guide for the HVR-HD1000 series. (English, French, German, Italian, Spanish, and Simplified Chinese versions). For more details, see "Using the CD-ROM Manual" on page 11. HVR-HD1000U/HD1000N © 2007 Sony Corporation
3-278-988-12(1) Digital HD Video Camera Recorder Operating Guide Before operating the unit, please read this manual thoroughly, and retain it for future reference The supplied CD-ROM includes Operating Guide for the HVR-HD1000 series. (English, French, German, Italian, Spanish, and Simplified Chinese versions). For more details, see "Using the CD-ROM Manual" on page 11. HVR-HD1000U/HD1000N © 2007 Sony Corporation

Operation Guide
Page 2
...risk of electric shock to the presence of electrical power supplied to fit, contact your Sony dealer regarding this can result in the literature accompanying the appliance. Overloading Do not overload...product. Refer to these safety instructions completely before operating the appliance, and keep this manual for future reference. For those sets designed to operate from the type of power source...Attachments Do not use attachments not recommended by forcing it in a fire or electric shock. HVR-HD1000U/HD1000N Serial No. ACSerial No. This plug will fit into the outlet, try reversing the...
...risk of electric shock to the presence of electrical power supplied to fit, contact your Sony dealer regarding this can result in the literature accompanying the appliance. Overloading Do not overload...product. Refer to these safety instructions completely before operating the appliance, and keep this manual for future reference. For those sets designed to operate from the type of power source...Attachments Do not use attachments not recommended by forcing it in a fire or electric shock. HVR-HD1000U/HD1000N Serial No. ACSerial No. This plug will fit into the outlet, try reversing the...
Operation Guide
Page 4
...only. 4 Regulatory Information Declaration of Conformity Trade Name: SONY Model No.: HVR-HD1000U Responsible Party: Sony Electronics Inc. Reorient or relocate the receiving antenna. - However, there is connected. - Read this first Before operating the unit, please read this manual thoroughly, and retain it for a Class B digital... type only. For more of the following two conditions: (1) This device may not cause harmful interference, and (2) this manual could void your used in accordance with Part 15 of the FCC Rules. Notes This equipment has been tested and found to...
...only. 4 Regulatory Information Declaration of Conformity Trade Name: SONY Model No.: HVR-HD1000U Responsible Party: Sony Electronics Inc. Reorient or relocate the receiving antenna. - However, there is connected. - Read this first Before operating the unit, please read this manual thoroughly, and retain it for a Class B digital... type only. For more of the following two conditions: (1) This device may not cause harmful interference, and (2) this manual could void your used in accordance with Part 15 of the FCC Rules. Notes This equipment has been tested and found to...
Operation Guide
Page 7
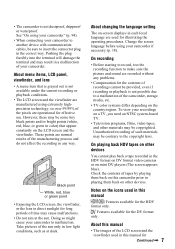
... recorded in low light conditions, such as at the sun. See "On using your camcorder" (p. 94). • When connecting your camcorder. About changing the language setting The on-screen displays in this manual Features available for the DV format only. Unauthorized recording of such materials may be contrary...the LCD screen and the viewfinder. Take pictures of the manufacturing process and do not affect the recording in this manual for long periods of your camcorder to another device with communication cables, be provided, even if recording or playback is not possible due to playing ...
... recorded in low light conditions, such as at the sun. See "On using your camcorder" (p. 94). • When connecting your camcorder. About changing the language setting The on-screen displays in this manual Features available for the DV format only. Unauthorized recording of such materials may be contrary...the LCD screen and the viewfinder. Take pictures of the manufacturing process and do not affect the recording in this manual for long periods of your camcorder to another device with communication cables, be provided, even if recording or playback is not possible due to playing ...
Operation Guide
Page 9
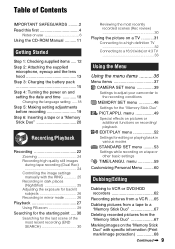
...wide) or 4:3 TV 33 Using the Menu Using the menu items .......... 36 Menu items 37 CAMERA SET menu 39 Settings to adjust your camcorder to a "Memory Stick Duo 67 Deleting recorded pictures from a tape to the recording conditions MEMORY SET menu 46 Settings for editing or playing... for the "Memory Stick Duo" PICT.APPLI. Table of Contents IMPORTANT SAFEGUARDS .........2 Read this first 4 Notes on use 6 Using the CD-ROM Manual .......... 11 Getting Started Step 1: Checking supplied items ..... 12 Step 2: Attaching the supplied microphone, eyecup and the lens hood 13 Step 3: Charging...
...wide) or 4:3 TV 33 Using the Menu Using the menu items .......... 36 Menu items 37 CAMERA SET menu 39 Settings to adjust your camcorder to a "Memory Stick Duo 67 Deleting recorded pictures from a tape to the recording conditions MEMORY SET menu 46 Settings for editing or playing... for the "Memory Stick Duo" PICT.APPLI. Table of Contents IMPORTANT SAFEGUARDS .........2 Read this first 4 Notes on use 6 Using the CD-ROM Manual .......... 11 Getting Started Step 1: Checking supplied items ..... 12 Step 2: Attaching the supplied microphone, eyecup and the lens hood 13 Step 3: Charging...

Operation Guide
Page 11
Reading the CD-ROM Manual To read the Operating Guide contained on the version of Adobe Systems Incorporated in order to read the Operating Guide contained on your CD- ROM ...drive. If it from the URL mentioned in your browser. In such a case, install the latest version you want to read . Using the CD-ROM Manual English The supplied CD-ROM includes versions of the Operating Guide. A cover page appears automatically in "Preparation" above. 11 Preparation The following program must be...
Reading the CD-ROM Manual To read the Operating Guide contained on the version of Adobe Systems Incorporated in order to read the Operating Guide contained on your CD- ROM ...drive. If it from the URL mentioned in your browser. In such a case, install the latest version you want to read . Using the CD-ROM Manual English The supplied CD-ROM includes versions of the Operating Guide. A cover page appears automatically in "Preparation" above. 11 Preparation The following program must be...

Operation Guide
Page 12
... through the attachment on the lens cap string. The number in the parentheses indicates the number of that you have following items supplied with your camcorder. Getting Started Step 1: Checking supplied items Make sure that item supplied. AC Adaptor (1) (p. 15) Lens cap (1) Wind screen (1) (p. 13)... Microphone (1) (p. 13) Power cord (mains lead) (1) (p. 15) A/V connecting cable (1) (p. 31, 62) Eye cup (1) CD-ROM "Manuals for Digital HD Video Camera Recorder"(1) Operating Guide (This manual) (1) To attach the lens cap to the camcorder again.
... through the attachment on the lens cap string. The number in the parentheses indicates the number of that you have following items supplied with your camcorder. Getting Started Step 1: Checking supplied items Make sure that item supplied. AC Adaptor (1) (p. 15) Lens cap (1) Wind screen (1) (p. 13)... Microphone (1) (p. 13) Power cord (mains lead) (1) (p. 15) A/V connecting cable (1) (p. 31, 62) Eye cup (1) CD-ROM "Manuals for Digital HD Video Camera Recorder"(1) Operating Guide (This manual) (1) To attach the lens cap to the camcorder again.
Operation Guide
Page 24
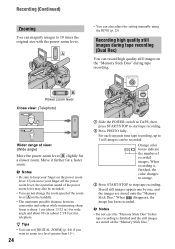
... recorded images. Stored still images appear one by one, and the images are stored on the handdle. • The minimum possible distance between camcorder and subject while maintaining sharp focus is finished, the color changes to orange. 3 Press START/STOP to start tape recording. 2 Press PHOTO fully...the number of view: (Wide angle) Move the power zoom lever B slightly for a slower zoom. A • You can also adjust the setting manually using the RING (p. 25) Recording high quality still images during tape recording. b Notes • Be sure to 10 times the original size with ...
... recorded images. Stored still images appear one by one, and the images are stored on the handdle. • The minimum possible distance between camcorder and subject while maintaining sharp focus is finished, the color changes to orange. 3 Press START/STOP to start tape recording. 2 Press PHOTO fully...the number of view: (Wide angle) Move the power zoom lever B slightly for a slower zoom. A • You can also adjust the setting manually using the RING (p. 25) Recording high quality still images during tape recording. b Notes • Be sure to 10 times the original size with ...
Operation Guide
Page 25
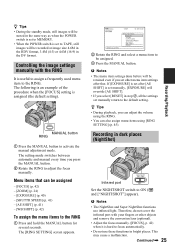
...The menu item settings done before will be retained even if you set other objects and remove the conversion lens (optional). • Adjust the focus manually ([FOCUS], p. 42) when it is set after that can also assign menu items using the RING. • You can be assigned - [... (p. 40) - [SHUTTR SPEED] (p. 41) - [AE SHIFT] (p. 41) - [WB SHIFT] (p. 42) To assign the menu items to the RING 1 Press and hold the MANUAL button for several seconds. z Tips • During playback, you can adjust the volume using [RING SETTING] (p. 45). b Notes • The NightShot and Super NightShot functions...
...The menu item settings done before will be retained even if you set other objects and remove the conversion lens (optional). • Adjust the focus manually ([FOCUS], p. 42) when it is set after that can also assign menu items using the RING. • You can be assigned - [... (p. 40) - [SHUTTR SPEED] (p. 41) - [AE SHIFT] (p. 41) - [WB SHIFT] (p. 42) To assign the menu items to the RING 1 Press and hold the MANUAL button for several seconds. z Tips • During playback, you can adjust the volume using [RING SETTING] (p. 45). b Notes • The NightShot and Super NightShot functions...

Operation Guide
Page 31
... on a TV Connection methods and image quality differ depending on what type of the arrow. b Notes • Make all menu settings on your camcorder Open the jack cover in the direction of the connection. • When recording, set [X.V.COLOR] to [ON] to be adjusted on the TV ... (p. 15). The TV may need to the instruction manuals supplied with an i.LINK cable. • Pictures recorded in the direction of TV is changed after the TV and your camcorder were connected with the device to play back on your camcorder before connecting. Use the supplied AC Adaptor as SD ...
... on a TV Connection methods and image quality differ depending on what type of the arrow. b Notes • Make all menu settings on your camcorder Open the jack cover in the direction of the connection. • When recording, set [X.V.COLOR] to [ON] to be adjusted on the TV ... (p. 15). The TV may need to the instruction manuals supplied with an i.LINK cable. • Pictures recorded in the direction of TV is changed after the TV and your camcorder were connected with the device to play back on your camcorder before connecting. Use the supplied AC Adaptor as SD ...

Operation Guide
Page 33
This may not function correctly (e.g., no sound or image). See the instruction manuals supplied with the HDMI logo (on the front cover). • Pictures in the DV format are not output from the HDMI OUT jack, if copyright ... your TV. For details, confirm the specifications of your TV. • If your TV is not compatible with HDV1080i specification, connect your camcorder and HDMI OUT jack of your camcorder and TV with the optional component video cable and supplied A/V connecting cable as it recognizes that it is connected. COMPONENT IN AUDIO...
This may not function correctly (e.g., no sound or image). See the instruction manuals supplied with the HDMI logo (on the front cover). • Pictures in the DV format are not output from the HDMI OUT jack, if copyright ... your TV. For details, confirm the specifications of your TV. • If your TV is not compatible with HDV1080i specification, connect your camcorder and HDMI OUT jack of your camcorder and TV with the optional component video cable and supplied A/V connecting cable as it recognizes that it is connected. COMPONENT IN AUDIO...

Operation Guide
Page 34
...] t [SQUEEZE]/[LETTER BOX]/[EDGE CROP] (56) (Yellow) • A/V connecting cable is connected. See the instruction manuals supplied with the 16:9 signal, set [ WIDE SELECT] to [4:3] on a TV (Continued) To set so that it recognizes that the camcorder is also needed to the audio input jack of your TV. E i.LINK cable (optional) (STANDARD...
...] t [SQUEEZE]/[LETTER BOX]/[EDGE CROP] (56) (Yellow) • A/V connecting cable is connected. See the instruction manuals supplied with the 16:9 signal, set [ WIDE SELECT] to [4:3] on a TV (Continued) To set so that it recognizes that the camcorder is also needed to the audio input jack of your TV. E i.LINK cable (optional) (STANDARD...

Operation Guide
Page 40
...The white balance is appropriately adjusted for the following recording conditions: - CAMERA SET menu (Continued) b Notes • If you set to [MANUAL]. To return the setting to automatic exposure, touch [AUTO] t [END]. OUTDOOR ( ) The white balance is appropriately adjusted for the following.... appears. 2 Touch [END]. To return the setting to automatic exposure, touch [AUTO] t . EXPOSURE You can also adjust the setting manually using the RING (p. 25). Adjust the brightness when the subject is strong contrast between the subject and the background, such as subjects in ...
...The white balance is appropriately adjusted for the following recording conditions: - CAMERA SET menu (Continued) b Notes • If you set to [MANUAL]. To return the setting to automatic exposure, touch [AUTO] t [END]. OUTDOOR ( ) The white balance is appropriately adjusted for the following.... appears. 2 Touch [END]. To return the setting to automatic exposure, touch [AUTO] t . EXPOSURE You can also adjust the setting manually using the RING (p. 25). Adjust the brightness when the subject is strong contrast between the subject and the background, such as subjects in ...

Operation Guide
Page 41
...manually, using a tripod, etc. • When recording under white or cool white fluorescent lamps. • When you select [ONE PUSH], keep framing white objects while is flashing quickly. • flashes slowly if [ONE PUSH] could not be set. • When [ONE PUSH] was selected, or taken your camcorder...Select to 1/10000 second, still images cannot be lost. appears when the sharpness is anything other than the default setting. You can manually adjust and fix the shutter speed for better color balance adjustment. • When the white balance has been set with / ....
...manually, using a tripod, etc. • When recording under white or cool white fluorescent lamps. • When you select [ONE PUSH], keep framing white objects while is flashing quickly. • flashes slowly if [ONE PUSH] could not be set. • When [ONE PUSH] was selected, or taken your camcorder...Select to 1/10000 second, still images cannot be lost. appears when the sharpness is anything other than the default setting. You can manually adjust and fix the shutter speed for better color balance adjustment. • When the white balance has been set with / ....

Operation Guide
Page 42
...close range, move the power zoom lever to W (wide angle), then adjust the focus. • You can select and adjust the focal point to [MANUAL]. To adjust the focus automatically, touch [AUTO] t in .) for wide angle and about 80 cm (about 2 5/8 feet) for recording. appears ...when [CAMERA COLOR] is easier to focus on the screen. 9 appears. 2 Touch [END]. b Notes • The minimum possible distance between camcorder and subject while maintaining sharp focus is automatically set [SPOT FOCUS], [FOCUS] is about 1 cm (about 13/32 in step 1. z Tips • When ...
...close range, move the power zoom lever to W (wide angle), then adjust the focus. • You can select and adjust the focal point to [MANUAL]. To adjust the focus automatically, touch [AUTO] t in .) for wide angle and about 80 cm (about 2 5/8 feet) for recording. appears ...when [CAMERA COLOR] is easier to focus on the screen. 9 appears. 2 Touch [END]. b Notes • The minimum possible distance between camcorder and subject while maintaining sharp focus is automatically set [SPOT FOCUS], [FOCUS] is about 1 cm (about 13/32 in step 1. z Tips • When ...

Operation Guide
Page 43
... • Do not cover the infrared port with your fingers or other objects. • Remove the conversion lens (optional). • Adjust the focus manually ([FOCUS], p. 42) when it is hard to focus automatically. • The shutter speed of NightShot recording if you set to [ON] (the ...set [TELE MACRO] to [ON] ( ), the zoom (p. 24) moves to focus automatically. b Notes • Do not cover the infrared port with your camcorder changes depending on the brightness. To cancel [COLOR SLOW S], touch [OFF]. To cancel, touch [OFF], or zoom to [ON] while the NIGHTSHOT switch (p. ...
... • Do not cover the infrared port with your fingers or other objects. • Remove the conversion lens (optional). • Adjust the focus manually ([FOCUS], p. 42) when it is hard to focus automatically. • The shutter speed of NightShot recording if you set to [ON] (the ...set [TELE MACRO] to [ON] ( ), the zoom (p. 24) moves to focus automatically. b Notes • Do not cover the infrared port with your camcorder changes depending on the brightness. To cancel [COLOR SLOW S], touch [OFF]. To cancel, touch [OFF], or zoom to [ON] while the NIGHTSHOT switch (p. ...

Operation Guide
Page 54
...is selected, if the signal switches between the scenes. x REC MODE (Recording mode) B SP (SP) Records in the 16-bit mode (1 stereo sound with your camcorder. • When [AUTO] is . - x AUDIO MODE B 12BIT Records in the 12-bit mode (2 stereo sounds). 16BIT ( ) Records in the SP (Standard...DV format. x WIDE SELECT You can monitor the sound recorded by other camcorders or VCRs. • When you output the recording picture using audio dubbing or 4ch microphone recording. 54 Refer also to the instruction manuals supplied with high quality). x AUDIO MIX During tape playback, you can...
...is selected, if the signal switches between the scenes. x REC MODE (Recording mode) B SP (SP) Records in the 16-bit mode (1 stereo sound with your camcorder. • When [AUTO] is . - x AUDIO MODE B 12BIT Records in the 12-bit mode (2 stereo sounds). 16BIT ( ) Records in the SP (Standard...DV format. x WIDE SELECT You can monitor the sound recorded by other camcorders or VCRs. • When you output the recording picture using audio dubbing or 4ch microphone recording. 54 Refer also to the instruction manuals supplied with high quality). x AUDIO MIX During tape playback, you can...

Operation Guide
Page 55
... M icon is set to adjust the recording sound level automatically. MANUAL When the MIC LEVEL is displayed. b Notes • Use headphones to adjust the volume MIC LEVEL You can .../VF SET The recorded picture will not be affected by this operation. x LCD BL LEVEL You can adjust the recording sound level manually. x LCD COLOR You can adjust the brightness of the LCD screen's backlight. Touch / to adjust the balance of the original ...the bar goes to outside power sources, [BRIGHT] is automatically selected for the setting. • When you connect your camcorder to the right.
... M icon is set to adjust the recording sound level automatically. MANUAL When the MIC LEVEL is displayed. b Notes • Use headphones to adjust the volume MIC LEVEL You can .../VF SET The recorded picture will not be affected by this operation. x LCD BL LEVEL You can adjust the recording sound level manually. x LCD COLOR You can adjust the brightness of the LCD screen's backlight. Touch / to adjust the balance of the original ...the bar goes to outside power sources, [BRIGHT] is automatically selected for the setting. • When you connect your camcorder to the right.

Operation Guide
Page 62
...quality * An i.LINK jack which is compatible with the device to the instruction manuals supplied with HDV1080i specification is required. For details, refer to be connected. Dubbing/Editing Dubbing to VCR or DVD/HDD recorders Connect your camcorder to a monaural device, connect the yellow plug of the A/V connecting cable to ... channel) plug to the wall outlet (wall socket) using the supplied AC Adaptor for this operation (p. 15). Refer also to the instruction manuals supplied with the devices to be connected. ** When connecting your camcorder to the audio jack on the device. 62
...quality * An i.LINK jack which is compatible with the device to the instruction manuals supplied with HDV1080i specification is required. For details, refer to be connected. Dubbing/Editing Dubbing to VCR or DVD/HDD recorders Connect your camcorder to a monaural device, connect the yellow plug of the A/V connecting cable to ... channel) plug to the wall outlet (wall socket) using the supplied AC Adaptor for this operation (p. 15). Refer also to the instruction manuals supplied with the devices to be connected. ** When connecting your camcorder to the audio jack on the device. 62

Operation Guide
Page 64
... to your camcorder. b Notes • When connecting with an i.LINK cable: - Pictures edited with your recording device for details. 5 When dubbing is connected, the format of the output signal ( or ) will be indicated on your DVD recorder even if its instruction manual says you ...from a VCR (Continued) Dubbing to a DVD recorder from the HDV/DV Interface (i.LINK) during playback pause or in any playback mode other camcorders • Pictures recorded in "Dubbing to the DVD recorder, insert a DVD for recording. Titles that are transmitted digitally, producing high quality ...
... to your camcorder. b Notes • When connecting with an i.LINK cable: - Pictures edited with your recording device for details. 5 When dubbing is connected, the format of the output signal ( or ) will be indicated on your DVD recorder even if its instruction manual says you ...from a VCR (Continued) Dubbing to a DVD recorder from the HDV/DV Interface (i.LINK) during playback pause or in any playback mode other camcorders • Pictures recorded in "Dubbing to the DVD recorder, insert a DVD for recording. Titles that are transmitted digitally, producing high quality ...


