Operating Instructions
Page 4
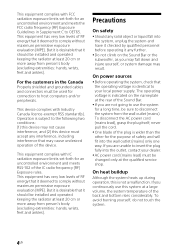
... damage may cause undesired operation of the device. To disconnect the AC power cord (mains lead), grasp the plug itself; Operation is indicated on the Sound Bar or the subwoofer, as you continuously use the system for a long time, be sure to your dealer. AC power cord (mains lead) must be...: (1) this device may not cause interference, and (2) this device must accept any further. Do not climb on the nameplate at the rear of the Sound Bar. If you are not going to use this is wider than the other for the purpose of safety and will fit into the outlet...
... damage may cause undesired operation of the device. To disconnect the AC power cord (mains lead), grasp the plug itself; Operation is indicated on the Sound Bar or the subwoofer, as you continuously use the system for a long time, be sure to your dealer. AC power cord (mains lead) must be...: (1) this device may not cause interference, and (2) this device must accept any further. Do not climb on the nameplate at the rear of the Sound Bar. If you are not going to use this is wider than the other for the purpose of safety and will fit into the outlet...
Operating Instructions
Page 5
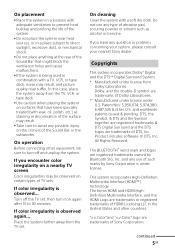
... If you encounter color irregularity on certain types of TV sets. and any question or problem concerning your system, please consult your nearest Sony dealer. On operation Before connecting other equipment, be observed on a nearby TV screen Color irregularities may suffer. "x.v.Color"and "x.v.Color" logo...TV, VCR, or tape deck, noise may result, and picture quality may be sure to turn it on the corners of the Sound Bar or the subwoofer. If color irregularity is observed... The terms HDMI and HDMI HighDefinition Multimedia Interface, and the HDMI Logo are trademarks of...
... If you encounter color irregularity on certain types of TV sets. and any question or problem concerning your system, please consult your nearest Sony dealer. On operation Before connecting other equipment, be observed on a nearby TV screen Color irregularities may suffer. "x.v.Color"and "x.v.Color" logo...TV, VCR, or tape deck, noise may result, and picture quality may be sure to turn it on the corners of the Sound Bar or the subwoofer. If color irregularity is observed... The terms HDMI and HDMI HighDefinition Multimedia Interface, and the HDMI Logo are trademarks of...
Operating Instructions
Page 9
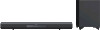
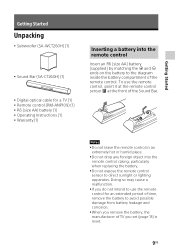
... remote control sensor to the diagram inside the battery compartment of the remote control. Getting Started Getting Started Unpacking Subwoofer (SA-WCT260H) (1) Sound Bar (SA-CT260H) (1) Digital optical cable for an extended period of time, remove the battery to use the remote control, point it at the remote control sensor...
... remote control sensor to the diagram inside the battery compartment of the remote control. Getting Started Getting Started Unpacking Subwoofer (SA-WCT260H) (1) Sound Bar (SA-CT260H) (1) Digital optical cable for an extended period of time, remove the battery to use the remote control, point it at the remote control sensor...
Operating Instructions
Page 10
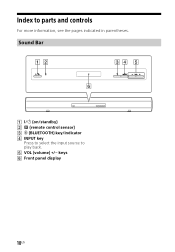
Index to play back. VOL (volume) +/ keys Front panel display 10US Sound Bar on/standby) (remote control sensor) (BLUETOOTH) key/indicator INPUT key Press to select the input source to parts and controls For more information, see the pages indicated in parentheses.
Index to play back. VOL (volume) +/ keys Front panel display 10US Sound Bar on/standby) (remote control sensor) (BLUETOOTH) key/indicator INPUT key Press to select the input source to parts and controls For more information, see the pages indicated in parentheses.
Operating Instructions
Page 11
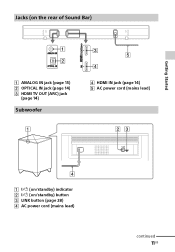
Getting Started Jacks (on the rear of Sound Bar) ANALOG IN jack (page 15) OPTICAL IN jack (page 14) HDMI TV OUT (ARC) jack (page 14) Subwoofer HDMI IN jack (page 14) AC power cord (mains lead) on/standby) indicator on/standby) button LINK button (page 28) AC power cord (mains lead) continued 11US
Getting Started Jacks (on the rear of Sound Bar) ANALOG IN jack (page 15) OPTICAL IN jack (page 14) HDMI TV OUT (ARC) jack (page 14) Subwoofer HDMI IN jack (page 14) AC power cord (mains lead) on/standby) indicator on/standby) button LINK button (page 28) AC power cord (mains lead) continued 11US
Operating Instructions
Page 12
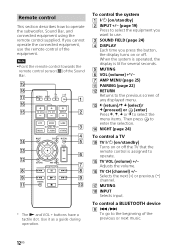
... you press the button, the display turns on or off . Remote control This section describes how to the beginning of the Sound Bar. * The and VOL + buttons have a tactile dot. To control a BLUETOOTH device / To go to operate the subwoofer..., Sound Bar, and connected equipment using the remote control supplied. If you cannot operate the connected equipment, use . SOUND FIELD (page 24) DISPLAY Each time you want to use the remote control of any...
... you press the button, the display turns on or off . Remote control This section describes how to the beginning of the Sound Bar. * The and VOL + buttons have a tactile dot. To control a BLUETOOTH device / To go to operate the subwoofer..., Sound Bar, and connected equipment using the remote control supplied. If you cannot operate the connected equipment, use . SOUND FIELD (page 24) DISPLAY Each time you want to use the remote control of any...
Operating Instructions
Page 14
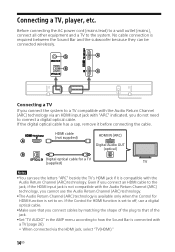
No cable connection is required between the Sound Bar and the subwoofer because they can see the letters "ARC" beside the TV's HDMI jack if it before connecting the cable. Even if you connect ... cables by matching the shape of the plug to that of the jack. Set "TV AUDIO" in the AMP menu according to how the Sound Bar is connected with a TV (page 26). When connected via an HDMI input jack with "ARC" indicated, you cannot use the Audio Return Channel (ARC...
No cable connection is required between the Sound Bar and the subwoofer because they can see the letters "ARC" beside the TV's HDMI jack if it before connecting the cable. Even if you connect ... cables by matching the shape of the plug to that of the jack. Set "TV AUDIO" in the AMP menu according to how the Sound Bar is connected with a TV (page 26). When connected via an HDMI input jack with "ARC" indicated, you cannot use the Audio Return Channel (ARC...
Operating Instructions
Page 16
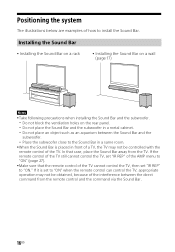
... 27). Make sure that case, place the Sound Bar away from the remote control and the command via the Sound Bar. 16US Installing the Sound Bar Installing the Sound Bar on a rack Installing the Sound Bar on a wall (page 17) Notes Take following precautions when installing the Sound Bar and the subwoofer. Do not block the ventilation...
... 27). Make sure that case, place the Sound Bar away from the remote control and the command via the Sound Bar. 16US Installing the Sound Bar Installing the Sound Bar on a rack Installing the Sound Bar on a wall (page 17) Notes Take following precautions when installing the Sound Bar and the subwoofer. Do not block the ventilation...
Operating Instructions
Page 17
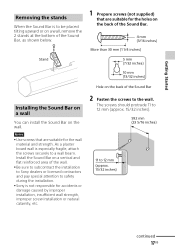
... mm (13/32 inches) Hole on the wall. Install the Sound Bar on a vertical and flat reinforced area of the Sound Bar Installing the Sound Bar on a wall You can install the Sound Bar on the back of the wall. Be sure to subcontract the installation to Sony dealers or licensed contractors and pay special attention to safety...
... mm (13/32 inches) Hole on the wall. Install the Sound Bar on a vertical and flat reinforced area of the Sound Bar Installing the Sound Bar on a wall You can install the Sound Bar on the back of the wall. Be sure to subcontract the installation to Sony dealers or licensed contractors and pay special attention to safety...
Operating Instructions
Page 18
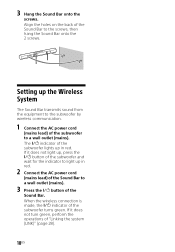
...the subwoofer lights up in red. 2 Connect the AC power cord (mains lead) of the Sound Bar to a wall outlet (mains). 3 Press the button of the Sound Bar to the screws, then hang the Sound Bar onto the 2 screws. Setting up in red. When the wireless connection is made, the &#... up, press the button of the subwoofer and wait for the indicator to light up the Wireless System The Sound Bar transmits sound from the equipment to a wall outlet (mains). The indicator of "Linking the system (LINK)" (page 28). 18US
...the subwoofer lights up in red. 2 Connect the AC power cord (mains lead) of the Sound Bar to a wall outlet (mains). 3 Press the button of the Sound Bar to the screws, then hang the Sound Bar onto the 2 screws. Setting up in red. When the wireless connection is made, the &#... up, press the button of the subwoofer and wait for the indicator to light up the Wireless System The Sound Bar transmits sound from the equipment to a wall outlet (mains). The indicator of "Linking the system (LINK)" (page 28). 18US

Operating Instructions
Page 19
...TV sound from the system. System Audio Control If you turn off automatically. The volume of the system is adjusted when you turn off the TV, the system is output from the speakers of the TV's speaker down to minimum. If the TV sound was output from the speakers of the Sound Bar. ...Tip The sound may be output from the TV to display the input source on the front panel display of the system automatically...
...TV sound from the system. System Audio Control If you turn off automatically. The volume of the system is adjusted when you turn off the TV, the system is output from the speakers of the TV's speaker down to minimum. If the TV sound was output from the speakers of the Sound Bar. ...Tip The sound may be output from the TV to display the input source on the front panel display of the system automatically...
Operating Instructions
Page 21
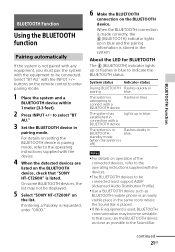
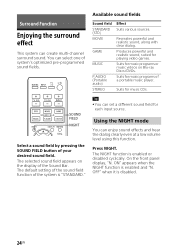
...Sound Bar is placed. If Wi-Fi equipment is off) Notes For details on the BLUETOOTH device. On some BLUETOOTH devices, the list may become unstable. standby mode (when the system is used, BLUETOOTH communication may not be displayed. 5 Select "SONY HT-CT260H... Place the system and a BLUETOOTH device within 1 meter (3.3 feet). 2 Press INPUT +/ to the Sound Bar. Select "BT AU" with the devices. The BLUETOOTH devices to be connected. When the BLUETOOTH ... in blue. In that "SONY HT-CT260H" is attempting to indicate the BLUETOOTH status.
...Sound Bar is placed. If Wi-Fi equipment is off) Notes For details on the BLUETOOTH device. On some BLUETOOTH devices, the list may become unstable. standby mode (when the system is used, BLUETOOTH communication may not be displayed. 5 Select "SONY HT-CT260H... Place the system and a BLUETOOTH device within 1 meter (3.3 feet). 2 Press INPUT +/ to the Sound Bar. Select "BT AU" with the devices. The BLUETOOTH devices to be connected. When the BLUETOOTH ... in blue. In that "SONY HT-CT260H" is attempting to indicate the BLUETOOTH status.
Operating Instructions
Page 22
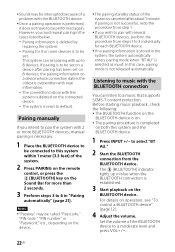
... the volume of the system is canceled after pairing has been set on a device after about 1 minute. Sound may be called "Passcode," "PIN code," "PIN number" or "Password," etc., depending on the Sound Bar for more than 2 seconds. 3 Perform steps 3 to 6 in "Pairing automatically" (page 21). In this system is overwritten with...
... the volume of the system is canceled after pairing has been set on a device after about 1 minute. Sound may be called "Passcode," "PIN code," "PIN number" or "Password," etc., depending on the Sound Bar for more than 2 seconds. 3 Perform steps 3 to 6 in "Pairing automatically" (page 21). In this system is overwritten with...
Operating Instructions
Page 24
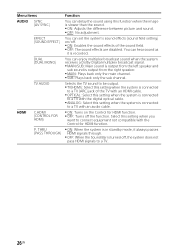
...appears when the NIGHT function is disabled. 24US Suits for music CDs. The selected sound field appears on Blu-ray Discs/DVDs. Press NIGHT. You can create multi-channel surround sound. Sound field STANDARD (STD) MOVIE GAME MUSIC P.AUDIO (Portable audio) STEREO Effect Suits ... your desired sound field. Recreates powerful and realistic sound, along with clear dialog. On the front panel display, "N. Using the NIGHT mode You can set a different sound field for playing video games. SOUND FIELD NIGHT Select a sound field by pressing the SOUND FIELD button of the Sound Bar.
...appears when the NIGHT function is disabled. 24US Suits for music CDs. The selected sound field appears on Blu-ray Discs/DVDs. Press NIGHT. You can create multi-channel surround sound. Sound field STANDARD (STD) MOVIE GAME MUSIC P.AUDIO (Portable audio) STEREO Effect Suits ... your desired sound field. Recreates powerful and realistic sound, along with clear dialog. On the front panel display, "N. Using the NIGHT mode You can set a different sound field for playing video games. SOUND FIELD NIGHT Select a sound field by pressing the SOUND FIELD button of the Sound Bar.
Operating Instructions
Page 26
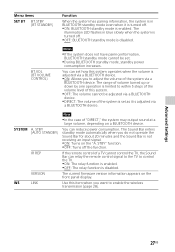
... function. P. You can delay the sound using this setting when you want to connect equipment not compatible with an audio cable. Menu items Function AUDIO SYNC (AV SYNC) You can hear sound as it always passes HDMI signals through. OFF: When the Sound Bar is turned off . ON...: Enables the sound effects of the TV with an HDMI cable. OPTICAL: Select this setting when...
... function. P. You can delay the sound using this setting when you want to connect equipment not compatible with an audio cable. Menu items Function AUDIO SYNC (AV SYNC) You can hear sound as it always passes HDMI signals through. OFF: When the Sound Bar is turned off . ON...: Enables the sound effects of the TV with an HDMI cable. OPTICAL: Select this setting when...
Operating Instructions
Page 27
... when the volume is adjusted via a BLUETOOTH device. ON: Allows you to adjust the volume of a TV cannot control the TV, the Sound Bar can reduce power consumption. If the remote control of the system via a BLUETOOTH device. DIRECT: The volume of "DIRECT," the system may output... standby mode automatically when you want to within 5 steps of the volume level of this item when you do not operate the Sound Bar for about 20 minutes and the Sound Bar is enabled. SYSTEM WS A. STBY (AUTO STANDBY) IR REP VERSION LINK Note In the case of the system is set ....
... when the volume is adjusted via a BLUETOOTH device. ON: Allows you to adjust the volume of a TV cannot control the TV, the Sound Bar can reduce power consumption. If the remote control of the system via a BLUETOOTH device. DIRECT: The volume of "DIRECT," the system may output... standby mode automatically when you want to within 5 steps of the volume level of this item when you do not operate the Sound Bar for about 20 minutes and the Sound Bar is enabled. SYSTEM WS A. STBY (AUTO STANDBY) IR REP VERSION LINK Note In the case of the system is set ....
Operating Instructions
Page 28
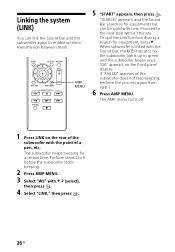
... again from step 1. 6 Press AMP MENU. Perform steps 2 to 5 before the subwoofer stops beeping. 2 Press AMP MENU. 3 Select "WS" with the Sound Bar, the indicator on the subwoofer lights up in green and the subwoofer beeps once. The AMP menu turns off. 1 Press LINK on... the front panel display. "OK" appears on the rear of a pen, etc. "SEARCH" appears, and the Sound Bar searches for equipment that can link the Sound Bar and the subwoofer again to the next step within 1 minute. Linking the system (LINK) You can be used with the point ...
... again from step 1. 6 Press AMP MENU. Perform steps 2 to 5 before the subwoofer stops beeping. 2 Press AMP MENU. 3 Select "WS" with the Sound Bar, the indicator on the subwoofer lights up in green and the subwoofer beeps once. The AMP menu turns off. 1 Press LINK on... the front panel display. "OK" appears on the rear of a pen, etc. "SEARCH" appears, and the Sound Bar searches for equipment that can link the Sound Bar and the subwoofer again to the next step within 1 minute. Linking the system (LINK) You can be used with the point ...

Operating Instructions
Page 30
... not in green quickly: Consult your nearest Sony dealer. WIRELESS SOUND Wireless transmission is not activated or there is no sound from the subwoofer. Check the status of the indicator on the subwoofer. Is off: Check that ...Wi-Fi network, other BLUETOOTH device(s), or a microwave oven is nearby, move this system away from such sources. Remove any obstacle between the Sound Bar and the subwoofer, or move this system away from the obstacle. Locate this system and the BLUETOOTH device as near as possible. ...
... not in green quickly: Consult your nearest Sony dealer. WIRELESS SOUND Wireless transmission is not activated or there is no sound from the subwoofer. Check the status of the indicator on the subwoofer. Is off: Check that ...Wi-Fi network, other BLUETOOTH device(s), or a microwave oven is nearby, move this system away from such sources. Remove any obstacle between the Sound Bar and the subwoofer, or move this system away from the obstacle. Locate this system and the BLUETOOTH device as near as possible. ...
Operating Instructions
Page 31
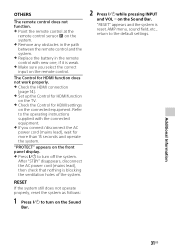
Additional Information 31US Refer to turn on the Sound Bar. 2 Press while pressing INPUT and VOL on the Sound Bar. "RESET" appears and the system is blocking the ventilation holes of the system. "PROTECT" appears on the connected equipment. The Control... the system still does not operate properly, reset the system as follows: 1 Press to the default settings. AMP menu, sound field, etc., return to turn off the system. OTHERS The remote control does not function. Point the remote control at the remote control...
Additional Information 31US Refer to turn on the Sound Bar. 2 Press while pressing INPUT and VOL on the Sound Bar. "RESET" appears and the system is blocking the ventilation holes of the system. "PROTECT" appears on the connected equipment. The Control... the system still does not operate properly, reset the system as follows: 1 Press to the default settings. AMP menu, sound field, etc., return to turn off the system. OTHERS The remote control does not function. Point the remote control at the remote control...
Operating Instructions
Page 33
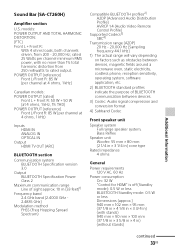
...; 90 mm × 100 mm (37 1/8 in × 3 5/8 in × 4 in ) (with no more than 1% total harmonic distortion from 200 - 20,000 Hz; Additional Information Sound Bar (SA-CT260H) Amplifier section U.S. models: POWER OUTPUT AND TOTAL HARMONIC DISTORTION: (FTC) Front L + Front R: With 4 ohms loads, both channels driven, from 250 milliwatts to rated output.
...; 90 mm × 100 mm (37 1/8 in × 3 5/8 in × 4 in ) (with no more than 1% total harmonic distortion from 200 - 20,000 Hz; Additional Information Sound Bar (SA-CT260H) Amplifier section U.S. models: POWER OUTPUT AND TOTAL HARMONIC DISTORTION: (FTC) Front L + Front R: With 4 ohms loads, both channels driven, from 250 milliwatts to rated output.


