
Operating Instructions
Page 4
... desirable that it should be sure to OET65. This equipment has very low levels of RF energy that the operating voltage is indicated on the Sound Bar or the subwoofer, as you continuously use the system for a long time, be installed and operated keeping the radiator at least 20 cm or..., wrists, feet and ankles). But it deemed to your dealer. AC power cord (mains lead) must be changed only at the rear of the Sound Bar. If you are not going to use this device must be installed and operated keeping the radiator at a large volume, the system temperature...
... desirable that it should be sure to OET65. This equipment has very low levels of RF energy that the operating voltage is indicated on the Sound Bar or the subwoofer, as you continuously use the system for a long time, be installed and operated keeping the radiator at least 20 cm or..., wrists, feet and ankles). But it deemed to your dealer. AC power cord (mains lead) must be changed only at the rear of the Sound Bar. If you are not going to use this device must be installed and operated keeping the radiator at a large volume, the system temperature...
Operating Instructions
Page 5
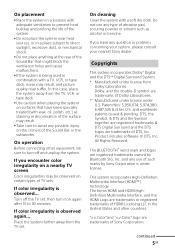
... DTS, the Symbol, & DTS and the Symbol together are registered trademarks & DTS Digital Surround and the DTS logos are trademarks of the Sound Bar that have any possible injury on the corners of TV sets. Do not use any use of Dolby Laboratories. ** Manufactured under license ..., be observed on again after 15 to turn it on certain types of the Sound Bar or the subwoofer. and worldwide patents issued & pending. "x.v.Color"and "x.v.Color" logo are registered trademarks owned by Sony Corporation is being used in the United States and other countries. If color irregularity ...
... DTS, the Symbol, & DTS and the Symbol together are registered trademarks & DTS Digital Surround and the DTS logos are trademarks of the Sound Bar that have any possible injury on the corners of TV sets. Do not use any use of Dolby Laboratories. ** Manufactured under license ..., be observed on again after 15 to turn it on certain types of the Sound Bar or the subwoofer. and worldwide patents issued & pending. "x.v.Color"and "x.v.Color" logo are registered trademarks owned by Sony Corporation is being used in the United States and other countries. If color irregularity ...
Operating Instructions
Page 8
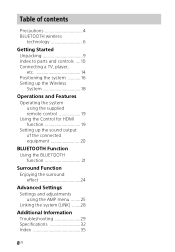
... Wireless System 18 Operations and Features Operating the system using the supplied remote control 19 Using the Control for HDMI function 19 Setting up the sound output of the connected equipment 20 BLUETOOTH Function Using the BLUETOOTH function 21 Surround Function Enjoying the surround effect 24 Advanced Settings Settings and adjustments...
... Wireless System 18 Operations and Features Operating the system using the supplied remote control 19 Using the Control for HDMI function 19 Setting up the sound output of the connected equipment 20 BLUETOOTH Function Using the BLUETOOTH function 21 Surround Function Enjoying the surround effect 24 Advanced Settings Settings and adjustments...
Operating Instructions
Page 9
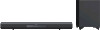
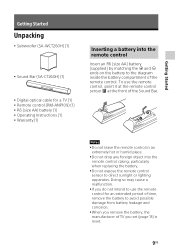
Getting Started Getting Started Unpacking Subwoofer (SA-WCT260H) (1) Sound Bar (SA-CT260H) (1) Digital optical cable for an extended period of time, remove the battery to the diagram inside the battery compartment of the Sound Bar. Notes Do not leave the remote control in an extremely hot or humid place. ...
Getting Started Getting Started Unpacking Subwoofer (SA-WCT260H) (1) Sound Bar (SA-CT260H) (1) Digital optical cable for an extended period of time, remove the battery to the diagram inside the battery compartment of the Sound Bar. Notes Do not leave the remote control in an extremely hot or humid place. ...
Operating Instructions
Page 10
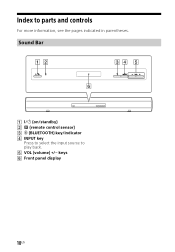
Sound Bar on/standby) (remote control sensor) (BLUETOOTH) key/indicator INPUT key Press to select the input source to parts and controls For more information, see the pages indicated in parentheses. Index to play back. VOL (volume) +/ keys Front panel display 10US
Sound Bar on/standby) (remote control sensor) (BLUETOOTH) key/indicator INPUT key Press to select the input source to parts and controls For more information, see the pages indicated in parentheses. Index to play back. VOL (volume) +/ keys Front panel display 10US
Operating Instructions
Page 11
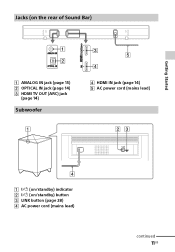
Getting Started Jacks (on the rear of Sound Bar) ANALOG IN jack (page 15) OPTICAL IN jack (page 14) HDMI TV OUT (ARC) jack (page 14) Subwoofer HDMI IN jack (page 14) AC power cord (mains lead) on/standby) indicator on/standby) button LINK button (page 28) AC power cord (mains lead) continued 11US
Getting Started Jacks (on the rear of Sound Bar) ANALOG IN jack (page 15) OPTICAL IN jack (page 14) HDMI TV OUT (ARC) jack (page 14) Subwoofer HDMI IN jack (page 14) AC power cord (mains lead) on/standby) indicator on/standby) button LINK button (page 28) AC power cord (mains lead) continued 11US
Operating Instructions
Page 12
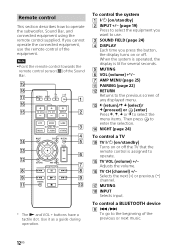
...guide during operation. To control the system on/standby) INPUT +/ (page 19) Press to select the equipment you want to use. SOUND FIELD (page 24) DISPLAY Each time you cannot operate the connected equipment, use the remote control of any displayed menu. (return...is assigned to the previous screen of the equipment. To control a BLUETOOTH device / To go to operate the subwoofer, Sound Bar, and connected equipment using the remote control supplied. Remote control This section describes how to the beginning of the...
...guide during operation. To control the system on/standby) INPUT +/ (page 19) Press to select the equipment you want to use. SOUND FIELD (page 24) DISPLAY Each time you cannot operate the connected equipment, use the remote control of any displayed menu. (return...is assigned to the previous screen of the equipment. To control a BLUETOOTH device / To go to operate the subwoofer, Sound Bar, and connected equipment using the remote control supplied. Remote control This section describes how to the beginning of the...
Operating Instructions
Page 14
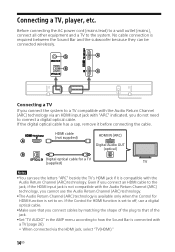
If the digital optical cable has a cap, remove it is required between the Sound Bar and the subwoofer because they can be connected wirelessly. If the Control for HDMI function is set to the system. Connecting a TV If you ... connection is compatible with "ARC" indicated, you connect cables by matching the shape of the plug to that you do not need to how the Sound Bar is set to off, use the Audio Return Channel (ARC) technology. The Audio Return Channel (ARC) technology is available only when the Control...
If the digital optical cable has a cap, remove it is required between the Sound Bar and the subwoofer because they can be connected wirelessly. If the Control for HDMI function is set to the system. Connecting a TV If you ... connection is compatible with "ARC" indicated, you connect cables by matching the shape of the plug to that you do not need to how the Sound Bar is set to off, use the Audio Return Channel (ARC) technology. The Audio Return Channel (ARC) technology is available only when the Control...
Operating Instructions
Page 15
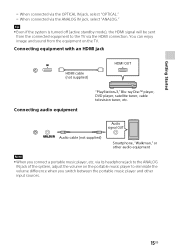
... HDMI signal will be sent from the equipment on the portable music player to the TV via the HDMI connection. You can enjoy image and sound from the connected equipment to eliminate the volume difference when you connect a portable music player, etc. Getting Started When connected via the OPTICAL IN...
... HDMI signal will be sent from the equipment on the portable music player to the TV via the HDMI connection. You can enjoy image and sound from the connected equipment to eliminate the volume difference when you connect a portable music player, etc. Getting Started When connected via the OPTICAL IN...
Operating Instructions
Page 16
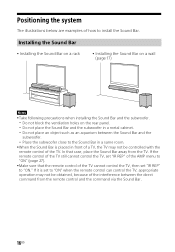
... subwoofer in a metal cabinet. Do not place an object such as an aquarium between the Sound Bar and the subwoofer. Place the subwoofer close to the Sound Bar in a same room. When the Sound Bar is set to "ON" when the remote control can control the TV, appropriate operation may... between the direct command from the TV. If the remote control of the TV still cannot control the TV, set "IR REP" to install the Sound Bar. If it is placed in front of a TV, the TV may not be controlled with the remote control of the TV. In that the...
... subwoofer in a metal cabinet. Do not place an object such as an aquarium between the Sound Bar and the subwoofer. Place the subwoofer close to the Sound Bar in a same room. When the Sound Bar is set to "ON" when the remote control can control the TV, appropriate operation may... between the direct command from the TV. If the remote control of the TV still cannot control the TV, set "IR REP" to install the Sound Bar. If it is placed in front of a TV, the TV may not be controlled with the remote control of the TV. In that the...
Operating Instructions
Page 17
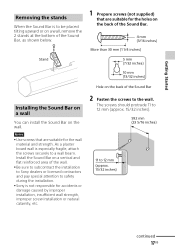
...Started Removing the stands When the Sound Bar is to the wall. Install the Sound Bar on a vertical and flat reinforced area of the wall. Be sure to subcontract the installation to Sony dealers or licensed contractors and pay special attention to safety during the installation. Sony is especially fragile, attach the...inches). 592 mm (23 5/16 inches) 11 to a wall beam. Notes Use screws that are suitable for the holes on the back of the Sound Bar. 4 mm (3/16 inches) More than 30 mm (1 1/4 inches) Stand 5 mm (7/32 inches) 10 mm (13/32 inches) Hole on the back ...
...Started Removing the stands When the Sound Bar is to the wall. Install the Sound Bar on a vertical and flat reinforced area of the wall. Be sure to subcontract the installation to Sony dealers or licensed contractors and pay special attention to safety during the installation. Sony is especially fragile, attach the...inches). 592 mm (23 5/16 inches) 11 to a wall beam. Notes Use screws that are suitable for the holes on the back of the Sound Bar. 4 mm (3/16 inches) More than 30 mm (1 1/4 inches) Stand 5 mm (7/32 inches) 10 mm (13/32 inches) Hole on the back ...
Operating Instructions
Page 18
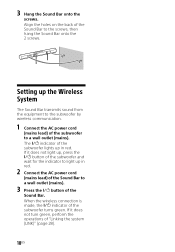
...green, perform the operations of the subwoofer to the screws, then hang the Sound Bar onto the 2 screws. The indicator of the subwoofer lights up the Wireless System The Sound Bar transmits sound from the equipment to light up in red. When the wireless connection is... made, the indicator of the Sound Bar to a wall outlet (mains). If it does not light up...
...green, perform the operations of the subwoofer to the screws, then hang the Sound Bar onto the 2 screws. The indicator of the subwoofer lights up the Wireless System The Sound Bar transmits sound from the equipment to light up in red. When the wireless connection is... made, the indicator of the Sound Bar to a wall outlet (mains). If it does not light up...

Operating Instructions
Page 19
... system is turned on automatically when you turn on the system while you are watching the TV, the TV sound is adjusted when you turn on the TV again, and the TV sound is simplified with the Audio Return Channel (ARC) technology, an HDMI cable connection also sends a digital audio signal from... the TV's speaker down to display the input source on the front panel display of the system is output from the system. Tip The sound may be output from the TV to the ANALOG IN jack BT AU BLUETOOTH device connected 3 Adjust the volume by pressing VOL +/. Input source...
... system is turned on automatically when you turn on the system while you are watching the TV, the TV sound is adjusted when you turn on the TV again, and the TV sound is simplified with the Audio Return Channel (ARC) technology, an HDMI cable connection also sends a digital audio signal from... the TV's speaker down to display the input source on the front panel display of the system is output from the system. Tip The sound may be output from the TV to the ANALOG IN jack BT AU BLUETOOTH device connected 3 Adjust the volume by pressing VOL +/. Input source...
Operating Instructions
Page 20
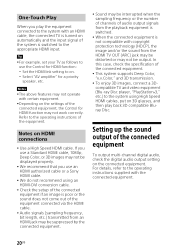
...the connected equipment is not compatible with the connected equipment. 20US Notes The above features may not work correctly. Setting up the sound output of the connected equipment To output multi-channel digital audio, check the digital audio output setting on the settings of the connected equipment, ...HDMI cable. For details, refer to the operating instructions of the equipment. One-Touch Play When you use an HDMI authorized cable or a Sony HDMI cable. We do not recommend using High Speed HDMI cables, put on automatically and the input signal of the system is ...
...the connected equipment is not compatible with the connected equipment. 20US Notes The above features may not work correctly. Setting up the sound output of the connected equipment To output multi-channel digital audio, check the digital audio output setting on the settings of the connected equipment, ...HDMI cable. For details, refer to the operating instructions of the equipment. One-Touch Play When you use an HDMI authorized cable or a Sony HDMI cable. We do not recommend using High Speed HDMI cables, put on automatically and the input signal of the system is ...
Operating Instructions
Page 21
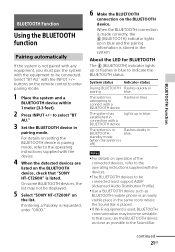
...1 Place the system and a BLUETOOTH device within 1 meter (3.3 feet). 2 Press INPUT +/ to be displayed. 5 Select "SONY HT-CT260H" on the list. In that "SONY HT-CT260H" is listed. When the BLUETOOTH connection is made correctly, the (BLUETOOTH) indicator lights up in blue. The system is in Flashes... with any equipment, you must support A2DP (Advanced Audio Distribution Profile). Use a BLUETOOTH device such as possible to the Sound Bar. On some BLUETOOTH devices, the list may become unstable. The system has established in connection with the equipment to select "BT...
...1 Place the system and a BLUETOOTH device within 1 meter (3.3 feet). 2 Press INPUT +/ to be displayed. 5 Select "SONY HT-CT260H" on the list. In that "SONY HT-CT260H" is listed. When the BLUETOOTH connection is made correctly, the (BLUETOOTH) indicator lights up in blue. The system is in Flashes... with any equipment, you must support A2DP (Advanced Audio Distribution Profile). Use a BLUETOOTH device such as possible to the Sound Bar. On some BLUETOOTH devices, the list may become unstable. The system has established in connection with the equipment to select "BT...
Operating Instructions
Page 22
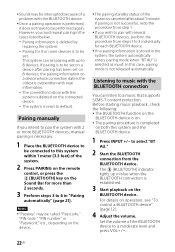
...device. If no pairing information is stored in the system, the system automatically enters pairing mode when "BT AU" is completed on the Sound Bar for 9 or more than 2 seconds. 3 Perform steps 3 to 6 in "Pairing automatically" (page 21). Listening to music with the BLUETOOTH... playback on operation, see "To control a BLUETOOTH device" (page 12). 4 Adjust the volume. The (BLUETOOTH) indicator lights up to 8 devices. Sound may be called "Passcode," "PIN code," "PIN number" or "Password," etc., depending on the connected device. The system is to be set. For...
...device. If no pairing information is stored in the system, the system automatically enters pairing mode when "BT AU" is completed on the Sound Bar for 9 or more than 2 seconds. 3 Perform steps 3 to 6 in "Pairing automatically" (page 21). Listening to music with the BLUETOOTH... playback on operation, see "To control a BLUETOOTH device" (page 12). 4 Adjust the volume. The (BLUETOOTH) indicator lights up to 8 devices. Sound may be called "Passcode," "PIN code," "PIN number" or "Password," etc., depending on the connected device. The system is to be set. For...
Operating Instructions
Page 23
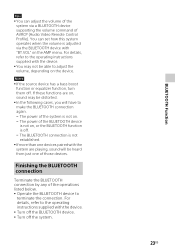
For details, refer to the operating instructions supplied with the system are on the device. If these functions are playing, sound will have to terminate the connection. Notes If the source device has a bass boost function or equalizer function, turn them off the system. 23US ... instructions supplied with the device. You may be distorted. In the following cases, you will be able to adjust the volume, depending on , sound may not be heard from just one of those devices. You can adjust the volume of the system via the BLUETOOTH device with "BT.VOL...
For details, refer to the operating instructions supplied with the system are on the device. If these functions are playing, sound will have to terminate the connection. Notes If the source device has a bass boost function or equalizer function, turn them off the system. 23US ... instructions supplied with the device. You may be distorted. In the following cases, you will be able to adjust the volume, depending on , sound may not be heard from just one of those devices. You can adjust the volume of the system via the BLUETOOTH device with "BT.VOL...
Operating Instructions
Page 24
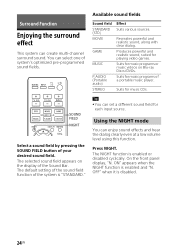
...dialog clearly even at a low volume level using this function. You can set a different sound field for music programs or music videos on the display of a portable music player. Sound field STANDARD (STD) MOVIE GAME MUSIC P.AUDIO (Portable audio) STEREO Effect Suits various sources.... Suits for each input source. SOUND FIELD NIGHT Select a sound field by pressing the SOUND FIELD button of system's optimized pre-programmed sound fields. The default setting of the sound field function of the system is enabled or disabled cyclically. Tip ...
...dialog clearly even at a low volume level using this function. You can set a different sound field for music programs or music videos on the display of a portable music player. Sound field STANDARD (STD) MOVIE GAME MUSIC P.AUDIO (Portable audio) STEREO Effect Suits various sources.... Suits for each input source. SOUND FIELD NIGHT Select a sound field by pressing the SOUND FIELD button of system's optimized pre-programmed sound fields. The default setting of the sound field function of the system is enabled or disabled cyclically. Tip ...
Operating Instructions
Page 25
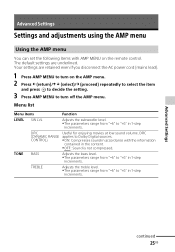
...continued 25US TREBLE Adjusts the treble level. The parameters range from "6" to "+6" in the content. OFF: Sound is not compressed. DRC applies to "+6" in 1-step increments. Advanced Settings Settings and adjustments using the AMP menu Using the AMP ... in 1-step increments. TONE BASS Adjusts the bass level. The parameters range from "6" to Dolby Digital sources. ON: Compresses sound in accordance with AMP MENU on the AMP menu. 2 Press (return)/ (select)/ (proceed) repeatedly to select the ...
...continued 25US TREBLE Adjusts the treble level. The parameters range from "6" to "+6" in the content. OFF: Sound is not compressed. DRC applies to "+6" in 1-step increments. Advanced Settings Settings and adjustments using the AMP menu Using the AMP ... in 1-step increments. TONE BASS Adjusts the bass level. The parameters range from "6" to Dolby Digital sources. ON: Compresses sound in accordance with AMP MENU on the AMP menu. 2 Press (return)/ (select)/ (proceed) repeatedly to select the ...
Operating Instructions
Page 26
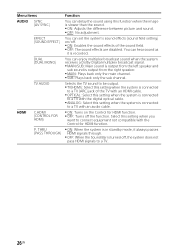
...right speaker. MAIN: Plays back only the main channel. SUB: Plays back only the sub channel. TV AUDIO Selects the TV sound to be output. TV(HDMI): Select this setting when you want to connect equipment not compatible with an audio cable. Select this setting when... the system is connected to a TV (ARC) jack of the sound field. OFF: The sound effects are disabled. P. THRU (PASS THROUGH) ON: When the system is in standby mode, it is recorded. DUAL (DUAL MONO)...
...right speaker. MAIN: Plays back only the main channel. SUB: Plays back only the sub channel. TV AUDIO Selects the TV sound to be output. TV(HDMI): Select this setting when you want to connect equipment not compatible with an audio cable. Select this setting when... the system is connected to a TV (ARC) jack of the sound field. OFF: The sound effects are disabled. P. THRU (PASS THROUGH) ON: When the system is in standby mode, it is recorded. DUAL (DUAL MONO)...


