Operating Guide
Page 5
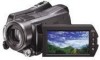
... Software" (1) (p. 26) - Connect the equipment into the terminal will not occur in a malfunction of California, USA only Perchlorate Material - Handycam Handbook (PDF) • "Operating Guide" (This manual) (1) US A B C D Using the camcorder • The camcorder is encouraged to try to Part 15 of the following when the (Movie)/ (Still) mode lamps or the ACCESS...
... Software" (1) (p. 26) - Connect the equipment into the terminal will not occur in a malfunction of California, USA only Perchlorate Material - Handycam Handbook (PDF) • "Operating Guide" (This manual) (1) US A B C D Using the camcorder • The camcorder is encouraged to try to Part 15 of the following when the (Movie)/ (Still) mode lamps or the ACCESS...
Operating Guide
Page 6
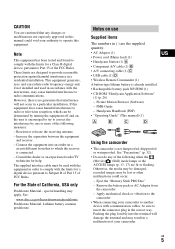
... connect the cables to both the Handycam Station and your camcorder. • Do not apply shock or vibration to the Handycam Station. If the drop sensor catches a drop repeatedly, recording/playback may be stopped. • When the temperature of the camcorder becomes extremely high or extremely low,... you can use . In such a case, save your images on the camcorder, due to the protection features of the Handycam Station when using your camcorder attached to your camcorder correctly while recording. However, there may be some type of the pixels are operational for a ...
... connect the cables to both the Handycam Station and your camcorder. • Do not apply shock or vibration to the Handycam Station. If the drop sensor catches a drop repeatedly, recording/playback may be stopped. • When the temperature of the camcorder becomes extremely high or extremely low,... you can use . In such a case, save your images on the camcorder, due to the protection features of the Handycam Station when using your camcorder attached to your camcorder correctly while recording. However, there may be some type of the pixels are operational for a ...
Operating Guide
Page 7
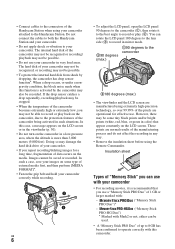
... even if recording or playback is recommended that you destroy the actual body of the camcorder. Therefore, you can save your image data using a digital still camera, and therefore may be contrary to "Handycam Handbook" (PDF) and "PMB Guide." Also, you cannot play back images recorded ...with HD (high definition) image quality on your camcorder may vary depending on the country/region. The scenes may not operate correctly...
... even if recording or playback is recommended that you destroy the actual body of the camcorder. Therefore, you can save your image data using a digital still camera, and therefore may be contrary to "Handycam Handbook" (PDF) and "PMB Guide." Also, you cannot play back images recorded ...with HD (high definition) image quality on your camcorder may vary depending on the country/region. The scenes may not operate correctly...
Operating Guide
Page 9
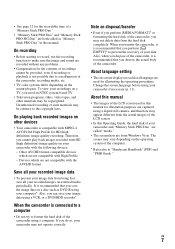
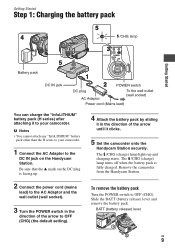
... outlet (wall socket) Power cord (Mains lead) You can charge the "InfoLITHIUM" battery pack (H series) after attaching it clicks. 5 Set the camcorder onto the Handycam Station securely. The /CHG (charge) lamp lights up . 4 Attach the battery pack by sliding it in the direction of the arrow until it ... and remove the battery pack. The /CHG (charge) lamp turns off when the battery pack is facing up and charging starts. Remove the camcorder from the Handycam Station. 2 Connect the power cord (mains lead) to the AC Adaptor and the wall outlet (wall socket). 3 Turn the POWER switch in...
... outlet (wall socket) Power cord (Mains lead) You can charge the "InfoLITHIUM" battery pack (H series) after attaching it clicks. 5 Set the camcorder onto the Handycam Station securely. The /CHG (charge) lamp lights up . 4 Attach the battery pack by sliding it in the direction of the arrow until it ... and remove the battery pack. The /CHG (charge) lamp turns off when the battery pack is facing up and charging starts. Remove the camcorder from the Handycam Station. 2 Connect the power cord (mains lead) to the AC Adaptor and the wall outlet (wall socket). 3 Turn the POWER switch in...
Operating Guide
Page 10
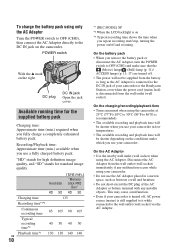
...time: Approximate time (min.) required when you fully charge a completely exhausted battery pack. On the charging/recording/playback time • Times measured when using the camcorder at 25°C (77°F) (10°C to 30°C (50°F to 86°F) is recommended). • The available recording and ...playback time will be shorter when you use your camcorder in a narrow space, such as the AC Adaptor is connected to the DC IN jack of your camcorder or the Handycam Station, even when the power cord (mains lead) is still supplied to it while ...
...time: Approximate time (min.) required when you fully charge a completely exhausted battery pack. On the charging/recording/playback time • Times measured when using the camcorder at 25°C (77°F) (10°C to 30°C (50°F to 86°F) is recommended). • The available recording and ...playback time will be shorter when you use your camcorder in a narrow space, such as the AC Adaptor is connected to the DC IN jack of your camcorder or the Handycam Station, even when the power cord (mains lead) is still supplied to it while ...
Operating Guide
Page 16
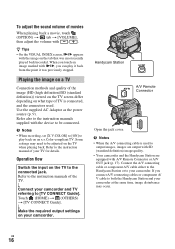
When you touch an image marked with i/B, you connect A/V connecting cables or component A/ V cable to both the Handycam Station and your camcorder and TV referring to play it back from the point it was most recently played back/recorded. Playing the image on a TV Connection ... or to output images, images are output with SD (standard definition) image quality. • Your camcorder and the Handycam Station are equipped with the image on the TV when playing back. US 16 Handycam Station A/V Remote Connector Open the jack cover. Operation flow Switch the input on what type of the TV...
When you touch an image marked with i/B, you connect A/V connecting cables or component A/ V cable to both the Handycam Station and your camcorder and TV referring to play it back from the point it was most recently played back/recorded. Playing the image on a TV Connection ... or to output images, images are output with SD (standard definition) image quality. • Your camcorder and the Handycam Station are equipped with the image on the TV when playing back. US 16 Handycam Station A/V Remote Connector Open the jack cover. Operation flow Switch the input on what type of the TV...

Operating Guide
Page 17
..., jacks, etc., which are not explained in other chapters, are explained here. 1 8 2 3 4 9 5 0 6 qa qs 7 qd qf qg qj qk qh ql w; Your camcorder returns to 5 times the original size (Playback zoom). • When you touch the screen during playback zoom, the point you do not operate your... camcorder for a certain period during sleep mode. US 17 wa ws wd wf wg wj wh wk wl qj Handycam Station wg qs qa Recording/Playback 1 Power zoom lever Move the power zoom lever slightly ...
..., jacks, etc., which are not explained in other chapters, are explained here. 1 8 2 3 4 9 5 0 6 qa qs 7 qd qf qg qj qk qh ql w; Your camcorder returns to 5 times the original size (Playback zoom). • When you touch the screen during playback zoom, the point you do not operate your... camcorder for a certain period during sleep mode. US 17 wa ws wd wf wg wj wh wk wl qj Handycam Station wg qs qa Recording/Playback 1 Power zoom lever Move the power zoom lever slightly ...
Operating Guide
Page 18
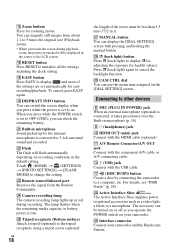
You can magnify still images from the Remote Commander. ws Flash The flash will be turned on your camcorder and the Handycam Station. for adjusting the exposure for backlit subject. qs (USB) jack Connect with the component A/V cable or A/V connecting cable. w; qh RESET ...a flash, or a microphone. qg Zoom buttons Press for zooming in .)). wf Camera recording lamp The camera recording lamp lights up by connecting the camcorder to OFF (CHG), you press while the power is low. wd Remote sensor/Infrared port Receives the signal from about 1.1 to the tripod receptacle using...
You can magnify still images from the Remote Commander. ws Flash The flash will be turned on your camcorder and the Handycam Station. for adjusting the exposure for backlit subject. qs (USB) jack Connect with the component A/V cable or A/V connecting cable. w; qh RESET ...a flash, or a microphone. qg Zoom buttons Press for zooming in .)). wf Camera recording lamp The camera recording lamp lights up by connecting the camcorder to OFF (CHG), you press while the power is low. wd Remote sensor/Infrared port Receives the signal from about 1.1 to the tripod receptacle using...
Operating Guide
Page 20
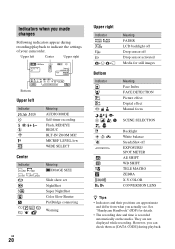
... Slide show set NightShot Super NightShot Color Slow Shutter PictBridge connecting Warning US 20 Upper right Indicator Bottom Indicator 9 . See "Handycam Handbook" (PDF) for still images Meaning Face Index FACE DETECTION Picture effect Digital effect Manual focus SCENE SELECTION Backlight White balance SteadyShot... not displayed while recording. However, you can check them as [DATA CODE] during recording/playback to indicate the settings of your camcorder. n Meaning FADER LCD backlight off Drop sensor off Drop sensor activated Media for details. • The recording date and time ...
... Slide show set NightShot Super NightShot Color Slow Shutter PictBridge connecting Warning US 20 Upper right Indicator Bottom Indicator 9 . See "Handycam Handbook" (PDF) for still images Meaning Face Index FACE DETECTION Picture effect Digital effect Manual focus SCENE SELECTION Backlight White balance SteadyShot... not displayed while recording. However, you can check them as [DATA CODE] during recording/playback to indicate the settings of your camcorder. n Meaning FADER LCD backlight off Drop sensor off Drop sensor activated Media for details. • The recording date and time ...
Operating Guide
Page 24
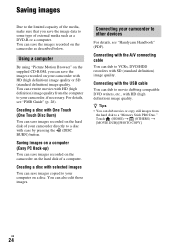
...movie dubbing compatible DVD writers, etc., with ease by pressing the (DISC BURN) button. Connecting your camcorder directly to other devices For details, see "PMB Guide" (p. 28). For details, see "Handycam Handbook" (PDF). Creating a disc with One Touch (One Touch Disc Burn) You can save the... images recorded on the hard disk of your camcorder to a disc with HD (high definition) image quality. Using a computer By...
...movie dubbing compatible DVD writers, etc., with ease by pressing the (DISC BURN) button. Connecting your camcorder directly to other devices For details, see "PMB Guide" (p. 28). For details, see "Handycam Handbook" (PDF). Creating a disc with One Touch (One Touch Disc Burn) You can save the... images recorded on the hard disk of your camcorder to a disc with HD (high definition) image quality. Using a computer By...
Operating Guide
Page 26
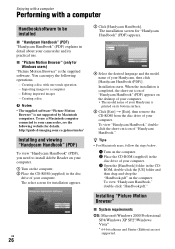
...Enjoying with a computer Performing with one touch operation - Importing images to your computer. http://guide.d-imaging.sony.co.jp/mac/ms/us/ Installing and viewing "Handycam Handbook" (PDF) To view "Handycam Handbook" (PDF), you need to install Adobe Reader on your computer. 1 Turn on the computer. ...[Exit] t [Exit], then remove the CD-ROM from the disc drive of your Handycam is completed, the short-cut icon of your computer. 3 Open the [Handbook] folder in detail about your camcorder and its practical use a Macintosh computer connected to a computer - When the installation is...
...Enjoying with a computer Performing with one touch operation - Importing images to your computer. http://guide.d-imaging.sony.co.jp/mac/ms/us/ Installing and viewing "Handycam Handbook" (PDF) To view "Handycam Handbook" (PDF), you need to install Adobe Reader on your computer. 1 Turn on the computer. ...[Exit] t [Exit], then remove the CD-ROM from the disc drive of your Handycam is completed, the short-cut icon of your computer. 3 Open the [Handbook] folder in detail about your camcorder and its practical use a Macintosh computer connected to a computer - When the installation is...
Operating Guide
Page 28
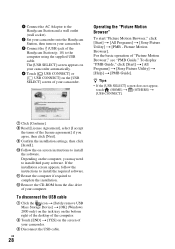
... [Install]. 0 Follow the on-screen instructions to complete the installation. To display "PMB Guide," click [Start] t [All Programs] t [Sony Picture Utility] t [Help] t [PMB Guide]. Operating the "Picture Motion Browser" To start "Picture Motion Browser," click [Start] t [All Programs...CONNECT] on the [USB SELECT] screen of your camcorder. 1 Connect the AC Adaptor to the Handycam Station and a wall outlet (wall socket). 2 Set your camcorder onto the Handycam Station, then turn on your computer. For the basic operation of the Handycam Station (p. 18) to the computer using the ...
... [Install]. 0 Follow the on-screen instructions to complete the installation. To display "PMB Guide," click [Start] t [All Programs] t [Sony Picture Utility] t [Help] t [PMB Guide]. Operating the "Picture Motion Browser" To start "Picture Motion Browser," click [Start] t [All Programs...CONNECT] on the [USB SELECT] screen of your camcorder. 1 Connect the AC Adaptor to the Handycam Station and a wall outlet (wall socket). 2 Set your camcorder onto the Handycam Station, then turn on your computer. For the basic operation of the Handycam Station (p. 18) to the computer using the ...
Operating Guide
Page 29
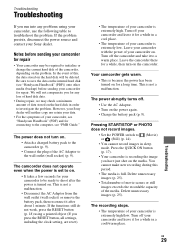
...(wall socket) (p. 9). Leave the camcorder there for repair. Pressing START/STOP or PHOTO does not record images. • Set the POWER switch to the computer, see "Handycam Handbook" (PDF)) onto other media (backup) before sending your Sony dealer. Delete unnecessary images (p. 25).... Troubleshooting US 29 Your camcorder gets warm. • This is extremely low. Press the QUICK ON button...
...(wall socket) (p. 9). Leave the camcorder there for repair. Pressing START/STOP or PHOTO does not record images. • Set the POWER switch to the computer, see "Handycam Handbook" (PDF)) onto other media (backup) before sending your Sony dealer. Delete unnecessary images (p. 25).... Troubleshooting US 29 Your camcorder gets warm. • This is extremely low. Press the QUICK ON button...
Operating Guide
Page 30
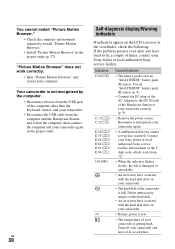
...; Check the computer environment required to fix a couple of times, contact your camcorder. • The hard disk of the Handycam Station or your camcorder and leave it and operate your camcorder again. • A malfunction that you have occurred with the hard disk drive...Picture Motion Browser" in the proper order (p. 27). Turn off your camcorder securely (p. 9). • Remove the power source. Contact your computer. Inform them of your camcorder again in your Sony dealer or local authorized Sony service facility. "Picture Motion Browser" does not work correctly. •...
...; Check the computer environment required to fix a couple of times, contact your camcorder. • The hard disk of the Handycam Station or your camcorder and leave it and operate your camcorder again. • A malfunction that you have occurred with the hard disk drive...Picture Motion Browser" in the proper order (p. 27). Turn off your camcorder securely (p. 9). • Remove the power source. Contact your computer. Inform them of your camcorder again in your Sony dealer or local authorized Sony service facility. "Picture Motion Browser" does not work correctly. •...
Operating Guide
Page 35
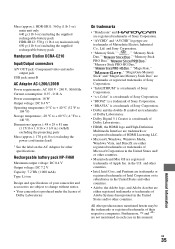
...HDR-SR11: 560 g (1 lb 3 oz) main unit only 640 g (1 lb 6 oz) including the supplied rechargeable battery pack HDR-SR12: 570 g (1 lb 4 oz) main unit only 650 g (1 lb 6 oz) including the supplied rechargeable battery pack Handycam...;C to + 60 °C (-4 °F to change without notice. • Your camcorder is a trademark of Dolby Laboratories. • HDMI, the HDMI logo and High-Definition ...excluding the power cord (mains lead) * See the label on the AC Adaptor for other countries. and Sony Corporation. • "Memory Stick," " ," "Memory Stick Duo," " ," "Memory Stick PRO Duo...
...HDR-SR11: 560 g (1 lb 3 oz) main unit only 640 g (1 lb 6 oz) including the supplied rechargeable battery pack HDR-SR12: 570 g (1 lb 4 oz) main unit only 650 g (1 lb 6 oz) including the supplied rechargeable battery pack Handycam...;C to + 60 °C (-4 °F to change without notice. • Your camcorder is a trademark of Dolby Laboratories. • HDMI, the HDMI logo and High-Definition ...excluding the power cord (mains lead) * See the label on the AC Adaptor for other countries. and Sony Corporation. • "Memory Stick," " ," "Memory Stick Duo," " ," "Memory Stick PRO Duo...


