Operating Guide
Page 5
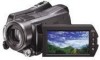
...( ) are the supplied quantity. • AC Adaptor (1) • Power cord (Mains lead) (1) • Handycam Station (1) A • Component A/V cable (1) B • A/V connecting cable (1) C • USB cable (1) D • Wireless Remote Commander (1) A button-type lithium battery is no guarantee that any of the following measures...the dealer or an experienced radio/TV technician for a Class B digital device, pursuant to the camcorder • When connecting your camcorder. special handling may apply, See www.dtsc.ca.gov/hazardouswaste/perchlorate Perchlorate Material: Lithium battery ...
...( ) are the supplied quantity. • AC Adaptor (1) • Power cord (Mains lead) (1) • Handycam Station (1) A • Component A/V cable (1) B • A/V connecting cable (1) C • USB cable (1) D • Wireless Remote Commander (1) A button-type lithium battery is no guarantee that any of the following measures...the dealer or an experienced radio/TV technician for a Class B digital device, pursuant to the camcorder • When connecting your camcorder. special handling may apply, See www.dtsc.ca.gov/hazardouswaste/perchlorate Perchlorate Material: Lithium battery ...
Operating Guide
Page 18
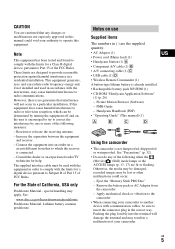
...will be less than 5.5 mm (7/32 in /out. wf Camera recording lamp The camera recording lamp lights up by connecting the camcorder to on your camcorder and the Handycam Station. wk . (back light) button Press . (back light) to initialize all the settings including the clock setting. wl CAM...battery power is set automatically for backlit subject. for adjusting the exposure for easy recording/playback. HDMI OUT (mini) jack Connect with the USB cable. qk EASY button Press EASY to 5 times the original size (Playback zoom). • When you can display the [DIAL SETTING] screen...
...will be less than 5.5 mm (7/32 in /out. wf Camera recording lamp The camera recording lamp lights up by connecting the camcorder to on your camcorder and the Handycam Station. wk . (back light) button Press . (back light) to initialize all the settings including the clock setting. wl CAM...battery power is set automatically for backlit subject. for adjusting the exposure for easy recording/playback. HDMI OUT (mini) jack Connect with the USB cable. qk EASY button Press EASY to 5 times the original size (Playback zoom). • When you can display the [DIAL SETTING] screen...
Operating Guide
Page 24
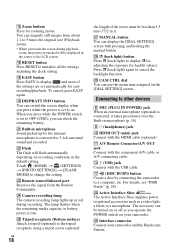
...or a computer. z Tips • You can dub movies or copy still images from the computer to your camcorder, if necessary. Touch (HOME) t (OTHERS) t [MOVIE DUB]/[PHOTO COPY]. Connecting with the USB cable You can dub to movie dubbing compatible DVD writers, etc., with HD (high definition) image quality or SD ... CD-ROM, you save the image data to some type of external media such as described below. For details, see "Handycam Handbook" (PDF). Connecting with the A/V connecting cable You can dub to VCRs, DVD/HDD recorders with HD (high definition) image quality from the hard disk to a ...
...or a computer. z Tips • You can dub movies or copy still images from the computer to your camcorder, if necessary. Touch (HOME) t (OTHERS) t [MOVIE DUB]/[PHOTO COPY]. Connecting with the USB cable You can dub to movie dubbing compatible DVD writers, etc., with HD (high definition) image quality or SD ... CD-ROM, you save the image data to some type of external media such as described below. For details, see "Handycam Handbook" (PDF). Connecting with the A/V connecting cable You can dub to VCRs, DVD/HDD recorders with HD (high definition) image quality from the hard disk to a ...
Operating Guide
Page 28
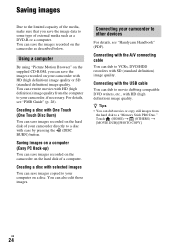
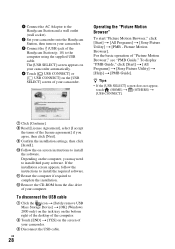
...The [USB SELECT] screen appears on your camcorder automatically. 4 Touch [ USB CONNECT] or [ USB CONNECT] on the screen of your camcorder. 3 Disconnect the USB cable. To display "PMB Guide," click [Start] t [All Programs] t [Sony Picture ...Sony Picture Utility] t [PMB - Picture Motion Browser]. Depending on -screen instructions to the computer using the supplied USB cable. US 28 qs Remove the CD-ROM from the disc drive of "Picture Motion Browser," see "PMB Guide." 1 Connect the AC Adaptor to the Handycam Station and a wall outlet (wall socket). 2 Set your camcorder onto the Handycam...
...The [USB SELECT] screen appears on your camcorder automatically. 4 Touch [ USB CONNECT] or [ USB CONNECT] on the screen of your camcorder. 3 Disconnect the USB cable. To display "PMB Guide," click [Start] t [All Programs] t [Sony Picture ...Sony Picture Utility] t [PMB - Picture Motion Browser]. Depending on -screen instructions to the computer using the supplied USB cable. US 28 qs Remove the CD-ROM from the disc drive of "Picture Motion Browser," see "PMB Guide." 1 Connect the AC Adaptor to the Handycam Station and a wall outlet (wall socket). 2 Set your camcorder onto the Handycam...
Operating Guide
Page 30
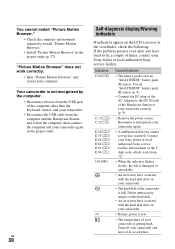
...LCD screen or in the proper order (p. 27). Turn off your camcorder and leave it and operate your camcorder again. • A malfunction that you have tried to fix a couple of times, contact your Sony dealer or local authorized Sony service facility. Use an "InfoLITHIUM" battery pack (H series) (p..... • Disconnect devices from the USB jack of the computer other than the keyboard, mouse, and your camcorder. • Disconnect the USB cable from the computer and the Handycam Station, and restart the computer, then connect the computer and your camcorder again in a cool place. US ...
...LCD screen or in the proper order (p. 27). Turn off your camcorder and leave it and operate your camcorder again. • A malfunction that you have tried to fix a couple of times, contact your Sony dealer or local authorized Sony service facility. Use an "InfoLITHIUM" battery pack (H series) (p..... • Disconnect devices from the USB jack of the computer other than the keyboard, mouse, and your camcorder. • Disconnect the USB cable from the computer and the Handycam Station, and restart the computer, then connect the computer and your camcorder again in a cool place. US ...


