Operating Guide
Page 7
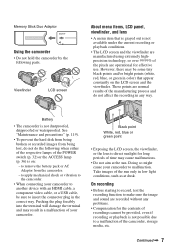
...). • To prevent the hard disk from being lost, do not do not affect the recording in any problems. • Compensation for long periods of the sun only in color) that is grayed out is not possible due to a malfunction of the camcorder, storage media, etc. These ... pack or AC Adaptor from being broken or recorded images from the camcorder. - Viewfinder LCD screen About menu items, LCD panel, viewfinder, and lens • A menu item that appear constantly on : - Doing so might cause your camcorder to another device with an HDMI cable, a component video cable, ...
...). • To prevent the hard disk from being lost, do not do not affect the recording in any problems. • Compensation for long periods of the sun only in color) that is grayed out is not possible due to a malfunction of the camcorder, storage media, etc. These ... pack or AC Adaptor from being broken or recorded images from the camcorder. - Viewfinder LCD screen About menu items, LCD panel, viewfinder, and lens • A menu item that appear constantly on : - Doing so might cause your camcorder to another device with an HDMI cable, a component video cable, ...
Operating Guide
Page 8
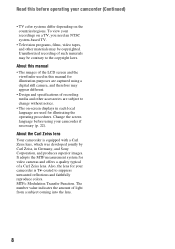
... used for illustrating the operating procedures. Change the screen language before operating your camcorder is equipped with a Carl Zeiss lens, which was developed jointly by Carl Zeiss, in Germany, and Sony Corporation, and produces superior images. The number value indicates the amount of a... subject to change without notice. • The on the countries/regions. About the Carl Zeiss lens Your camcorder is T -coated to the copyright laws. Also, the lens for your camcorder (Continued) • TV color systems differ depending on -screen displays in each local language are...
... used for illustrating the operating procedures. Change the screen language before operating your camcorder is equipped with a Carl Zeiss lens, which was developed jointly by Carl Zeiss, in Germany, and Sony Corporation, and produces superior images. The number value indicates the amount of a... subject to change without notice. • The on the countries/regions. About the Carl Zeiss lens Your camcorder is T -coated to the copyright laws. Also, the lens for your camcorder (Continued) • TV color systems differ depending on -screen displays in each local language are...
Operating Guide
Page 32
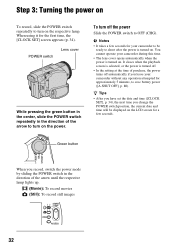
... to save battery power ([A.SHUT OFF], p. 80). You cannot operate your camcorder to be displayed on the LCD screen for a few seconds for your camcorder during this time. • The lens cover opens automatically when the power is turned on . POWER switch Lens cover While pressing the green button in the center, slide the...
... to save battery power ([A.SHUT OFF], p. 80). You cannot operate your camcorder to be displayed on the LCD screen for a few seconds for your camcorder during this time. • The lens cover opens automatically when the power is turned on . POWER switch Lens cover While pressing the green button in the center, slide the...
Operating Guide
Page 33
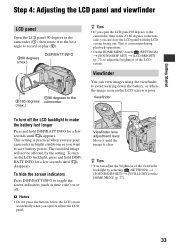
... 4: Adjusting the LCD panel and viewfinder LCD panel Open the LCD panel 90 degrees to the camcorder (1), then rotate it to the best angle to record or play (2). 290 degrees (max.) DISP/BATT ...INFO 190 degrees to the 2180 degrees camcorder (max.) z Tips • If you want to save battery power. b Notes • Do not...below the LCD screen accidentally when you open the LCD panel 90 degrees to the camcorder, then rotate it 180 degrees to the lens side, you can view images using the viewfinder to avoid wearing down the battery...
... 4: Adjusting the LCD panel and viewfinder LCD panel Open the LCD panel 90 degrees to the camcorder (1), then rotate it to the best angle to record or play (2). 290 degrees (max.) DISP/BATT ...INFO 190 degrees to the 2180 degrees camcorder (max.) z Tips • If you want to save battery power. b Notes • Do not...below the LCD screen accidentally when you open the LCD panel 90 degrees to the camcorder, then rotate it 180 degrees to the lens side, you can view images using the viewfinder to avoid wearing down the battery...
Operating Guide
Page 36
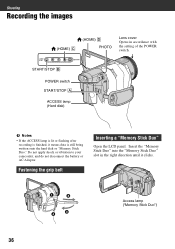
START/STOP B POWER switch START/STOP A ACCESS lamp (Hard disk) b Notes • If the ACCESS lamp is lit or flashing after recording is finished, it clicks. Fastening the grip belt Inserting a "Memory Stick Duo" Open .... Do not apply shock or vibration to your camcorder, and do not disconnect the battery or AC Adaptor. Access lamp ("Memory Stick Duo") 36 Shooting Recording the images (HOME) C (HOME) D PHOTO Lens cover Opens in the right direction until it means data is still being written onto the hard disk or "Memory Stick Duo."
START/STOP B POWER switch START/STOP A ACCESS lamp (Hard disk) b Notes • If the ACCESS lamp is lit or flashing after recording is finished, it clicks. Fastening the grip belt Inserting a "Memory Stick Duo" Open .... Do not apply shock or vibration to your camcorder, and do not disconnect the battery or AC Adaptor. Access lamp ("Memory Stick Duo") 36 Shooting Recording the images (HOME) C (HOME) D PHOTO Lens cover Opens in the right direction until it means data is still being written onto the hard disk or "Memory Stick Duo."
Operating Guide
Page 41
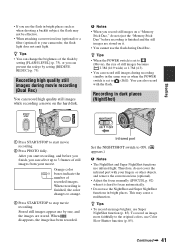
...images during movie recording (Dual Rec) You can record high quality still images while recording a movie on it is hard to start recording, and before recording is finished and ...the NightShot and Super NightShot functions in bright places. To record an image more faithfully to your camcorder, the flash light does not emit light. Stored still images appear one by setting [FLASH ... boxes indicate the number of the flash by one, and the images are stored on the hard disk. and remove the conversion lens (optional). • Adjust the focus manually ([FOCUS], p. 82) when it . •...
...images during movie recording (Dual Rec) You can record high quality still images while recording a movie on it is hard to start recording, and before recording is finished and ...the NightShot and Super NightShot functions in bright places. To record an image more faithfully to your camcorder, the flash light does not emit light. Stored still images appear one by setting [FLASH ... boxes indicate the number of the flash by one, and the images are stored on the hard disk. and remove the conversion lens (optional). • Adjust the focus manually ([FOCUS], p. 82) when it . •...

Operating Guide
Page 42
... a golf or tennis swing. 5 Press START/STOP. Open the LCD panel 90 degrees to the camcorder (1), then rotate it 180 degrees to cancel the smooth slow recording. Touch to the lens side (2). Recording in smooth moving subjects and actions, which cannot be captured under the ordinary shooting conditions...]. 1 Touch (OPTION) on the LCD screen, but the image will be shot in mirror mode (HOME) A 1 Slide the POWER switch to turn on the camcorder. 2 Press (HOME) A (or B) to display .. z Tips • A mirror-image of the following start point The default setting is useful to shoot...
... a golf or tennis swing. 5 Press START/STOP. Open the LCD panel 90 degrees to the camcorder (1), then rotate it 180 degrees to cancel the smooth slow recording. Touch to the lens side (2). Recording in smooth moving subjects and actions, which cannot be captured under the ordinary shooting conditions...]. 1 Touch (OPTION) on the LCD screen, but the image will be shot in mirror mode (HOME) A 1 Slide the POWER switch to turn on the camcorder. 2 Press (HOME) A (or B) to display .. z Tips • A mirror-image of the following start point The default setting is useful to shoot...
Operating Guide
Page 44
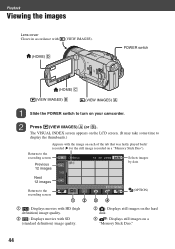
...to the recording screen Previous 12 images Selects images by date Next 12 images Returns to the recording screen (OPTION) 1 : Displays movies with HD (high definition) image quality. 2 : Displays movies with (VIEW IMAGES). (HOME) D POWER switch (HOME) C (VIEW IMAGES) B (VIEW IMAGES) A ... Viewing the images Lens cover Closes in accordance with SD (standard definition) image quality. 3 : Displays still images on the hard disk. 4 : Displays still images on a "Memory Stick Duo." 44 The VISUAL INDEX screen appears on the LCD screen. (It may take some time to turn on your camcorder.
...to the recording screen Previous 12 images Selects images by date Next 12 images Returns to the recording screen (OPTION) 1 : Displays movies with HD (high definition) image quality. 2 : Displays movies with (VIEW IMAGES). (HOME) D POWER switch (HOME) C (VIEW IMAGES) B (VIEW IMAGES) A ... Viewing the images Lens cover Closes in accordance with SD (standard definition) image quality. 3 : Displays still images on the hard disk. 4 : Displays still images on a "Memory Stick Duo." 44 The VISUAL INDEX screen appears on the LCD screen. (It may take some time to turn on your camcorder.
Operating Guide
Page 71
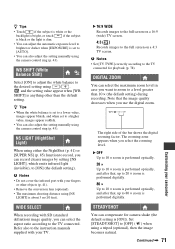
... You can compensate for playback (p. 78). WIDE SELECT When recording with your camcorder DIGITAL ZOOM You can select the maximum zoom level in case you select the...shows the digital zooming factor. b Notes • Do not cover the infrared port with SD (standard definition) image quality, you can record clearer images by setting [NS LIGHT], which emits infrared light (invisible... to brighter or darker when [EXPOSURE] is anything other objects (p. 41). • Remove the conversion lens (optional). • The maximum shooting distance using [NS LIGHT] is set to a lower value,...
... You can compensate for playback (p. 78). WIDE SELECT When recording with your camcorder DIGITAL ZOOM You can select the maximum zoom level in case you select the...shows the digital zooming factor. b Notes • Do not cover the infrared port with SD (standard definition) image quality, you can record clearer images by setting [NS LIGHT], which emits infrared light (invisible... to brighter or darker when [EXPOSURE] is anything other objects (p. 41). • Remove the conversion lens (optional). • The maximum shooting distance using [NS LIGHT] is set to a lower value,...
Operating Guide
Page 85
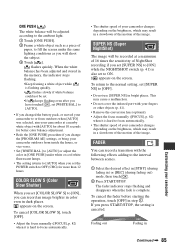
...COLOR SLOW S], touch [OFF]. • Adjust the focus manually ([FOCUS], p. 82) when it is hard to focus automatically. • The shutter speed of your camcorder changes depending on the screen. The fader indicator stops flashing and disappears when the fade is canceled. FADER... with your fingers or other objects (p. 41). • Remove the conversion lens (optional). • Adjust the focus manually ([FOCUS], p. 82) when it is hard to focus automatically. • The shutter speed of your camcorder changes depending on the screen. ONE PUSH ( ) The white balance will ...
...COLOR SLOW S], touch [OFF]. • Adjust the focus manually ([FOCUS], p. 82) when it is hard to focus automatically. • The shutter speed of your camcorder changes depending on the screen. The fader indicator stops flashing and disappears when the fade is canceled. FADER... with your fingers or other objects (p. 41). • Remove the conversion lens (optional). • Adjust the focus manually ([FOCUS], p. 82) when it is hard to focus automatically. • The shutter speed of your camcorder changes depending on the screen. ONE PUSH ( ) The white balance will ...

Operating Guide
Page 96
... of the images on the Remote Commander) (p. 33). No image is displayed in the viewfinder is not clear. • Move the viewfinder lens adjustment lever until the image appears clearly (p. 33). Troubleshooting (Continued) LCD screen/viewfinder An unknown image appears on the LCD screen or viewfinder....]) (p. 120). Release the protection of images that you use a "Memory Stick Duo" formatted on a computer, format it again on your camcorder (or DISPLAY on the device which you disconnect the DC plug or remove the battery pack without turning off the power first. "Memory Stick ...
... of the images on the Remote Commander) (p. 33). No image is displayed in the viewfinder is not clear. • Move the viewfinder lens adjustment lever until the image appears clearly (p. 33). Troubleshooting (Continued) LCD screen/viewfinder An unknown image appears on the LCD screen or viewfinder....]) (p. 120). Release the protection of images that you use a "Memory Stick Duo" formatted on a computer, format it again on your camcorder (or DISPLAY on the device which you disconnect the DC plug or remove the battery pack without turning off the power first. "Memory Stick ...
Operating Guide
Page 98
... while shooting a movie - [SMTH SLW REC] - [FADER] - [D.EFFECT] - [PICT.EFFECT] - The conversion lens (optional) attached • Even if auto flash or (Auto redeye reduction) is extremely high. The recording stops. • The temperature of the hard disk. • Depending on the camcorder. 98 NightShot - [SUPER NS] - [SPOTLIGHT], [SUNSET&MOON] or [LANDSCAPE] in [PROGRAM AE] - [MANUAL...
... while shooting a movie - [SMTH SLW REC] - [FADER] - [D.EFFECT] - [PICT.EFFECT] - The conversion lens (optional) attached • Even if auto flash or (Auto redeye reduction) is extremely high. The recording stops. • The temperature of the hard disk. • Depending on the camcorder. 98 NightShot - [SUPER NS] - [SPOTLIGHT], [SUNSET&MOON] or [LANDSCAPE] in [PROGRAM AE] - [MANUAL...

Operating Guide
Page 100
...be obstructed by it. This is bright, and the subject does not appear on other devices may not function properly. • Remove the conversion lens (optional) as direct sunlight or overhead lighting. The image appears too bright or flickering, or changes in the actual size. • Still ...screen. • Set [STEADYSHOT] to minimize this phenomena (p. 84). The screen image is not a malfunction (p. 117). 100 Playing back images on your camcorder Still images stored on the screen. • Press and hold DISP/BATT INFO for your DVD device, or cover the sensor of your DVD device...
...be obstructed by it. This is bright, and the subject does not appear on other devices may not function properly. • Remove the conversion lens (optional) as direct sunlight or overhead lighting. The image appears too bright or flickering, or changes in the actual size. • Still ...screen. • Set [STEADYSHOT] to minimize this phenomena (p. 84). The screen image is not a malfunction (p. 117). 100 Playing back images on your camcorder Still images stored on the screen. • Press and hold DISP/BATT INFO for your DVD device, or cover the sensor of your DVD device...
Operating Guide
Page 111
...a while and try again later. Cannot record still images. • You are trying to a Playlist. Lens accessory attached. Release the protection of HD (high definition) movies - Ended USB function. Overheated. Check the printer. • Turn off the printer and on ... Ended USB function. Overheated. x Flash Charging... Not available. • A malfunction has occurred with SD (standard definition) image quality to format the camcorder hard disk, while the battery capacity is low. USB function ended. Playback prohibited. • You can select only 100 images ...
...a while and try again later. Cannot record still images. • You are trying to a Playlist. Lens accessory attached. Release the protection of HD (high definition) movies - Ended USB function. Overheated. Check the printer. • Turn off the printer and on ... Ended USB function. Overheated. x Flash Charging... Not available. • A malfunction has occurred with SD (standard definition) image quality to format the camcorder hard disk, while the battery capacity is low. USB function ended. Playback prohibited. • You can select only 100 images ...
Operating Guide
Page 119
... in these operating instructions. • Do not let your camcorder gets wet, it . • Keep metal contacts clean. If decreased usage time between charges becomes significant, it is governed by a Sony dealer before operating it any solid object or liquid gets inside of the lens. • Keep the POWER switch setting to direct...
... in these operating instructions. • Do not let your camcorder gets wet, it . • Keep metal contacts clean. If decreased usage time between charges becomes significant, it is governed by a Sony dealer before operating it any solid object or liquid gets inside of the lens. • Keep the POWER switch setting to direct...

Operating Guide
Page 121
... rechargeable battery to OFF (CHG) for a long period of the Remote Commander 1 While pressing on your camcorder to little dirt or dust. • To prevent mold, periodically clean the lens as thinner, benzine, alcohol, chemical cloths, repellent, insecticide and sunscreen. - x Procedures Connect your hands....lithium battery becomes weak, the operating distance of the lens clean with a Sony CR2025 lithium battery. If you do not use a sharp-pointed object for a long time. Doing so may not function properly. Handling the camcorder with the screen facing out. In hot or humid ...
... rechargeable battery to OFF (CHG) for a long period of the Remote Commander 1 While pressing on your camcorder to little dirt or dust. • To prevent mold, periodically clean the lens as thinner, benzine, alcohol, chemical cloths, repellent, insecticide and sunscreen. - x Procedures Connect your hands....lithium battery becomes weak, the operating distance of the lens clean with a Sony CR2025 lithium battery. If you do not use a sharp-pointed object for a long time. Doing so may not function properly. Handling the camcorder with the screen facing out. In hot or humid ...
Operating Guide
Page 122
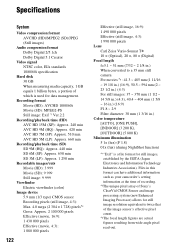
...Hard disk 30 GB When measuring madia capacity, 1 GB equals 1 billion bytes, a portion of the image sensor's effective pixel count. *3The focal length figures are actual figures resulting from wide angle pixel read-out. Recording format Movie (HD): AVCHD...Effective (still image, 16:9): 1 490 000 pixels Effective (still image, 4:3): 1 990 000 pixels Lens Carl Zeiss Vario-Sonnar T 10 × (Optical), 20 ×, 80 × (Digital) ...have additional information such as your camcorder's setting information at the time of recording. *2The unique pixel array of Sony's ClearVid CMOS Sensor and image ...
...Hard disk 30 GB When measuring madia capacity, 1 GB equals 1 billion bytes, a portion of the image sensor's effective pixel count. *3The focal length figures are actual figures resulting from wide angle pixel read-out. Recording format Movie (HD): AVCHD...Effective (still image, 16:9): 1 490 000 pixels Effective (still image, 4:3): 1 990 000 pixels Lens Carl Zeiss Vario-Sonnar T 10 × (Optical), 20 ×, 80 × (Digital) ...have additional information such as your camcorder's setting information at the time of recording. *2The unique pixel array of Sony's ClearVid CMOS Sensor and image ...

Operating Guide
Page 126
A Power zoom lever (39, 47) B PHOTO button (38) C Eyecup D Viewfinder (33) E Viewfinder lens adjustment lever (33) F POWER switch (32) G (Movie)/ (Still) mode lamps (32) H CHG (charge) lamp (28) I Hooks for a shoulder belt Attach a shoulder belt (optional). Quick Reference Identifying parts and controls The numbers in ( ) are reference pages. J Battery pack (28) K ACCESS lamp (Hard disk) (36) L REMOTE jack M i (headphones) jack N Grip belt (36) O START/STOP button (37) 126
A Power zoom lever (39, 47) B PHOTO button (38) C Eyecup D Viewfinder (33) E Viewfinder lens adjustment lever (33) F POWER switch (32) G (Movie)/ (Still) mode lamps (32) H CHG (charge) lamp (28) I Hooks for a shoulder belt Attach a shoulder belt (optional). Quick Reference Identifying parts and controls The numbers in ( ) are reference pages. J Battery pack (28) K ACCESS lamp (Hard disk) (36) L REMOTE jack M i (headphones) jack N Grip belt (36) O START/STOP button (37) 126

Operating Guide
Page 129
Flashes when remaining hard disk space or battery power is low. B Flash (40) C Lens (Carl Zeiss Lens) (8) D Camera control ring (43) E Camera recording lamp (79) Lights up in .)) to operate your camcorder. L Remote sensor/Infrared port Point the Remote Commander (p. 130) towards the remote sensor to the tripod receptacle using a tripod screw. Continued , 129 Quick Reference...
Flashes when remaining hard disk space or battery power is low. B Flash (40) C Lens (Carl Zeiss Lens) (8) D Camera control ring (43) E Camera recording lamp (79) Lights up in .)) to operate your camcorder. L Remote sensor/Infrared port Point the Remote Commander (p. 130) towards the remote sensor to the tripod receptacle using a tripod screw. Continued , 129 Quick Reference...
Operating Guide
Page 137
... quality 18 HDD INFO 67 HDMI cable 50 HDMI OUT jack 49 Help HOME MENU 24 Software 89 High altitudes 9 High Definition TV 49 Holding the camcorder .........36 HOME MENU........20, 68, 134 CLOCK/LANG 79 GENERAL SET 79 MOVIE SETTINGS ......70 OUTPUT SETTINGS ...78 PHOTO SETTINGS......73 SOUND/DISP SET .......77 ... LCD BRIGHT 77 LCD COLOR 77 LCD PANEL 78 LCD panel 33 LCD BL LEVEL........... 77 LCD BRIGHT 77 LCD COLOR 77 LCD screen 33 Lens cover 32, 36 LP 70 LUMI.
... quality 18 HDD INFO 67 HDMI cable 50 HDMI OUT jack 49 Help HOME MENU 24 Software 89 High altitudes 9 High Definition TV 49 Holding the camcorder .........36 HOME MENU........20, 68, 134 CLOCK/LANG 79 GENERAL SET 79 MOVIE SETTINGS ......70 OUTPUT SETTINGS ...78 PHOTO SETTINGS......73 SOUND/DISP SET .......77 ... LCD BRIGHT 77 LCD COLOR 77 LCD PANEL 78 LCD panel 33 LCD BL LEVEL........... 77 LCD BRIGHT 77 LCD COLOR 77 LCD screen 33 Lens cover 32, 36 LP 70 LUMI.


