
Operating Instructions
Page 3
... adopted in BS (broadcast satellite) digital and terrestrial digital HDTV broadcastings and in Blu-ray disc recorders. z Tip • Your camcorder adopts the HDV1080i specification, which utilizes 1080 effective scanning lines, within the HDV standards, and records pictures at the image bit rate ..., pursuant to operate this equipment. Notes on a TV, you need an NTSC system-based TV. • Television programs, films, video tapes, and other materials may be provided, even if recording or playback is not possible due to provide reasonable protection against harmful interference in a...
... adopted in BS (broadcast satellite) digital and terrestrial digital HDTV broadcastings and in Blu-ray disc recorders. z Tip • Your camcorder adopts the HDV1080i specification, which utilizes 1080 effective scanning lines, within the HDV standards, and records pictures at the image bit rate ..., pursuant to operate this equipment. Notes on a TV, you need an NTSC system-based TV. • Television programs, films, video tapes, and other materials may be provided, even if recording or playback is not possible due to provide reasonable protection against harmful interference in a...
Operating Instructions
Page 4
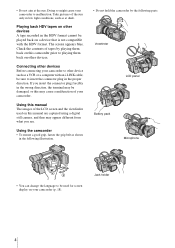
...of the LCD screen and the viewfinder used for screen display on your camcorder to other devices A tape recorded in the HDV format cannot be sure to malfunction. Connecting other devices Before connecting your camcorder (p. 18). Using the camcorder • To ensure a good grip, fasten the grip belt as a... • You can change the language to playing them back on this camcorder prior to be damaged, or this may cause a malfunction of tapes by the following illustration. • Do not hold the camcorder by playing them back on this manual are captured using a digital still ...
...of the LCD screen and the viewfinder used for screen display on your camcorder to other devices A tape recorded in the HDV format cannot be sure to malfunction. Connecting other devices Before connecting your camcorder (p. 18). Using the camcorder • To ensure a good grip, fasten the grip belt as a... • You can change the language to playing them back on this camcorder prior to be damaged, or this may cause a malfunction of tapes by the following illustration. • Do not hold the camcorder by playing them back on this manual are captured using a digital still ...
Operating Instructions
Page 5
... the LCD panel and viewfinder 15 Adjusting the LCD panel 15 Adjusting the viewfinder 15 Step 5: Setting the date and time 16 Step 6: Inserting a cassette tape 17 Step 7: Setting the screen language 18 Recording Recording movies 20 Recording for backlit subjects 25 Recording the subject lit by strong light - ND FILTER...
... the LCD panel and viewfinder 15 Adjusting the LCD panel 15 Adjusting the viewfinder 15 Step 5: Setting the date and time 16 Step 6: Inserting a cassette tape 17 Step 7: Setting the screen language 18 Recording Recording movies 20 Recording for backlit subjects 25 Recording the subject lit by strong light - ND FILTER...
Operating Instructions
Page 6
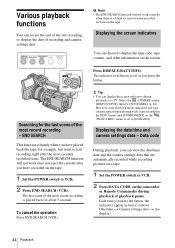
... the picture on a TV 46 Viewing the picture on a high definition TV 46 Viewing the picture on a 16:9 TV or a 4:3 TV 48 Locating a scene on a tape for playback 49 Searching quickly for a recording start point - END SEARCH 44 Displaying the screen indicators 44 Displaying the date/time and camera settings data...
... the picture on a TV 46 Viewing the picture on a high definition TV 46 Viewing the picture on a 16:9 TV or a 4:3 TV 48 Locating a scene on a tape for playback 49 Searching quickly for a recording start point - END SEARCH 44 Displaying the screen indicators 44 Displaying the date/time and camera settings data...
Operating Instructions
Page 7
... Recording pictures from a VCR or TV 74 Connecting to a computer 77 Dubbing sound to a recorded tape 78 Connecting an analog VCR to the computer via your camcorder abroad 90 HDV format and recording/playback ..91 About the "InfoLITHIUM" battery pack 92 About i.LINK 94 Maintenance and ... (LCD/VF SET) menu - Signal conversion function ........81 Troubleshooting Troubleshooting 83 Warning indicators and messages .....88 Additional Information Using your camcorder - LCD COLOR, etc 58 Using the (IN/OUT REC) menu - REC FORMAT/TV TYPE, etc. ...59 Using the (OTHERS) menu -
... Recording pictures from a VCR or TV 74 Connecting to a computer 77 Dubbing sound to a recorded tape 78 Connecting an analog VCR to the computer via your camcorder abroad 90 HDV format and recording/playback ..91 About the "InfoLITHIUM" battery pack 92 About i.LINK 94 Maintenance and ... (LCD/VF SET) menu - Signal conversion function ........81 Troubleshooting Troubleshooting 83 Warning indicators and messages .....88 Additional Information Using your camcorder - LCD COLOR, etc 58 Using the (IN/OUT REC) menu - REC FORMAT/TV TYPE, etc. ...59 Using the (OTHERS) menu -
Operating Instructions
Page 17
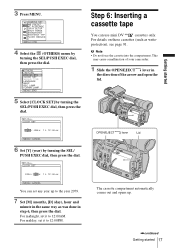
b Note • Do not force the cassette into the compartment. This may cause a malfunction of your camcorder. 1 Slide the OPEN/EJECT lever in step 6, then press the dial. OTHERS RETURN ASS I GN BTN CLOCK SET WORLD T I N SETUP SHOT TRANS STEADYSHOT STDYSHOT TYP ... [M] (month), [D] (day), hour and minute in the same way as write- For midday, set any year up . ,continued Getting started 3 Press MENU. Step 6: Inserting a cassette tape You can set it to 12:00PM. For details on these cassettes (such as was done in the direction of the arrow and open the...
b Note • Do not force the cassette into the compartment. This may cause a malfunction of your camcorder. 1 Slide the OPEN/EJECT lever in step 6, then press the dial. OTHERS RETURN ASS I GN BTN CLOCK SET WORLD T I N SETUP SHOT TRANS STEADYSHOT STDYSHOT TYP ... [M] (month), [D] (day), hour and minute in the same way as write- For midday, set any year up . ,continued Getting started 3 Press MENU. Step 6: Inserting a cassette tape You can set it to 12:00PM. For details on these cassettes (such as was done in the direction of the arrow and open the...
Operating Instructions
Page 21
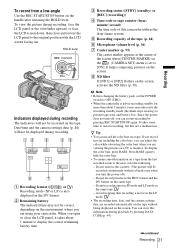
...44). ,continued Recording 21 Recording H ND filter If [ND1] or [ND2] flashes on the same tape. - If you record movies including the color bars, you can view this camcorder utilizes the drop-frame system. Do not remove the cassette. (The picture will not be recorded continuously ... Tip • You can adjust the color while observing the color bars when you are using your camcorder exits the recording standby mode (the drum stops rotating) to prevent tape wear and battery loss. HOLD lever Indicators displayed during recording, face the LCD panel or the viewfinder ...
...44). ,continued Recording 21 Recording H ND filter If [ND1] or [ND2] flashes on the same tape. - If you record movies including the color bars, you can view this camcorder utilizes the drop-frame system. Do not remove the cassette. (The picture will not be recorded continuously ... Tip • You can adjust the color while observing the color bars when you are using your camcorder exits the recording standby mode (the drum stops rotating) to prevent tape wear and battery loss. HOLD lever Indicators displayed during recording, face the LCD panel or the viewfinder ...
Operating Instructions
Page 22
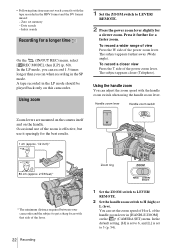
.... Occasional use it further for the best results. 1 cm (approx. 1/2 inch)* 80 cm (approx. 2 5/8 feet)* Zoom ring * The minimum distance required between your camcorder and the subject to get a sharp focus with that side of the lever. 22 Recording 1 Set the ZOOM switch to LEVER/ REMOTE. 2 Set the handle... use of the handle zoom lever in the SP mode. • Following functions may not work correctly with the tape recorded in the LP mode should be played back only on this camcorder. Zero set to LEVER/ REMOTE. 2 Press the power zoom lever slightly for a longer time On the (IN/...
.... Occasional use it further for the best results. 1 cm (approx. 1/2 inch)* 80 cm (approx. 2 5/8 feet)* Zoom ring * The minimum distance required between your camcorder and the subject to get a sharp focus with that side of the lever. 22 Recording 1 Set the ZOOM switch to LEVER/ REMOTE. 2 Set the handle... use of the handle zoom lever in the SP mode. • Following functions may not work correctly with the tape recorded in the LP mode should be played back only on this camcorder. Zero set to LEVER/ REMOTE. 2 Press the power zoom lever slightly for a longer time On the (IN/...
Operating Instructions
Page 31
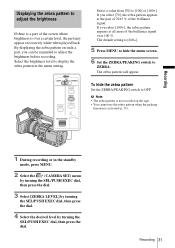
By displaying the zebra pattern on the tape. • You cannot use the zebra pattern when the peaking function is over 100 %. The zebra pattern will appear. Select a value from [70] to adjust ...
By displaying the zebra pattern on the tape. • You cannot use the zebra pattern when the peaking function is over 100 %. The zebra pattern will appear. Select a value from [70] to adjust ...
Operating Instructions
Page 33
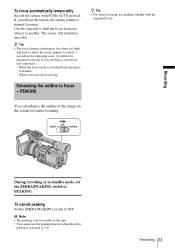
... subject to another. Recording During recording or in the following cases. (It will transition smoothly. You can enhance the outline of the image on the tape. • You cannot use peaking together with PUSH AUTO pressed. The scenes will not be displayed correctly if you are using a conversion lens (optional).) - Enhancing...
... subject to another. Recording During recording or in the following cases. (It will transition smoothly. You can enhance the outline of the image on the tape. • You cannot use peaking together with PUSH AUTO pressed. The scenes will not be displayed correctly if you are using a conversion lens (optional).) - Enhancing...

Operating Instructions
Page 39
... button assigned to assign a function. When pressed during recording appears for the scene later (p. 50). b Note • You cannot record an index signal on a recorded tape afterward. See page 68 to the FADER function repeatedly until the FADER indicators disappear. Press the ASSIGN button assigned to the index function again. When...
... button assigned to assign a function. When pressed during recording appears for the scene later (p. 50). b Note • You cannot record an index signal on a recorded tape afterward. See page 68 to the FADER function repeatedly until the FADER indicators disappear. Press the ASSIGN button assigned to the index function again. When...

Operating Instructions
Page 41
Then, your camcorder is set to the standby mode. The last few seconds of the most recently recorded scenes - Recording 41 In the standby mode, press REC REVIEW. Recording Reviewing the most recently recorded scene are played back. Rec Review You can view a few seconds of the scene recorded just before you stopped the tape.
Then, your camcorder is set to the standby mode. The last few seconds of the most recently recorded scenes - Recording 41 In the standby mode, press REC REVIEW. Recording Reviewing the most recently recorded scene are played back. Rec Review You can view a few seconds of the scene recorded just before you stopped the tape.
Operating Instructions
Page 42
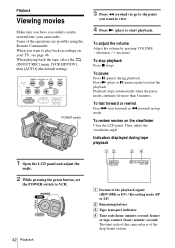
... (HDV1080i or DV) / Recording mode (SP or LP) B Remaining battery C Tape transport indicator D Time code (hour: minute: second: frame) or tape counter (hour: minute: second) The time code of this camcorder is of the operations are possible using the Remote Commander. To review movies on your... camcorder. Press N (play ) to restart the playback. Playback stops automatically ...
... (HDV1080i or DV) / Recording mode (SP or LP) B Remaining battery C Tape transport indicator D Time code (hour: minute: second: frame) or tape counter (hour: minute: second) The time code of this camcorder is of the operations are possible using the Remote Commander. To review movies on your... camcorder. Press N (play ) to restart the playback. Playback stops automatically ...
Operating Instructions
Page 43
... 2 times faster (double speed) ×2 (double speed) on pressing M (fast forward) or m (rewind) while fast forwarding or rewinding the tape. To return to the normal playback mode, press N (play). * Horizontal lines may see mosaic-like images of the previously played picture remaining on ...the Remote Commander. This is played back. Picture search Keep on the Remote Commander. 2 y (slow). Playback b Note • When playing back a tape recorded in the HDV and DV formats, and the signal switches between HDV and DV, the picture and sound disappear temporarily. • You cannot play...
... 2 times faster (double speed) ×2 (double speed) on pressing M (fast forward) or m (rewind) while fast forwarding or rewinding the tape. To return to the normal playback mode, press N (play). * Horizontal lines may see mosaic-like images of the previously played picture remaining on ...the Remote Commander. This is played back. Picture search Keep on the Remote Commander. 2 y (slow). Playback b Note • When playing back a tape recorded in the HDV and DV formats, and the signal switches between HDV and DV, the picture and sound disappear temporarily. • You cannot play...
Operating Instructions
Page 44
... the screen indicators during playback or playback pause. b Note • The END SEARCH function will not work correctly when there is set to [1080i/480i]. Searching for the last scene of the most recent recording is played back for example, but want to VCR. 2 Press END SEARCH (VCR...can view the date/time data and the camera settings data that are automatically recorded while recording pictures on a tape. 1 Set the POWER switch to VCR. 2 Press DATA CODE on the camcorder or Remote Commander during playback on a TV. The last scene of recording and camera settings data. However, ...
... the screen indicators during playback or playback pause. b Note • The END SEARCH function will not work correctly when there is set to [1080i/480i]. Searching for the last scene of the most recent recording is played back for example, but want to VCR. 2 Press END SEARCH (VCR...can view the date/time data and the camera settings data that are automatically recorded while recording pictures on a tape. 1 Set the POWER switch to VCR. 2 Press DATA CODE on the camcorder or Remote Commander during playback on a TV. The last scene of recording and camera settings data. However, ...
Operating Instructions
Page 46
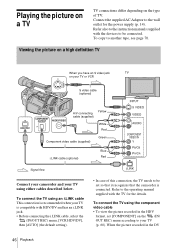
...cable (optional) Yellow A/V connecting cable (supplied) White Red Component video cable (supplied) Green i.LINK cable (optional) Blue Red Signal flow Connect your camcorder and your TV is compatible with the TV for the power supply (p. 14). To copy to be set [COMPONENT] on the type of this connection...according to the wall outlet for the details. When the picture recorded in the HDV format, set so that it recognizes that the camcorder is recommended when your TV using the component video cable • To view the picture recorded in the DV 46 Playback To connect ...
...cable (optional) Yellow A/V connecting cable (supplied) White Red Component video cable (supplied) Green i.LINK cable (optional) Blue Red Signal flow Connect your camcorder and your TV is compatible with the TV for the power supply (p. 14). To copy to be set [COMPONENT] on the type of this connection...according to the wall outlet for the details. When the picture recorded in the HDV format, set so that it recognizes that the camcorder is recommended when your TV using the component video cable • To view the picture recorded in the DV 46 Playback To connect ...

Operating Instructions
Page 49
...stop) when you want to stop playback. 3 Press m (rewind). If the tape counter is reset to "0:00:00" and appears on the tape counter. ,continued Playback 49 When your TV is connected to a VCR Connect your camcorder to the LINE IN input on the VCR to LINE. Zero set memory Playback... 1 During playback, press ZERO SET MEMORY on your camcorder or Remote Commander at the point you want to locate later on a tape for playback Searching quickly for that purpose. The tape stops automatically when the tape counter reaches "0:00:00." 4 Press N (play the sound in the...
...stop) when you want to stop playback. 3 Press m (rewind). If the tape counter is reset to "0:00:00" and appears on the tape counter. ,continued Playback 49 When your TV is connected to a VCR Connect your camcorder to the LINE IN input on the VCR to LINE. Zero set memory Playback... 1 During playback, press ZERO SET MEMORY on your camcorder or Remote Commander at the point you want to locate later on a tape for playback Searching quickly for that purpose. The tape stops automatically when the tape counter reaches "0:00:00." 4 Press N (play the sound in the...

Operating Instructions
Page 50
... SEARCH]. 3 Press . (previous)/> (next) on the Remote Commander. b Note • If 1 day's recording is less than 2 minutes, your camcorder may not accurately find the point where the recording date changes. Index search You can locate the point where the recording date changes. Playback starts...select an index point. Date search • The Date search will not function correctly when there is a blank section between recorded sections on the tape. 50 Playback SEARCH MODE . / > STOP 1 Set the POWER switch to VCR. 2 Press SEARCH MODE on the Remote Commander repeatedly to ...
... SEARCH]. 3 Press . (previous)/> (next) on the Remote Commander. b Note • If 1 day's recording is less than 2 minutes, your camcorder may not accurately find the point where the recording date changes. Index search You can locate the point where the recording date changes. Playback starts...select an index point. Date search • The Date search will not function correctly when there is a blank section between recorded sections on the tape. 50 Playback SEARCH MODE . / > STOP 1 Set the POWER switch to VCR. 2 Press SEARCH MODE on the Remote Commander repeatedly to ...
Operating Instructions
Page 55
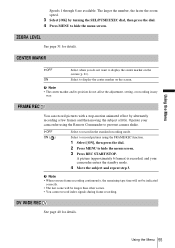
.... 3 Select [OK] by alternately recording a few frames and then moving the subject a little. A picture (approximately 6 frames) is recorded, and your camcorder using the FRAME REC function. 1 Select [ON], then press the dial. 2 Press MENU to display the center marker on the screen (p. 21). FRAME ...the screen. Using the Menu Speeds 1 through 8 are available. CENTER MARKR GOFF ON Select when you use frame recording continuously, the remaining tape time will not be indicated correctly. • The last scene will be longer than other scenes. • You cannot record index signals ...
.... 3 Select [OK] by alternately recording a few frames and then moving the subject a little. A picture (approximately 6 frames) is recorded, and your camcorder using the FRAME REC function. 1 Select [ON], then press the dial. 2 Press MENU to display the center marker on the screen (p. 21). FRAME ...the screen. Using the Menu Speeds 1 through 8 are available. CENTER MARKR GOFF ON Select when you use frame recording continuously, the remaining tape time will not be indicated correctly. • The last scene will be longer than other scenes. • You cannot record index signals ...
Operating Instructions
Page 56
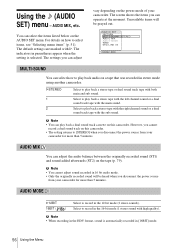
... marked with the sub sound. b Note • You can play back a dual sound track cassette on this camcorder. • The setting returns to play back audio on a tape that was recorded in 16 bit audio mode. • Only the originally recorded sound will be heard when you ...sound (ST1) and sound added afterwards (ST2) on this camcorder. The screen shows the items you cannot record a dual sound track on the tape (p. 79). Select to play back a stereo tape with the left channel sound or a dual sound track tape with high quality). Unavailable items will be grayed out. b ...
... marked with the sub sound. b Note • You can play back a dual sound track cassette on this camcorder. • The setting returns to play back audio on a tape that was recorded in 16 bit audio mode. • Only the originally recorded sound will be heard when you ...sound (ST1) and sound added afterwards (ST2) on this camcorder. The screen shows the items you cannot record a dual sound track on the tape (p. 79). Select to play back a stereo tape with the left channel sound or a dual sound track tape with high quality). Unavailable items will be grayed out. b ...


