
Operating Instructions
Page 24
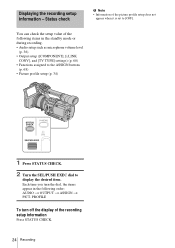
... dial, the items appear in the following items in the standby mode or during recording. • Audio setup such as microphone volume level (p. 36) • Output setup ([COMPONENT], [i.LINK CONV], and [TV TYPE] settings) (p. 60) • Functions assigned to the ASSIGN buttons (p. 68) • Picture profile setup (p. 34) 1 Press STATUS CHECK... the setup value of the recording setup information Press STATUS CHECK. 24 Recording Each time you turn off the display of the following order: AUDIO t OUTPUT t ASSIGN t PICT.
... dial, the items appear in the following items in the standby mode or during recording. • Audio setup such as microphone volume level (p. 36) • Output setup ([COMPONENT], [i.LINK CONV], and [TV TYPE] settings) (p. 60) • Functions assigned to the ASSIGN buttons (p. 68) • Picture profile setup (p. 34) 1 Press STATUS CHECK... the setup value of the recording setup information Press STATUS CHECK. 24 Recording Each time you turn off the display of the following order: AUDIO t OUTPUT t ASSIGN t PICT.
Operating Instructions
Page 43
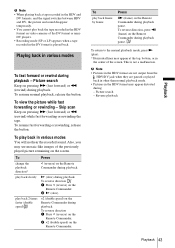
..., you may appear distorted during playback - To play back in the DV format is not a malfunction. b Note • Pictures in the HDV format are not output from the HDV/DV jack when they are paused or played back in other than normal playback mode. • Pictures in the center of the...
..., you may appear distorted during playback - To play back in the DV format is not a malfunction. b Note • Pictures in the HDV format are not output from the HDV/DV jack when they are paused or played back in other than normal playback mode. • Pictures in the center of the...
Operating Instructions
Page 44
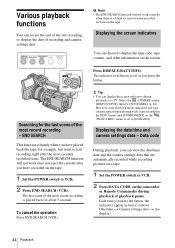
... scene. The last scene of recording and camera settings data. To cancel the operation Press END SEARCH (VCR). Select the (OTHERS) menu, [DISP OUTPUT], then [V-OUT/PANEL] (p. 64). Each time you can view the date/time data and the camera settings data that are automatically recorded while recording ...pictures on the camcorder or Remote Commander during playback on the (IN/OUT REC) menu is set to [1080i/480i]. Various playback functions You can locate the end of the last recording, or display the ...
... scene. The last scene of recording and camera settings data. To cancel the operation Press END SEARCH (VCR). Select the (OTHERS) menu, [DISP OUTPUT], then [V-OUT/PANEL] (p. 64). Each time you can view the date/time data and the camera settings data that are automatically recorded while recording ...pictures on the camcorder or Remote Commander during playback on the (IN/OUT REC) menu is set to [1080i/480i]. Various playback functions You can locate the end of the last recording, or display the ...
Operating Instructions
Page 45
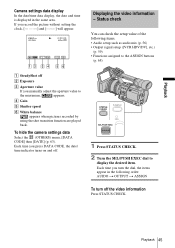
... In the date/time data display, the date and time is displayed in the following items. • Audio setup such as audio mix (p. 56) • Output signal setup ([VCR HDV/DV], etc.) (p. 59) • Functions assigned to the ASSIGN buttons (p. 68) A SteadyShot off . 1 Press STATUS CHECK. 2 Turn the... by using the shot transition function are played back. Playback 45 Status check You can check the setup value of the following order: AUIDO t OUTPUT t ASSIGN To turn off the video information Press STATUS CHECK. Each time you press DATA CODE, the date/ time indicator turns on and off...
... In the date/time data display, the date and time is displayed in the following items. • Audio setup such as audio mix (p. 56) • Output signal setup ([VCR HDV/DV], etc.) (p. 59) • Functions assigned to the ASSIGN buttons (p. 68) A SteadyShot off . 1 Press STATUS CHECK. 2 Turn the... by using the shot transition function are played back. Playback 45 Status check You can check the setup value of the following order: AUIDO t OUTPUT t ASSIGN To turn off the video information Press STATUS CHECK. Each time you press DATA CODE, the date/ time indicator turns on and off...
Operating Instructions
Page 47
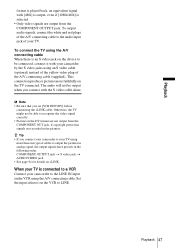
... on the VCR using the A/V connecting cable. To output audio signals, connect the white and red plugs of the A/V connecting cable to the audio input jack of your camcorder to be connected, connect it with [480i] is output, even if [1080i/480i] is selected. • Only video signals are... recorded in the pictures. Otherwise, the TV might not be output when you connect with the S video cable alone. b ...
... on the VCR using the A/V connecting cable. To output audio signals, connect the white and red plugs of the A/V connecting cable to the audio input jack of your camcorder to be connected, connect it with [480i] is output, even if [1080i/480i] is selected. • Only video signals are... recorded in the pictures. Otherwise, the TV might not be output when you connect with the S video cable alone. b ...
Operating Instructions
Page 48
... TV or VCR using the A/V connecting cable When there is selected. • Only video signals are output from the COMPONENT OUTPUT jack. The audio will not be connected, connect it with your camcorder by the S video jacks using the component video cable This connection is recommended when your TV (p. 60...the device to produce high resolution pictures. When a picture recorded in the DV format is played back, an equivalent signal with [480i] is output, even if [1080i/480i] is an S video jack on the (IN/ OUT REC) menu according to the audio input jack of the A/V connecting cable to ...
... TV or VCR using the A/V connecting cable When there is selected. • Only video signals are output from the COMPONENT OUTPUT jack. The audio will not be connected, connect it with your camcorder by the S video jacks using the component video cable This connection is recommended when your TV (p. 60...the device to produce high resolution pictures. When a picture recorded in the DV format is played back, an equivalent signal with [480i] is output, even if [1080i/480i] is an S video jack on the (IN/ OUT REC) menu according to the audio input jack of the A/V connecting cable to ...

Operating Instructions
Page 49
...plug to the audio input jack of your TV or VCR. The playback starts from the COMPONENT OUT jack, if copyright protection signals are not output from the point designated "0:00:00" on the tape counter. ,continued Playback 49 When your TV is not displayed, press DISPALY/BATT INFO....rewind). Locating a scene on a tape for playback Searching quickly for that purpose. Zero set memory Playback 1 During playback, press ZERO SET MEMORY on your camcorder or Remote Commander at the point you want to locate later on the VCR to LINE. The tape counter is connected to a VCR Connect your...
...plug to the audio input jack of your TV or VCR. The playback starts from the COMPONENT OUT jack, if copyright protection signals are not output from the point designated "0:00:00" on the tape counter. ,continued Playback 49 When your TV is not displayed, press DISPALY/BATT INFO....rewind). Locating a scene on a tape for playback Searching quickly for that purpose. Zero set memory Playback 1 During playback, press ZERO SET MEMORY on your camcorder or Remote Commander at the point you want to locate later on the VCR to LINE. The tape counter is connected to a VCR Connect your...

Operating Instructions
Page 51
...(p. 14). 2 Press MENU to display the menu index screen. OTHERS BEEP REC LAMP FORMAT LAMP I R I S D I AL LETTER S I ZE REMA I N I NG D I SP OUTPUT REMOTE CTRL [ MENU ] : END OFF STBY 6 Press MENU to the previous screen, select [ RETURN]. To return to hide the menu screen. IN/OUT REC (p. 59... ASS I GN BTN CLOCK SET WORLD T I N SETUP SHOT TRANS STEADYSHOT STDYSHOT TYP FLCKR REDUCE [ MENU ] : END STBY 3 Select the icon of your camcorder. CAMERA SET WB PRESET AE RESPONSE GA I ME LANGUAGE BEEP REC LAMP FORMAT LAMP [ MENU ] : END STBY 4 Select the desired item by turning the SEL...
...(p. 14). 2 Press MENU to display the menu index screen. OTHERS BEEP REC LAMP FORMAT LAMP I R I S D I AL LETTER S I ZE REMA I N I NG D I SP OUTPUT REMOTE CTRL [ MENU ] : END OFF STBY 6 Press MENU to the previous screen, select [ RETURN]. To return to hide the menu screen. IN/OUT REC (p. 59... ASS I GN BTN CLOCK SET WORLD T I N SETUP SHOT TRANS STEADYSHOT STDYSHOT TYP FLCKR REDUCE [ MENU ] : END STBY 3 Select the icon of your camcorder. CAMERA SET WB PRESET AE RESPONSE GA I ME LANGUAGE BEEP REC LAMP FORMAT LAMP [ MENU ] : END STBY 4 Select the desired item by turning the SEL...

Operating Instructions
Page 59
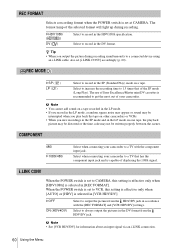
... [i.LINK CONV] is converted to record/play back the input/ output signals in parentheses appear when the setting is recorded or played back. You can adjust vary depending on the power mode of your camcorder. The indicators in the HDV format only. Otherwise, the connected TV... set to record/play back the input/ output signals in the HDV format only. • For an i.LINK connection, select this when connecting the camcorder to select these items, see "Selecting menu items" (p. 51). When the camcorder is not output. ,continued Using the Menu 59 Unavailable items...
... [i.LINK CONV] is converted to record/play back the input/ output signals in parentheses appear when the setting is recorded or played back. You can adjust vary depending on the power mode of your camcorder. The indicators in the HDV format only. Otherwise, the connected TV... set to record/play back the input/ output signals in the HDV format only. • For an i.LINK connection, select this when connecting the camcorder to select these items, see "Selecting menu items" (p. 51). When the camcorder is not output. ,continued Using the Menu 59 Unavailable items...
Operating Instructions
Page 60
...you mix recordings in the SP mode and in the LP mode on a tape. The use of Sony Excellence/Master mini DV cassettes is recommended to get the most out of the selected format will light ... time code may be written properly between the scenes. Select when connecting your camcorder. When the POWER switch is set to always output the pictures in the DV format from the HDV/DV jack in [REC ... [i.LINK CONV] accordingly (p. 60). The format lamp of your camcorder to record in [VCR HDV/DV]. REC MODE GSP ( SP ) LP ( LP ) Select to a TV that of displaying the 1080i signal.
...you mix recordings in the SP mode and in the LP mode on a tape. The use of Sony Excellence/Master mini DV cassettes is recommended to get the most out of the selected format will light ... time code may be written properly between the scenes. Select when connecting your camcorder. When the POWER switch is set to always output the pictures in the DV format from the HDV/DV jack in [REC ... [i.LINK CONV] accordingly (p. 60). The format lamp of your camcorder to record in [VCR HDV/DV]. REC MODE GSP ( SP ) LP ( LP ) Select to a TV that of displaying the 1080i signal.
Operating Instructions
Page 61
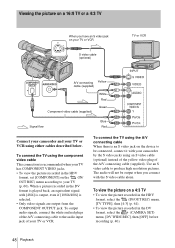
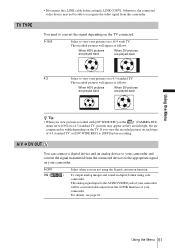
...played back 4:3 Select to view your pictures on your pictures on such type of your camcorder will appear as they are in height, but are not using the Signal conversion function. ) To output analog images and sound in width depending on the TV connected. A/V c DV OUT You...of 4:3 standard TV, set to [ON] on a 4:3 standard TV, pictures may not be converted and output from the connected devices to your camcorder and convert the signal transmitted from the i.LINK Interface of your camcorder. Using the Menu TV TYPE • Disconnect the i.LINK cable before recording.
...played back 4:3 Select to view your pictures on your pictures on such type of your camcorder will appear as they are in height, but are not using the Signal conversion function. ) To output analog images and sound in width depending on the TV connected. A/V c DV OUT You...of 4:3 standard TV, set to [ON] on a 4:3 standard TV, pictures may not be converted and output from the connected devices to your camcorder and convert the signal transmitted from the i.LINK Interface of your camcorder. Using the Menu TV TYPE • Disconnect the i.LINK cable before recording.

Operating Instructions
Page 64
Select to deactivate the Remote Commander to prevent your camcorder from your camcorder for about 8 seconds: • After you press DISPLAY/BATT INFO while [V-OUT/PANEL] is selected. REMAINING GAUTO ON DISP OUTPUT Select to display the remaining tape indicator for more than 5 minutes. 64 Using the ...Menu GLCD PANEL V-OUT/PANEL Select to a command sent by another VCR remote control unit. Select to your camcorder if you set the POWER switch ...
Select to deactivate the Remote Commander to prevent your camcorder from your camcorder for about 8 seconds: • After you press DISPLAY/BATT INFO while [V-OUT/PANEL] is selected. REMAINING GAUTO ON DISP OUTPUT Select to display the remaining tape indicator for more than 5 minutes. 64 Using the ...Menu GLCD PANEL V-OUT/PANEL Select to a command sent by another VCR remote control unit. Select to your camcorder if you set the POWER switch ...
Operating Instructions
Page 72
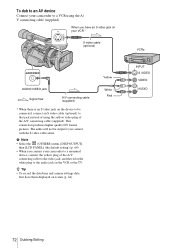
... to that jack instead of using the A/ V connecting cable (supplied). b Note • Select the (OTHERS) menu, [DISP OUTPUT], then [LCD PANEL] (the default setting) (p. 64). • When you connect your camcorder to a VCR using the yellow video plug of the A/V connecting cable to the video jack, and the red or... the white plug to the audio jack on your camcorder to a monaural device, connect the yellow plug of the A/V connecting cable (supplied). z Tip • To record the date/time and camera settings...
... to that jack instead of using the A/ V connecting cable (supplied). b Note • Select the (OTHERS) menu, [DISP OUTPUT], then [LCD PANEL] (the default setting) (p. 64). • When you connect your camcorder to a VCR using the yellow video plug of the A/V connecting cable to the video jack, and the red or... the white plug to the audio jack on your camcorder to a monaural device, connect the yellow plug of the A/V connecting cable (supplied). z Tip • To record the date/time and camera settings...
Operating Instructions
Page 73
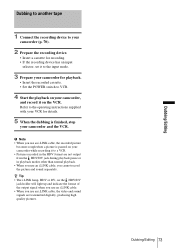
... modes other than normal playback. • When you cannot record the picture and sound separately. Dubbing to another tape 1 Connect the recording device to your camcorder (p. 70). 2 Prepare the recording device. • Insert a cassette for recording. • If the recording device has an input selector, set it to the... input mode. 3 Prepare your camcorder for details. 5 When the dubbing is paused on the HDV/DV jack holder will light up and indicate the format of the output signal when you use an i.LINK cable. • When you use an i.LINK...
... modes other than normal playback. • When you cannot record the picture and sound separately. Dubbing to another tape 1 Connect the recording device to your camcorder (p. 70). 2 Prepare the recording device. • Insert a cassette for recording. • If the recording device has an input selector, set it to the... input mode. 3 Prepare your camcorder for details. 5 When the dubbing is paused on the HDV/DV jack holder will light up and indicate the format of the output signal when you use an i.LINK cable. • When you use an i.LINK...
Operating Instructions
Page 75
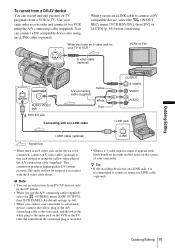
...(optional). The audio will not be connected, connect an S video cable (optional) to connect it using the yellow video plug of your camcorder. Use your camcorder as a recorder and connect it appears with the S video cable alone. When you use the A/V connecting cable (supplied), select the (...OTHERS) menu, [DISP OUTPUT], then [LCD PANEL] (the default setting) (p. 64). • When you connect your camcorder to a monaural device, connect the yellow plug of the A/V connecting cable to the video jack, and ...
...(optional). The audio will not be connected, connect an S video cable (optional) to connect it using the yellow video plug of your camcorder. Use your camcorder as a recorder and connect it appears with the S video cable alone. When you use the A/V connecting cable (supplied), select the (...OTHERS) menu, [DISP OUTPUT], then [LCD PANEL] (the default setting) (p. 64). • When you connect your camcorder to a monaural device, connect the yellow plug of the A/V connecting cable to the video jack, and ...
Operating Instructions
Page 78
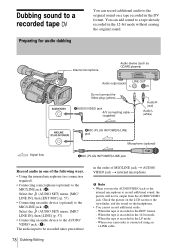
... HDV format. - b Note • When you use the AUDIO/VIDEO jack or the internal microphone to be output from the AUDIO/VIDEO jack. When the tape is connected using an i.LINK cable. When your camcorder is recorded in the order of MIC/LINE jack t AUDIO/ VIDEO jack t internal microphone. When the tape... additional audio: - You can record additional audio to a tape already recorded in the DV format. Internal microphone Audio device (such as CD/MD players) Audio output jacks Do not connect the Video plug (yellow).
... HDV format. - b Note • When you use the AUDIO/VIDEO jack or the internal microphone to be output from the AUDIO/VIDEO jack. When the tape is connected using an i.LINK cable. When your camcorder is recorded in the order of MIC/LINE jack t AUDIO/ VIDEO jack t internal microphone. When the tape... additional audio: - You can record additional audio to a tape already recorded in the DV format. Internal microphone Audio device (such as CD/MD players) Audio output jacks Do not connect the Video plug (yellow).
Operating Instructions
Page 79
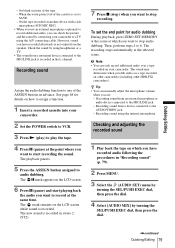
... play ) to one of the ASSIGN buttons in the L channel. The mark remains on other camcorders (including other HDR-FX1 camcorders). Recording sound from the speaker. Dubbing/Editing - On the tape recorded on which you have recorded afterwards is not output from a device connected to SAVE. - See page 68 for audio dubbing During playback, press...
... play ) to one of the ASSIGN buttons in the L channel. The mark remains on other camcorders (including other HDR-FX1 camcorders). Recording sound from the speaker. Dubbing/Editing - On the tape recorded on which you have recorded afterwards is not output from a device connected to SAVE. - See page 68 for audio dubbing During playback, press...

Operating Instructions
Page 80
The adjusted audio balance returns to the default setting about 5 minutes after the battery pack or other power sources have been disconnected. 6 Press MENU to adjust the balance between the original sound (ST1) and the sound recorded afterwards (ST2), then press the dial. The original sound (ST1) is output in the default setting. 5 Turn the SEL/PUSH EXEC dial to hide the menu screen. 80 Dubbing/Editing
The adjusted audio balance returns to the default setting about 5 minutes after the battery pack or other power sources have been disconnected. 6 Press MENU to adjust the balance between the original sound (ST1) and the sound recorded afterwards (ST2), then press the dial. The original sound (ST1) is output in the default setting. 5 Turn the SEL/PUSH EXEC dial to hide the menu screen. 80 Dubbing/Editing

Operating Instructions
Page 81
..., the computer may hang up or may not recognize this operation with the application software for the system requirements of the computer. Your camcorder converts the analog video signal from the VCR to a digital signal and transmits it to the computer to be installed on your VCR... AUDIO/VIDEO jack Yellow A/V connecting cable (supplied) White Red HDV/DV jack i.LINK cable (optional) Signal flow b Note • Select the (OTHERS) menu, [DISP OUTPUT], then [LCD PANEL] (the default setting) (p. 64). • Before connecting the i.LINK cable, select the (IN/OUT REC) menu, [VCR HDV/DV], then ...
..., the computer may hang up or may not recognize this operation with the application software for the system requirements of the computer. Your camcorder converts the analog video signal from the VCR to a digital signal and transmits it to the computer to be installed on your VCR... AUDIO/VIDEO jack Yellow A/V connecting cable (supplied) White Red HDV/DV jack i.LINK cable (optional) Signal flow b Note • Select the (OTHERS) menu, [DISP OUTPUT], then [LCD PANEL] (the default setting) (p. 64). • Before connecting the i.LINK cable, select the (IN/OUT REC) menu, [VCR HDV/DV], then ...

Operating Instructions
Page 82
..., and stop playback on -line help for details. b Note • Your camcorder may not be able to output the signal to the computer correctly depending on the video signal input to your camcorder. 82 Dubbing/Editing Refer to a computer via your camcorder. • You cannot import pictures that have been recorded using a copyright protection...
..., and stop playback on -line help for details. b Note • Your camcorder may not be able to output the signal to the computer correctly depending on the video signal input to your camcorder. 82 Dubbing/Editing Refer to a computer via your camcorder. • You cannot import pictures that have been recorded using a copyright protection...


