
Operating Instructions
Page 1
Operating Instructions Read this first Digital HD Video Camera Recorder HDR-FX1 2-178-348-11(1) © 2004 Sony Corporation
Operating Instructions Read this first Digital HD Video Camera Recorder HDR-FX1 2-178-348-11(1) © 2004 Sony Corporation
Operating Instructions
Page 3
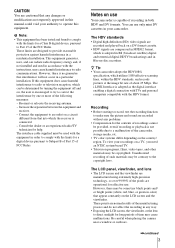
...approved in this manual could void your recordings on a TV, you need an NTSC system-based TV. • Television programs, films, video tapes, and other materials may be copyrighted. Increase the separation between the equipment and receiver. - However, there may cause malfunctions. Be...8226; Compensation for a Class B digital device, pursuant to a malfunction of FCC Rules. This equipment generates, uses, and can use Your camcorder is connected. - Recording • Before starting to record, test the recording function to make sure the picture and sound are normal results of...
...approved in this manual could void your recordings on a TV, you need an NTSC system-based TV. • Television programs, films, video tapes, and other materials may be copyrighted. Increase the separation between the equipment and receiver. - However, there may cause malfunctions. Be...8226; Compensation for a Class B digital device, pursuant to a malfunction of FCC Rules. This equipment generates, uses, and can use Your camcorder is connected. - Recording • Before starting to record, test the recording function to make sure the picture and sound are normal results of...
Operating Instructions
Page 6
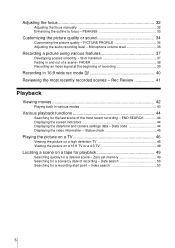
... the outline to focus - END SEARCH 44 Displaying the screen indicators 44 Displaying the date/time and camera settings data - Data code 44 Displaying the video information - PICTURE PROFILE 34 Adjusting the audio recording level -
... the outline to focus - END SEARCH 44 Displaying the screen indicators 44 Displaying the date/time and camera settings data - Data code 44 Displaying the video information - PICTURE PROFILE 34 Adjusting the audio recording level -
Operating Instructions
Page 10
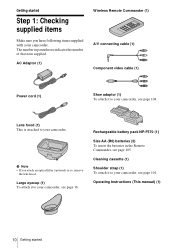
...105. b Note • If you have following items supplied with your camcorder, see page 101. AC Adaptor (1) Wireless Remote Commander (1) A/V connecting cable (1) Component video cable (1) Power cord (1) Shoe adaptor (1) To attach it to your camcorder. Operating Instructions (This manual) (1) 10 Getting started Step 1: Checking ... in parentheses indicates the number of that item supplied. Cleaning cassette (1) Shoulder strap (1) To attach it to your camcorder. The number in the Remote Commander, see page 16. Getting started Large eyecup (1) To attach it to your...
...105. b Note • If you have following items supplied with your camcorder, see page 101. AC Adaptor (1) Wireless Remote Commander (1) A/V connecting cable (1) Component video cable (1) Power cord (1) Shoe adaptor (1) To attach it to your camcorder. Operating Instructions (This manual) (1) 10 Getting started Step 1: Checking ... in parentheses indicates the number of that item supplied. Cleaning cassette (1) Shoulder strap (1) To attach it to your camcorder. The number in the Remote Commander, see page 16. Getting started Large eyecup (1) To attach it to your...
Operating Instructions
Page 27
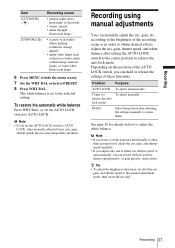
... manually. The white balance is set all of these functions. b Note • If you adjust only one of the recording scene or in a studio, under video lamps such as those in order to obtain desired effects. Depending on how to adjust the white balance. To restore the automatic white balance Press...
... manually. The white balance is set all of these functions. b Note • If you adjust only one of the recording scene or in a studio, under video lamps such as those in order to obtain desired effects. Depending on how to adjust the white balance. To restore the automatic white balance Press...
Operating Instructions
Page 30
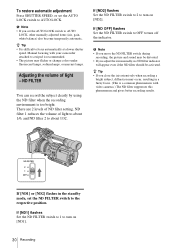
...filter 1 reduces the volume of light to about 1/32. If [ND1] or [ND2] flashes in a fuzzy focus. (This is a common phenomenon with your camcorder attached to a tripod is recommended. • The picture may flicker or change colors under fluorescent lamps, sodium lamps, or mercury lamps. ND FILTER You can... a lower shutter speed. If [ND OFF] flashes Set the ND FILTER switch to OFF to turn on [ND1]. 30 Recording Manual focusing with video cameras.) The ND filter suppresses this phenomenon and gives better recording results. If [ND2] flashes Set the ND FILTER switch to 2 to turn on...
...filter 1 reduces the volume of light to about 1/32. If [ND1] or [ND2] flashes in a fuzzy focus. (This is a common phenomenon with your camcorder attached to a tripod is recommended. • The picture may flicker or change colors under fluorescent lamps, sodium lamps, or mercury lamps. ND FILTER You can... a lower shutter speed. If [ND OFF] flashes Set the ND FILTER switch to OFF to turn on [ND1]. 30 Recording Manual focusing with video cameras.) The ND filter suppresses this phenomenon and gives better recording results. If [ND2] flashes Set the ND FILTER switch to 2 to turn on...
Operating Instructions
Page 36
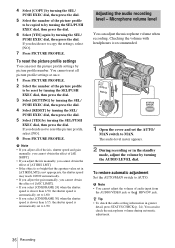
... level You can reset the picture profile settings by picture profile number. b Note • You cannot adjust the volume of audio input from the AUDIO/VIDEO jack or the HDV/DV jack. The audio level meter appears. 2 During recording or in greater detail, press STATUS CHECK (p. 24). You can also check...
... level You can reset the picture profile settings by picture profile number. b Note • You cannot adjust the volume of audio input from the AUDIO/VIDEO jack or the HDV/DV jack. The audio level meter appears. 2 During recording or in greater detail, press STATUS CHECK (p. 24). You can also check...
Operating Instructions
Page 43
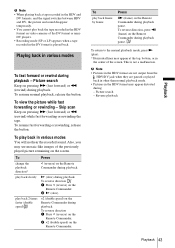
... signal switches between HDV and DV, the picture and sound disappear temporarily. • You cannot play back the tape recorded in the HDV format on video cameras of the DV format or miniDV players. • Recording mode (SP or LP) appears when a tape recorded in the DV format is not a malfunction...
... signal switches between HDV and DV, the picture and sound disappear temporarily. • You cannot play back the tape recorded in the HDV format on video cameras of the DV format or miniDV players. • Recording mode (SP or LP) appears when a tape recorded in the DV format is not a malfunction...
Operating Instructions
Page 45
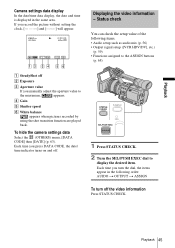
...68) A SteadyShot off B Exposure C Aperture value If you press DATA CODE, the date/ time indicator turns on and off the video information Press STATUS CHECK. Status check You can check the setup value of the following order: AUIDO t OUTPUT t ASSIGN To turn ... the picture without setting the clock and [--:--:--] will appear. 6 0min HDV1080i 0:00:00 6 0min AUTO F 1 . 7 6 dB 1 0 0 Displaying the video information - D Gain E Shutter speed F White balance appears when pictures recorded by using the shot transition function are played back. Each time you manually adjust the...
...68) A SteadyShot off B Exposure C Aperture value If you press DATA CODE, the date/ time indicator turns on and off the video information Press STATUS CHECK. Status check You can check the setup value of the following order: AUIDO t OUTPUT t ASSIGN To turn ... the picture without setting the clock and [--:--:--] will appear. 6 0min HDV1080i 0:00:00 6 0min AUTO F 1 . 7 6 dB 1 0 0 Displaying the video information - D Gain E Shutter speed F White balance appears when pictures recorded by using the shot transition function are played back. Each time you manually adjust the...
Operating Instructions
Page 46
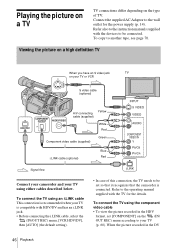
...the picture on a high definition TV When you have an S video jack TV on your TV or VCR S video cable (optional) Yellow A/V connecting cable (supplied) White Red Component video cable (supplied) Green i.LINK cable (optional) Blue Red Signal flow Connect your camcorder and your TV (p. 60). To connect the TV using either... to another tape, see page 70. Refer to the wall outlet for the details. To copy to be set so that it recognizes that the camcorder is compatible with HDV/DV and has an i.LINK jack. • Before connecting the i.LINK cable, select the (IN/OUT REC) menu, ...
...the picture on a high definition TV When you have an S video jack TV on your TV or VCR S video cable (optional) Yellow A/V connecting cable (supplied) White Red Component video cable (supplied) Green i.LINK cable (optional) Blue Red Signal flow Connect your camcorder and your TV (p. 60). To connect the TV using either... to another tape, see page 70. Refer to the wall outlet for the details. To copy to be set so that it recognizes that the camcorder is compatible with HDV/DV and has an i.LINK jack. • Before connecting the i.LINK cable, select the (IN/OUT REC) menu, ...
Operating Instructions
Page 47
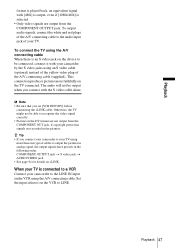
...on the device to the LINE IN input on i.LINK. When your TV is connected to a VCR Connect your camcorder to be connected, connect it with your camcorder by the S video jacks using more faithfully on the VCR to the audio input jack of the A/V connecting cable to LINE. The ...selector on the TV connected. Playback 47 Playback format is played back, an equivalent signal with [480i] is output, even if [1080i/480i] is selected. • Only video signals are output from the COMPONENT OUT jack, if copyright protection signals are not output from the COMPONENT OUTPUT jack. z Tip •...
...on the device to the LINE IN input on i.LINK. When your TV is connected to a VCR Connect your camcorder to be connected, connect it with your camcorder by the S video jacks using more faithfully on the VCR to the audio input jack of the A/V connecting cable to LINE. The ...selector on the TV connected. Playback 47 Playback format is played back, an equivalent signal with [480i] is output, even if [1080i/480i] is selected. • Only video signals are output from the COMPONENT OUT jack, if copyright protection signals are not output from the COMPONENT OUTPUT jack. z Tip •...
Operating Instructions
Page 48
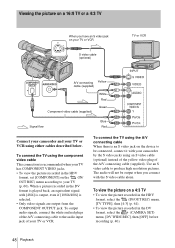
... TV or VCR A/V connecting Yellow cable (supplied) Component video cable (supplied) White Red Green Signal flow Blue Red Connect your camcorder and your TV (p. 60). The audio will not be connected, connect it with your camcorder by the S video jacks using either cables described below. To view the picture... signal with [480i] is output, even if [1080i/480i] is selected. • Only video signals are output from the COMPONENT OUTPUT jack. To connect the TV using the component video cable This connection is an S video jack on the device to produce high resolution pictures....
... TV or VCR A/V connecting Yellow cable (supplied) Component video cable (supplied) White Red Green Signal flow Blue Red Connect your camcorder and your TV (p. 60). The audio will not be connected, connect it with your camcorder by the S video jacks using either cables described below. To view the picture... signal with [480i] is output, even if [1080i/480i] is selected. • Only video signals are output from the COMPONENT OUTPUT jack. To connect the TV using the component video cable This connection is an S video jack on the device to produce high resolution pictures....

Operating Instructions
Page 49
... monaural mode, use a connecting cable (optional) for a desired scene - The tape counter is reset to the audio input jack of the A/V connecting cable to the video input jack and connect the white or the red plug to "0:00:00" and appears on the screen. The tape stops automatically when the tape...:00" on the tape counter. ,continued Playback 49 When your TV is connected to a VCR Connect your camcorder to locate later on. Zero set memory Playback 1 During playback, press ZERO SET MEMORY on your camcorder or Remote Commander at the point you want to the LINE IN input on the VCR using...
... monaural mode, use a connecting cable (optional) for a desired scene - The tape counter is reset to the audio input jack of the A/V connecting cable to the video input jack and connect the white or the red plug to "0:00:00" and appears on the screen. The tape stops automatically when the tape...:00" on the tape counter. ,continued Playback 49 When your TV is connected to a VCR Connect your camcorder to locate later on. Zero set memory Playback 1 During playback, press ZERO SET MEMORY on your camcorder or Remote Commander at the point you want to the LINE IN input on the VCR using...

Operating Instructions
Page 59
...or played back. at [DV], a DV signal is output as it is output as follows: - The selected signal is selected. When the camcorder is ; Select this camcorder. • When [AUTO] is selected and the signal switches between HDV and DV, the picture and sound disappear temporarily. • When ... For an i.LINK connection, select this to the DV format and output; Otherwise, the connected TV may not be able to recognize the video signal from the HDV/DV jack by switching the format between HDV and DV automatically. • Select this to play back the input/ ...
...or played back. at [DV], a DV signal is output as it is output as follows: - The selected signal is selected. When the camcorder is ; Select this camcorder. • When [AUTO] is selected and the signal switches between HDV and DV, the picture and sound disappear temporarily. • When ... For an i.LINK connection, select this to the DV format and output; Otherwise, the connected TV may not be able to recognize the video signal from the HDV/DV jack by switching the format between HDV and DV automatically. • Select this to play back the input/ ...
Operating Instructions
Page 61
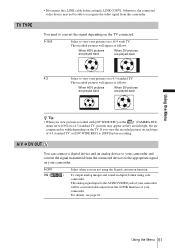
... recorded pictures will appear as follows: When HDV pictures are played back When DV pictures are played back 4:3 Select to recognize the video signal from this camcorder. Using the Menu 61 A/V c DV OUT You can connect a digital device and an analog device to the appropriate signal on your pictures on the TV...
... recorded pictures will appear as follows: When HDV pictures are played back When DV pictures are played back 4:3 Select to recognize the video signal from this camcorder. Using the Menu 61 A/V c DV OUT You can connect a digital device and an analog device to the appropriate signal on your pictures on the TV...
Operating Instructions
Page 70
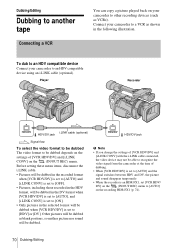
... of [VCR HDV/DV] and [i.LINK CONV] with the i.LINK cable connected, the video device may not be dubbed in the DV format when [VCR HDV/DV] is set to [AUTO], and [i.LINK CONV] is an HDR-FX1, set to [ON]. • Only pictures in the following illustration. Player Recorder i.LINK...; When the recorder is set [VCR HDV/ DV] on the (IN/OUT REC) menu to [AUTO] on the recording HDR-FX1 (p. 74). 70 Dubbing/Editing Dubbing/Editing Dubbing to another tape Connecting a VCR You can copy a picture played back on your camcorder to an HDV compatible device using an i.LINK cable (optional).
... of [VCR HDV/DV] and [i.LINK CONV] with the i.LINK cable connected, the video device may not be dubbed in the DV format when [VCR HDV/DV] is set to [AUTO], and [i.LINK CONV] is an HDR-FX1, set to [ON]. • Only pictures in the following illustration. Player Recorder i.LINK...; When the recorder is set [VCR HDV/ DV] on the (IN/OUT REC) menu to [AUTO] on the recording HDR-FX1 (p. 74). 70 Dubbing/Editing Dubbing/Editing Dubbing to another tape Connecting a VCR You can copy a picture played back on your camcorder to an HDV compatible device using an i.LINK cable (optional).

Operating Instructions
Page 71
... settings of [VCR HDV/DV] and [i.LINK CONV] with the i.LINK cable connected, the video device may not be dubbed. i.LINK compatible devices Dubbing/Editing HDV/DV jack i.LINK jack i.LINK cable ...(optional) Signal flow To select the video format to be dubbed The video format to be dubbed depends on the settings of dubbing. • If [i.LINK CONV]...]. • If the tape was recorded with the HDV and DV formats mixed, set to recognize the video signal from the camcorder at the time of [VCR HDV/DV] (p. 59) and [i.LINK CONV] (p. 60) in the ...
... settings of [VCR HDV/DV] and [i.LINK CONV] with the i.LINK cable connected, the video device may not be dubbed. i.LINK compatible devices Dubbing/Editing HDV/DV jack i.LINK jack i.LINK cable ...(optional) Signal flow To select the video format to be dubbed The video format to be dubbed depends on the settings of dubbing. • If [i.LINK CONV]...]. • If the tape was recorded with the HDV and DV formats mixed, set to recognize the video signal from the camcorder at the time of [VCR HDV/DV] (p. 59) and [i.LINK CONV] (p. 60) in the ...
Operating Instructions
Page 72
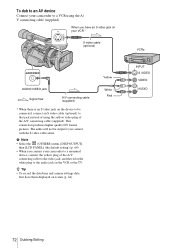
... alone. z Tip • To record the date/time and camera settings data, first have an S video jack on your camcorder to a VCR using the yellow video plug of the A/V connecting cable to the video jack, and the red or the white plug to the audio jack on screen (p. 44). To dub to an ...AV device Connect your camcorder to a monaural device, connect the yellow plug of the A/V connecting cable (supplied). This connection produces...
... alone. z Tip • To record the date/time and camera settings data, first have an S video jack on your camcorder to a VCR using the yellow video plug of the A/V connecting cable to the video jack, and the red or the white plug to the audio jack on screen (p. 44). To dub to an ...AV device Connect your camcorder to a monaural device, connect the yellow plug of the A/V connecting cable (supplied). This connection produces...
Operating Instructions
Page 73
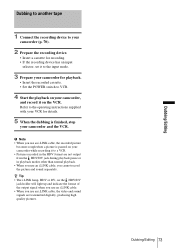
...the picture and sound separately. z Tip • The i.LINK lamp, HDV or DV, on your camcorder while recording it to a VCR. • Pictures recorded in the HDV format are transmitted digitally, producing...• If the recording device has an input selector, set it to the input mode. 3 Prepare your camcorder for details. 5 When the dubbing is paused on the HDV/DV jack holder will light up and indicate the... signal when you use an i.LINK cable. • When you use an i.LINK cable, the video and sound signals are not output from the HDV/DV jack during playback pause or in playback modes ...
...the picture and sound separately. z Tip • The i.LINK lamp, HDV or DV, on your camcorder while recording it to a VCR. • Pictures recorded in the HDV format are transmitted digitally, producing...• If the recording device has an input selector, set it to the input mode. 3 Prepare your camcorder for details. 5 When the dubbing is paused on the HDV/DV jack holder will light up and indicate the... signal when you use an i.LINK cable. • When you use an i.LINK cable, the video and sound signals are not output from the HDV/DV jack during playback pause or in playback modes ...
Operating Instructions
Page 75
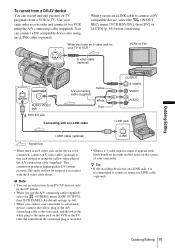
.../AV devices only in the DV format. • When you use an i.LINK cable to connect it using the yellow video plug of using an i.LINK cable (optional). Use your camcorder as a recorder and connect it appears with black bands on the right and left sides on the device to that jack...), select the (OTHERS) menu, [DISP OUTPUT], then [LCD PANEL] (the default setting) (p. 64). • When you connect your camcorder to a monaural device, connect the yellow plug of the A/V connecting cable to the video jack, and the red or the white plug to the audio jack on the VCR or the TV. b Note...
.../AV devices only in the DV format. • When you use an i.LINK cable to connect it using the yellow video plug of using an i.LINK cable (optional). Use your camcorder as a recorder and connect it appears with black bands on the right and left sides on the device to that jack...), select the (OTHERS) menu, [DISP OUTPUT], then [LCD PANEL] (the default setting) (p. 64). • When you connect your camcorder to a monaural device, connect the yellow plug of the A/V connecting cable to the video jack, and the red or the white plug to the audio jack on the VCR or the TV. b Note...


