
Operating Instructions
Page 2
... this manual thoroughly, and retain it for the FCC related matters only. HDR-FX1 Serial No. and CANADA RECYCLING LITHIUM-ION BATTERIES Lithium-Ion batteries are located on the bottom. This symbol is for future reference. Telephone No.: 858-942-2230 This device complies with Part 15 of Conformity Trade Name: SONY Model No.: HDR-FX1...
... this manual thoroughly, and retain it for the FCC related matters only. HDR-FX1 Serial No. and CANADA RECYCLING LITHIUM-ION BATTERIES Lithium-Ion batteries are located on the bottom. This symbol is for future reference. Telephone No.: 858-942-2230 This device complies with Part 15 of Conformity Trade Name: SONY Model No.: HDR-FX1...
Operating Instructions
Page 3
.... • Compensation for a digital device pursuant to a malfunction of the following measures: - However, there may be determined by one or more of the camcorder, storage media, etc. • TV color systems differ depending on the country/ region. Be careful when placing the camera near a window or outdoors. ,...time may be contrary to radio communications. CAUTION You are cautioned that any changes or modifications not expressly approved in this manual could void your authority to an outlet on a circuit different from that appear constantly on the LCD screen and the viewfinder.
.... • Compensation for a digital device pursuant to a malfunction of the following measures: - However, there may be determined by one or more of the camcorder, storage media, etc. • TV color systems differ depending on the country/ region. Be careful when placing the camera near a window or outdoors. ,...time may be contrary to radio communications. CAUTION You are cautioned that any changes or modifications not expressly approved in this manual could void your authority to an outlet on a circuit different from that appear constantly on the LCD screen and the viewfinder.
Operating Instructions
Page 4
...plug in the proper direction. Doing so might cause your camcorder (p. 18). Check the contents of the sun only in low light conditions, such as shown in the wrong direction, the terminal may be sure to be played back on this manual are captured using a digital still camera, and thus ...may cause a malfunction of the LCD screen and the viewfinder used for screen display on your camcorder to playing them back on other device such as a VCR or a ...
...plug in the proper direction. Doing so might cause your camcorder (p. 18). Check the contents of the sun only in low light conditions, such as shown in the wrong direction, the terminal may be sure to be played back on this manual are captured using a digital still camera, and thus ...may cause a malfunction of the LCD screen and the viewfinder used for screen display on your camcorder to playing them back on other device such as a VCR or a ...
Operating Instructions
Page 5
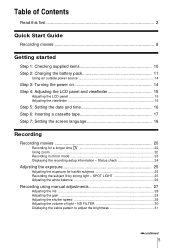
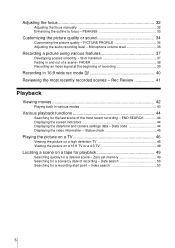
... time 22 Using zoom ...22 Recording in mirror mode 23 Displaying the recording setup information - SPOT LIGHT 25 Adjusting the white balance 26 Recording using manual adjustments 27 Adjusting the iris ...28 Adjusting the gain ...28 Adjusting the shutter speed 29 Adjusting the volume of Contents Read this first 2 Quick Start...
... time 22 Using zoom ...22 Recording in mirror mode 23 Displaying the recording setup information - SPOT LIGHT 25 Adjusting the white balance 26 Recording using manual adjustments 27 Adjusting the iris ...28 Adjusting the gain ...28 Adjusting the shutter speed 29 Adjusting the volume of Contents Read this first 2 Quick Start...
Operating Instructions
Page 6
Adjusting the focus 32 Adjusting the focus manually 32 Enhancing the outline to focus - Status check 45 Playing the picture on a TV 46 Viewing the picture on a high definition TV 46 Viewing the ...
Adjusting the focus 32 Adjusting the focus manually 32 Enhancing the outline to focus - Status check 45 Playing the picture on a TV 46 Viewing the picture on a high definition TV 46 Viewing the ...
Operating Instructions
Page 7
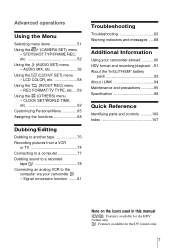
...i.LINK 94 Maintenance and precautions 95 Specification 98 Quick Reference Identifying parts and controls ...........100 Index 107 Note on the icons used in this manual : Features available for the HDV format only. : Features available for the DV format only. 7 REC FORMAT/TV TYPE, etc. ......59 Using the (OTHERS) menu - Signal conversion function ........81 Troubleshooting Troubleshooting 83 Warning indicators and messages .....88 Additional Information Using your camcorder - LCD COLOR, etc 58 Using the (IN/OUT REC) menu - AUDIO MIX, etc 56 Using the (LCD/VF SET) menu -...
...i.LINK 94 Maintenance and precautions 95 Specification 98 Quick Reference Identifying parts and controls ...........100 Index 107 Note on the icons used in this manual : Features available for the HDV format only. : Features available for the DV format only. 7 REC FORMAT/TV TYPE, etc. ......59 Using the (OTHERS) menu - Signal conversion function ........81 Troubleshooting Troubleshooting 83 Warning indicators and messages .....88 Additional Information Using your camcorder - LCD COLOR, etc 58 Using the (IN/OUT REC) menu - AUDIO MIX, etc 56 Using the (LCD/VF SET) menu -...
Operating Instructions
Page 10
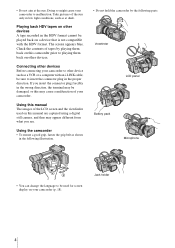
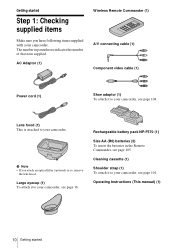
... cable (1) Power cord (1) Shoe adaptor (1) To attach it to your camcorder, see page 16. Rechargeable battery pack NP-F570 (1) Size AA (R6) batteries (2) To insert the batteries in parentheses indicates the number of that item supplied. Getting started Operating Instructions (This manual) (1) 10 Getting started Step 1: Checking supplied items Make sure you...
... cable (1) Power cord (1) Shoe adaptor (1) To attach it to your camcorder, see page 16. Rechargeable battery pack NP-F570 (1) Size AA (R6) batteries (2) To insert the batteries in parentheses indicates the number of that item supplied. Getting started Operating Instructions (This manual) (1) 10 Getting started Step 1: Checking supplied items Make sure you...
Operating Instructions
Page 25
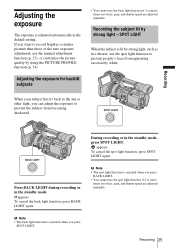
... exposure for backlit subjects • You cannot use the back light function if 2 or more items out of iris, gain, and shutter speed are adjusted manually. Recording During recording or in the standby mode. . appears. b Note • The back light function is canceled when you press BACK LIGHT. • You... to the sun or other light, you want to record brighter or darker pictures than those of iris, gain, and shutter speed are adjusted manually. SPOT LIGHT When the subject is lit by strong light, such as in the default setting. If you can adjust the exposure to prevent ...
... exposure for backlit subjects • You cannot use the back light function if 2 or more items out of iris, gain, and shutter speed are adjusted manually. Recording During recording or in the standby mode. . appears. b Note • The back light function is canceled when you press BACK LIGHT. • You... to the sun or other light, you want to record brighter or darker pictures than those of iris, gain, and shutter speed are adjusted manually. SPOT LIGHT When the subject is lit by strong light, such as in the default setting. If you can adjust the exposure to prevent ...
Operating Instructions
Page 27
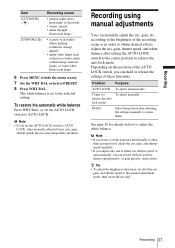
... switch to PRESET. 8 Press WHT BAL. b Note • If you adjust only one of the iris, gain, and shutter speed to the manual adjustment mode, then rotate the iris dial. according to obtain desired effects. Center (to release the auto lock mode. z Tip • To adjust... the brightness of pictures, set the exposure intentionally to other manually adjusted items (iris, gain, shutter speed) also become temporarily automatic. Recording using manual adjustments You can hold or release the settings of the recording scene or in a studio, under sodium lamps...
... switch to PRESET. 8 Press WHT BAL. b Note • If you adjust only one of the iris, gain, and shutter speed to the manual adjustment mode, then rotate the iris dial. according to obtain desired effects. Center (to release the auto lock mode. z Tip • To adjust... the brightness of pictures, set the exposure intentionally to other manually adjusted items (iris, gain, shutter speed) also become temporarily automatic. Recording using manual adjustments You can hold or release the settings of the recording scene or in a studio, under sodium lamps...
Operating Instructions
Page 28
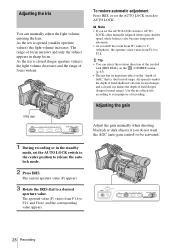
... values), the light volume decreases and the range of focus widens. b Note • If you set the AUTO LOCK switch to AUTO LOCK, other manually adjusted items (gain, shutter speed, white balance) also become temporarily automatic. • As you do not want the AGC (auto gain control) to... automatic adjustment Press IRIS, or set the AUTO LOCK switch to the center position to be activated. 28 Recording Adjusting the gain Adjust the gain manually when shooting blackish or dark objects if you shift the zoom from W (wide) to T (telephoto), the aperture value varies from F1.6 to...
... values), the light volume decreases and the range of focus widens. b Note • If you set the AUTO LOCK switch to AUTO LOCK, other manually adjusted items (gain, shutter speed, white balance) also become temporarily automatic. • As you do not want the AGC (auto gain control) to... automatic adjustment Press IRIS, or set the AUTO LOCK switch to the center position to be activated. 28 Recording Adjusting the gain Adjust the gain manually when shooting blackish or dark objects if you shift the zoom from W (wide) to T (telephoto), the aperture value varies from F1.6 to...
Operating Instructions
Page 29
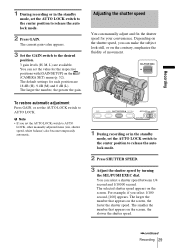
...settings for each position are available. You can make the subject look still, or on the (CAMERA SET) menu (p. 52). You can manually adjust and fix the shutter speed for the respective positions with [GAIN SETUP] on the contrary, emphasize the fluidity of movement. Adjusting the... value for your convenience. The larger the number that appears on the shutter speed, you set the AUTO LOCK switch to AUTO LOCK, other manually adjusted items (iris, shutter speed, white balance) also become temporarily automatic. 1 During recording or in the standby mode, set the AUTO LOCK...
...settings for each position are available. You can make the subject look still, or on the (CAMERA SET) menu (p. 52). You can manually adjust and fix the shutter speed for the respective positions with [GAIN SETUP] on the contrary, emphasize the fluidity of movement. Adjusting the... value for your convenience. The larger the number that appears on the shutter speed, you set the AUTO LOCK switch to AUTO LOCK, other manually adjusted items (iris, shutter speed, white balance) also become temporarily automatic. 1 During recording or in the standby mode, set the AUTO LOCK...
Operating Instructions
Page 30
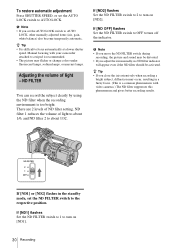
...filter suppresses this phenomenon and gives better recording results. If [ND1] or [ND2] flashes in a fuzzy focus. (This is a common phenomenon with your camcorder attached to a tripod is recommended. • The picture may flicker or change colors under fluorescent lamps, sodium lamps, or mercury lamps. z Tip &#.... z Tip • It is too bright. Adjusting the volume of ND filter setting. b Note • If you adjust the iris manually, no ND filter indicator will appear even if the ND filter should be activated. To restore automatic adjustment Press SHUTTER SPEED, or set the...
...filter suppresses this phenomenon and gives better recording results. If [ND1] or [ND2] flashes in a fuzzy focus. (This is a common phenomenon with your camcorder attached to a tripod is recommended. • The picture may flicker or change colors under fluorescent lamps, sodium lamps, or mercury lamps. z Tip &#.... z Tip • It is too bright. Adjusting the volume of ND filter setting. b Note • If you adjust the iris manually, no ND filter indicator will appear even if the ND filter should be activated. To restore automatic adjustment Press SHUTTER SPEED, or set the...
Operating Instructions
Page 32
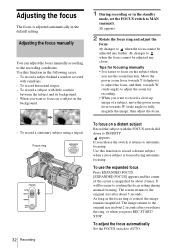
... - appears. To use the zoom function. Adjusting the focus The focus is magnified by about 2 times. Adjusting the focus manually You can adjust the focus manually according to automatic focusing. To record a subject behind a window covered with little contrast between the subject and its background. -... the power zoom lever towards T (telephoto) to adjust the focus, and then, towards W (wide angle) to adjust the zoom for focusing manually • It is easier to focus on a distant subject Record the subject with the FOCUS switch slid down to record a distant subject when ...
... - appears. To use the zoom function. Adjusting the focus The focus is magnified by about 2 times. Adjusting the focus manually You can adjust the focus manually according to automatic focusing. To record a subject behind a window covered with little contrast between the subject and its background. -... the power zoom lever towards T (telephoto) to adjust the focus, and then, towards W (wide angle) to adjust the zoom for focusing manually • It is easier to focus on a distant subject Record the subject with the FOCUS switch slid down to record a distant subject when ...
Operating Instructions
Page 33
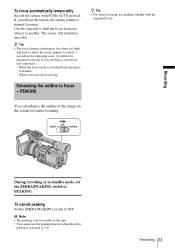
... z Tip • For easier focusing, use the peaking function when the zebra pattern is dark and hard to manual. - To focus automatically temporarily Record the subject with the expanded focus. Enhancing the outline to manual focusing. b Note • The peaking is not recorded on the screen for about 3 seconds in standby mode...
... z Tip • For easier focusing, use the peaking function when the zebra pattern is dark and hard to manual. - To focus automatically temporarily Record the subject with the expanded focus. Enhancing the outline to manual focusing. b Note • The peaking is not recorded on the screen for about 3 seconds in standby mode...
Operating Instructions
Page 36
.../PUSH EXEC dial, then press the dial. You cannot reset all of the iris, shutter speed and gain manually, you cannot obtain the effect of [AE SHIFT]. • If you adjust the iris manually, you cannot obtain the effect of [AT IRIS LMT]. • If the object is so bright that the... aperture value set in [AT IRIS LMT] is not appropriate, the shutter speed may reach 1/2000 automatically. • If you adjust the gain manually, you cannot obtain the effect of audio input from the AUDIO/VIDEO jack or the HDV/DV jack. If you decide not to AUTO. Microphone...
.../PUSH EXEC dial, then press the dial. You cannot reset all of the iris, shutter speed and gain manually, you cannot obtain the effect of [AE SHIFT]. • If you adjust the iris manually, you cannot obtain the effect of [AT IRIS LMT]. • If the object is so bright that the... aperture value set in [AT IRIS LMT] is not appropriate, the shutter speed may reach 1/2000 automatically. • If you adjust the gain manually, you cannot obtain the effect of audio input from the AUDIO/VIDEO jack or the HDV/DV jack. If you decide not to AUTO. Microphone...
Operating Instructions
Page 37
... the AUTO LOCK switch to the center position to turn on the (CAMERA SET) menu (p. 53). The settings are automatically adjusted as iris manually, set the POWER switch to the registered one, resulting in a smooth transition of scenes (Shot transition). If you can shift the focus from... setting will develop smoothly between objects indoor and those outdoor. The setting is stored in which the setting was stored. For example, you register the manual adjustment function of field by adjusting the iris. The focus, zoom, and so on adjustment. 3 Press a button (A or B) to turn on...
... the AUTO LOCK switch to the center position to turn on the (CAMERA SET) menu (p. 53). The settings are automatically adjusted as iris manually, set the POWER switch to the registered one, resulting in a smooth transition of scenes (Shot transition). If you can shift the focus from... setting will develop smoothly between objects indoor and those outdoor. The setting is stored in which the setting was stored. For example, you register the manual adjustment function of field by adjusting the iris. The focus, zoom, and so on adjustment. 3 Press a button (A or B) to turn on...
Operating Instructions
Page 38
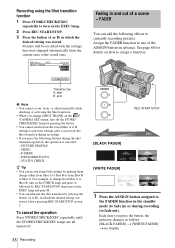
... (to the stored ones. 120min REC SHOT TRANS 0:00:05 EXEC SHOT A SHOT B S E Transition bar S: start E: end b Note • You cannot zoom, focus, or adjust manually while checking or activating the Shot transition. • When you change [SHOT TRANS] on the (CAMERA SET) menu, turn off . 38 Recording Fading in advance...
... (to the stored ones. 120min REC SHOT TRANS 0:00:05 EXEC SHOT A SHOT B S E Transition bar S: start E: end b Note • You cannot zoom, focus, or adjust manually while checking or activating the Shot transition. • When you change [SHOT TRANS] on the (CAMERA SET) menu, turn off . 38 Recording Fading in advance...
Operating Instructions
Page 45
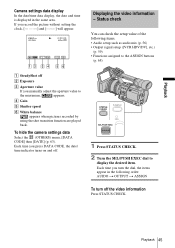
... (p. 56) • Output signal setup ([VCR HDV/DV], etc.) (p. 59) • Functions assigned to the ASSIGN buttons (p. 68) A SteadyShot off B Exposure C Aperture value If you manually adjust the aperture value to display the desired item. To hide the camera settings data Select the (OTHERS) menu, [DATA CODE] then [DATE] (p. 63). Each...
... (p. 56) • Output signal setup ([VCR HDV/DV], etc.) (p. 59) • Functions assigned to the ASSIGN buttons (p. 68) A SteadyShot off B Exposure C Aperture value If you manually adjust the aperture value to display the desired item. To hide the camera settings data Select the (OTHERS) menu, [DATA CODE] then [DATE] (p. 63). Each...
Operating Instructions
Page 46
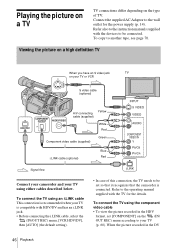
...cable (optional) Yellow A/V connecting cable (supplied) White Red Component video cable (supplied) Green i.LINK cable (optional) Blue Red Signal flow Connect your camcorder and your TV (p. 60). To connect the TV using an i.LINK cable This connection is recommended when your TV is connected. To connect the ...on a TV TV connections differ depending on the type of this connection, the TV needs to be connected. Refer also to the instruction manuals supplied with the TV for the power supply (p. 14). Refer to the wall outlet for the details. Connect the supplied AC Adaptor ...
...cable (optional) Yellow A/V connecting cable (supplied) White Red Component video cable (supplied) Green i.LINK cable (optional) Blue Red Signal flow Connect your camcorder and your TV (p. 60). To connect the TV using an i.LINK cable This connection is recommended when your TV is connected. To connect the ...on a TV TV connections differ depending on the type of this connection, the TV needs to be connected. Refer also to the instruction manuals supplied with the TV for the power supply (p. 14). Refer to the wall outlet for the details. Connect the supplied AC Adaptor ...
Operating Instructions
Page 77
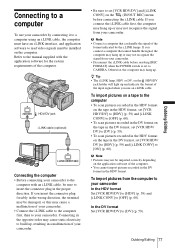
... Set [VCR HDV/DV] to the manual supplied with an i.LINK cable, be damaged, or this may cause a malfunction of your camcorder. b Note • Connect a computer that cannot handle the signal, the computer may hang up or may not recognize the signal from your camcorder. • Disconnect the i.LINK cable...Editing 77 Dubbing/Editing Connecting in the opposite order may be sure to insert the connector plug in the HDV format. If you use your camcorder by the i.LINK lamps. If you connect a computer that can handle the signal of the format indicated by connecting it to a computer ...
... Set [VCR HDV/DV] to the manual supplied with an i.LINK cable, be damaged, or this may cause a malfunction of your camcorder. b Note • Connect a computer that cannot handle the signal, the computer may hang up or may not recognize the signal from your camcorder. • Disconnect the i.LINK cable...Editing 77 Dubbing/Editing Connecting in the opposite order may be sure to insert the connector plug in the HDV format. If you use your camcorder by the i.LINK lamps. If you connect a computer that can handle the signal of the format indicated by connecting it to a computer ...


